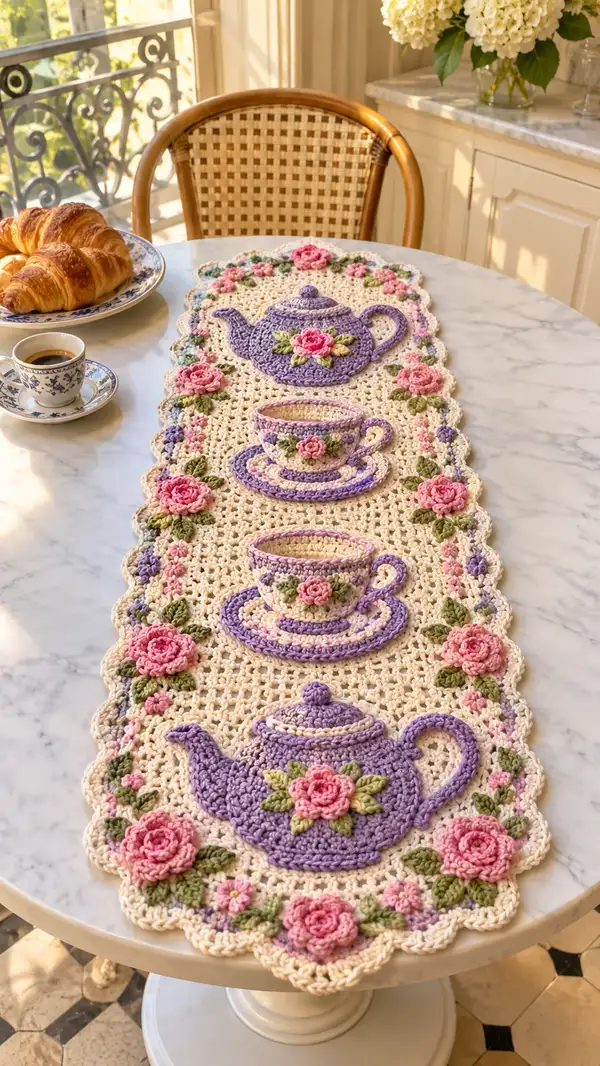
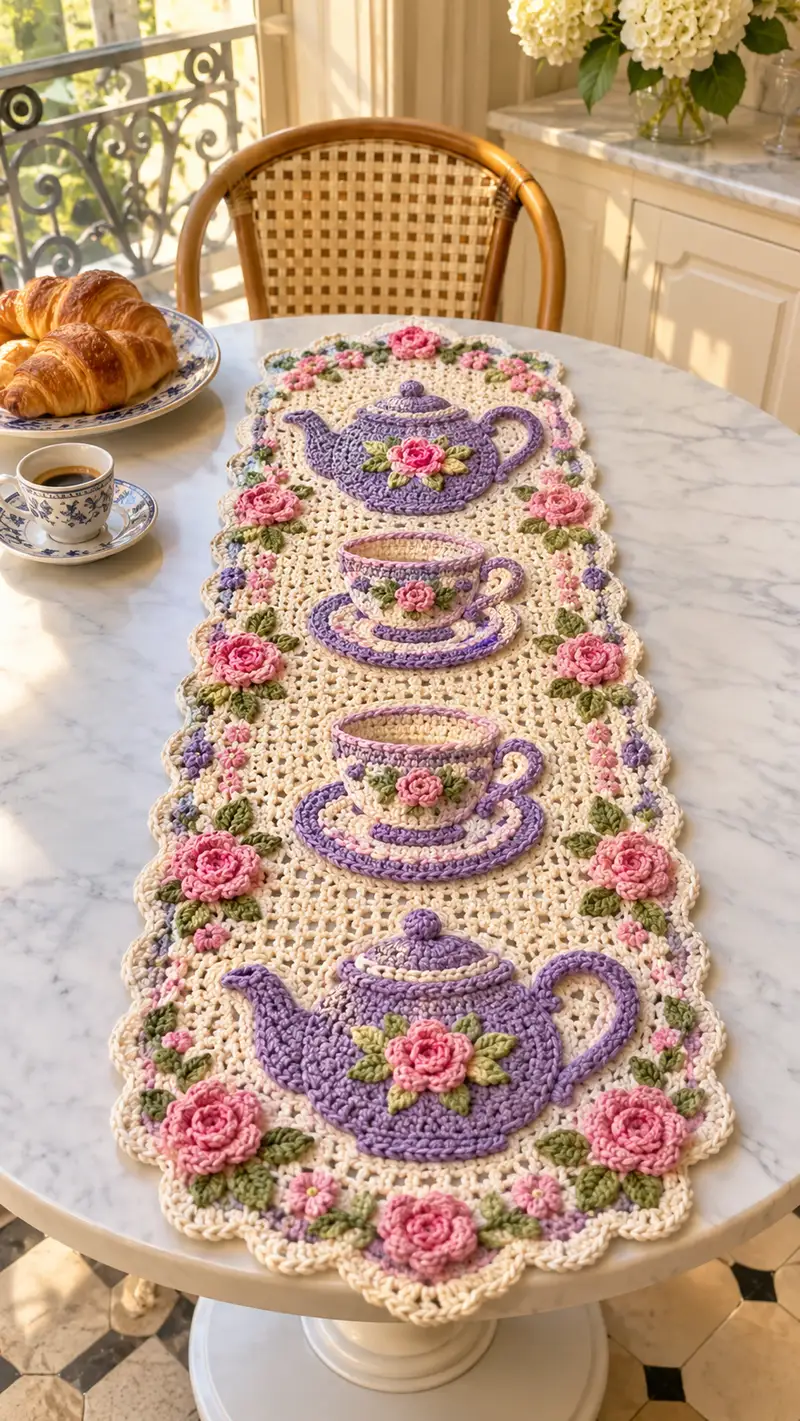
A vintage-inspired crochet table runner featuring two lilac teapots, two matching teacups and saucers, and a border of raised pink roses and green leaves. Worked in a delicate open mesh with appliqued 3D motifs, this runner brings a romantic afternoon-tea vibe to your table. Perfect for displaying on a small round or rectangular table as a charming centerpiece.
Progress Tracker
0% Complete
— Materials & Gauge :
Info :
Gauge is not critical for this decorative runner but for reference: 10 cm x 10 cm (4in x 4in) in mesh pattern = approx 12 mesh clusters by 10 rows using 3.5mm hook and worsted weight. Adjust hook if you prefer a denser or lacy look
— Base Panel (Mesh Runner) :
Round 1 :
Foundation: ch 85 (this will create a runner approx 28-32cm wide depending on yarn tension). Work a multiple of 4 plus 1 for mesh repeat. (chain 85)
Round 2 :
Row 1: dc in 4th ch from hook (counts as dc + ch2 sp), *ch2, sk 2 ch, dc in next ch; rep from * across to last ch, dc in last ch. Turn. (1 dc, plus mesh repeats across)
Round 3 :
Row 2: ch 3 (counts as dc), *ch2, dc in next dc (in the top of the previous dc across), rep from * across. Turn. This establishes a classic dc-ch2 mesh with an even rectangular repeat
Round 4-18 :
Continue Row 2 pattern for a total of 16 mesh rows (including the row you just made). This gives length for one teapot and one cup area spacing. Keep consistent tension. (mesh remains constant)
Info :
Measure and mark center-line of runner with removable stitch markers so you will place the teapot and teacups evenly along the length. The runner photographed is made with two teapots at each end and two teacups between them; spacing is about 16-18 mesh rows apart. Plan placement: starting from one short end, place teapot centered across width at mesh rows 3-10 of the area, then teacup at rows 22-30, and mirror from the center outwards.
Round 19-34 :
Continue mesh for another 16 rows (rows 19-34). The total mesh rows now equal 34 rows; this will be the central body of the runner. Adjust number of rows to lengthen or shorten runner. Keep stitch markers at the 1/4, 1/2 and 3/4 positions across width to help align appliques later
Round 35-46 :
Work a final 12 rows of mesh to reach desired overall length (rows 35-46). The total rows for this sample runner are 46 mesh rows. Fasten off leaving long tail for border join. Block flat to square edges before applique
Info :
If your gauge is larger or smaller, adjust starting chain in multiples of 4 +1 and keep the mesh repeat consistent. Blocking now will flatten mesh and make applique sewing easier
— Teapot Motif (Make 2 identical) :
Round 1 :
mr, 6 sc in magic ring (6)
Round 3 :
(1 sc, inc) x6 (18)
Round 4 :
(2 sc, inc) x6 (24)
Round 5 :
(3 sc, inc) x6 (30)
Info :
These first rounds establish a centered circular base which will be worked into the teapot body; use lilac yarn. Keep tension slightly loose so the shape lies flat when joined to the mesh base
Round 6 :
1 sc in each st around (30)
Round 7 :
1 sc in each st (30)
Round 8 :
(3 sc, inc) x6 (36) — start to broaden teapot midline
Round 9 :
1 sc in each st (36)
Round 10 :
(4 sc, inc) x6 (42)
Info :
At this stage the round shape is the main body of the teapot. The spout and handle will be worked separately and sewn on. Place a temporary marker at the right-hand side st for spout placement and at opposite side for handle placement
Round 11 :
1 sc in each st (42)
Round 12 :
(5 sc, inc) x6 (48)
Round 13 :
1 sc in each st (48)
Round 14 :
(6 sc, inc) x6 (54)
Round 15 :
1 sc in each st (54)
Info :
Now we will shape the flatter rim for the spout and lid placement. Keep the body flat by blocking after finishing motif back to the base
Round 16 :
(6 sc, dec) x6 (48) — begin slight inward shaping toward top rim
Round 17 :
(5 sc, dec) x6 (42)
Round 18 :
(4 sc, dec) x6 (36)
Round 19 :
1 sc in each st (36)
Round 20 :
(3 sc, dec) x6 (30)
Round 21 :
(2 sc, dec) x6 (24)
Round 22 :
Work 1 sc around in BLO for one round to create a slight ridge (24)
Info :
Lid: With same lilac yarn, join at the center top and make a small dome: mr, 6 sc (6); rounds: inc to 12, 1 sc around for 2 rounds, dec to 6 and fasten off leaving long tail. Sew lid centered on teapot top. Make a small knop by chaining 3 and slip stitching into a tight loop; sew to lid apex
Spout (worked flat) - Round 23 :
Ch 6, turning row: starting in 2nd ch from hook: sc, hdc, dc, hdc, sc (5 sts). Fasten off leaving long tail for sewing. Slightly curve when sewing on
Spout - Round 24 :
Optional: add a row of sc around the spout edge to give thickness: join and sc along both edges picking up 10-12 sts (approx 10-12). Fasten and sew to body at marked spout position
Handle (Round 25) :
Ch 10, join with sl st to form a small loop, work 1 sc in each ch around both sides of the loop (20 sts total). Work 2 rounds of sc to thicken handle. Fasten off and sew to opposite marked position forming a slight curve
Info :
Sew spout and handle firmly to the body. Place the spout at one side of the mid-round (row 11-14 area) and handle opposite. Use small whip stitches and then sew an overcast row around seams for a neat finish
Round 26 :
Decorative Rope: In contrasting cream (or pale pink) work surface slip stitch or reverse single crochet around upper rim and lid for a rope-effect trim. Join at one point and work evenly spaced sl sts (approx 54) around rim. Fasten off
Round 27 :
Embellishment: Using pale pink, embroider a rose center by sewing a small spiral and then attach crocheted leaves (see leaf pattern). Add 1-2 small embroidered leaves around rose using satin stitch
Info :
Block each teapot flat before mounting. If you want a slightly raised center for the rose, add a small dab of fiberfill behind the rose before sewing it in place
— Teacup Motif (Make 2) :
Round 1 :
mr, 6 sc in magic ring (6)
Round 3 :
(1 sc, inc) x6 (18)
Round 4 :
(2 sc, inc) x6 (24)
Round 5 :
1 sc in each st (24) — this forms the inside base of the cup
Info :
We will flare the cup walls up from this ring. Use lilac for cup body and cream for the inside rim if desired. Mark the front of the cup where handle will attach
Round 6 :
(3 sc, inc) x6 (30)
Round 7 :
1 sc in each st (30)
Round 8 :
(4 sc, inc) x6 (36)
Round 9 :
1 sc in each st (36)
Round 10 :
Switch to cream (Info before round): Info :
Change to cream for the cup inner rim: join cream yarn in FLO and work 1 round of sc in FLO to create a subtle lip. (36)
Round 11 :
Work 2 rounds of sc in both loops to define lip (36)
Round 12 :
Handle: Ch 6, sl st to join to body at marked position to create a small arch for handle; work 1 sc in each ch along underside and back into body (approx 12 sts). Fasten and sew firmly. Add one extra row of sc for thickness if desired
Round 13 :
Decorative band: With pale pink, work a contrasting round of sl st or single surface crochet across front third of cup to create floral gallery (optional). Fasten off
Info :
Saucer will be worked separately and the cup sewn on top. Add a small 3D rose or embroidered sprig to the cup front using the rose and leaf patterns below
— Saucer (Make 2) :
Round 3 :
(1 sc, inc) x6 (18)
Round 4 :
(2 sc, inc) x6 (24)
Round 5 :
(3 sc, inc) x6 (30)
Round 6 :
1 sc in each st (30)
Round 7 :
Switch to lilac border: *(ch 2, sk 1 sc, dc) in next st*, rep around to create scallop effect along saucer rim (30 scallops approx). Fasten off
Info :
Sew cup to saucer centered, lining up cup base center with saucer center. Make sure the cup is stable — use up to 6 hidden stitches to secure the cup perimeter to the saucer
— Rose Applique (Make 8 large roses and 16 small rosebuds) :
Round 1 :
Large Rose: ch 2, 12 sc in 2nd ch from hook, sl st to join (12)
Round 2 :
(ch 3, 3 dc in next st, sl st to next st) around to form 6 petals. (6 petals)
Round 3 :
For depth, work into petal bases: *ch 2, sc in petal base, ch 2, (3 dc, ch 1, 3 dc) in petal top, ch 2, sc in next petal base* rep for 6 petals; fasten off leaving long tail. This creates a layered rose look
Round 4 :
Small Rosebud: mr, 6 sc, then 1 round of *ch 3, sl st into next st* around to create tiny ruffled bud. Fasten off
Info :
For each rose, gently roll the petal rounds into a spiral and sew a few stitches at the base to hold the shape. Optionally place a dab of fabric glue inside the spiral before sewing for extra hold. Block slightly to open petals
Round 5 :
Rose Center Detail: Using a smaller hook, embroider a tiny spiral with deep pink yarn by stitching a continuous spiral and sewing into place. This small center makes the rose read as classic English garden rose
Info :
Make 8 large roses for the outer border positions and 16 small rosebuds to scatter along each side between larger roses. Keep a consistent size by using the same tension and hook for all roses
— Leaves (Make 18-24) :
Round 1 :
Ch 6. Row: sc in 2nd ch from hook, hdc in next, dc in next, hdc in next, sc in last. Fasten off leaving tail to sew. This creates a simple pointed leaf (approx 5 stitches long)
Round 2 :
For larger leaves: ch 8, sc, hdc, 2 dc, hdc, sc in turning ch. Add a picot at tip (ch 3, sl st in 3rd ch) if desired. Fasten off
Info :
Work leaves in sage green. Make at least 18 leaves for each runner: 8 larger leaves to sit under big roses and 10 smaller leaves for filler. Place and pin before sewing to check visual balance
— Small 5-Petal Flowers (Make 24) :
Round 1 :
mr, ch 3, 3 dc in mr, sl st to next ch, rep x 5 to create five petals. Fasten off
Info :
These tiny flowers are used along both edges between larger roses and leaves. Use pale pink or lavender to echo palette. Attach with small stitches so centers are secure
— Border Scallop and Floral Edge :
Round 1 :
Join cream along outer mesh edge: join with sl st at corner edge, ch1, sc evenly along edge (work 2 sc in corner spaces). Continue around entire runner placing 2 sc in corner rows for a smooth turn
Round 2 :
Work a decorative chain-lace row: *ch5, sk 3 sc, sl st in next sc* rep around to create scallop loop spaces. Adjust ch length to suit gauge. Fasten off
Round 3 :
Attach scallop top: In lilac, join in each chain-5 loop and work (sc, hdc, 5 dc, hdc, sc) to form scallop shells. This yields pronounced scalloped edge for a romantic finish. Rep in each ch-5 loop around
Round 4 :
Switch to cream and work a tidy round of slip stitches in between scallops to smooth transitions (sl st across around, approx 140 sl sts for sample runner). Fasten and weave ends
Info :
Before finalizing the scallops, pin runner flat and position scallops so they mirror across both long edges. The scallop should extend slightly beyond mesh edge to frame appliques
Round 5 :
Edge Embellishment: In sage green, surface-crochet or embroider leaf vines connecting larger roses along border. Use a chain-stitch surface line then sew small leaves and tiny five-petal flowers at intervals to echo the photo. Fasten off
Round 6 :
Final tidy round: With cream, work 1 sc in between each scallop and around the runner to unify color and hide ends. Fasten off and weave in all ends thoroughly
Info :
Block entire runner with pins to set scallops into a gentle wave and allow appliques to sit flat. Spray lightly with water and shape while pinned until dry
— Placement & Assembly (Applique Attachment) :
Round 1 :
Layout: Position teapots at both short ends centered across width roughly 4-6 mesh rows from runner edge. Position teacups and saucers between teapots, with approx 16-18 mesh rows of space between motifs. Use removable stitch markers to mark centers and edges before sewing
Round 2 :
Sewing Appliques: Use yarn needle and matching thread; tack motifs in place with long basting stitches around the perimeter first. Check placement from both ends to ensure symmetry then sew a more secure round of whip or mattress stitches, nearly invisible on the right side
Round 3 :
Roses & Leaves: Attach large roses to scallop positions along the outer border with 6-8 secure sewn stitches through the base of the rose into mesh. Add leaves underneath each rose using 3-5 secure stitches per leaf, slightly overlapping the rose base to hide joining stitches
Round 4 :
Small Flowers: Scatter small 5-petal flowers between larger groupings and secure with a small French knot of yarn or a tiny slip stitch to anchor the center
Round 5 :
Reinforce: After all appliques are sewn, flip runner and reinforce each motif with a few extra stitches to stabilize heavy areas like handles and spouts. Make sure there are no loose loops on the wrong side
Info :
Work slowly when attaching spout and handle pieces—these edges are thin and need close, even stitches to lie flat. If desired, place a thin felt patch under heavy appliques for extra support then cover with stitches
— Finishing Touches :
Round 1 :
Weave in all ends using yarn needle, burying tails along join lines and into the back of appliques. Trim close but not flush to avoid unraveling
Round 2 :
Blocking: Pin runner on blocking mat to desired dimensions, shape scallop edges uniformly, and allow to dry overnight. Use steam or spray for stubborn curl but avoid excessive heat
Round 3 :
Optional: Add a few beads or small pearl buttons to center of tiny flowers for a subtle shimmer (sew securely from back so beads do not snag)
Info :
Final inspection: Check for loose threads, reinforce any visible joins, and test the runner on table to ensure applqiues sit flat under light weight. The finished runner should be beautiful yet functional as a decorative top layer
This Teapot and Teacup Afternoon Tea Runner is a delightful blend of vintage charm and modern crochet technique. Each applique is crafted with care and sewn on to create a layered, tactile centerpiece that brightens any table. The pattern is relaxing to work and rewarding to finish — the final blocking truly brings the scallops and roses to life. 🧶☕ Share your creation and enjoy tea time with a handmade flourish! 🌸