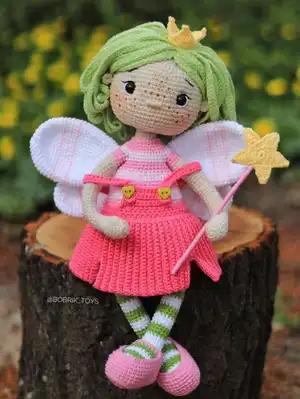
Make your own whimsical Teya the Fairy with this complete crochet pattern. You will find step-by-step instructions for the head, ears, wig, crown, arms and finishing details so you can recreate this charming doll exactly. Perfect for gifting or displaying, the pattern includes materials, abbreviations and helpful assembly tips to guide you.
Progress Tracker
0% Complete
— Head :
Info :
Work bottom up in beige yarn color code 05. Stitch marker goes through the middle of the back.
Round 1 :
Start 6 SC in a MR (6)
Round 3 :
(1 SC, INC)6 (18)
Round 4 :
(2 SC, INC)6 (24)
Round 5 :
(3 SC, INC)6 (30)
Round 6 :
(4 SC, INC)6 (36)
Round 7 :
(5 SC, INC)6 (42)
Round 8 :
(6 SC, INC)6 (48)
Round 9 :
(7 SC, INC)6 (54)
Round 10 :
(8 SC, INC)6 (60)
Round 11-12 :
60 SC (60), 2 rounds.
Round 13 :
(9 SC, INC)6 (66)
Round 14-25 :
66 SC (66), 12 rounds.
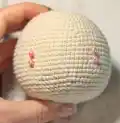
Info :
Install the eyes in the 19th-20th rounds with the distance 14 stitches between the eyes.
Round 26 :
(9 SC, dec)6 (60)
Round 28 :
(8 SC, dec)6 (54)
Round 29 :
(7 SC, dec)6 (48)
Round 30 :
(6 SC, dec)6 (42)
Round 31 :
(5 SC, dec)6 (36)
Round 32 :
(4 SC, dec)6 (30)
Round 33 :
(3 SC, dec)6 (24)
Round 34 :
(2 SC, dec)6 (18)
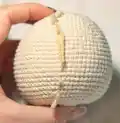
Info :
Do not sew the opening closed.
— Ears :
Info :
Crochet the ears in beige color code 05.
Round 1 :
Start 6 SC in a MR, sl st (6)
Info :
Sew the ears on the 19th-21st rounds.
— Hair (Wig) :
Info :
Crochet hair in green color code 11.
Round 1 :
Start 6 SC in a MR (6)
Round 2 :
6 INC SC (12) into BLO.
Round 3 :
(1 SC, INC)6 (18)
Round 4 :
(2 SC, INC)6 (24) into BLO.
Round 5 :
(3 SC, INC)6 (30)
Round 6 :
(4 SC, INC)6 (36) into BLO.
Round 7 :
(5 SC, INC)6 (42)
Round 8 :
(6 SC, INC)6 (48) into BLO.
Round 9 :
(7 SC, INC)6 (54)
Info :
Where you stopped working make ch35 and from the 2nd stitch from hook crochet 34 SC, now make sl st into nearest stitch, one more sl st into next stitch, crochet ch35 and crochet 34 SC from the 2nd stitch from hook, repeat to the end of the round. You made 27 hair strands.
Info :
Crochet sl st in the 8th round. Make ch37 and from the 2nd stitch from hook crochet 36 SC, sl st into next stitch, one more sl st into next stitch and make ch37 and repeat to the end of the round. You made 21 hair strands.
Info :
SL ST in the 6th round. Make ch39 and from the 2nd stitch from hook crochet 38 SC, sl st into next stitch, one more sl st into next stitch and make ch39, repeat to the end of the round. You made 15 hair strands.
Info :
SL ST in the 4th round. Make ch41 and crochet from the 2nd stitch from hook 40 SC, sl st into next stitch, one more sl st into next stitch and crochet ch41 and repeat to the end of the round. You made 10 hair strands.
Info :
SL ST in the 2nd round. Make ch43 and from the 2nd stitch from hook crochet 42 SC, sl st into next stitch, one more sl st into next stitch and make ch 43, repeat to the end of the round. You made 6 hair strands.
Info :
Glue the wig on the head. But first of all I recommend steaming the wig to make the hair strands straight. Keep the shape of the wig as pictured.
— Details :
Infos :
Install the eyes in the 19th - the 20th rounds with the distance 14 stitches between the eyes. I glue the eyes, so I will place pins to mark the eye sockets. Do sculpting. Please note: (If you use safety eyes, do sculpting around them, if you glue the eyes, place pins, and do sculpting and only then glue the eyes). When sculpting is done, glue the eyes, now embroider white lines along the eyes as pictured. Embroider thin black line and eyelashes line. Embroider the nose on the 22nd round, grabbing 3 or 4 stitches, there are two ways to embroider the nose: the first way just make stitches back and forth. Now step 2 or 3 stitches up from the eyes, embroider the eyebrows grabbing 3 stitches with the distance 14 stitches between the eyebrows. Now use soft pastel pink color to tone the cheeks.
— Crown :
Info :
Work in yellow color.
Round 1 :
17 SC, crochet sl st to connect the round.
Round 2 :
Ch1, 17 SC, sl st. (17)
Round 3 :
Ch1, DC into the 3rd stitch from hook, into the same stitch (1 DC, ch1, 1 DC, ch1, TR, ch4 and make sl st into the 1st stitch of the chain, TR, ch1, DC, ch1, DC, ch1), now step 2 SC and crochet sl st into the 3rd stitch, Ch1, DC into the 3rd stitch from hook, into the same stitch (1 DC, ch1, 1 DC, ch1, TR, ch4 and make sl st into the 1st stitch of the chain, TR, ch1, DC, ch1, DC, ch1), now step 2 SC and crochet sl st into the 3rd stitch, Ch1, DC into the 3rd stitch from hook, into the same stitch (1 DC, ch1, 1 DC, ch1, TR, ch4 and make sl st into the 1st stitch of the chain, TR, ch1, DC, ch1, DC, ch1), now step 2 SC and crochet sl st into the 3rd stitch.
Info :
You made 3 triangles. Sew or glue the crown on the head, as pictured.
— Arms :
Info :
Work in beige color code 05.
Round 1 :
Start 6 SC in a MR (6)
Round 4 :
(2 SC, INC)4 (16)
Round 5-7 :
16 SC (16), 3 rounds.
Round 8 :
(2 SC, dec)4 (12)
Round 9-32 :
12 SC (12), 24 rounds.
Info :
Change the yarn to pink color.
Round 33-35 :
12 SC (12), 3 rounds.
This charming Teya the Fairy amigurumi pattern is designed to be a delightful project that teaches shaping, hair construction, and face sculpting. It includes step-by-step rounds, photos and finishing tips so you can recreate every adorable detail. Make a special gift or a decorative companion that brings a little magic to your home. 🧚♀️🧶