🧢 Beautiful ✨ Detailed πŸ’ Adorable

The Cannady Cardigan Pattern

The Cannady Cardigan Pattern
4.4β˜… Rating
12-15 Hours Time Needed
3.6K Made This
βœ‚οΈ

Beginner Friendly Level

Perfect for those just starting their crochet journey, with clear instructions and simple techniques

⏱️

Multi-Day Project

A rewarding 12+ hour journeyβ€”perfect for dedicated crafters who love detailed work.

πŸ§₯

Layered Comfort

Perfect for cozy, stylish layering through changing seasons with versatile, mix-and-match potential.

About This The Cannady Cardigan Pattern

This pattern creates the Cannady Cardigan β€” a chunky oversized knit cardi with a relaxed, drop-shoulder fit. Youll work the back, both front panels, and two sleeves flat, then stitch everything together using the mattress stitch. The pattern is designed for super bulky weight yarn (weight 6) and large needles for fast, bold texture.

The Cannady Cardigan Pattern crochet pattern - detailed view of completed project

Sizes are given as S/M and L/XL with clear row counts for both sizes. Blocking is optional and recommended if youd like to even out stitches and obtain final measurements.

Why You'll Love This The Cannady Cardigan Pattern

I absolutely love this pattern because it celebrates slow, tactile knitting without complicated shaping. The oversized silhouette is forgiving and comfortable, and the super bulky yarn makes the garment come together quickly. I enjoy how the simple stockinette body paired with ribbed edges creates that modern, cozy look I always reach for in cooler months. Its a project that feels luxurious to wear and is satisfying to finish.

The Cannady Cardigan Pattern step 1 - construction progress The Cannady Cardigan Pattern step 2 - assembly progress The Cannady Cardigan Pattern step 3 - details and accessories The Cannady Cardigan Pattern step 4 - final assembly and finishing

Switch Things Up

I love customizing this cardigan by changing yarn color to create a statement pieceβ€”try a deep charcoal or a soft pastel for different vibes.

To make a cropped version, simply work fewer stockinette rows on the body before starting the armhole shaping; I often reduce length by 4-6 inches for a modern crop.

If you want a longer, cozier wrap, add extra stockinette rows to the back and front panels to extend the length; this is my go-to tweak for taller wearers.

I sometimes substitute a chunky wool blend for extra warmth, but always make a gauge swatch first to ensure the stitch and row counts still work.

For a refined finish, I knit the ribbed hem in tighter tension or on a slightly smaller needle to make the border more structured.

I enjoy adding subtle details like an embroidered initial or small decorative stitches along the front edge to personalize my cardigans.

Want a hood? I usually pick up stitches around the neckline after seaming and work a simple hood in stockinette, shaping by decreases to fit neatly around the head.

If youd like fitted sleeves, reduce decreases less aggressively and work fewer rows before beginning the sleeve cap; I do this when I want a less ballooned sleeve effect.

For an ultra-cozy version, double the yarn and work with two strands held together on a larger needle to create a super chunky fabric; just remember yardage will increase dramatically.

I also like to experiment with contrasting cuffs or hemβ€”just switch color for the ribbed rows and carry or weave in ends neatly for a polished look.

Common Mistakes & How to Fix Them

βœ— Not checking gauge before starting; make a 4" x 4" swatch (7 S x 10 R in stockinette) and adjust needle size to match the pattern gauge. βœ— Skipping the ribbed cast-on rows causes uneven edges; work rows 1-6 as [k1, p1] rib as written to create stable edges for the fronts and back. βœ— Forgetting to keep counts for both sizes leads to mismatched pieces; mark which parentheses you are following (S/M or L/XL) and track stitch counts carefully each decrease row. βœ— Sewing pieces without pinning can produce crooked seams; pin or baste shoulder seams and sleeve seams before mattress-stitching to ensure accurate alignment. βœ— Overlooking neckline shaping details may shorten or widen the opening; follow the neckline shaping instructions exactly and refer to the Knitting 101 blog post if youre unsure.

The Cannady Cardigan Pattern

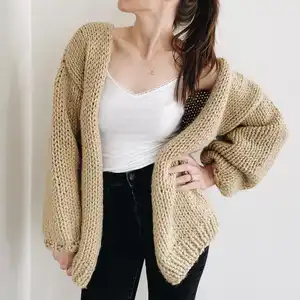
Make a chunky, oversized Cannady Cardigan that feels cozy and effortless to wear. This easy knitting pattern uses super bulky yarn and extra-large needles to create quick, satisfying progress. Youll knit the front, back, and sleeves flat, then mattress-stitch them together for a clean finish. Perfect for makers who love simple construction and a relaxed, modern silhouette.

Beginner Friendly 12-15 Hours

Materials Needed for The Cannady Cardigan Pattern

β€” Main Fabric

  • 01
    Weight 6 super bulky yarn (recommended: Lion Brand Wool-Ease Thick & Quick)
  • 02
    Small/Medium (US 0 - 10): approximately 636 yards
  • 03
    Large/X-Large (US 12 - 22): approximately 848 yards

β€” Tools Required

  • 01
    12.0 mm knitting needles (or substitute to achieve gauge)
  • 02
    Circular needles or long straight needles suitable for 12.0 mm (optional for long rows)
  • 03
    Tapestry/darning needle for seaming
  • 04
    Scissors
  • 05
    Measuring tape
  • 06
    Stitch markers (optional)
  • 07
    Blocking tools (pins, mats) (optional)

Progress Tracker

0% Complete

β€” Notes :

Infos :

The Cannady cardigan is a chunky knit sweater with an oversized fit. The front, back, and sleeves are knitted flat and then stitched together. Sizes are shown on pattern as S/M (L/XL). If needed, blocking your finished garment may help smooth imperfections, loosen stitches + obtain final measurements.

β€” Back :

Info :

cast on 46 (56)

Row 1 - 6 :

[k1, p1] (rib stitch)

Row 7 - 62 :

starting with a knit row, work in stockinette stitch (for size S/M work to row 62; for L/XL work to row 72)

Infos :

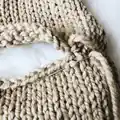
Neckline shaping: *check out the Knitting 101 blog post at hellomadisonmarie.com/blog to see an example of this kind of neckline shaping

Row 63 (73) :

k17 (22), cast off 12, knit to the end

Row 64 (74) :

p17 (22) (turn your work, leaving other stitches on needle; you will come back to these)

Info :

cast off remaining neckline stitches as instructed and repeat with other stitches left on needle

Row 64 (74) :

p17 (22)

Info :

cast off

β€” Front (Left Side) :

Info :

cast on 24 (28)

Row 1 - 6 :

[k1, p1] (rib stitch)

Row 7 :

sl1, knit to the end

Row 8 :

purl

Row 9 - 36 (46) :

repeat rows 7 and 8

Row 37 (47) :

sl1, k1, k2tog, knit to the end (23 (27) stitches)

Row 38 (48) :

purl

Row 39 (49) :

sl1, knit to the end

Row 40 (50) :

purl

Row 41 (51) :

sl1, k1, k2tog, knit to the end (22 (26) stitches)

Row 42 (52) :

purl

Row 43 (53) :

sl1, knit to the end

Row 44 (54) :

purl

Row 45 (55) :

sl1, k1, k2tog, knit to the end (21 (25) stitches)

Row 46 (56) :

purl

Row 47 (57) :

sl1, knit to the end

Row 48 (58) :

purl

Row 49 (59) :

sl1, k1, k2tog, knit to the end (20 (24) stitches)

Row 50 (60) :

purl

Row 51 (61) :

sl1, knit to the end

Row 52 (62) :

purl

Row 53 (63) :

sl1, k1, k2tog, knit to the end (19 (23) stitches)

Row 54 (64) :

purl

Row 55 (65) :

sl1, knit to the end

Row 56 (66) :

purl

Row 57 (67) :

sl1, k1, k2tog, knit to the end (18 (22) stitches)

Row 58 (68) :

purl

Row 59 (69) :

sl1, knit to the end

Row 60 (70) :

purl

Row 61 (71) :

*size S/M: sl1, k1, k2tog, knit to the end (17 stitches) *size L/XL: sl1, knit to the end (22 stitches)

Row 62 (72) :

purl

Row 63 (73) :

sl1, knit to the end

Row 64 (74) :

purl

Info :

cast off

β€” Front (Right Side) :

Info :

cast on 24 (28)

Row 1 - 6 :

[k1, p1] (rib stitch)

Row 7 :

knit

Row 8 :

sl1, purl to the end

Row 9 - 36 (46) :

repeat rows 7 and 8

Row 37 (47) :

k20 (24), k2tog, k2 (23 (27) stitches)

Row 38 (48) :

sl1, purl to the end

Row 39 (49) :

knit

Row 40 (50) :

sl1, pull to the end

Row 41 (51) :

k19 (23), k2tog, k2 (22 (26) stitches)

Row 42 (52) :

sl1, pull to the end

Row 43 (53) :

knit

Row 44 (54) :

sl1, pull to the end

Row 45 (55) :

k18 (22), k2tog, k2 (21 (25) stitches)

Row 46 (56) :

sl1, pull to the end

Row 47 (57) :

knit

Row 48 (58) :

sl1, pull to the end

Row 49 (59) :

k17 (21), k2tog, k2 (20 (24) stitches)

Row 50 (60) :

sl1, pull to the end

Row 51 (61) :

knit

Row 52 (62) :

sl1, pull to the end

Row 53 (63) :

k16 (20), k2tog, k2 (19 (23) stitches)

Row 54 (64) :

sl1, pull to the end

Row 55 (65) :

knit

Row 56 (66) :

sl1, pull to the end

Row 57 (67) :

k15 (19), k2tog, k2 (18 (22) stitches)

Row 58 (68) :

sl1, pull to the end

Row 59 (69) :

knit

Row 60 (70) :

sl1, pull to the end

Row 61 (71) :

*size S/M: k14, k2tog, k2 (17 stitches) *size L/XL: k22 (22 stitches)

Row 62 (72) :

sl1, pull to the end

Row 63 (73) :

knit

Row 64 (74) :

sl1, pull to the end

Info :

cast off

β€” Sleeves :

Info :

follow instructions twice to make sleeves

Info :

cast on 34

Row 1 - 12 :

starting with a knit row, work in stockinette stitch

Row 13 :

(decrease stitches) k2tog, k30, k2tog (32 stitches)

Row 14 - 24 :

starting with a purl row, work in stockinette stitch

Row 25 :

(decrease stitches) k2tog, k28, k2tog (30 stitches)

Row 26 - 36 :

starting with a purl row, work in stockinette stitch

Row 37 :

(decrease stitches) k2tog, k26, k2tog (28 stitches)

Info :

Note: Row numbers will now change according to size. Due to the drop shoulder design, size S/M works up longer than size L/XL.

Row 38 - 44 (40) :

starting with a purl row, work in stockinette stitch

Row 45 (41) :

(decrease stitches) [k2tog, k1] 8 times [k2tog, k2tog] (18 stitches)

Row 46 (42) - 48 (44) :

[k1, p1] (rib stitch)

Info :

cast off

β€” Finish :

Info :

Place front pieces and back of sweater together with right sides facing up. Using a darning needle, long piece of yarn, and the mattress stitch technique, stitch shoulder seams together.

Info :

Continuing with right sides facing up, line sleeves up with stitched up shoulder seams and stitch together using the mattress stitch technique.

Info :

Finish by stitching together the sleeve seams and side seams using the mattress stitch technique.

Info :

Weave in ends.

Assembly Instructions

  • Place front pieces and back of sweater together with right sides facing up and stitch shoulder seams together using the mattress stitch and a darning needle.
  • With right sides facing up, align each sleeve with the shoulder seam opening and baste or pin in place, then stitch using the mattress stitch technique for a neat join.
  • Stitch sleeve seams closed from cuff to underarm using mattress stitch, ensuring the ribbed edges align evenly.
  • Sew side seams of the body together using mattress stitch, matching ribbed hems and keeping the stockinette sections smooth.
  • Weave in all loose ends and, if desired, gently block the finished garment to relax stitches and achieve final measurements.

Important Notes

  • πŸ’‘The cardigan is knit flat β€” front, back, and sleeves are worked separately and stitched together with mattress stitch.
  • πŸ’‘Check gauge (4" x 4" = 7 stitches x 10 rows in stockinette) and adjust needle size to achieve the correct fabric and fit.
  • πŸ’‘Sizes are written as S/M (L/XL); be consistent in following the stitch and row counts for your chosen size.
  • πŸ’‘Blocking may help smooth imperfections, loosen stitches, and obtain final measurements for the best fit.

This cozy Cannady Cardigan pattern is made for lovers of chunky texture and oversized style. Its simple construction and bold needles mean big progress and a stunning finished piece. Make one for yourself or knit several as thoughtful handmade gifts. 🧢🧡

You ask,

we answer.

FAQs

What size will the finished cardigan be?

The finished cardigan measures approximately 24" wide by 26" long for size S/M, and 29" wide by 31" long for size L/XL, as shown in the schematics.

Can I use a different yarn weight for this pattern?

You can substitute yarn, but changing weight will alter the finished size and drape; if you choose a different yarn weight, make a gauge swatch and adjust needle size and yardage accordingly.

Do I need prior knitting experience for this pattern?

This pattern is rated easy (Beginner Friendly), so basic knitting skills such as knit, purl, k2tog, and slipping stitches are recommended for best results.

How long will it typically take to complete?

This is a multi-day project that typically takes 12+ hours depending on your speed, familiarity with the stitches, and the size youre making.