🧶 Beautiful ✨ Detailed 💝 Adorable

The Cornflower Sweater Pattern

The Cornflower Sweater Pattern
4.3★ Rating
8-10 Hours Time Needed
2.7K Made This
✂️

Intermediate Level

Ideal for those with basic crochet experience, featuring slightly more advanced stitches and techniques to expand your skills.

⏱️

All-Day Adventure

Requires 8-10 hours, ideal for a full day of immersive crocheting.

👕

Casual Chic

Relaxed style with a modern twist, perfect for everyday wear while maintaining that handcrafted uniqueness.

About This The Cornflower Sweater Pattern

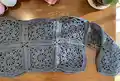
This pattern teaches you to crochet decorative flower squares and assemble them into the Cornflower Sweater, an intentionally oversized pullover. Each square is worked in rounds using triple crochet petals and chain loops to create a floral motif. You will block and seam squares to form front and back panels, then join them for the final sweater.

The Cornflower Sweater Pattern crochet pattern - detailed view of completed project

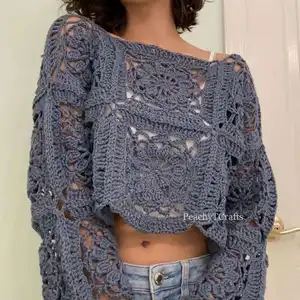
The pattern focuses on motif construction and assembly rather than precise garment sizing. Adjust the number of squares and panel layout to customize fit and length.

Why You'll Love This The Cornflower Sweater Pattern

I absolutely love this pattern because it turns simple floral squares into a chic wearable sweater full of texture. I enjoy the rhythm of repeating the flower motif and seeing the squares grow into panels. The assembly step is satisfying—blocking and seaming reveal a beautifully braided seam that feels professional. I also appreciate how customizable this design is; you can change yarn or the number of squares to suit your style. Making a sweater from motifs feels both vintage and modern, and I always smile when the finished piece drapes just right.

The Cornflower Sweater Pattern step 1 - construction progress The Cornflower Sweater Pattern step 2 - assembly progress The Cornflower Sweater Pattern step 3 - details and accessories The Cornflower Sweater Pattern step 4 - final assembly and finishing

Switch Things Up

I love how easy it is to customize this sweater by changing yarn and hook size; swapping to a lighter weight yarn creates a delicate, drapey version while bulky yarn gives a chunky, cozy look.

I often vary the colors between squares to make a patchwork effect—try alternating two or three shades for a cohesive striped panel or use a gradient for subtle color shifts.

For a more fitted silhouette, I reduce the number of squares across the chest or make smaller squares by using thinner yarn and a smaller hook.

You can also add sleeves by seaming additional rows into the arm openings or leave the sleeve openings large for a dolman-style fit.

I sometimes embroider small centers on the flower motifs for extra contrast, or attach tiny crocheted buttons and loops as decorative closures.

To create a boxy cropped sweater, I stop after fewer rows and finish the hem with a ribbed edging worked in back loop only single crochet.

If I want a boho vibe, I attach fringe to the hem or add tassels to the lower corners of the panels.

Consider inserting a light lining or fabric behind the squares for warmth and opacity while keeping the floral texture as an overlay.

I also experiment with different seam techniques; an exposed whipstitch gives a rustic feel while the running stitch produces a braided, polished seam.

Finally, I recommend trying different panel layouts—move a square diagonally or offset rows to create asymmetric necklines or unique garment shapes for an artistic finish.

Common Mistakes & How to Fix Them

✗ Skipping blocking before assembly will leave uneven squares and an ill-fitting garment; always block each square to even out the shape prior to sewing. ✗ Not counting petals or repeats carefully can result in mismatched edges when seaming; count your petals and chain loops after each square to ensure consistency. ✗ Pulling tension too tight on the running stitch when sewing squares together can warp the motif edges; sew with gentle, even tension and adjust as needed for a flat seam. ✗ Forgetting that starting chains count as stitches will change stitch count and shape; always treat beginning chains (for example ch4) as part of your stitch total for that round.

The Cornflower Sweater Pattern

Create a breezy, oversized sweater made from floral crochet squares that stack together into a relaxed, drapey pullover. You will make repeating flower squares and seam them into two panels for a front and back, giving you control over fit and length. This pattern emphasizes blocking and a clean braided seam for a polished finish. Perfect for stitch-lovers who enjoy assembling motifs into wearable art.

Intermediate 8-10 Hours

Materials Needed for The Cornflower Sweater Pattern

— Main Fabric

  • 01
    Weight 4 yarn of choice (I used a cotton/nylon blend)
  • 02
    No specific color quantities listed — choose enough worsted weight (#4) yarn for multiple 8-inch squares to cover desired sweater panels

— Tools Required

  • 01
    5mm crochet hook
  • 02
    6mm crochet hook (optional for looser gauge)
  • 03
    Yarn needle for sewing squares together
  • 04
    Blocking materials
  • 05
    Stitch markers, as needed

Progress Tracker

0% Complete

— Flower Square :

Round 1 :

Slip knot. Ch 6 and sl st to the first stitch.

Round 2 :

Ch 4, tc in the same st where you placed the sl st, ch 1. [All in the same stitch: tc, ch1, tc, ch1] x5. You should now count 12 tc st total, including the "ch 4". Find the "ch 4" you started this round with and sl st to the 3rd ch st.

Info :

*Note that chains at the beginnings of rounds count as stitches! Think of this "ch 4" as a "tc, ch 1".

Item Name (Tc instructions) :

Yo twice, insert hook into stitch and pull up a loop. Yo and pull through the first 2 loops. You should have 3 loops. Yo and pull through the next 2 loops. You should have 2 loops now. Yo and pull through the remaining 2 loops.

Round 3 :

Each of the flower petals is essentially a tc 4 together, placed in the same stitch. The first petal will be a bit different from the others. Ch 2. Yo 2 times. Insert the hook under the next ch st of the round below. Pull up a loop. Yo and pull through the first 2 loops. You will have 3 loops left on your hook. Yo and pull through the next 2 loops. You should have 2 loops left on your hook.

Round 3 :

[Yo 2 times and insert the hook under the same ch st. Pull up a loop. Yo and pull through the first 2 loops. Yo and pull through the next 2 loops.] x2 You should now have 4 loops on your hook. Yo and pull through all 4 loops. Ch 4.

Round 3, continued :

[Yo 2 times and insert the hook under the next ch st of the row below. Pull up a loop. Yo and pull through the first 2 loops. Yo and pull through the next 2 loops.] x4. You should have 5 loops on your hook. Yo and pull through all 5 loops. Ch 4. Repeat the above "petal stitch" for every ch st you made in round 2. You should have 12 petals total. Sl st to the stitch at the top of the first petal.

Round 4 :

[Ch 7 sk 4 sl st] x12. Place your last sl st right before the first st of the round.

Round 5 :

Ch 7, sk 3, sl st (the sl st should be in the peak of that first chain loop). [Ch 7, sk 7, sl st] x2. Ch 4, sk 3, tc, ch 4, sk 3, sl st. <- Repeat this whole line a total of 3 times.

Round 5 :

[Ch 7, sk 7, sl st] x2. Ch 4. Find the first chain of this round and sl st to the 4th ch st.

Round 6 :

For this round, you will be placing one tc in each ch st. Ch 3, tc 3, ch1, sk1. [Tc 3, ch 1, sk1] x4. Tc 4, ch3, sk1.

Round 6 :

Tc 4, ch1, sk1. [Tc 3 ch 1 sk1] x4. Tc 4, ch3, sk1. <- Repeat this line a total of 3 times. Find the chain that started this round – sl st to the 3rd ch st. Tie off.

Info :

Repeat from the beginning to create several squares before moving on to assembly. Each square should measure about 8 inches wide.

Info :

For best results, you will need to block your squares to even out the shape before assembly!

— Sewing Squares Together :

Info :

After blocking, put 2 squares together with the wrong sides facing each other. Use a running stitch along the edge, threading the yarn back and forth through each stitch. When you get to the "ch 3" corners, sew the first ch st.

Info :

When you unfold the squares, you should see a double braided texture at the seam.

— Assembly :

Info :

The Cornflower Sweater is meant to be oversized, so the dimensions are not intended to be exact. Choose the dimensions that you feel suit you best, and don't be afraid to overshoot the measurements for a draping, graceful look!

Info :

Make two panels that look like the diagram: one front panel and one back panel. Adjust the number of squares across the chest and arm span to suit your size. Add another row for more arm room if desired.

Info :

Line up your front and back panels and sew them together along the dotted seam lines shown in the diagram. Weave in any stray ends.

Assembly Instructions

  • After blocking, align two squares with wrong sides together and sew with a running stitch through each edge stitch, working from one side to the other.
  • When you reach the "ch 3" corner loops while sewing squares, stitch the first chain stitch to secure the corner and continue the running stitch along the next edge.
  • Create two panels (front and back) sized to your desired chest width and length, then line them up and sew the shoulder and side seams where indicated on the layout diagram.
  • If you want extra arm room, add another row of squares at the arm span before joining panels; adjust seam placement accordingly for a balanced look.

Important Notes

  • 💡Block every square before assembly to ensure consistent shape and easier seaming.
  • 💡Treat beginning chains as counted stitches (for example a "ch 4" may count as a tc + ch1) to keep stitch counts accurate.
  • 💡Sew squares with wrong sides facing so the seam creates a neat double-braided texture on the right side.

This Cornflower Sweater pattern turns cheerful floral motifs into a relaxed, oversized pullover you will love to wear. Customize the size by adding or removing squares and experiment with yarns for different drape and texture. Make it your own—handmade pieces like this carry so much personality. 🧶✨

You ask,

we answer.

FAQs

What size will the finished piece be?

The finished garment size depends on how many 8-inch squares you assemble; each square measures about 8 inches wide when blocked, so plan panel layout to match your chest width and desired length.

Can I use different yarn weights for this pattern?

Yes, you can substitute yarn weights, but the square size will change; adjust hook size and plan for a different number of squares to achieve the desired final dimensions.

Do I need prior crochet experience for this pattern?

This pattern is rated intermediate and uses triple crochet clusters and motif assembly, so basic experience with stitches and reading rounds is recommended.

How long does this project typically take to complete?

Most crocheters complete this project in 8-10 hours for the motif making plus additional time for blocking and assembly, depending on experience and chosen size.

How should I join the squares for the best finish?

Place squares wrong sides together and use a running stitch along the edges, sewing into each stitch; when unfolded, this creates a clean double-braided texture on the seam.