🧶 Beautiful ✨ Detailed 💝 Adorable

The Elephant Queen Amigurumi Pattern

The Elephant Queen Amigurumi Pattern
4.3★ Rating
5-7 Hours Time Needed
3.0K Made This
✂️

Intermediate Level

Ideal for those with basic crochet experience, featuring slightly more advanced stitches and techniques to expand your skills.

⏱️

Weekend Treat

Takes 5-7 hours, making it an enjoyable project to finish over a couple of days.

🐥

Charming Critter

Delightful animal designs with sweet details that capture the essence of your favorite woodland and farmyard friends.

About This The Elephant Queen Amigurumi Pattern

This pattern creates a soft, seated elephant with oversized ears and a cuddly trunk. You'll make separate pieces — trunk, head, body, legs, arms, ears, tail and an optional mouth — then assemble them for a finished amigurumi. Techniques used include magic ring, increases, decreases, working in BLO and basic sewing for assembly. The pattern is written in continuous-round format and includes placement notes for safety eyes and ear folding.

The Elephant Queen Amigurumi Pattern crochet pattern - detailed view of completed project

Designed for an intermediate crocheter comfortable with shaping and finishing, this pattern includes clear round-by-round instructions. The finished elephant can be customized with color choices and small accessories.

Why You'll Love This The Elephant Queen Amigurumi Pattern

I absolutely love this pattern because it balances simple shaping with personality — the oversized ears and sweet trunk give the elephant so much character. I enjoy that the ear construction lets you create two-tone, dimensional ears that look great folded and sewn. The pattern pieces are modular which makes it fun to assemble and adjust placement to perfect the pose. Sewing everything together is satisfying and gives you a handmade piece that is both adorable and durable.

The Elephant Queen Amigurumi Pattern step 1 - construction progress The Elephant Queen Amigurumi Pattern step 2 - assembly progress The Elephant Queen Amigurumi Pattern step 3 - details and accessories The Elephant Queen Amigurumi Pattern step 4 - final assembly and finishing

Switch Things Up

I love how easily you can customize the Elephant Queen by changing colors — try soft pastels for a nursery-friendly version or bright jewel tones for a playful look.

If you want a bigger elephant, I often use a bulkier yarn and a larger hook to create a chunky, cuddle-friendly version; conversely use finer yarn for a tiny keychain-sized pal.

I sometimes swap the safety eyes for embroidered eyes to make the toy suitable for babies and to give a softer expression.

For a posable version I add a small wire armature in the trunk or limbs before stuffing, which lets me bend and pose the elephant for display.

Try adding tiny crocheted accessories like a crown, scarf, or blanket to give the elephant personality and make it gift-ready.

I also enjoy embroidering subtle facial details or adding blush with fabric-safe paint to enhance the expression.

To change the ear style, experiment with different increases in the ear pattern or omit the double-layer construction for a single-layer ear with less bulk.

If you want a weighted base for better stability, add a small pouch of poly pellets into the bottom of the body before fully stuffing and closing.

Try mixing yarn textures — a fuzzy yarn for a mane or tail tip creates attractive contrast against the smooth body yarn.

When sewing parts together I always pin and adjust placement first; this helps me try a few positions and pick the most natural pose before stitching permanently.

Common Mistakes & How to Fix Them

✗ Skipping stitch markers during continuous rounds causes lost stitch counts; use a stitch marker at the beginning of every round to always know your starting point. ✗ Understuffing limbs and head leads to a floppy finished piece; stuff firmly but in small amounts, shaping as you go to maintain even tension and fullness. ✗ Forgetting to place safety eyes before significant stuffing makes attachment difficult; insert safety eyes between the indicated rounds and before finishing stuffing permanently. ✗ Not pinning parts before sewing results in uneven placement and asymmetry; pin or baste pieces in position and check from multiple angles before stitching permanently.

The Elephant Queen Amigurumi Pattern

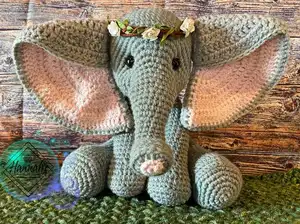
Make a charming handcrafted elephant with soft curves, big floppy ears, and a sweet personality. This pattern walks you through each piece — trunk, head, body, legs, arms, ears, tail and optional mouth — with clear rounds and assembly steps. Perfect for creating a treasured plush companion or a thoughtful handmade gift you can customize.

Intermediate 5-7 Hours

Materials Needed for The Elephant Queen Amigurumi Pattern

— Main Fabric

  • 01
    I Love This Yarn (Any 4ply yarn will do) - Gray - amount not specified in pattern (use sufficient yardage for head, body, limbs and outer ears)
  • 02
    I Love This Yarn (Any 4ply yarn will do) - Light Pink - small amount for inner ears and trunk tip (amount not specified in pattern)

— Tools Required

  • 01
    Crochet hook 3.5mm (E)
  • 02
    15mm safety eyes (2 pieces)
  • 03
    Stitch marker
  • 04
    Scissors
  • 05
    Needle / yarn needle for sewing
  • 06
    Fiberfill stuffing (poly-fil)
  • 07
    Pins for assembly (optional)

Progress Tracker

0% Complete

— Trunk :

Info :

Start with Pink: Lightly stuff with poly-fil as you go!!

Round 1 :

MR-6sc (6)

Round 2 :

INC x6 (12) CHANGE COLOR- Gray

Round 3 :

(Hdc, Hdc INC) x6 (18)

Round 4 :

Sc in BLO each st around (18)

Round 5 :

(4sc, Dec) x3 (15)

Round 6 :

Sc each st around (15)

Round 7 :

(3sc, Dec) x3 (12)

Round 8.-12 :

Sc each st around (12) 5 rounds

Round 13 :

(3sc, INC) x3 (15)

Round 14 :

Sc each st around

Round 15 :

(4sc, INC) x3 (18)

Round 16.-17 :

Sc each st around (18) 2 rounds

Round 18 :

(4sc, INC) x3, Sc next 3st (21)

Round 19 :

Sc each st around (21)

Round 20 :

(5sc, INC) x3, Sc next 3st (24)

Round 21 :

Sc each st around (24)

Round 22 :

(6sc, INC) x3, Sc next 3st (27)

Round 23 :

(7sc, INC) x3, Sc next 3st (30)

Info :

This completes the trunk. DO NOT FASTEN OFF. Continue to head ->

— Head :

Round 24 :

6sc, (2sc, INC) x6, 6sc (36)

Round 25 :

6sc, (3sc, INC) x6, 6sc (42)

Round 26 :

6sc, (4sc, INC) x6, 6sc (48)

Round 27 :

6sc, (5sc, INC) x6, 6sc (54)

Round 28.-35 :

Sc each st around (54) 8 rounds

Info :

At this time place safety eyes between rounds 25 & 26, before the 2nd INC and after the 5th INC, 18st apart. From this point on stuff with poly-fil accordingly!

Round 36 :

(7sc, Dec) x6 (48)

Round 37 :

Sc each st around (48)

Round 38 :

(6sc, Dec) x6 (42)

Round 39 :

(5sc, Dec) x6 (36)

Round 40 :

(4sc, Dec) x6 (30)

Round 41 :

(3sc, Dec) x6 (24)

Round 42 :

(2sc, Dec) x6 (18)

Info :

Finish stuffing firmly!

Round 43 :

(1sc, Dec) x6 (12)

Round 44 :

Dec x6 (6)

Info :

F/O. Cinch up the opening and weave in end.

— Legs :

Info :

Make 2. Gray

Round 1 :

MR-6sc (6)

Round 2 :

INC each st (12)

Round 3 :

(1sc, INC) x6 (18)

Round 4 :

(2sc, INC) x6 (24)

Round 5 :

(3sc, INC) x6 (30)

Round 6 :

(4sc, INC) x6 (36)

Round 7 :

Sc BLO each st around (36)

Round 8.-9 :

Sc each st around (36) 2 rounds

Round 10 :

(4sc, Dec) x6 (30)

Round 11 :

Sc each st around (30)

Round 12 :

(3sc, Dec) x6 (24)

Round 13 :

Sc each st around (24)

Round 14 :

(2sc, Dec) x6 (18)

Round 15.-24 :

Sc each st around (18) 10 rounds

Info :

Stuff firmly with poly-fil until about round 20!

Info :

Pinch opening together and Sc stitches together to close. F/O. Leave tail for sewing to body.

— Arms :

Info :

Make 2. Gray

Round 1 :

MR- 6sc (6)

Round 2 :

INC each st around (12)

Round 3 :

(1sc, INC) x6 (18)

Round 4 :

(2sc, INC) x6 (24)

Round 5 :

(3sc, INC) x6 (30)

Round 6 :

Sc BLO each st around (30)

Round 7 :

Sc each st around (30)

Round 8 :

(3sc, Dec) x6 (24)

Round 9 :

Sc each st around (24)

Round 10 :

(2sc, Dec) x6 (18)

Round 11 :

Sc each st around (18)

Round 12 :

Dec, Sc next 16st (17)

Round 13.-14 :

Sc each st around (17) 2 rounds

Round 15 :

Dec, Sc next 15st (16)

Round 16.-17 :

Sc each st around (16) 2 rounds

Round 18 :

Dec, Sc next 14st (15)

Round 19 :

(3sc, Dec) x3 (12)

Round 20.-23 :

Sc each st around (12) 4 rounds

Round 24 :

(2sc, Dec) x3 (9)

Round 25.-28 :

Sc each st around (9) 4 rounds

Info :

Stuff firmly with poly-fil until about round 24!!

Info :

Pinch opening together and Sc stitches together to close. F/O. Leave tail for sewing to body.

— Body :

Round 1 :

MR- 6sc (6)

Round 2 :

INC each st around (12)

Round 3 :

(1sc, INC) x6 (18)

Round 4 :

(2sc, INC) x6 (24)

Round 5 :

(3sc, INC) x6 (30)

Round 6 :

(4sc, INC) x6 (36)

Round 7 :

(5sc, INC) x6 (42)

Round 8 :

(6sc, INC) x6 (48)

Round 9 :

(7sc, INC) x6 (54)

Round 10 :

(8sc, INC) x6 (60)

Round 11.-14 :

Sc each st around (60) 4 rounds

Round 15 :

(8sc, Dec) x6 (54)

Round 16.-17 :

Sc each st around (54) 2 rounds

Round 18 :

15sc, (2sc, Dec) x6, 15sc (48)

Round 19.-20 :

Sc each st around (48) 2 rounds

Round 21 :

15sc, (1sc, Dec) x6, 15sc (42)

Round 22.-23 :

Sc each st around (42) 2 rounds

Round 24 :

15sc, Dec x6, 15sc (36)

Round 25.-26 :

Sc each st around (36) 2 rounds

Round 27 :

(4sc, Dec) x6 (30)

Round 28 :

Sc each st around (30)

Round 29 :

(3sc, Dec) x6 (24)

Round 30 :

Sc each st around (24)

Round 31 :

(2sc, Dec) x6 (18)

Round 32.-33 :

Sc each st around (18) 2 rounds

Info :

F/O. Leave long tail for sewing the body to the head. Stuff firmly with poly-fil!!
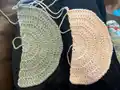
— Ears :

Info :

Make 4. 2 pink-inner earpieces 2 Gray- Outer earpieces

Round 1 :

MR- ch3, 5Dc (6)

Round 2 :

Ch1, Turn, 2 Dc each st around (12)

Round 3 :

Ch1, Turn, (1Dc, Dc INC) x6 (18)

Round 4 :

Ch1, Turn, (2Dc, Dc INC) x6 (24)

Round 5 :

Ch1, Turn, (3Dc, Dc INC) x6 (30)

Round 6 :

Ch1, Turn, (4Dc, Dc INC) x6 (36)

Round 7 :

Ch1, Turn, (5Dc, Dc INC) x6 (42)

Round 8 :

Ch1, Turn, (6Dc, Dc INC) x6 (48)

Round 9 :

Ch1, Turn, (7Dc, Dc INC) x6 (54)

Info :

** F/O inner earpieces & cut short tail.

Info :

**Do NOT F/O outer earpieces. Continue using working yarn to sew the inner and outer earpieces together. See "Assembly" section for directions!!

— Tail :

Round 1 :

MR-6sc (6)

Round 2 :

INC x6 (12)

Round 3.-14 :

Sc each st around (12) 10 rounds

Info :

Do not stuff with poly-fil. Attach to bum between rounds 10 & 11.

— Mouth :

Info :

Gray (Optional Piece)

Round 1 :

MR- 6sc (6)

Round 2 :

INC x6 (12)

Round 3.-4 :

Sc each st around (12) 2 rounds

Info :

Fold, match up stitches, sc the opening shut and attach under the trunk between rounds 23 & 24.

— Assembly :

Info :

Head/Body: Sew the Head to the Body!! Make sure head is centered over the opening of the body. Also, make sure the trunk is centered over the belly!!

Info :

Assembling the Ears: After making all 4 pieces (2 inner and 2 outer).

Item Name (P1) :

Match 1 inner and 1 outer earpiece. Sc all the way around the 2 pieces using the working yarn from the outer earpiece. Once you have sc all the way around, Fold the top of the ear down to the center.

Info :

This should be your result!! LEFT & RIGHT EARS WILL BE FOLDED OVER AT OPPOSITE ENDS. BE SURE TO HOLD THE EARS UP TO THE ELEPHANTS HEAD BEFORE SEWING TO KNOW THAT YOU ARE FOLDING AND SEWING THE RIGHT END!!

Info :

Attach the ears to the side of the head slightly up from the eyes. Folds of the ears should be at the top. Ears should be placed between rounds 32 & 33!

Info :

Legs: Sew the closed end of the legs to the sides of the body between rounds 10-16.

Info :

Arms: Sew the closed end of the arms to the seam between the head and the body directly about the legs!

Info :

Tail: Sew to the bum between rounds 10 & 11!!

Assembly Instructions

  • Sew the Head to the Body ensuring the head is centered over the body opening and the trunk is centered over the belly.
  • Match one inner ear and one outer ear, SC all the way around both pieces using the working yarn from the outer earpiece, fold the top down to the center and sew the ear to the head between rounds 32 & 33.
  • Sew the closed end of each leg to the sides of the body between rounds 10 and 16, spacing them evenly for balance.
  • Sew the closed end of each arm to the seam between the head and the body just above the legs so the arms sit naturally beside the body.
  • Attach the tail to the bum between rounds 10 and 11 and attach the optional mouth folded and sewn under the trunk between rounds 23 & 24.

Important Notes

  • 💡Do NOT join rounds unless stated; work in continuous spiral throughout the pattern unless directed otherwise.
  • 💡Use a stitch marker to mark the beginning of each round to maintain accurate stitch counts and shaping.
  • 💡All stitches are worked in both loops unless otherwise stated; when BLO is indicated work in the back loop only.

This Elephant Queen pattern is designed to bring a regal, floppy-eared friend to life with simple shaping and charming details. Make it in soft gray with pink inner ears for a classic look, or switch colors for a unique touch. Perfect as a handmade gift or a new addition to your amigurumi collection. 🐘🧶

You ask,

we answer.

FAQs

What size will the finished piece be?

The finished amigurumi size depends on your yarn and tension; using the recommended 3.5mm hook and 4ply yarn you can expect a medium-sized plush approximately 9-12 inches seated, though exact dimensions will vary.

Can I use different yarn weights for this pattern?

Yes, you can use different yarn weights, but the final size will change; choose an appropriate hook for your yarn and adjust stuffing to maintain shape.

Do I need prior crochet experience for this pattern?

This pattern is rated intermediate and assumes familiarity with magic ring, increases, decreases, working in BLO and sewing pieces together.

How long does this project typically take to complete?

Most crocheters complete this project in 5-7 hours, though time may vary based on experience level and how much time you spend on assembly and finishing.