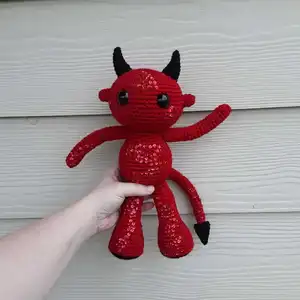
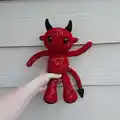
Make an adorable little devil amigurumi with optional wings, two horn styles, and a playful tail. This pattern guides you through each part step-by-step, with clear rounds and helpful tips so you can customize details like sequins or embroidered freckles. Perfect for makers who love small stuffed characters with personality — create a cute Halloween friend or a year-round companion.
Progress Tracker
0% Complete
— Ears :
Round 1 :
Ch 2. Place 6 sc into the the 2nd ch from your hook. Place your stitch marker. (6 sts)
Round 2-3 :
Sc around. Place stitch marker. (6 sts)
Info :
Break yarn with a long tail for sewing. Do not stuff the ears. Place them aside for now!
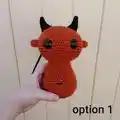
— Horns (Option 1) :
Instruction :
Use 2.00 mm crochet hook. Use accent color. The horns are worked in continuous rounds so you will need a stitch marker for this portion of the tutorial. Make 2 horns.
Round 1 :
Ch 2. Place 4 sc into the 2nd ch from your hook. Place your stitch marker. (4 sts)
Round 2 :
{sc, inc} Repeat what's inside the { } for the entire round. Place stitch marker. (6 sts)
Round 3 :
{sc 2, inc} Repeat what's inside the { } for the entire round. Place stitch marker. (8 sts)
Round 4 :
Sc around. Place stitch marker. (8 sts)
Round 5 :
{sc 3, inc} Repeat what's inside the { } for the entire round. Place stitch marker. (10 sts)
Round 6 :
Sc around. Place stitch marker. (10 sts)
Round 7 :
Inc, sc, inc, sc 7. Place stitch marker. (12 sts)
Round 8 :
Sc around. (12 sts)
Round 9 :
Inc, sc 2, inc, sc 8. Place stitch marker. (14 sts)
Round 10 :
Sc around. Place stitch marker. (14 sts)
Round 11 :
Inc, sc 3, inc, sc 9. Place stitch marker. (16 sts)
Round 12 :
inc, sc 14, inc. Place stitch marker. (18 sts)
Round 13 :
Sc 16. Inc twice. Place stitch marker. (20 sts)
Round 14 :
Sc around. (20 sts)
Info :
Break yarn with a long tail for sewing. Gently stuff. Set aside for now!
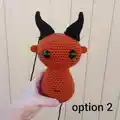
— Horns (Option 2) :
Instruction :
Use 2.00 mm crochet hook. Use accent color. The horns are worked in continuous rounds so you will need a stitch marker for this portion of the tutorial. Make 2 horns.
Round 1 :
Ch 2. Place 4 sc into the 2nd ch from your hook. Place your stitch marker. (4 sts)
Round 2 :
{sc, inc} Repeat what's inside the { } for the entire round. Place stitch marker. (6 sts)
Round 3 :
{sc 2, inc} Repeat what's inside the { } for the entire round. Place stitch marker. (8 sts)
Round 4 :
Sc around. Place stitch marker. (8 sts)
Round 5 :
{sc 3, inc} Repeat what's inside the { } for the entire round. Place stitch marker. (10 sts)
Round 6 :
Sc around. Place stitch marker. (10 sts)
Round 7 :
Inc, sc, inc, sc 7. Place stitch marker. (12 sts)
Round 8 :
Sc around. Place stitch marker. (12 sts)
Round 9 :
Inc, sc 2, inc, sc 8. Place stitch marker. (14 sts)
Round 10 :
Sc around. Place stitch marker. (14 sts)
Round 11 :
Inc, sc 3, inc, sc 9. Place stitch marker. (16 sts)
Round 12 :
inc, sc 14, inc. Place stitch marker. (18 sts)
Round 13 :
Sc 16. Inc twice. Place stitch marker. (20 sts)
Round 14 :
Sc around. (20 sts)
Info :
Break yarn with a long tail for sewing. Gently stuff. Set aside for now!
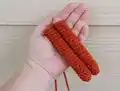
— Legs :
Instruction :
Use 3.00 mm crochet hook. Start with accent color! WATCH for directions on when to change color. The legs are worked in continuous round so you will need a stitch marker for this portion of the tutorial. Make 2 legs. Stuff the legs with poly-fill as you go!
Round 1 :
Ch 2. Place 10 sc into the 2nd ch from your hook. Place your stitch marker. (10 sts)
Round 2 :
{sc, inc} Repeat what's inside the { } for the entire round. Place stitch marker. (15 sts)
Round 3 :
{sc 2, inc} Repeat what's inside the { } for the entire round. Place stitch marker. (20 sts)
Round 4 :
{sc 3, inc} Repeat what's inside the { } for the entire round. Place stitch marker. (25 sts)
Info :
Switch to main body color yarn!
Round 5 :
{sc 4, inc} Repeat what's inside the { } for the entire round. Place stitch marker. (30 sts)
Round 6 :
In the blo! {sc 4, dec} Repeat what's inside the { } for the entire round. Place stitch marker. (25 sts)
Round 7-8 :
Sc around. Place your stitch marker. (25 sts)
Round 9 :
{sc 3, dec} Repeat what's inside the { } for the entire round. Place stitch marker. (20 sts)
Round 10-12 :
Sc around. Place your stitch marker. (20 sts)
Round 13 :
{sc 2, dec} Repeat what's inside the { } for the entire round. Place stitch marker. (15 sts)
Round 14-24 :
Sc around. Place your stitch marker. (15 sts)
Round 25 :
{sc, dec} Repeat what's inside the { } for the entire round. Place stitch marker. (10 sts)
Info :
Do not stuff the last two rounds with poly-fill!
Round 26-27 :
Sc around. Place your stitch marker. (10 sts)
Info :
Break yarn with a long tail for sewing! Gently stuff the leg. Make sure to leave the last two rounds unstuffed. Set aside for now!
— Tail :
Instruction :
The tail is optional!
Tail :
Use 3.00 mm crochet hook. Use main body color. The tail is worked in continuous rounds so you will need a stitch marker for portion of the tutorial. Make 1. Stuff the tail with poly-fill as you go!
Round 1 :
Ch 2. Place 6 sc into the 2nd ch from your hook. Place your stitch marker. (6 sts)
Round 2-28 :
Sc around. Place stitch marker. (6 sts)
Info :
Break yarn with a long tail for sewing. Set tail aside for now!
Tail Spike :
Use 2.00 mm crochet hook. Use accent color yarn. The tail spike is worked in continuous rounds so you will need a stitch marker for this portion of the tutorial. Make 1.
Round 1 :
Ch 2. Place 4 sc into the 2nd ch from your hook. Place your stitch marker. (4 sts)
Round 2 :
{sc, inc} Repeat what's inside the { } for the entire round. Place stitch marker. (6 sts)
Round 3 :
{sc 2, inc} Repeat what's inside the { } for the entire round. Place stitch marker. (8 sts)
Round 4 :
Sc around. Place stitch marker. (8 sts)
Round 5 :
{sc 3, inc} Repeat what's inside the { } for the entire round. Place stitch marker. (10 sts)
Round 6 :
Sc around. Place stitch marker. (10 sts)
Round 7 :
Inc, sc, inc, sc 7. (12 sts)
Info :
Break yarn with a long tail for sewing. Flatten the spike. Do not stuff with poly-fill. Take your tapestry needle and sew the tail spike securely in place on the end of your tail. Break yarn and sew in your ends. See image below!
Info :
Your tail is complete! Set it aside for now!
— Body :
Instruction :
Use 3.00 mm crochet hook. Use main body color. The body is worked in continuous rounds so you will need a stitch marker for this portion of the tutorial. Make 1.
Round 1 :
Ch 2. Place 10 sc into the 2nd ch from your hook. Place your stitch marker. (10 sts)
Round 2 :
{sc, inc} Repeat what's inside the { } for the entire round. Place stitch marker. (15 sts)
Round 3 :
{sc 2, inc} Repeat what's inside the { } for the entire round. Place stitch marker. (20 sts)
Round 4 :
{sc 3, inc} Repeat what's inside the { } for the entire round. Place stitch marker. (25 sts)
Round 5 :
{sc 4, inc} Repeat what's inside the { } for the entire round. Place stitch marker. (30 sts)
Round 6 :
{sc 5, inc} Repeat what's inside the { } for the entire round. Place stitch marker. (35 sts)
Round 7 :
{sc 6, inc} Repeat what's inside the { } for the entire round. Place stitch marker. (40 sts)
Round 8 :
{sc 6, dec} Repeat what's inside the { } for the entire round. Place stitch marker. (35 sts)
Round 9-11 :
Sc around. Place stitch marker. (35 sts)
Round 12 :
{sc 5, dec} Repeat what's inside the { } for the entire round. Place stitch marker. (30 sts)
Round 13-14 :
Sc around. Place stitch marker. (30 sts)
Round 15 :
{sc 4, dec} Repeat what's inside the { } for the entire round. Place stitch marker. (25 sts)
Round 16-17 :
Sc around. Place stitch marker. (25 sts)
Round 18 :
{sc 3, dec} Repeat what's inside the { } for the entire round. Place stitch marker. (20 sts)
Round 19-20 :
Sc around. Place stitch marker. (20 sts)
Info :
Break yarn with a long tail for sewing. Optionally you can use a tapestry needle and embroidery floss/yarn to stitch on a belly button. Gently stuff the body. Set aside for now!
— Arms :
Instruction :
Use 3.00 mm crochet hook. Use main body color. The arms are worked in continuous rounds so you will need a stitch marker for this portion of the tutorial. Make 2. Stuff the arms with poly-fill as you go!
Round 1 :
Ch 2. Place 8 sc into the 2nd ch from your hook. Place your stitch marker. (8 sts)
Round 2-22 :
Sc around. Place stitch marker. (8 sts)
Info :
Break yarn with a long tail for sewing. Set tail aside for now!
— Wings :
Instruction :
Use 2.00 mm crochet hook. Use accent color. Make 2. The wings are worked in rows. You will ch 1 before each new row. The ch 1 does not count as a stitch unless stated otherwise.
Row 1 :
Ch 3. Place 1 sc into the 2nd ch from your hook. Sc across. (2 sts)
Row 2 :
Ch 1 and turn your work. In the blo place 1 sc into the 1st st of the row. In the blo place 3 sc into the last st of the row. (4 sts)
Row 3 :
Ch 1 and turn your work. In the blo sc across. (4 sts)
Row 4 :
Ch 1 and turn your work. In the blo place 1 sc into the 1st three sts of the row. In the blo place 3 sc into the last st of the row. (6 sts)
Row 5 :
Ch 1 and turn your work. In the blo sc across. (6 sts)
Row 6 :
Ch 1 and turn your work. In the blo place 1 sc into the 1st 5 sts of the row. In the blo place 3 sc into the last st of the row. (8 sts)
Row 7 :
Ch 1 and turn your work. In the blo sc across. (8 sts)
Row 8 :
Ch 1 and turn your work. In the blo place 1 sc into the 1st 7 sts of the row. In the blo place 3 sc into the last st of the row. (10 sts)
Row 9 :
Ch 1 and turn your work. In the blo sc across. (10 sts)
Row 10 :
Ch 1 and turn your work. In the blo place 1 sc into the 1st 9 sts of the row. In the blo place 3 sc into the last st of the row. (12 sts)
Row 11 :
Ch 1 and turn your work. In the blo sc across. (12 sts)
Row 12 :
Ch 1 and turn your work. In the blo place 1 sc into the 1st 11 sts of the row. In the blo place 3 sc into the last st of the row. (14 sts)
Row 13 :
Ch 1 and turn your work. In the blo sc across. (14 sts)
Row 14 :
Ch 1 and turn your work. In the blo place 1 sc into the 1st 13 sts of the row. In the blo place 3 sc into the last st of the row. (16 sts)
Row 15 :
Ch 1 and turn your work. In the blo sc across. (16 sts)
Row 16 :
Ch 1 and turn your work. In the blo place 1 sc into the 1st 15 sts of the row. In the blo place 3 sc into the last st of the row. (18 sts)
Row 17 :
Ch 1 and turn your work. In the blo sc across. (18 sts)
Row 18 :
Ch 1 and turn your work. In the blo place 1 sc into the 1st 17 sts of the row. In the blo place 3 sc into the last st of the row. (20 sts)
Row 19 :
Ch 1 and turn your work. In the blo sc across. (20 sts)
Row 20 :
Ch 1 and turn your work. In the blo place 1 sc into the 1st 19 sts of the row. In the blo place 3 sc into the last st of the row. (22 sts)
Row 21 :
Ch 1 and turn your work. In the blo sc across. (22 sts)
Row 22 :
Ch 1 and turn your work. In the blo place 1 sc into the 1st 21 sts of the row. In the blo place 3 sc into the last st of the row. (24 sts)
Info :
Break yarn with a long tail for sewing. Your wing is finished See image below!
— Head :
Instruction :
Use 3.00 mm crochet hook. Use main body color. The head is worked in continuous rounds so you will need a stitch marker for this portion of the tutorial. Make 1.
Round 1 :
Ch 2. Place 6 sc into the 2nd ch from your hook. Place your stitch marker! (6 sts)
Round 2 :
Inc into each st of the round. Place your stitch marker! (12 sts)
Round 3 :
{sc 1, inc.} Repeat what's inside the { } for the entire round. Place your stitch marker! (18 sts)
Round 4 :
{sc 2, inc} Repeat what's inside the { } for the entire round. Place your stitch marker! (24 sts)
Round 5 :
{sc 3, inc} Repeat what's inside the { } for the entire round. Place your stitch marker! (30 sts)
Round 6 :
{sc 4, inc} Repeat what's inside the { } for the entire round. Place your stitch marker! (36 sts)
Round 7 :
{sc 5, inc} Repeat what's inside the { } for the entire round. Place your stitch marker! (42 sts)
Round 8 :
{sc 6, inc} Repeat what's inside the { } for the entire round. Place your stitch marker! (48 sts)
Round 9 :
{sc 7, inc} Repeat what's inside the { } for the entire round. Place your stitch marker! (54 sts)
Round 10-17 :
Place 1 sc into each st of the round. Place your stitch marker! (54 sts)
Round 18 :
{sc 7, dec.} Repeat what's inside the { } for the entire round. Place your stitch marker! (48 sts)
Round 19 :
{sc 6, dec.} Repeat what's inside the { } for the entire round. Place your stitch marker! (42 sts)
Round 20 :
{sc 5, dec.} Repeat what's inside the { } for the entire round. Place your stitch marker! (36 sts)
Round 21 :
{sc 4, dec.} Repeat what's inside the { } for the entire round. Place your stitch marker! (30 sts)
Round 22 :
{sc 3, dec.} Repeat what's inside the { } for the entire round. Place your stitch marker! (24 sts)
Infos :
Place safety eyes between Round 13 & 14. Place safety eyes 8-9 stitches apart. You can use embroidery floss/yarn to stitch on some freckles.
Round 23 :
{sc 2, dec.} Repeat what's inside the { } for the entire round. Place your stitch marker! (18 sts)
Info :
Firmly stuff your head with polyfill.
Round 24 :
{sc, dec.} Repeat what's inside the { } for the entire round. Place your stitch marker! (12 sts)
Round 25 :
dec around. (6 sts)
Info :
Add more poly-fill if needed! Use a running stitch to close the remaining hole. Break yarn and weave in your ends. See images below!
This Little Devil amigurumi pattern is full of playful options — choose horns, wings, a spike tail, or sequins to make it your own. Whether you stitch a spooky Halloween friend or a tiny mischievous companion, you can truly personalize every detail. Happy hooking and enjoy bringing this little devil to life! 🧶🎃