Make a playful little devil amigurumi with this detailed crochet pattern. You will work in continuous rounds to create a cuddly character with optional horns, wings, tail, and sequined details. The pattern includes clear instructions, stitch counts, and helpful assembly tips so you can finish a charming handmade friend you will be proud of.
Progress Tracker
0% Complete
— General Information :
Info :
Materials: You will need #4 worsted weight yarn in two different colors, 3.00 mm crochet hook, 2.00 mm crochet hook, poly-fill for stuffing, stitch marker, tapestry needle, sewing/straight pins, and 20.00 mm safety eyes. Optionally you may need sequins and embroidery floss.
Info :
Gauge: 4 sts by 5 rows = 1 inch with a 3.00 mm crochet hook and worsted weight yarn. Gauge is not extremely important for this pattern. You just want to keep even tension and crochet tight enough that stuffing does not poke through the holes.
Info :
Abbreviations: Ch: chain. Sl st: slip stitch. Sc: single crochet. Blo: back loop only. Sc inc: single crochet increase. Sc dec: single crochet decrease.
Info :
Notes: This would be considered an intermediate pattern. Sewing skills and patience are required! This pattern is written in US crochet terminology. Most of this pattern is worked in continuous rounds so you will need to use a stitch marker. This is a lengthy pattern so I will be including a notes section before each new task. Yarn and hook information will be included before each new task. Happy hooking!
Info :
Other important Information! When making amigurumi I suggest using the invisible decrease method. There are a ton of YouTube tutorials on this but basically you decrease as you normally would but in the front loops only. This ensures that there won't be any bumps or gaps in your finished amigurumi project! Please note that the rest of your project will be worked through both loops! You will only be working in the front loops when you decrease!
Info :
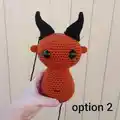
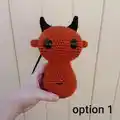
Now on to the crochet pattern! There will be a couple different ways to make your little devil. You will have 2 options for horns. I have included instructions for a tail, but you may want to make yours without a tail. I have also included instructions on how to create wings. These are also optional. Different yarn color choices and embellishments can change how your finished creature looks. I used embroidery floss to add freckles/belly button to one and sewed sequins onto the other.
— Ears :
Info :
Use a 3.00 mm crochet hook. Use main body color. The ears are worked in continuous rounds so you will need a stitch marker for this portion of the tutorial.
Round 1 :
Ch 2. Place 6 sc into the the 2nd ch from your hook. Place your stitch marker. (6 sts)
Round 2-3 :
Sc around. Place stitch marker. (6 sts)
Info :
Break yarn with a long tail for sewing. Do not stuff the ears. Place them aside for now!
— Horns :
Info :
Horns: (two options provided). Use 2.00 mm crochet hook. Use accent color. The horns are worked in continuous rounds so you will need a stitch marker for this portion of the tutorial. Make 2 horns.
— Option 1 :
Use 2.00 mm crochet hook. Use accent color. The horns are worked in continuous rounds so you will need a stitch marker for this portion of the tutorial. Make 2 horns.
Round 1 :
Ch 2. Place 4 sc into the 2nd ch from your hook. Place your stitch marker. (4 sts)
Round 2 :
{sc, inc} Repeat what's inside the { } for the entire round. Place stitch marker. (6 sts)
Round 3 :
{sc 2, inc} Repeat what's inside the { } for the entire round. Place stitch marker. (8 sts)
Round 4 :
Sc around. Place stitch marker. (8 sts)
Round 5 :
{sc 3, inc} Repeat what's inside the { } for the entire round. Place stitch marker. (10 sts)
Round 6 :
Sc around. Place stitch marker. (10 sts)
Round 7 :
Inc, sc, inc, sc 7. Place stitch marker. (12 sts)
Round 8 :
Sc around. (12 sts)
Round 9 :
Inc, sc 2, inc, sc 8. Place stitch marker. (14 sts)
Round 10 :
Sc around. Place stitch marker. (14 sts)
Round 11 :
Inc, sc 3, inc, sc 9. Place stitch marker. (16 sts)
Round 12 :
inc, sc 14, inc. Place stitch marker. (18 sts)
Round 13 :
Sc 16. Inc twice. Place stitch marker. (20 sts)
Round 14 :
Sc around. (20 sts)
Info :
Break yarn with a long tail for sewing. Gently stuff. Set aside for now!
— Option 2 :
Use 2.00 mm crochet hook. Use accent color. The horns are worked in continuous rounds so you will need a stitch marker for this portion of the tutorial. Make 2 horns.
Round 1 :
Ch 2. Place 4 sc into the 2nd ch from your hook. Place your stitch marker. (4 sts)
Round 2 :
{sc, inc} Repeat what's inside the { } for the entire round. Place stitch marker. (6 sts)
Round 3 :
{sc 2, inc} Repeat what's inside the { } for the entire round. Place stitch marker. (8 sts)
Round 4 :
Sc around. Place stitch marker. (8 sts)
Round 5 :
{sc 3, inc} Repeat what's inside the { } for the entire round. Place stitch marker. (10 sts)
Round 6 :
Sc around. Place stitch marker. (10 sts)
Round 7 :
Inc, sc, inc, sc 7. Place stitch marker. (12 sts)
Round 8 :
Sc around. Place stitch marker. (12 sts)
Round 9 :
Inc, sc 2, inc, sc 8. Place stitch marker. (14 sts)
Round 10 :
Sc around. Place stitch marker. (14 sts)
Round 11 :
Inc, sc 3, inc, sc 9. Place stitch marker. (16 sts)
Round 12 :
Sc 16. Inc twice. Place stitch marker. (20 sts)
Round 13 :
Sc around. (20 sts)
Round 14 :
Sc around. (20 sts)
Info :
Break yarn with a long tail for sewing. Gently stuff. Set aside for now!
— Legs :
Info :
Use 3.00 mm crochet hook. Start with accent color! WATCH for directions on when to change color. The legs are worked in continuous round so you will need a stitch marker for this portion of the tutorial. Make 2 legs. Stuff the legs with poly-fill as you go!
Round 1 :
Ch 2. Place 10 sc into the 2nd ch from your hook. Place your stitch marker. (10 sts)
Round 2 :
{sc, inc} Repeat what's inside the { } for the entire round. Place stitch marker. (15 sts)
Round 3 :
{sc 2, inc} Repeat what's inside the { } for the entire round. Place stitch marker. (20 sts)
Round 4 :
{sc 3, inc} Repeat what's inside the { } for the entire round. Place stitch marker. (25 sts)
Round 5 :
{sc 4, inc} Repeat what's inside the { } for the entire round. Place stitch marker. (30 sts)
Round 6 :
In the blo! {sc 4, dec} Repeat what's inside the { } for the entire round. Place stitch marker. (25 sts)
Round 7-8 :
Sc around. Place your stitch marker. (25 sts)
Round 9 :
{sc 3, dec} Repeat what's inside the { } for the entire round. Place stitch marker. (20 sts)
Round 10-12 :
Sc around. Place your stitch marker. (20 sts)
Round 13 :
{sc 2, dec} Repeat what's inside the { } for the entire round. Place stitch marker. (15 sts)
Round 14-24 :
Sc around. Place your stitch marker. (15 sts)
Round 25 :
{sc, dec} Repeat what's inside the { } for the entire round. Place stitch marker. (10 sts)
Info :
Do not stuff the last two rounds with poly-fill!
Round 26-27 :
Sc around. Place your stitch marker. (10 sts)
Info :
Break yarn with a long tail for sewing! Gently stuff the leg. Make sure to leave the last two rounds unstuffed. Set aside for now!
— Tail :
Info :
The tail is optional!
Info :
Use 3.00 mm crochet hook. Use main body color. The tail is worked in continuous rounds so you will need a stitch marker for portion of the tutorial. Make 1. Stuff the tail with poly-fill as you go!
Round 1 :
Ch 2. Place 6 sc into the 2nd ch from your hook. Place your stitch marker. (6 sts)
Round 2-28 :
Sc around. Place stitch marker. (6 sts)
Info :
Break yarn with a long tail for sewing. Set tail aside for now!
— Tail Spike :
Info :
Use 2.00 mm crochet hook. Use accent color yarn. The tail spike is worked in continuous rounds so you will need a stitch marker for this portion of the tutorial. Make 1.
Round 1 :
Ch 2. Place 4 sc into the 2nd ch from your hook. Place your stitch marker. (4 sts)
Round 2 :
{sc, inc} Repeat what's inside the { } for the entire round. Place stitch marker. (6 sts)
Round 3 :
{sc 2, inc} Repeat what's inside the { } for the entire round. Place stitch marker. (8 sts)
Round 4 :
Sc around. Place stitch marker. (8 sts)
Round 5 :
{sc 3, inc} Repeat what's inside the { } for the entire round. Place stitch marker. (10 sts)
Round 6 :
Sc around. Place stitch marker. (10 sts)
Round 7 :
Inc, sc, inc, sc 7. (12 sts)
Round 8 :
Sc around. Place stitch marker. (12 sts)
Info :
Break yarn with a long tail for sewing. Flatten the spike. Do not stuff with poly-fill. Take your tapestry needle and sew the tail spike securely in place on the end of your tail. Break yarn and sew in your ends. See image below!
Info :
Your tail is complete! Set it aside for now!
— Body :
Info :
Use 3.00 mm crochet hook. Use main body color. The body is worked in continuous rounds so you will need a stitch marker for this portion of the tutorial. Make 1.
Round 1 :
Ch 2. Place 10 sc into the 2nd ch from your hook. Place your stitch marker. (10 sts)
Round 2 :
{sc, inc} Repeat what's inside the { } for the entire round. Place stitch marker. (15 sts)
Round 3 :
{sc 2, inc} Repeat what's inside the { } for the entire round. Place stitch marker. (20 sts)
Round 4 :
{sc 3, inc} Repeat what's inside the { } for the entire round. Place stitch marker. (25 sts)
Round 5 :
{sc 4, inc} Repeat what's inside the { } for the entire round. Place stitch marker. (30 sts)
Round 6 :
{sc 5, inc} Repeat what's inside the { } for the entire round. Place stitch marker. (35 sts)
Round 7 :
{sc 6, inc} Repeat what's inside the { } for the entire round. Place stitch marker. (40 sts)
Round 8 :
{sc 6, dec} Repeat what's inside the { } for the entire round. Place stitch marker. (35 sts)
Round 9-11 :
Sc around. Place stitch marker. (35 sts)
Round 12 :
{sc 5, dec} Repeat what's inside the { } for the entire round. Place stitch marker. (30 sts)
Round 13-14 :
Sc around. Place stitch marker. (30 sts)
Round 15 :
{sc 4, dec} Repeat what's inside the { } for the entire round. Place stitch marker. (25 sts)
Round 16-17 :
Sc around. Place stitch marker. (25 sts)
Round 18 :
{sc 3, dec} Repeat what's inside the { } for the entire round. Place stitch marker. (20 sts)
Round 19-20 :
Sc around. Place stitch marker. (20 sts)
Info :
Break yarn with a long tail for sewing. Optionally you can use a tapestry needle and embroidery floss/yarn to stitch on a belly button. Gently stuff the body. Set aside for now!
— Arms :
Info :
Use 3.00 mm crochet hook. Use main body color. The arms are worked in continuous rounds so you will need a stitch marker for this portion of the tutorial. Make 2. Stuff the arms with poly-fill as you go!
Round 1 :
Ch 2. Place 8 sc into the 2nd ch from your hook. Place your stitch marker. (8 sts)
Round 2-22 :
Sc around. Place stitch marker. (8 sts)
Info :
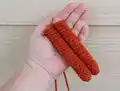
Break yarn with a long tail for sewing. Set tail aside for now! See image below!
— Wings :
Info :
Use 2.00 mm crochet hook. Use accent color. Make 2. The wings are worked in rows. You will ch 1 before each new row. The ch 1 does not count as a stitch unless stated otherwise.
Row 1 :
Ch 3. Place 1 sc into the 2nd ch from your hook. Sc across. (2 sts)
Row 2 :
Ch 1 and turn your work. In the blo place 1 sc into the 1st st of the row. In the blo place 3 sc into the last st of the row. (4 sts)
Row 3 :
Ch 1 and turn your work. In the blo sc across. (4 sts)
Row 4 :
Ch 1 and turn your work. In the blo place 1 sc into the 1st three sts of the row. In the blo place 3 sc into the last st of the row. (6 sts)
Row 5 :
Ch 1 and turn your work. In the blo sc across. (6 sts)
Row 6 :
Ch 1 and turn your work. In the blo place 1 sc into the 1st 5 sts of the row. In the blo place 3 sc into the last st of the row. (8 sts)
Row 7 :
Ch 1 and turn your work. In the blo sc across. (8 sts)
Row 8 :
Ch 1 and turn your work. In the blo place 1 sc into the 1st 7 sts of the row. In the blo place 3 sc into the last st of the row. (10 sts)
Row 9 :
Ch 1 and turn your work. In the blo sc across. (10 sts)
Row 10 :
Ch 1 and turn your work. In the blo place 1 sc into the 1st 9 sts of the row. In the blo place 3 sc into the last st of the row. (12 sts)
Row 11 :
Ch 1 and turn your work. In the blo sc across. (12 sts)
Row 12 :
Ch 1 and turn your work. In the blo place 1 sc into the 1st 11 sts of the row. In the blo place 3 sc into the last st of the row. (14 sts)
Row 13 :
Ch 1 and turn your work. In the blo sc across. (14 sts)
Row 14 :
Ch 1 and turn your work. In the blo place 1 sc into the 1st 13 sts of the row. In the blo place 3 sc into the last st of the row. (16 sts)
Row 15 :
Ch 1 and turn your work. In the blo sc across. (16 sts)
Row 16 :
Ch 1 and turn your work. In the blo place 1 sc into the 1st 15 sts of the row. In the blo place 3 sc into the last st of the row. (18 sts)
Row 17 :
Ch 1 and turn your work. In the blo sc across. (18 sts)
Row 18 :
Ch 1 and turn your work. In the blo place 1 sc into the 1st 17 sts of the row. In the blo place 3 sc into the last st of the row. (20 sts)
Row 19 :
Ch 1 and turn your work. In the blo sc across. (20 sts)
Row 20 :
Ch 1 and turn your work. In the blo place 1 sc into the 1st 19 sts of the row. In the blo place 3 sc into the last st of the row. (22 sts)
Row 21 :
Ch 1 and turn your work. In the blo sc across. (22 sts)
Row 22 :
Ch 1 and turn your work. In the blo place 1 sc into the 1st 21 sts of the row. In the blo place 3 sc into the last st of the row. (24 sts)
Info :
Break yarn with a long tail for sewing. Your wing is finished See image below!
Info :
Now it is time to sew the wing onto the arm. I find it helpful to use sewing pins and maybe even a safety pin to hold the wing in place while you sew. See image below on how to pin the wing to the arm!
Info :
You want to take your time while sewing so that your finished wing comes out as desired. When you have completed sewing the wing onto the arm DO NOT break yarn. You will want to use that tail to sew the wing onto the body later during the assemble portion of the tutorial!! See image below!
— Head :
Info :
Use 3.00 mm crochet hook. Use main body color. The head is worked in continuous rounds so you will need a stitch marker for this portion of the tutorial. Make 1.
Round 1 :
Ch 2. Place 6 sc into the 2nd ch from your hook. Place your stitch marker! (6 sts)
Round 2 :
Inc into each st of the round. Place your stitch marker! (12 sts)
Round 3 :
{sc 1, inc.} Repeat what's inside the { } for the entire round. Place your stitch marker! (18 sts)
Round 4 :
{sc 2, inc.} Repeat what's inside the { } for the entire round. Place your stitch marker! (24 sts)
Round 5 :
{sc 3, inc.} Repeat what's inside the { } for the entire round. Place your stitch marker! (30 sts)
Round 6 :
{sc 4, inc.} Repeat what's inside the { } for the entire round. Place your stitch marker! (36 sts)
Round 7 :
{sc 5, inc.} Repeat what's inside the { } for the entire round. Place your stitch marker! (42 sts)
Round 8 :
{sc 6, inc.} Repeat what's inside the { } for the entire round. Place your stitch marker! (48 sts)
Round 9 :
{sc 7, inc.} Repeat what's inside the { } for the entire round. Place your stitch marker! (54 sts)
Round 10-17 :
Place 1 sc into each st of the round. Place your stitch marker! (54 sts)
Round 18 :
{sc 7, dec.} Repeat what's inside the { } for the entire round. Place your stitch marker! (48 sts)
Round 19 :
{sc 6, dec.} Repeat what's inside the { } for the entire round. Place your stitch marker! (42 sts)
Round 20 :
{sc 5, dec.} Repeat what's inside the { } for the entire round. Place your stitch marker! (36 sts)
Round 21 :
{sc 4, dec.} Repeat what's inside the { } for the entire round. Place your stitch marker! (30 sts)
Round 22 :
{sc 3, dec.} Repeat what's inside the { } for the entire round. Place your stitch marker! (24 sts)
Info :
Place safety eyes between Round 13 & 14. Place safety eyes 8-9 stitches apart. You can use embroidery floss/yarn to stitch on some freckles.
Round 23 :
{sc 2, dec.} Repeat what's inside the { } for the entire round. Place your stitch marker! (18 sts)
Info :
Firmly stuff your head with polyfill.
Round 24 :
{sc, dec.} Repeat what's inside the { } for the entire round. Place your stitch marker! (12 sts)
Round 25 :
dec around. (6 sts)
Info :
Add more poly-fill if needed! Use a running stitch to close the remaining hole. Break yarn and weave in your ends. See images below!
This Little Devil amigurumi pattern gives you playful customization and charming details to craft a unique, handmade friend. Make it spooky, sweet, or sparkly with sequins and embroidery for personality. Try different color combinations or add tiny props for storytelling fun. 🧶✨👹