🧢 Beautiful ✨ Detailed πŸ’ Adorable

The Little Sheep Amigurumi Pattern

The Little Sheep Amigurumi Pattern
4.6β˜… Rating
2-4 Hours Time Needed
3.9K Made This
βœ‚οΈ

Intermediate Level

Ideal for those with basic crochet experience, featuring slightly more advanced stitches and techniques to expand your skills.

⏱️

Bite-Sized Project

Finishes in 2-4 hoursβ€”perfect for an afternoon of creative relaxation.

🧸

Cute Companion

An adorable friend to cherish, handcrafted with love to bring comfort and joy for years to come.

About This The Little Sheep Amigurumi Pattern

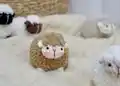
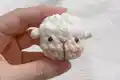
This pattern teaches you to crochet a little sheep amigurumi using chunky velvet-style yarn for a plush, textured finish. It includes detailed rounds for the body and head, plus notes on bobble stitches and color changes. You will finish with embroidered facial details and gentle blush for the cheeks.

The Little Sheep Amigurumi Pattern crochet pattern - detailed view of completed project

Perfect for an afternoon project, the finished toy measures roughly 7 cm high using the recommended materials. Step-by-step photos and video links are provided to support tricky steps and assembly.

Why You'll Love This The Little Sheep Amigurumi Pattern

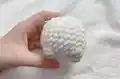
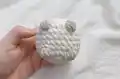
I absolutely love this pattern because the chunky yarn creates the cutest plush texture that feels delightful to hold. I enjoy how the bobble stitch gives the body a cozy, woolly look without extra sewing. The construction is compact and satisfying β€” you can finish a full sheep in just a couple of hours. I also love that the pattern includes tips and video links to help you master the slightly trickier parts like invisible decreases and embroidery.

The Little Sheep Amigurumi Pattern step 1 - construction progress The Little Sheep Amigurumi Pattern step 2 - assembly progress The Little Sheep Amigurumi Pattern step 3 - details and accessories The Little Sheep Amigurumi Pattern step 4 - final assembly and finishing

Switch Things Up

I love changing the yarn color to make a whole flock of different-looking sheep; try soft pastels, natural beiges, or even bright playful colors.

I sometimes use a bulkier hook and super bulky yarn to make a larger, cuddlier version for a bigger gift.

I also swap the safety eyes for embroidered eyes for a safer toy suitable for babies; I just embroider two small French knots instead.

I like to add tiny crocheted scarves or hats in contrasting colors for seasonal or themed variations.

I often experiment with the placement of the eyes and mouth to give each sheep a unique personality; try moving the eyes slightly closer or further apart.

I suggest adding a small loop at the top to turn the sheep into an ornament or keychain for portability.

I sometimes embroider patterns on the sides or back using simple surface crochet to add visual interest and texture.

I recommend trying different bobble stitch sizesβ€”use bo2 or bo4 combinations to vary the woolly texture dramatically.

I occasionally stuff with lavender sachets mixed into the fiberfill to make fragrant little gifts that smell lovely in a drawer.

I enjoy assembling matching sets (two-tone body and head) to create mini collectible series that look great displayed together.

Common Mistakes & How to Fix Them

βœ— Skipping stitch markers when working in continuous rounds can make counting difficult; place a marker at the start of each round to keep track. βœ— Not stuffing parts as instructed will cause a floppy shape; stuff gradually and firmly according to the pattern notes to hold the form. βœ— Pulling your tension too tightly while working with chunky velvet yarn can distort the stitches; maintain an even, relaxed tension for consistent texture. βœ— Forgetting to change colors exactly where indicated results in mismatched details; follow the color notes carefully and make the change at the specified round.

The Little Sheep Amigurumi Pattern

Create a charming little sheep amigurumi that is perfect for gifting or decorating your home. This pattern guides you through crocheting a soft, squishy body and a cute, detailed head using chunky velvet-style yarn. You will learn bobble stitches, invisible decreases, and simple assembly techniques to finish a lovable toy. Follow clear step-by-step rounds and helpful tips to make your own adorable sheep.

Intermediate 2-4 Hours

Materials Needed for The Little Sheep Amigurumi Pattern

β€” Main Fabric

  • 01
    Chunky yarn size 4-5mm (e.g. Himalaya Velvet, Himalaya Dolphin Baby) - main body yarn
  • 02
    White chunky yarn - used for body and features (as indicated)
  • 03
    Cream chunky yarn - used for head and face areas (as indicated)
  • 04
    Beige/brown chunky yarn - optional body color for variations
  • 05
    Brown embroidery thread - small amount for nose embroidery

β€” Tools Required

  • 01
    Crochet hook size 4mm
  • 02
    4.5mm toy safety eyes (2 pieces)
  • 03
    Needle for sewing (yarn needle)
  • 04
    Toy stuffing (fiberfill)
  • 05
    Stitch marker
  • 06
    Scissors
  • 07
    Powder blush for cheeks (optional for finishing)

Progress Tracker

0% Complete

β€” Materials :

Infos :

4mm crochet hook. 4.5mm toy safety eyes. Needle for sewing. Toy stuffing (fiberfill). Stitch marker. Scissors. Chunky yarn size 4-5mm (E.g: Himalaya Velvet, Himalaya Dolphin Baby ....).

β€” Notes :

Infos :

Make the invisible decrease stitches to have a better results. Add toy stuffing according to instruction of each part. Stitches should be close together so that when the finished toy is stuffed, the stuffing doesn't come out through gaps in the stitches. The pattern includes color change techniques, bobble stitch technique and the X stitch technique for single crochet stitch. It is important to master these techniques to ensure the finished product resembles the pattern. Finished size: the finished toy is approximately 7cm (~ 2.75 inch) high.

β€” Abbreviations :

Infos :

MR - magic ring. st(s) - stitch(es). slst - slip stitch. ch - chain stitch. sc - single crochet stitch. dc - double crochet stitch. inc - increase (2 single crochet sts into the same stitch). dec - decrease (crochet together 2 single crochet sts with 1 st). dc-dec - double crochet decrease. bo2 - bobble stitch - 2 double crochet into one stitch. bo4 - bobble stitch - 4 double crochet into one stitch. FLO - work stitch through front loop only. rnd(s) - round(s). [...] - number of stitches should have at the end of each round. (...) x ... - repeat instructions x times.

β€” Body :

Info :

Start in white yarn. (Note: Use cream yarn in pink word, white yarn in black word)

Round 1 :

8sc in MR [8]

Round 2 :

8inc [16]

Round 3 :

(sc, inc) x 8 [24]

Round 4 :

(3sc, inc) x 6 [30]

Round 5 :

11sc, bo4, 4sc, bo4, 13 sc [30]

Round 6 - 9 :

(4 rounds): 30sc [30]

Round 10 :

11sc, bo4, 4sc, bo4, 13 sc [30]

Round 11 :

(3sc, dec) x 6 [24]

Round 12 :

(sc, dec) x 8 [16]

Info :

Stuff the body firmly with fiberfill.

Round 13 :

8dec [8]

Info :

Fasten off, leaving the yarn tail. Using the yarn needle, weave the yarn tail through the front loop of each remaining stitch and pull it tight to close.

Info :

~ How to weave in the yarn end on a stuffed piece: https://youtu.be/amYifc37uSs

β€” Head :

Info :

Start in cream yarn. Ch 4. Stitches are worked in both sides of the foundation chain.

Round 1 :

Skip the first ch on the hook, inc in next ch, sc in next ch, 4sc in next ch. Continue on the other side of the foundation chain, sc in next ch, inc in next ch [10]

Round 2 :

2inc, sc, 4inc, sc, 2inc [18]

Round 3 :

18sc [18]

Round 4 :

(ch 4 , skip 3 ch from the hook, slst in next ch), sc in next st of the base, dec, (sc, dec) x 2, (ch 4, skip 3 ch from the hook, slst in next ch), sc in next st of the base, dec, (sc, dec) x 2 [12]

Info :

Change to white yarn.

Round 5 :

(sc, bo2) x 6 [12]

Info :

Stuff the head firmly with fiberfill.

Round 6 :

6dc-dec [6]

Info :

Fasten off, leaving the yarn tail. Using the yarn needle, weave the yarn tail through the front loop of each remaining stitch and pull it tight to close.

Info :

Insert the 4.5mm safety eyes between rounds 3 and 4, 4 stitches apart. Embroider the nose with brown threads. Sew the head to the body. Use powder blush for the cheeks.

Infos :

Video tutorials: ~ How to crochet the sheep's head (from rnd 4 to 6): https://youtu.be/85tKbY9tJMk ~ How to embroider the sheep's face: https://youtu.be/_t3-pnZa54M ~ How to sew the head to the body: https://youtu.be/LIMfpMLDcvU

Assembly Instructions

  • Insert the 4.5mm safety eyes between rounds 3 and 4 of the head, spaced 4 stitches apart, then secure the safety backs firmly before continuing.
  • Embroider the nose with brown thread centered below the eyes and add powder blush lightly to the cheeks for a soft finish.
  • Sew the head to the body using the long tail left after fastening off; align the head so the eyes face forward and use a yarn needle and whipstitch to attach securely.
  • After finishing the rounds and stuffing, weave the yarn tail through the front loops of the remaining stitches and pull tight to close openings neatly before sewing pieces together.

Important Notes

  • πŸ’‘Use stitch markers to keep track of round beginnings, especially during increases and decreases to maintain correct shaping.
  • πŸ’‘Stuff parts firmly but evenly as you go to avoid lumps and to achieve the rounded, plump shape of the sheep.
  • πŸ’‘When working bobble stitches and color changes, maintain consistent tension and follow the video tutorials if you are unsure about technique.

This little sheep is designed to bring a smile to any maker and recipient with its squishy texture and sweet face. It is quick to make and delightful to personalize with colors and tiny accessories. Make a whole flock in different shades and gift them to friends and family. πŸ‘πŸ§Ά

You ask,

we answer.

FAQs

What size will the finished piece be?

The finished amigurumi measures approximately 7 cm high when using the recommended chunky yarn and 4mm hook.

Can I use different yarn weights for this pattern?

Yes, you can change yarn weight, but this will alter the final size; adjust hook size accordingly and expect differences in texture.

Do I need prior crochet experience for this pattern?

This pattern is rated intermediate because it uses bobble stitches, invisible decreases, and color changes, so basic crochet experience is recommended.

How long does this project typically take to complete?

Most crocheters complete this project in 2-4 hours, though time may vary based on experience level and how much time you spend on finishing details.