🧢 Beautiful ✨ Detailed πŸ’ Adorable

The moonlit bralette Pattern

The moonlit bralette Pattern
4.8β˜… Rating
2-4 Hours Time Needed
1.5K Made This
βœ‚οΈ

Intermediate Level

Ideal for those with basic crochet experience, featuring slightly more advanced stitches and techniques to expand your skills.

⏱️

Bite-Sized Project

Finishes in 2-4 hoursβ€”perfect for an afternoon of creative relaxation.

πŸ‘•

Casual Chic

Relaxed style with a modern twist, perfect for everyday wear while maintaining that handcrafted uniqueness.

About This The moonlit bralette Pattern

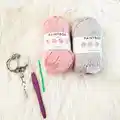
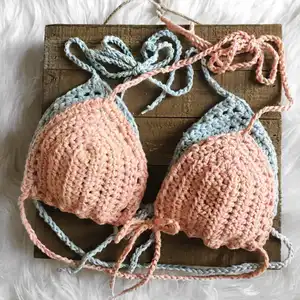
This pattern creates the Moonlit Bralette: a simple crochet bralette made from two strands of Paintbox Cotton DK yarn held together. Youll make two shaped cups, add a decorative border, and crochet shoulder and bottom straps to assemble a stylish, adjustable top. The pattern includes size options for Small, Medium, and Large.

The moonlit bralette Pattern crochet pattern - detailed view of completed project

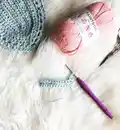
Worked mostly in half double crochet with easy shaping, the design is comfortable and customizable. Follow the step-by-step rows and border instructions to create a neat finished edge and woven strap channels.

Why You'll Love This The moonlit bralette Pattern

I absolutely love this pattern because it takes a classic crochet technique and turns it into a wearable, modern piece. I enjoy how the two-strand cotton gives the bralette a soft but structured fabric that holds its shape. The cup shaping is simple but effective, letting you customize the size easily. I also love the decorative border step β€” it adds a pretty finish while creating practical loops to weave the straps through.

The moonlit bralette Pattern step 1 - construction progress The moonlit bralette Pattern step 2 - assembly progress The moonlit bralette Pattern step 3 - details and accessories The moonlit bralette Pattern step 4 - final assembly and finishing

Switch Things Up

I love experimenting with color for this bralette; try a striped effect by alternating two colorways every few rows for a playful look.

I often change the cup size by adding or subtracting chains at the startβ€”adding two chains per side will give a little more coverage while keeping the pattern shape.

If you want a padded look, I add a thin removable fabric pad or a layer of felt between the cup and the border for modesty and shape.

I sometimes make the straps longer for a halter style by increasing the CH80 to CH100+ or by creating ties that wrap around the torso for a different silhouette.

For a sportier version, I use a sturdier cotton blend and a slightly smaller hook so the fabric is firmer and gives more support.

I like to add small scallop or picot edging instead of the CH1 border for a more decorative finishβ€”experiment with CH2 picots or tiny shells along the top edge.

If you want a quicker make, use a bulkier yarn and a larger hook; this will create a chunkier but still wearable bralette with the same construction ideas.

I also enjoy embellishing the cups with simple embroidery or tiny crocheted flowers to personalize each piece and make it unique.

To make this bralette into a bikini top, choose a 100% cotton suitable for swimwear and test support; reinforce the strap channels and weave the bottom strap tightly for extra hold.

Finally, I recommend sewing in a small label or adding a decorative knot where straps meet the cup to make your finished piece look polished and professional.

Common Mistakes & How to Fix Them

βœ— Not holding two strands together as instructed; always hold two strands of Paintbox Cotton DK together throughout to match gauge and fabric density. βœ— Skipping the instruction to place a HDC in the very last chain of the previous row; place that HDC to keep the cup straight at the bottom and avoid a curved or uneven base. βœ— Cutting your yarn too early after repeating Row 3; follow the note that says DO NOT CUT YARN until you finish the repeat and are instructed to cut, to avoid loose ends or having to rejoin yarn unnecessarily.
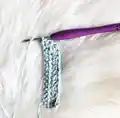
 βœ— Uneven tension when working the bottom border and strap holes; work consistently and evenly across the bottom so the CH1 spaces for the strap are regular and the strap will weave neatly. βœ— Incorrect chain counts for sizes S, M, L; double-check the starting chain CH 14(16,18) and use the matching repeat counts 3(5,7) so your cup dimensions match the intended sizes.

The moonlit bralette Pattern

Make a delicate, handmade bralette with this easy-to-follow pattern that guides you through crocheting cups and straps. Youll work with two strands of Paintbox Cotton DK for a soft, sturdy result. This pattern is adjustable with three size options and includes clear border and strap instructions to finish a wearable summer piece.

Intermediate 2-4 Hours

Materials Needed for The moonlit bralette Pattern

β€” Main Fabric

  • 01
    Paintbox Cotton DK yarn (DK/#3) - 2 balls, hold two strands of yarn together for the pattern

β€” Tools Required

  • 01
    4mm crochet hook
  • 02
    Scissors
  • 03
    Tapestry needle

Progress Tracker

0% Complete

β€” Cups :

Info :

Make 2. For this pattern, we will be holding two strands of yarn together.

Info :

To begin, CH 14(16,18) S,M,L

Round 1 :

HDC in 3rd CH from hook and in every CH after.

Round 2 :

CH2, turn. In same CH work HDC and in each CH until you get to the CH3 space at the top of this row. In this CH3 space, work 3 HDC. Continue HDC in every stitch after. Be sure to place a HDC in the very very last CH of the previous row to keep your cup straight at the bottom.

Round 3 :

CH2, turn. HDC in every stitch until you get to the top where we previously placed 3 HDC. Work HDC, HDC,CH1,HDC in middle stitch of the three, HDC in the next CH. HDC as usual down the row to the bottom.

Round 4-6 (S), 4-8 (M), 4-10 (L) :

Repeat Row 3. 3(5,7) more times. DO NOT CUT YARN.

Info :

Let's create a cute border now:)

Round Border 1 :

CH4,turn. Skip one CH, work HDC. CH1,skip 1, HDC in next CH until you reach the top where we turn. In the top middle CH, work HDC, CH2, HDC in same stitch. CH1, continue border as usual to very bottom.

Round Border 2 :

CH2,turn. Work HDC in each CH1 space and at the top of each HDC. So one HDC in every CH1 space and every HDC. Until you get to the top where the cup turns. In top CH space, work 2 HDC,CH1, 2HDC. Continue the border like normal down the other side. (Each CH1 space and each HDC.

Info :

Now we need to create a border of spaces along the bottom of the cup to weave in our straps we will make.

Round Bottom Border :

CH2, immediately work HDC in the side of the very last HDC of previous border row. Along the bottom, as consistently as you can, work HDC,CH1, skip a space, HDC. Ending with a HDC in side of previous row's first HDC. Cut and tie off! Make one more cup.

β€” Straps :

Item Name (Shoulder Straps) :

For the shoulder straps, attach yarn at top of each cup. CH80.

Item Name (Bottom Strap) :

For bottom strap, CH 150-200. Weave the strap in and out of your bottom loops. You can choose to have the bow tie in the front or in the back :)

β€” Finishing :

Info :

All done! Feel free to contact me for support if you have any questions! Please do not sell,alter or giveaway this pattern. Feel free to sell items made using this pattern!

Assembly Instructions

  • Make two identical cups following the cup instructions, finishing each with the bottom border and cutting and tying off as instructed.
  • Attach shoulder straps by securing yarn at the top of each cup where indicated, then CH80 for each strap and fasten off; weave ends in securely.
  • Create a long bottom strap (CH150-200) and weave it in and out of the bottom loops created by the bottom border so the strap runs through both cups.
  • Adjust strap placement and length before tying: position the bottom strap so the bow can tie in the front or the back, then tie and secure ends neatly.

Important Notes

  • πŸ’‘Hold two strands of Paintbox Cotton DK yarn together throughout the pattern for the correct fabric density and gauge.
  • πŸ’‘Place a HDC in the very last chain of the previous row as instructed to keep the cup straight at the bottom.
  • πŸ’‘Do not cut the yarn immediately after the Row 3 repeats; follow the pattern notes and only cut when the pattern tells you to do so.
  • πŸ’‘Work the bottom border consistently so the CH1 spaces are even and the bottom strap will weave smoothly through the loops.

Thank you for choosing the Moonlit Bralette Pattern β€” a cozy, stylish piece you can finish in an afternoon. 🧢 This pattern is written with clear steps and size options to make a custom fit, and it uses two strands of cotton for a soft, wearable fabric. ✨ Happy crocheting and enjoy wearing your handmade bralette with pride! 😊

You ask,

we answer.

FAQs

What sizes are included in this pattern?

The pattern includes size options using starting chains CH 14(16,18) for Small, Medium, and Large; follow the bracketed counts for your size.

Can I use a different yarn weight for this bralette?

Yes, but changing yarn weight will affect the final size and drape; if you use a different yarn, check your gauge and adjust starting chain and hook size accordingly.

What tools do I need to complete the bralette?

You will need a 4mm crochet hook, scissors, and a tapestry needle; the pattern specifies holding two strands of Paintbox Cotton DK together.

How long will this project take to finish?

Most crocheters can finish this bralette in 2-4 hours, depending on experience and the size you make.