🧢 Beautiful ✨ Detailed πŸ’ Adorable

Zig-Zag Blanket Pattern

Zig-Zag Blanket Pattern
4.1β˜… Rating
12-15 Hours Time Needed
2.9K Made This
βœ‚οΈ

Beginner Friendly Level

Perfect for those just starting their crochet journey, with clear instructions and simple techniques

⏱️

Multi-Day Project

A rewarding 12+ hour journeyβ€”perfect for dedicated crafters who love detailed work.

πŸ€—

Soft Hug

Gentle, plush, and full of warmth, creating a sense of comfort and coziness wherever they find a home.

About This Zig-Zag Blanket Pattern

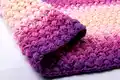
This pattern creates a textured zig-zag blanket using sport weight yarn held double and puff stitches for a plush, dimensional fabric. You can make newborn, crib, or adult throw sizes by adjusting the starting chain and number of rows. The pattern includes clear step-by-step photos, a color placement chart for four colors, and guidance for changing and weaving in yarn ends. It is written in American terms and is ideal for a relaxing, rewarding crochet project.

Zig-Zag Blanket Pattern crochet pattern - detailed view of completed project

The design uses Knit Picks Brava Sport in four colors and a 5.5 mm hook, but you can substitute other yarns and weights. Detailed instructions for the puff stitch and color changes are included to help you achieve neat, consistent results.

Why You'll Love This Zig-Zag Blanket Pattern

I absolutely love this pattern because the puff stitch creates an incredibly soft and textured fabric that feels luxurious to touch. I enjoy how quickly the rows grow once you get into the rhythm of making puff stitches and chaining; it is very satisfying. The color placement chart makes it easy to plan beautiful gradients or stripes, and I find swapping colors one strand at a time keeps the transitions clean. This is one of my go-to projects when I want a cozy handmade gift that looks more complicated than it actually is.

Zig-Zag Blanket Pattern step 1 - construction progress Zig-Zag Blanket Pattern step 2 - assembly progress Zig-Zag Blanket Pattern step 3 - details and accessories Zig-Zag Blanket Pattern step 4 - final assembly and finishing

Switch Things Up

I love how easily this zig-zag blanket accepts color variations; try pastel tones for a nursery or bold brights for a modern throw.

You can swap the sport weight yarn for a worsted weight and a larger hook to create a thicker, chunkier blanket that works up faster.

Hold three strands together instead of two to make an extra plush fabric; just be sure to adjust your hook size for comfortable tension.

Make a mini version using fingering weight yarn and a small hook to create a decorative lapghan or baby security blanket.

Experiment with striping sequences: repeat each color for more rows for longer stripes or alternate each row for a peppered multicolor effect.

I sometimes add a simple single crochet border in a contrasting color to frame the blanket and give a clean finish to the edges.

Try substituting a self-striping yarn for one of the color strands to introduce subtle variegation without extra color changes.

You can make a reversible version by changing the placement of puff stitches and DCs on the wrong side to create mirrored texture.

If you want a lacy look, replace the ch-1 between puff stitches with a ch-2 and adjust spacing to open up the fabric.

I also like to add appliques, pom-pom corners, or small tassels in the corner colors to personalize the blanket for gifts.

Common Mistakes & How to Fix Them

βœ— Skipping the initial chain count or chaining the wrong number will change the width dramatically; double-check the starting chain (83, 128, or 146) before beginning. βœ— Not holding yarn double as instructed will change gauge and texture; be sure to hold two strands together consistently for the pattern to work as written. βœ— Cutting both yarn ends when changing color can make joining messy; replace one strand at a time and leave one thread uncut before starting the new color. βœ— Failing to weave in ends securely can cause unraveling over time; knot paired ends close to the fabric and use a yarn needle to weave them in tightly.

Zig-Zag Blanket Pattern

Create a soft, textured zig-zag blanket using the puff stitch technique and simple color changes. This beginner-friendly pattern guides you through holding yarn double, making puff stitches, and changing colors for a beautiful gradient effect. Perfect for baby blankets, crib throws, or a cozy adult throw β€” you can adapt the size using the provided starting chain and row counts. Enjoy a satisfying make that showcases rich texture and lovely color transitions.

Beginner Friendly 12-15 Hours

Materials Needed for Zig-Zag Blanket Pattern

β€” Main Fabric

  • 01
    Sport weight yarn (Knit Picks Brava Sport recommended) in 4 colors: Blush, Cream, Freesia, Lady Slipper
  • 02
    Newborn size total yarn: approximately 1140 yards (1040 meters) in total
  • 03
    Crib size total yarn: approximately 2890 yards (2420 meters) in total
  • 04
    Adult throw size total yarn: approximately 6600 yards (6020 meters) in total
  • 05
    Color placement: hold strands together as charted (some rows held double, some rows one strand of two colors)

β€” Tools Required

  • 01
    Crochet Hook 5.5 mm
  • 02
    Yarn needle for weaving in ends
  • 03
    Scissors

Progress Tracker

0% Complete

β€” Zig-Zag Blanket :

Info :

Skill level: Beginner.

Info :

Supplies needed: Sport weight yarn. Crochet Hook 5.5 mm. Yarn needle for weaving in ends.

Info :

Sport weight yarn: Knit Picks Brava Sport in 4 colors: -Blush -Cream -Freesia -Lady Slipper

Info :

Gauge in pattern: 5 puff stitches and 7 rows in 4x4 inches

Info :

To make a newborn size baby blanket: Size 22x22 inches (56x56 centimetres). You will need: 1140 yards (1040 meters) of yarn in total. Starting chain 83, make 38 rows.

Info :

To make a crib size baby blanket: Size 35x35 inches (90x90 centimetres). You will need: 2890 yards (2420 meters) of yarn in total. Starting chain 128, make 60 rows.

Info :

To make an adult size throw blanket: Size 70x40 inches (173x107 centimetres). You will need: 6600 yards (6020 meters) of yarn in total. Starting chain 146, make 120 rows.

Info :

Color placement chart, if you are using 4 colors (you are crocheting holding yarn double, some rows will have 2 colors held together): Row 1-2: Cream color held double. Row 3-4: 1 strand Cream color, 1 strand Blush. Row 5-6: Blush color held double. Row 7-8: 1 strand Blush, 1 strand Freesia. Row 9-10: Freesia color held double. Row 11-12: 1 strand Freesia, 1 strand Lady Slipper. Row 13-14: Lady Slipper color held double.

Step 1 :

Hold yarn double. Ch 83 (128 for crib blanket, 146 for throw blanket).

Step 2 :

Row 1: Dc into 7th ch from hook

Step 3 :

Make a puff st in ch before dc (as pointed with arrow).

Step 4 :

To make a puff st: Yo, insert hook into the loop. Pull loop through.

Step 5 :

(Yo, insert hook into the loop. Pull loop through) 2 more times.

Step 6 :

Yo, pull loop through all loops on the hook. Puff st complete.

Step 7 :

Make ch 1 to tighten the top of the puff st.

Step 8 :

Sk 2 ch, dc into 3rd ch.

Step 9 :

Make a puff st into ch before dc.

Step 10 :

Repeat steps 8 and 9 until you reach the end of the row.

Step 11 :

Dc into last ch.

Step 12 :

Row 2: Ch 4, turn

Step 13 :

Dc into next space between dc and puff st of the previous row.

Step 14 :

Make a puff st into the space under ch st of the previous row, as pointed with an arrow.

Step 15 :

(Puff st complete)

Step 16 :

Ch 1.

Step 17 :

Repeat steps 13-16 until you reach the end of the row.

Step 18 :

Dc into ch

Step 19 :

puff st into ch before dc of the previous row.

Step 20 :

Dc into ch.

Step 21 :

Repeat row 2 (steps 12-20) until you reach 38 (60, 120) rows for baby blanket (crib blanket, throw blanket).

Step 22 :

To change yarn color, you will replace one yarn thread at a time. Before you start a new row, cut one thread leaving long yarn end.

Step 23 :

Hold new color together with the one yarn thread left uncut, and start crocheting new row.

Step 24 :

Continue with usual pattern. At the beginning of the row you will have 2 yarn ends that will need to be weaved in.

Step 25 :

To weave in ends, find 2 yarn ends side by side. Make a few tight knots close to the fabric of the blanket, to secure. Use yarn needle to weave in both ends at a time.

Row 1 :

Dc into 7th ch from hook, make a puff st in ch before dc, make ch 1 to tighten the top of the puff st. *Sk 2 ch, dc into 3rd ch. Make a puff st into ch before dc. Repeat from * until you reach the end of the row. Dc into last ch.

Row 2 :

Ch 4, turn. *Dc into next space between dc and puff st of the previous row. Make a puff st into the space under ch st of the previous row. Ch 1. Repeat from * until you reach the end of the row. Dc into ch. Puff st into ch before dc of the previous row. Dc into ch.

Info :

Repeat Row 2, until you reach 38 (60, 120) rows for baby blanket (crib blanket, throw blanket).

Assembly Instructions

  • To change yarn color, replace one yarn thread at a time; before starting the new row cut one thread leaving a long yarn end and hold the new color with the uncut strand to begin the row.
  • When starting each new row after a color change you will have two yarn ends; secure them and weave them in later following the weaving instructions.
  • To weave in ends, place two yarn ends side by side, make a few tight knots close to the fabric to secure, then use a yarn needle to weave both ends into the blanket.
  • Follow the color placement chart to hold yarn double on specified rows (some rows are two strands of the same color held together, other rows are one strand of two different colors).
  • For finishing, trim excess yarn tails after weaving in and smooth the blanket by blocking lightly if desired to even out texture and edges.

Important Notes

  • πŸ’‘This pattern is written in standard American terms; follow American crochet stitch names when working the pattern.
  • πŸ’‘You can use any other yarn weight and color, but the finished size and gauge will changeβ€”adjust hook size and starting chain accordingly.
  • πŸ’‘This pattern is yarn hungry; plan for the total yardage listed for each size and consider using leftovers for color transitions.
  • πŸ’‘When changing colors, leave one yarn tail uncut to join with the new color for a smooth transition, then weave in ends securely.

This Zig-Zag Blanket pattern gives you a plush, textured blanket perfect for gifting or keeping warm. The puff stitch and thoughtful color placement create beautiful depth and cozy softness. Make a newborn, crib, or full throw using the included yardage and row counts β€” happy crocheting! 🧢✨

You ask,

we answer.

FAQs

What size will the finished piece be?

The pattern includes three sizes: Newborn 22x22 inches, Crib 35x35 inches, and Adult Throw 70x40 inches using the recommended yarn and hook size.

Can I use different yarn weights for this pattern?

Yes, you can use different yarn weights, but this will affect the final size and gauge; adjust your hook size and check gauge to achieve desired dimensions.

Do I need prior crochet experience for this pattern?

This pattern is beginner friendly and teaches the puff stitch step-by-step with photos, but basic skills like chaining, double crochet, and yarn over are helpful.

How long does this project typically take to complete?

Time varies by size: expect a multi-day project of about 12-15 hours for the full throw; smaller baby or crib sizes will take less time.