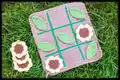
About This Tic-Tac-Toe Pattern
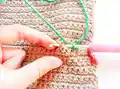
This pattern creates a portable Tic-Tac-Toe board with removable sunflower and leaf pieces, crocheted primarily in single crochet. You will learn how to crochet a square board, add a stitched grid, and make small floral and leaf motifs. The finished board is compact and great for play, gifting, or decoration.
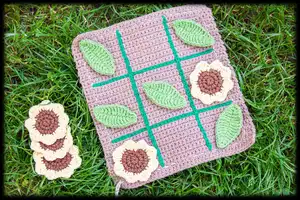
Includes step-by-step rounds for the board, five sunflowers, and five leaves with clear abbreviations and helpful photos. Skill level is easy, making this project accessible to beginners with basic crochet knowledge.
Why You'll Love This Tic-Tac-Toe Pattern
I absolutely love this pattern because it combines a simple technique with a delightfully creative outcome that is both functional and pretty. I enjoy making small projects that finish quickly and bring instant satisfaction—this board does exactly that. The sunflower and leaf pieces let you add personality with color and texture, and they are fun to crochet in short bursts. I also love that it makes a thoughtful handmade gift that is practical and playful for all ages.
Switch Things Up
I love customizing this Tic-Tac-Toe set by changing the color palette to suit seasons or recipients.
I often swap the sunflower pieces for buttons, crocheted hearts, or themed shapes to match holidays.
Want a bigger board? I change to a bulkier yarn and a larger hook to make a chunky, cuddly version perfect for kids.
To make a mini keychain version I use a lighter yarn and a 2.5mm hook so the pieces become pocket-friendly.
I sometimes add embroidery or bead accents to the centers of the sunflowers for extra shine and texture.
For removable pieces I attach small snaps or velcro so they are easy to store and safe for children to play with.
I recommend trying different borders like crab stitch or single crochet rounds to give the board a polished edge.
I also experiment with ombre effects across the board by changing yarn colors every 10 rows for a gradient look.
Try using cotton cord as the drawstring for a rustic look or a matching yarn for a subtle finish around the board.
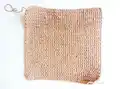
If you want a travel set, I make a fabric pouch with pockets for the pieces and a foldable board that fits inside.
I sometimes convert the grid lines to thin crocheted cords sewn on afterwards for a raised, tactile effect.
Don't be afraid to mix yarn brands and textures; each combination gives the finished set its own unique character and charm.
Common Mistakes & How to Fix Them
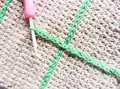
✗ Skipping stitch markers when marking grid positions can result in off-center lines; mark each grid line position carefully and count stitches before crocheting the sl sts.
✗ Not hiding yarn ends securely can lead to unraveling during play; weave in and hide all yarn tails thoroughly before finishing.
✗ Crocheting with inconsistent tension makes the board edges uneven and warped; maintain steady tension and block lightly if necessary to square the board.
✗ Using the wrong hook size changes final dimensions and stitch density; use the recommended 3.5mm hook or adjust yarn weight and hook together to achieve desired size.