🧢 Beautiful ✨ Detailed πŸ’ Adorable

Tommy the T-Rex Amigurumi Pattern

Tommy the T-Rex Amigurumi Pattern
4.6β˜… Rating
5-7 Hours Time Needed
1.9K Made This
βœ‚οΈ

Intermediate Level

Ideal for those with basic crochet experience, featuring slightly more advanced stitches and techniques to expand your skills.

⏱️

Weekend Treat

Takes 5-7 hours, making it an enjoyable project to finish over a couple of days.

🧸

Cute Companion

An adorable friend to cherish, handcrafted with love to bring comfort and joy for years to come.

About This Tommy the T-Rex Amigurumi Pattern

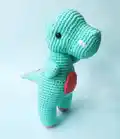
This pattern creates Tommy the T-Rex, a sweet amigurumi dinosaur with a rounded head, chubby torso, tiny arms and a spiral tail. The design uses DK/8ply yarn with clear round-by-round instructions for shaping and finishing. Techniques include working in the round, simple increases and decreases, and small bobble details on the head.

Tommy the T-Rex Amigurumi Pattern crochet pattern - detailed view of completed project

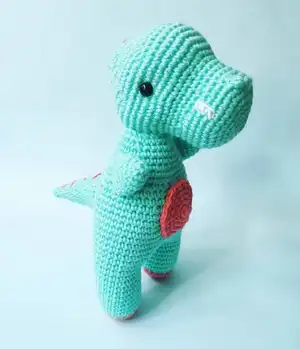
You will make two legs, two arms, a separate head, tail and a crocheted stomach circle, then sew everything together. The pattern includes placement notes for safety eyes and embroidered teeth and stripes.

Why You'll Love This Tommy the T-Rex Amigurumi Pattern

I absolutely love this pattern because Tommy has a playful, cuddly shape that comes together quickly yet feels substantial. I enjoy the gentle shaping in the head and torso that gives him personality without complicated stitches. The separate stomach disc and spiral tail make assembly satisfying and allow for nice finishing touches. I also love how easy it is to customise colors and add little embroidered details to make each dinosaur unique.

Tommy the T-Rex Amigurumi Pattern step 1 - construction progress Tommy the T-Rex Amigurumi Pattern step 2 - assembly progress Tommy the T-Rex Amigurumi Pattern step 3 - details and accessories Tommy the T-Rex Amigurumi Pattern step 4 - final assembly and finishing

Switch Things Up

I love changing colours to make a whole family of dinosaurs; swap the GREEN and ORANGE for pastels or brights to create different personalities.

I often make mini versions by using a finer yarn and a smaller hook for keychains and ornaments.

To make Tommy chunkier, try a bulkier yarn and a larger hook; remember the stitch tension will change the sizing dramatically.

I sometimes embroider different expressions by moving the eyes or stitching a small smile to alter his mood.

Try adding small crocheted accessories like a scarf, bow or tiny hat to personalise each toy.

Use felt instead of safety eyes if you are making toys for very young children and prefer no plastic parts.

I like to add wire inside the tail for a poseable finish; be sure to encase wire ends securely and use it only if the toy is not for small children.

For a textured spine, consider stitching raised ridges using back stitch or small bobbles along the back and tail.

You can change the stomach shape to a heart or star by crocheting a different applique and sewing it on instead of the round stomach disc.

I recommend experimenting with stripes or speckled yarns for the body to give Tommy a unique look every time.

Common Mistakes & How to Fix Them

βœ— Skipping stitch counts when increasing will quickly throw off the shaping; count stitches after each increase round to verify totals. βœ— Not stuffing gradually leads to lumps and mis-shaped limbs; stuff little by little while you shape to keep a smooth finish. βœ— Changing color incorrectly can leave visible joins; pull through the new colour on the last stitch of the previous round to create a neat transition. βœ— Using a hook that is too large makes stitches too loose for amigurumi; choose a smaller hook than recommended to get tight, neat fabric. βœ— Placing safety eyes too late can misposition them; insert eyes between the specified rounds and count stitches to ensure correct spacing.

Tommy the T-Rex Amigurumi Pattern

Make your own adorable Tommy the T-Rex with this detailed intermediate crochet pattern. Follow step-by-step rounds for the head, body, arms, legs, tail and stomach with clear assembly instructions. Perfect for crafters who enjoy making charming amigurumi toys with neat finishes. Create a handmade gift or keepsake that stands about 23cm tall using DK weight yarn.

Intermediate 5-7 Hours

Materials Needed for Tommy the T-Rex Amigurumi Pattern

β€” Main Fabric

  • 01
    8ply/DK or Light Worsted yarn (GREEN) - approximately >50g (example: Paintbox Yarns Cotton DK Col 425 Pistachio Green)
  • 02
    8ply/DK or Light Worsted yarn (ORANGE) - approximately 25g (example: Paintbox Yarns Cotton DK Col 409 Light Camel)
  • 03
    WHITE 4ply yarn or embroidery thread for teeth and small details

β€” Tools Required

  • 01
    Crochet hook size 2.75mm (C-2 US)
  • 02
    7.5mm plastic safety eyes (2 pieces)
  • 03
    Scissors
  • 04
    Tapestry needle for sewing and weaving ends
  • 05
    Polyester toy stuffing
  • 06
    Stitch marker (optional)

Progress Tracker

0% Complete

β€” Arms :

Round 1 :

6 sc in MR [6]

Round 2 :

(sc, inc) x 3 [9]

Round 3 :

(sc x 2, inc) x 3 [12]

Round 4-7 :

sc x 12 [12]

Info :

Stuff, sc across the top and fasten off. Leave a tail for sewing.

β€” Head :

Round 1 :

6 sc in MR [6]

Round 2 :

inc x 6 [12]

Round 3 :

(sc, inc) x 6 [18]

Round 4 :

(sc x 2, inc) x 6 [24]

Round 5 :

(sc x 3, inc) x 6 [30]

Round 6 :

(sc x 4, inc) x 6 [36]

Round 7 :

sc x 36 [36]

Round 8 :

sc x 14, dc bobble, sc x 6, dc bobble, sc x 14 [36]

Round 9-10 :

sc x 36 [36]

Round 11 :

(dec, sc x 4) x 6 [30]

Round 12-13 :

sc x 30 [30]

Round 14 :

(sc x 2, inc) x 10 [40]

Round 15 :

(sc x 3, inc) x 10 [50]

Round 16 :

(sc x 9, inc) x 5 [55]

Round 17-19 :

sc x 55 [55]

Round 20 :

(sc x 6, dec) x 6, sc x 7 [49]

Round 21 :

(sc x 5, dec) x 7 [42]

Round 22 :

(sc x 4, dec) x 7 [35]

Round 23 :

(sc x 3, dec) x 7 [28]

Round 24 :

sc x 28 [28]

Info :

Place 7.5mm safety eyes between rounds 17-18, 25 stitches apart. Stuff head and continue stuffing until fastened off. To indent the eyes, using the one piece of green yarn sew a stitch under each safety eye, pull the yarn and tie together.

Round 25 :

(sc x 2, dec) x 7 [21]

Round 26 :

sc x 21 [21]

Round 27 :

(sc x 3, dec) x 4, sc [17]

Round 28 :

sc x 2, (dec, sc) x 5 [12]

Round 29 :

dec x 6 [6]

Info :

Weave tail through stitches of final round and pull to close. Weave end.

β€” Legs and torso :

Legs and torso - Legs (ORANGE, make 2) Round 1 :

5 sc in MR [5]

Round 2 :

inc x 5 [10]

Round 3 :

(sc, inc) x 5 [15]

Round 4 :

(sc x 2, inc) x 5 [20]

Info :

Change to GREEN yarn.

Round 5 :

in BLO: sc x 20 [20]

Round 6-12 :

sc x 20 [20]

Info :

Fasten off 1st leg ONLY, continue for 2nd leg.

Round 13 :

ch5, sc x 20 around 1st leg, sc in 5 ch, sc x 20 in 2nd leg [50]

Round 14 :

sc in 5 ch, sc x 45 [50]

Round 15-22 :

sc x 50 [50]

Info :

Stuff and continue stuffing as you go.

Round 23 :

(sc x 8, dec) x 5 [45]

Round 24-25 :

sc x 45 [45]

Round 26 :

(sc x 7, dec) x 5 [40]

Round 27-28 :

sc x 40 [40]

Round 29 :

(sc x 6, dec) x 5 [35]

Round 30-31 :

sc x 35 [35]

Round 32 :

(sc x 5, dec) x 5 [30]

Round 33-34 :

sc x 30 [30]

Round 35 :

(sc x 4, dec) x 5 [25]

Round 36 :

sc x 25 [25]

Round 37 :

(sc x 3, dec) x 5 [20]

Round 38 :

sc x 20 [20]

Info :

Weave tail through final round and pull to close. Leave a tail for sewing.

β€” Tail :

Round 1 :

4 sc in MR [4]

Round 2 :

sc x 4 [4]

Round 3 :

(sc, inc) x 2 [6]

Round 4 :

sc x 6 [6]

Round 5 :

(sc x 2, inc) x 2 [8]

Round 6 :

(sc x 3, inc) x 2 [10]

Round 7 :

sc x 10 [10]

Round 8 :

(sc x 4, inc) x 2 [12]

Round 9 :

(sc x 5, inc) x 2 [14]

Round 10 :

sc x 14 [14]

Round 11 :

(sc x 6, inc) x 2 [16]

Round 12 :

(sc x 7, inc) x 2 [18]

Round 13 :

(sc x 8, inc) x 2 [20]

Round 14 :

sc x 20 [20]

Round 15 :

(sc x 3, inc) x 5 [25]

Round 16 :

sc x 25 [25]

Round 17 :

(sc x 4, inc) x 5 [30]

Round 18 :

sc x 30 [30]

Info :

Fasten off and leave a tail for sewing.

β€” Stomach :

Round 1 :

6 sc in MR [6]

Round 2 :

inc x 6 [12]

Round 3 :

(sc, inc) x 6 [18]

Round 4 :

(sc x 2, inc) x 6 [24]

Round 5 :

(sc x 3, inc) x 6 [30]

Info :

Fasten off and leave a tail for sewing.

β€” Assembly :

Step 1 :

Stomach - sew to torso between rounds 21-30.

Step 2 :

Arms - sew to sides of torso between rounds 28-34.

Step 3 :

Head - sew to torso, go around twice to make secure.

Step 4 :

Tail - sew to torso between rounds 19-27.

Step 5 :

Stripes - using ORANGE, embroider stripes over every second round for the tail, back of the torso and head.

Step 6 :

Teeth - using WHITE, embroider teeth on each side of the head over rounds 8-10.

Assembly Instructions

  • Stomach - sew to torso between rounds 21-30.
  • Arms - sew to sides of torso between rounds 28-34.
  • Head - sew to torso, go around twice to make secure.
  • Tail - sew to torso between rounds 19-27.
  • Stripes - using ORANGE, embroider stripes over every second round for the tail, back of the torso and head.
  • Teeth - using WHITE, embroider teeth on each side of the head over rounds 8-10.

Important Notes

  • πŸ’‘Amigurumi is stitched in the round (unless it says otherwise).
  • πŸ’‘A yarn with no stretch is best for amigurumi; I ordinarily use cotton or a cotton blend for neat stitches.
  • πŸ’‘When changing colour, pull through new colour on the last stitch of the round prior for a clean join.
  • πŸ’‘Generally, use a smaller hook for amigurumi than you normally would so your stitches are tight.
  • πŸ’‘The yarn thickness and hook size used will affect finished size; Tommy measures approximately 23cm tall (9 inches).

This Tommy the T-Rex pattern is a delightful project that brings a cheerful handmade friend to life. Perfect for gifting or keeping, Tommy is full of personality and simple to customise with colour. Happy crocheting and enjoy making your very own little dinosaur! πŸ§ΆπŸ¦–

You ask,

we answer.

FAQs

What size will the finished piece be?

The finished amigurumi measures approximately 23 cm (9 inches) tall when using the recommended DK/8ply yarn and 2.75mm hook.

Can I use different yarn weights for this pattern?

Yes, you can change yarn weight but the finished size will change; use an appropriate hook for your chosen yarn and expect different proportions.

Do I need prior crochet experience for this pattern?

This pattern is rated intermediate, so basic knowledge of single crochet, increases, decreases and working in the round is recommended.

How long does this project typically take to complete?

Most crocheters finish this project in about 5-7 hours depending on experience and how much time is spent on assembly and embroidery details.