🧢 Beautiful ✨ Detailed πŸ’ Adorable

Tree of Life Leather Bag Pattern

Tree of Life Leather Bag Pattern
4.2β˜… Rating
5-7 Hours Time Needed
3.8K Made This
βœ‚οΈ

Intermediate Level

Ideal for those with basic crochet experience, featuring slightly more advanced stitches and techniques to expand your skills.

⏱️

Weekend Treat

Takes 5-7 hours, making it an enjoyable project to finish over a couple of days.

✨

Stylish Touch

An elegant detail to elevate any look, combining traditional techniques with contemporary design sensibilities.

About This Tree of Life Leather Bag Pattern

This pattern creates a small Tree of Life leather crossbody bag with laser-engraved decoration and a LOXX closing system. The PDF includes printing instructions, templates scaled for A4/Letter, and a materials list for vegetable tanned leather and small hardware. You can cut and engrave the pieces with a laser or hand-cut them and finish by hand-stitching.

Tree of Life Leather Bag Pattern crochet pattern - detailed view of completed project

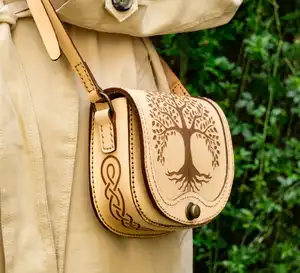
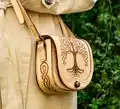
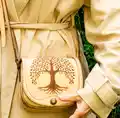
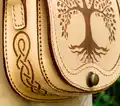
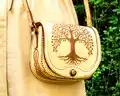
Includes recommended tools, hole punch sizes, and clear hardware specifications for an accurate build. Photos show the finished bag for reference and placement of decorative engraving.

Why You'll Love This Tree of Life Leather Bag Pattern

I absolutely love this pattern because it balances beautiful engraved detail with simple construction, making a luxurious-looking bag that is still approachable. I enjoy how the Tree of Life artwork becomes the focal point whether you laser engrave it or burnish it by hand. I also love that the pattern is compact β€” it fits everyday essentials without being bulky. The LOXX closing system and simple strap assembly give it a professional finish I am proud to share.

Tree of Life Leather Bag Pattern step 1 - construction progress Tree of Life Leather Bag Pattern step 2 - assembly progress Tree of Life Leather Bag Pattern step 3 - details and accessories Tree of Life Leather Bag Pattern step 4 - final assembly and finishing

Switch Things Up

I love how easily you can customize this bag by changing the leather color or finish; try a dark brown or dyed teal for a bold look.

You can make the bag larger or smaller by scaling the printable templates when you print; remember to check the calibration page so hardware holes stay in proportion.

I often swap the LOXX closing system for a magnetic snap or a traditional stud for a different front closure aesthetic and functionality.

For a softer feel, use thinner leather and reinforce key areas with a lightweight interfacing or canvas lining to add structure without bulk.

I sometimes add a fabric or suede lining for color contrastβ€”cut the lining from the template, glue it in place, and stitch along the top edge for a polished interior.

Try different hardware finishes like antique brass, matte black, or polished nickel to change the bag's overall style quickly.

I also enjoy adding small leather or metal charms to the strap for a personal touch or seasonal decoration.

Experiment with hand-tooling or stamping initials near the flap edge to create heirloom gifts or personalized pieces.

Change the strap width or use an adjustable strap to make the bag wearable as a shoulder bag or crossbody depending on preference.

I recommend testing edge-dye colors on scrap leather first so you can create subtle or bold edge accents to complement your chosen leather and hardware.

Common Mistakes & How to Fix Them

βœ— Skipping the calibration when printing templates causes incorrect part sizes; always print at Actual size (100%) and check the calibration page before cutting. βœ— Punching holes too close to the edge will weaken the leather; measure carefully and use the correct hole punch sizes to keep sufficient edge distance. βœ— Using thin thread or improper stitching techniques makes seams fragile; use 1 mm waxed thread and saddle stitch for durable, long-lasting seams. βœ— Not beveling and dyeing the edge creates a rough finish; use edge dye and burnish the edges slowly for a clean professional look. βœ— Overstretching the leather while gluing and stitching will warp shapes; glue parts lightly, press firmly, and allow full cure time before stitching.

Tree of Life Leather Bag Pattern

Make a charming Tree of Life leather crossbody bag using this printable pattern and step-by-step guidance. This pattern includes templates, materials, hardware list, and recommended tools so you can laser-engrave or hand-cut and assemble the bag. Perfect for makers who enjoy leathercraft and want a small, stylish everyday purse. Follow the printing and assembly notes to recreate the exact finished size shown.

Intermediate 5-7 Hours

Materials Needed for Tree of Life Leather Bag Pattern

β€” Main Fabric

  • 01
    6 oz (2.4 mm) vegetable tanned leather β€” enough to make 4 bags from 11 sqft (1 sqm), use one small hide per bag
  • 02
    1 mm waxed thread for saddle stitching β€” length depends on stitching method, recommend 2x the seam length
  • 03
    Edge dye β€” color to match or contrast (small bottle)
  • 04
    Leather glue (contact cement or PVA suitable for leather)

β€” Tools Required

  • 01
    Creality Falcon 2 22W Laser (optional for cutting and engraving)
  • 02
    Cutter (utility knife or rotary cutter) for hand cutting
  • 03
    Needles (leather sewing needles) for saddle stitching
  • 04
    1/16'' (1.5 mm) hole punch for stitch holes
  • 05
    10 mm hole punch for the LOXX closing system installation
  • 06
    Cutting mat to protect work surface
  • 07
    Mallet for setting hardware and punches
  • 08
    Edge beveler and burnisher (optional but recommended)
  • 09
    Ruler and compass for marking
  • 10
    Stitch groover or pricking iron for consistent stitch spacing

Progress Tracker

0% Complete

β€” Introduction :

Infos :

PDF pattern and the link to an instructional video that will walk you through the process of making The Tree of Life Bag. This cute little bag is cut and engraved with Creality Falcon 2 22W Laser. Sign up on our WEBSITE (vasileandpavel.com) for special offers :) Enjoy!

β€” Instructional Video :

Info :

CLICK HERE FOR THE VIDEO TUTORIAL

β€” Printing Instructions :

Infos :

Print the pattern on A4, legal or letter size paper, setting the printer on Actual size (100%). Check the calibration page to make sure the measurements are correct. CLICK HERE for the VIDEO TUTORIAL.

Info :

The printable template pages include dashed crop marks and a calibration marker so the parts will align correctly when assembled.

β€” Size :

Info :

TALL: 5 1/2" (14 cm) WIDE: 6 3/4" (17 cm) DEEP: 1 3/4" (4.5 cm)

β€” Materials :

Infos :

6 oz (2.4 mm) vegetable tanned leather (you can make 4 from 11 sqft (1 sqm)). 1 mm waxed thread. Edge dye. Glue.

β€” Hardware :

Infos :

1 x LOXX closing system. 1 x 1" (25 mm) buckle. 2 x 3/4" (20 mm) D rings.

β€” Tools :

Infos :

Cutter. Needles. 1/16" (1.5 mm) hole punch. 10 mm hole punch (for the LOXX closing system). Cutting mat. Mallet.

β€” Pattern Template :

Info :

The downloadable template includes the front flap, front panel, back panel, gusset pieces, strap pieces and placement markers for stitching and hardware. Align pages using the crop marks and ensure the calibration circle prints true to size before cutting.

β€” Cutting and Engraving :

Info :

If using a laser, reference the Creality Falcon 2 22W settings for 6 oz (2.4 mm) veg tanned leather and run tests on scrap for best cut and engraving depth. If hand cutting, transfer the printed template to the leather with tracing or contact adhesive and cut carefully with a sharp cutter on a cutting mat.

β€” Hole Layout and Stitching :

Info :

Punch stitch holes with a 1/16" (1.5 mm) punch according to the template marks. Use a pricking iron or stitch groover for consistent spacing. Saddle stitch with 1 mm waxed thread for durable seams and finish by back-stitching at the start and end.

β€” Hardware Installation :

Info :

Punch a 10 mm hole for the LOXX closing system as marked on the template and install according to LOXX manufacturer instructions. Attach the 1" (25 mm) buckle and 3/4" (20 mm) D rings to the strap and side tabs securely, using rivets or stitched loops as preferred.

β€” Finishing :

Info :

Bevel and dye edges, then burnish until smooth. Apply edge finish and allow to dry. Clean any engraving dust and condition the leather as desired. Attach the strap and check all hardware for secure fit.

Assembly Instructions

  • Glue the front flap and front panel layers together where indicated on the template, clamp or press until the adhesive cures, then stitch along the marked stitch line to secure the layers.
  • Align the gusset pieces to the front and back panels using the template marks; punch stitch holes through all layers, then saddle stitch the gusset to the front and back for a clean seam.
  • Install the LOXX closing system by punching the 10 mm hole on the flap as marked, insert the LOXX stud and cap, and set it firmly with a mallet ensuring it is centered and secure.
  • Attach the side D rings and strap tabs by folding the tab over the D ring, stitching or riveting the tab to the body between the specified rounds of the pattern, and reinforcing with backstitches for strength.
  • Finish by attaching the strap to the D rings with the 1" (25 mm) buckle, trim excess strap length, burnish all edges, and apply final conditioner to the leather surface.

Important Notes

  • πŸ’‘Always print templates at Actual size (100%) and confirm the calibration page dimensions before cutting material.
  • πŸ’‘Perform test cuts and engravings on scrap leather to dial in laser or cutter settings and avoid damaging your hide.
  • πŸ’‘Use a stitch spacer or pricking iron for evenly spaced stitch holes to achieve a professional-looking saddle stitch finish.
  • πŸ’‘Allow adhesives and edge dye to fully dry between steps to prevent shifting or smudging during assembly.
  • πŸ’‘Wear appropriate safety gear and follow recommended laser safety procedures when using a laser cutter for engraving or cutting.

This Tree of Life leather bag pattern brings elegant laser-engraved detail to a compact, wearable purse. 🌳 Follow the templates and tool recommendations to cut, punch, stitch, and finish like a pro. ✨ Perfect for gift making or building your leathercraft skills with a beautiful finished piece. πŸ‘œ

You ask,

we answer.

FAQs

What size will the finished piece be?

The finished bag measures approximately TALL: 5 1/2" (14 cm), WIDE: 6 3/4" (17 cm), DEEP: 1 3/4" (4.5 cm) using the recommended leather thickness.

Can I use a different leather thickness or weight?

Yes, you can use different leather thicknesses but adjust sewing tension and hardware choices accordingly; thicker leather may require stronger needles and different laser/cutter settings.

Do I need a laser to make this bag?

No, the pattern can be hand-cut and hand-engraved or tooled; the Creality Falcon 2 22W Laser is optional and used here to show engraving and cutting for precision.

How long does this project typically take to complete?

Most makers complete this project in about 5-7 hours, depending on experience, whether you use a laser, and the amount of finishing work like edge dyeing and burnishing.