🧢 Beautiful ✨ Detailed πŸ’ Adorable

Trick or Treat Sam Amigurumi Pattern

Trick or Treat Sam Amigurumi Pattern
4.3β˜… Rating
5-7 Hours Time Needed
3.1K Made This
βœ‚οΈ

Intermediate Level

Ideal for those with basic crochet experience, featuring slightly more advanced stitches and techniques to expand your skills.

⏱️

Weekend Treat

Takes 5-7 hours, making it an enjoyable project to finish over a couple of days.

🧸

Cute Companion

An adorable friend to cherish, handcrafted with love to bring comfort and joy for years to come.

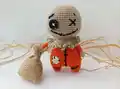
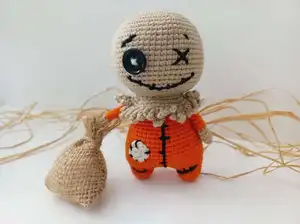
About This Trick or Treat Sam Amigurumi Pattern

This pattern creates a small Halloween-themed amigurumi named Trick or Treat Sam, complete with a ruffled collar, a patch, and a stitched smile. You will crochet the head, legs, body, arms and make a little patch, then assemble and embroider charming facial details. The instructions include round-by-round counts and helpful notes so you can follow along easily.

Trick or Treat Sam Amigurumi Pattern crochet pattern - detailed view of completed project

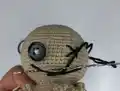
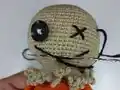
Worked in continuous rounds, this doll uses basic increases, decreases and simple joining techniques for assembly. Photos and step notes are included to help you place details and finish with personality.

Why You'll Love This Trick or Treat Sam Amigurumi Pattern

I absolutely love this pattern because it blends spooky charm with sweet amigurumi styling, making it a delightful seasonal project. I enjoy adding the ruffled collar and button eye detailβ€”those little touches bring Sam to life. The pattern is playful but structured, so I can be creative while following clear instructions. Seeing the stitched smile appear during embroidery always makes me smile and reminds me why I crochet.

Trick or Treat Sam Amigurumi Pattern step 1 - construction progress Trick or Treat Sam Amigurumi Pattern step 2 - assembly progress Trick or Treat Sam Amigurumi Pattern step 3 - details and accessories Trick or Treat Sam Amigurumi Pattern step 4 - final assembly and finishing

Switch Things Up

I love to customize this pattern by changing the colour palette; try pastel tones for a softer, whimsical Sam or deep rust and brown for a vintage Halloween look.

I often swap the button eye for embroidered eyes if I'm making the toy for a child, which also makes it machine-washable and safe for little ones.

To make a larger version I use a thicker yarn and a larger hook; the proportions remain the same so the pattern scales nicely.

If I want a mini keychain version, I use finer cotton thread and a 1.5mm hook and reduce stuffing to keep it light for carrying.

I sometimes add wire inside the arms if I want posability so the doll can hold small props or be posed for display.

Try different collars β€” longer ruffles or a simple round collar changes the character a lot; experiment with length and stitch height.

For a rustic look I switch to natural linen or jute for the little bag accessory and fray the ends for texture and charm.

I like to embroider different facial expressions: move the embroidered smile higher or change the eyebrow angle to give Sam a mischievous or surprised look.

You can make a small set of outfits by crocheting tiny hats, scarves, or a removable cape β€” these are fun add-ons and great for gifting variations.

When customizing patches, I play with shapes and colours, or add tiny beads or sequins for an accent; secure any embellishments well so they remain attached during play.

Common Mistakes & How to Fix Them

βœ— Skipping counting after increases and decreases can cause your shaping to be off; count stitches at the end of each round and adjust before continuing. βœ— Cutting the thread at the wrong time when making legs may prevent you from joining to the body correctly; follow the instruction to cut after the first leg and keep the thread for the second leg so you can continue to the body. βœ— Overstuffing the head or body will distort the shape and make seams hard to close; stuff gradually and check shape as you go so you can add small amounts for even firmness. βœ— Not working with the remaining loops on the 28th row will make it difficult to form the ruffle correctly; follow the note to work with remaining loops and use the photos as a guide for best results. βœ— Forgetting to switch yarn colors cleanly can leave loose ends and messy joins; fasten off neatly and weave in ends or carry yarn where appropriate to hide joins.

Trick or Treat Sam Amigurumi Pattern

Make a spooky-cute Trick or Treat Sam amigurumi with this detailed crochet pattern. You will create a small Halloween character with a ruffled collar, button eye, embroidered stitches, and a patched outfit. The pattern walks you through head, legs, body, arms, and finishing touches so you can complete a charming handmade doll. Perfect for gifting or seasonal decor, this pattern encourages creativity and playful details.

Intermediate 5-7 Hours

Materials Needed for Trick or Treat Sam Amigurumi Pattern

β€” Main Fabric

  • 01
    Alize Cotton Gold 37
  • 02
    Alize Cotton Gold 262
  • 03
    Alize Cotton Gold 60
  • 04
    6 mm safety eyes
  • 05
    Polyester Fiberfill

β€” Tools Required

  • 01
    Crochet hook 2.00 mm or a hook that fits your yarn
  • 02
    6 mm safety eyes
  • 03
    Polyester Fiberfill

Progress Tracker

0% Complete

β€” Head :

Rnd 1 :

6 sc in magic ring (6)

Rnd 2 :

(inc) x6 (12)

Rnd 3 :

(sc, inc) (18)

Rnd 4 :

(inc, 2 sc) x6 (24)

Rnd 5 :

(3 sc, inc) x6 (30)

Rnd 6 :

2 sc, inc, (4 sc, inc) x5, 2 sc (36)

Rnd 7 :

(5 sc, inc) (42)

Rnd 8 :

3 sc, inc, (6 sc, inc) x5, 3 sc (48)

Rnd 9 :

(7 sc, inc) x6 (54)

Rnd 10 :

4 sc, inc, (8 sc, inc) x5, 4 sc (60)

Rnd 11-23 :

sc around (60) (13 rnds)

Rnd 24 :

(3 sc, dec) x12 (48)

Rnd 25 :

(2 sc, dec) x12 (36)

Rnd 26 :

2 sc, dec, (4 sc, dec) x5, 2 sc (30)

Rnd 27 :

(3 sc, dec) x6 (24)

Rnd 28 :

BLO sc around (24) *cut the yarn.

Info :

Work with the remaining loops of the 28th row. Photos will help.

Rnd 29 :

(inc) x24 (48)

Rnd 30-31 :

sc around (48) (2 rnds)

Rnd 32 :

ch5, slst, ch7, slst, ch9, slst, ch7, slst, ch5, slst, .........

Info :

*continue in the same way throughout the row and finish.

β€” Leg :

Rnd 1 :

7 sc in magic ring (7)

Rnd 2 :

(inc) x7 (14)

Rnd 3-5 :

sc around (14) *make 2 pieces.

Info :

*After making the first leg, cut the thread. When making the second leg, do not cut the thread and continue to the body.

β€” Body :

Rnd 6 :

ch4, join the first leg with the sc. Crochet on the first leg: 2 sc, (inc, 5 sc) x2, working on the chain: inc, 2 sc, inc, crochet on the second leg: (5 sc, inc) x2, 2 sc, working on the chain: 4 sc (42)

Rnd 7 :

(13 sc, inc) x3 (45)

Rnd 8-12 :

sc around (45) (5 rnds)

Rnd 13 :

(13 sc, dec) x3 (42)

Rnd 14-16 :

sc around (42) (3 rnds)

Rnd 17 :

(5 sc, dec) x6 (36)

Rnd 18-20 :

sc around (36) (3 rnds)

Rnd 21 :

(4 sc, dec) x6 (30)

Rnd 22-24 :

sc around (30)

Rnd 25 :

(3 sc, dec) x6, slst (24)

Info :

*Fasten off and leaving a long tail for sewing. Stuff the body. Sew the Head with the Body.

β€” Patch :

Rnd 1 :

6 sc in magic ring (6)

Rnd 2 :

(inc) x6 (12)

β€” Arm :

Info :

Use the beige yarn

Rnd 1 :

6 sc in magic ring (6)

Rnd 2 :

(sc, inc) x3 (9)

Rnd 3-4 :

sc around (9) (2 rnds)

Info :

*switch the orange.

Rnd 5-11 :

sc around (9) (7 rnds) *I don't fill arms.

Info :

Follow the photos for embroidery and facial feature placement. Sew patch onto the body and add button eye or safety eye as desired.

Info :

Your Trick or Treat Sam is complete, I hope you like it. Happy Crocheting ☺

Assembly Instructions

  • After completing the second leg, do not cut the thread; continue crocheting the chain to join the second leg to the body as instructed in Rnd 6 so the legs and body are joined seamlessly.
  • Stuff the body firmly but evenly before closing; fasten off leaving a long tail and use the tail to sew the head to the body securely with a yarn needle.
  • Sew the patch onto the body in the desired position (refer to photos for placement) using matching yarn and small, neat stitches to secure edges.
  • Attach one button or a 6 mm safety eye to the face for the button eye detail; if using a safety eye, insert before closing the head and secure the back washer.
  • Position the arms on either side of the body and sew them in place using a yarn needle and the remaining yarn tails, checking symmetry before securing.

Important Notes

  • πŸ’‘Work with the remaining loops of the 28th row to form the ruffle; consult the photos provided for visual guidance when making this detail.
  • πŸ’‘After making the first leg, cut the thread; when making the second leg do not cut the thread and continue to the body to join pieces smoothly.
  • πŸ’‘Fasten off leaving a long tail for sewing so you can neatly attach head and other parts; use this tail to close and sew pieces together securely.
  • πŸ’‘Do not fill the arms (author note) if you prefer the slimmer look; the pattern states '*I don't fill arms.' adjust filling to suit your preference.

This adorable Trick or Treat Sam pattern brings a playful Halloween friend to life with a sweetly spooky design. 🧢 Follow the step-by-step rounds, photos, and finishing notes to create a cuddly, characterful doll perfect for gifts or seasonal decor. πŸŽƒ Enjoy stitching the tiny details and be proud of your handmade creation β€” Happy Crocheting! ✨

You ask,

we answer.

FAQs

What size will the finished piece be?

The finished amigurumi measures approximately 12-15 cm tall depending on your yarn and tension when using the recommended small hook and cotton yarn.

Can I use different yarn weights for this pattern?

Yes, you can use different yarn weights but this will change the final size; use an appropriate hook for your chosen yarn and adjust stuffing and eye size accordingly.

Do I need prior crochet experience for this pattern?

This pattern is rated intermediate and uses increases, decreases, BLO and joining techniques; basic knowledge of single crochet, increases and decreases is recommended.

How long does this project typically take to complete?

Most crocheters complete this project in 5-7 hours, though the time may vary depending on experience level, speed, and how many details you choose to add.