🧢 Beautiful ✨ Detailed πŸ’ Adorable

Millie the Melon Pig Amigurumi Pattern

Millie the Melon Pig Amigurumi Pattern
4.1β˜… Rating
5-7 Hours Time Needed
2.3K Made This
βœ‚οΈ

Intermediate Level

Ideal for those with basic crochet experience, featuring slightly more advanced stitches and techniques to expand your skills.

⏱️

Weekend Treat

Takes 5-7 hours, making it an enjoyable project to finish over a couple of days.

🧸

Cute Companion

An adorable friend to cherish, handcrafted with love to bring comfort and joy for years to come.

About This Millie the Melon Pig Amigurumi Pattern

This pattern creates a charming pig amigurumi named Millie, featuring a watermelon-inspired skirt and cute facial details. You will crochet the head, body, legs, arms, ears, tail, and a decorative skirt, then assemble and finish with embroidered eyelashes and seeds. The instructions include step-by-step rounds and helpful photos to guide placement and finishing.

Millie the Melon Pig Amigurumi Pattern crochet pattern - detailed view of completed project

Designed for intermediate crocheters, the pattern uses worsted weight yarn and a 3.25 mm hook for a 12-inch finished toy. Detailed assembly and eye-placement tips ensure a polished result.

Why You'll Love This Millie the Melon Pig Amigurumi Pattern

I absolutely love this pattern because it combines playful details with classic amigurumi shaping, making each piece feel unique and full of personality. I enjoy the creative twist of turning a simple pig into a watermelon-themed companion with a ruffled skirt. The step-by-step instructions and photos make assembly satisfying and help you get neat eye placement every time. I find this pattern very rewarding to stitch and finish because the small embroidered details really bring Millie to life.

Millie the Melon Pig Amigurumi Pattern step 1 - construction progress Millie the Melon Pig Amigurumi Pattern step 2 - assembly progress Millie the Melon Pig Amigurumi Pattern step 3 - details and accessories Millie the Melon Pig Amigurumi Pattern step 4 - final assembly and finishing

Switch Things Up

I love how easy it is to customize Millie by changing yarn colors; try pastel shades for a softer look or bright contrast for a playful version.

I often switch yarn weight and hook size to create different sizes; bulky yarn makes a chunky cuddly pig and thinner yarn makes a tiny keychain friend.

I sometimes omit the embroidered seeds and instead sew tiny felt shapes for a different dress texture and finish.

I add tiny props like a crocheted slice of watermelon or a little bow to the ear to give each pig a unique personality.

I recommend experimenting with safety eye sizes; smaller eyes give a more delicate look while larger eyes create a cute, wide-eyed expression.

I like to use variegated yarn for the skirt to introduce subtle color variations without extra sewing or color changes.

If you want a posable toy, I will sometimes insert wire in the limbs before closing and sewing to allow slight posing.

I tweak the eye placement a stitch or two to create different expressions β€” slightly closer gives a youthful look while wider set eyes look more whimsical.

I occasionally embroider a tiny mouth or blushing cheeks with yarn or pastel to add character and warmth to the face.

I enjoy making matching sets by creating several pigs in complementary colors and giving each one a tiny accessory like a scarf or hat for variety.

Common Mistakes & How to Fix Them

βœ— Placing safety eyes without counting stitches can make the face look asymmetrical; count the holes and follow the placement instructions carefully before securing the backs. βœ— Forgetting to leave long tails when fastening off will make sewing parts together difficult; always leave a generous tail for sewing and weaving in ends. βœ— Not stuffing gradually causes lumps or awkward shapes; stuff the legs and body as you work in small amounts to maintain smooth shaping. βœ— Skipping the back-loop-only (BLO) instruction where specified can change the skirt and neck shaping; follow BLO and FLO notes exactly to keep the intended texture and fit.

Millie the Melon Pig Amigurumi Pattern

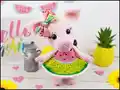
Create Millie the Melon Pig, a sweet amigurumi with a playful watermelon dress and adorable details. This pattern walks you through every step, from crocheting the head and body to assembling tiny ears, arms, and the ruffled skirt. You'll enjoy the clear instructions and helpful photos to guide your finishing and eye placement. Perfect as a handmade gift or a bright addition to your amigurumi collection.

Intermediate 5-7 Hours

Materials Needed for Millie the Melon Pig Amigurumi Pattern

β€” Main Fabric

  • 01
    Worsted Weight yarn (#4), approximately 100g of main color
  • 02
    Accent colors: 50-75g total for multiple accent colors
  • 03
    Color A: Dark Pink (for dress)
  • 04
    Color B: Light Pink (for body accents)
  • 05
    Color C: Light Green (skirt main color)
  • 06
    Color D: Dark Green (skirt edge)
  • 07
    Color E: White (skirt trim)
  • 08
    Color F: Medium Pink (main body/head)
  • 09
    Color G: Mint (skirt finishing)
  • 10
    Exact yarns used (examples): Red Heart Bubblegum (Dark Pink), I love this yarn Soft Pink (Light Pink), I love this yarn Pink (Medium Pink), I love this yarn Keylime (Light Green), I love this yarn Jelly Bean (Dark Green), I love this yarn White, Red Heart Mint (Mint)

β€” Tools Required

  • 01
    Crochet hook size D / 3.25 mm
  • 02
    18 mm safety eyes (2 pieces) - blue recommended
  • 03
    Scissors
  • 04
    Sewing needle / yarn needle for sewing pieces together
  • 05
    Stitch markers
  • 06
    Polyester fiberfill stuffing
  • 07
    Pins for assembly
  • 08
    Black embroidery thread (optional) for eyelashes and seeds

Progress Tracker

0% Complete

β€” Head :

Info :

Crocheted from front of nose to back of head. Starting with Color F.

Round 1 :

Make 6 sc into a magic ring (6)

Round 2 :

Increase in each st around (12)

Round 3 :

(sc, inc) x 6 (18)

Round 4 :

3 dc in the next 2 stitches, 2 sl, 3 dc in the next 2 stitches, 12 sc (26)

Info :

Change to Color B.

Round 5 :

BLO, 6 sc, dec (You will be decreasing in the 2 sl from previous round), 16 sc, dec (24)

Round 6 :

(7 sc, inc) x 3 (27)

Round 7 :

sc in each st around

Round 8 :

(8 sc, inc) x 3 (30)

Round 9 :

sc in each st around

Round 10 :

(2 sc, inc) x 6, 12 sc (36)

Round 11 :

(3 sc, inc) x 6, 12 sc (42)

Round 12 :

(4 sc, inc) x 6, 12 sc (48)

Round 13 :

(5 sc, inc) x 6, 12 sc (54)

Info :

Place eyes between rounds 11 and 12, leaving 13 holes between them. 1st eye is placed before the 2nd increase. Count 13 holes after the first eye and place the 2nd eye. If you want the sunken eye look, do not place the backs of the eyes on until round 22. TIP! You may have to adjust the eye placement depending on yarn and hook size you use.

Round 14-19 :

sc in each st around

Round 20 :

(7 sc, dec) x 6 (48)

Round 21 :

(6 sc, dec) x 6 (42)

Round 22 :

(5 sc, dec) x 6 (36)

Info :

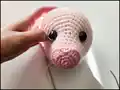
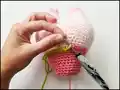
Now for the eyes. Stuff the head well. Cut a long piece of yarn and remove the eyes. Place the needle in the hole where the first eye was and thread the needle into a hole next to the eye hole. Go back and forth between each eye hole repeating the process from the first eye. Pull slightly on the yarn after going through each hole. Do this about 3 times on each side until you reach the look you want. Follow the pictures for help. There is also a youtube video I have for extra help on this process. https://www.youtube.com/watch?v=9XoBnTY6k70&t=55s To place the backs of the eyes you will need to remove most of the stuffing to place the washers on the eyes then re stuff it.

Round 23 :

(4 sc, dec) x 6 (30)

Round 24 :

(3 sc, dec) x 6 (24)

Round 25 :

(2 sc, dec) x 6 (18)

Round 26 :

(sc, dec) x 6 (12)

Round 27 :

dec x 6 (6)

Info :

F/O and sew the hole closed

β€” Legs and Body :

Info :

Starting with Legs (Make 2). Starting with Color F. Make 2 hooves.

Round 1 :

Make 6 sc into a magic ring (6)

Round 2 :

sc in each st around

Info :

Do not F/O the 2nd hoof! Continue crocheting to connect them.

Round 3 :

Work a sc in the 1st hoof, 2 more sc, inc, (3 sc, inc) x 2 (15)

Round 4 :

sc in each st around

Info :

Change to Color B.

Round 5 :

sc in each st around

Round 6 :

(4 sc, inc) x 3 (18)

Round 7 :

sc in each st around

Round 8 :

(5 sc, inc) x 3 (21)

Round 9 :

sc in each st around

Info :

On the 2nd leg, work an additional 16 sc, this is to move the starting point.

Round 10 :

Ch 3, work a sc on the 1st leg to connect them together, work 20 more sc around the 1st leg, work 3 sc on the back of the ch 3, work 21 sc on the 2nd leg, work 3 sc on the front of the ch 3 (48)

β€” Body Continued :

Round 2 :

sc in each st around

Info :

Start stuffing the legs and stuff the body as you work.

Round 3 :

(7 sc, inc) x 6 (54)

Round 4 :

(8 sc, inc) x 6 (60)

Round 5-9 :

sc in each st around

Round 10 :

(8 sc, dec) x 6 (54)

Round 11 :

(7 sc, dec) x 6 (48)

Round 12 :

(6 sc, dec) x 6 (42)

Round 13-14 :

sc in each st around

Info :

Change to Color A.

Round 15 :

sc in each st around

Round 16 :

BLO (5 sc, dec) x 6 (36)

Round 17-20 :

sc in each st around

Round 21 :

(4 sc, dec) x 6 (30)

Round 22-23 :

sc in each st around

Round 24 :

(3 sc, dec) x 6 (24)

Round 25 :

(2 sc, dec) x 6 (18)

Info :

F/O and leave a long tail for sewing

β€” Tail :

Info :

With Color B.

Round 1 :

Ch 17

Round 2 :

inc in 2nd ch from hook and across (32)

Info :

F/O and leave a long tail for sewing

β€” Ears (Make 2) :

Info :

With Color B.

Round 1 :

Make 6 sc into a magic ring (6)

Round 2 :

sc in each st around

Round 3 :

(sc, inc) x 3 (9)

Round 4 :

(2 sc, inc) x 3 (12)

Round 5 :

sc in each st around

Round 6 :

(sc, inc) x 6 (18)

Round 7 :

(2 sc, inc) x 6 (24)

Round 8-10 :

sc in each st around

Info :

Do not stuff the ears

Round 11 :

(2 sc, dec) x 6 (18)

Round 12 :

(sc, dec) x 6 (12)

Info :

Fold the ear in half and sc the opening closed. F/O and leave a long tail for sewing.

β€” Arms (Make 2) :

Info :

Starting with Color F. Make 2 hooves.

Round 1 :

Make 6 sc into a magic ring (6)

Round 2 :

Sc in each st around

Info :

Do not F/O the 2nd hoof!

Round 3 :

Work a sc in the 1st hoof to connect them together, work 11 more sc around (12)

Round 4 :

(3 sc, inc) x 3 (15)

Round 5 :

Sc in each st around

Info :

Change to Color B.

Round 6 :

(3 sc, dec) x 3 (12)

Round 7 :

Sc in each st around

Round 8 :

Dec, 10 sc (11)

Round 9 :

Sc in each st around

Info :

Stop stuffing the arms

Round 10 :

Dec, 9 sc (10)

Round 11 :

sc in each st around

Round 12 :

Dec, 8 sc (9)

Round 13-17 :

sc in each st around

Info :

Fold the arm in half and sc the opening closed. F/O and leave a long tail for sewing.

β€” Skirt :

Info :

Starting with Color C. Turn the body upside down with the back side of the pig facing you. Attach the yarn to the center stitch with a sl st on round 16 of the body.

Round 1 :

ch 4 (counts as the 1st dc), in the next st dc + ch 1. Repeat around the body. Sl st in the 3rd starting chain to join.

Round 2 :

Ch 3, dc + Ch 1 + 2 dc in same st, *skip 1st ch space, in the next ch space work 2 dc, ch 1, 2 dc* Repeat from * to *, sl st in the 3rd chain to join

Round 3 :

Ch 3, dc +Ch 1 + 2 dc in same st, *skip 1st ch space, in the next ch space work 2 dc, ch 1, 2 dc* Repeat from * to *, sl st in the 3rd chain to join

Info :

Change to Color D.

Round 4 :

Ch 2, Work a hdc in each st around, join to top of ch 2 with a sl st

Info :

Change to Color E.

Round 5 :

Repeat round 4

Info :

F/O and weave in any tails.

Info :

With Color G: Turn the body upside down and attach the yarn with a sl st in between the skirt and top. Sl st around the body in between those rounds: F/O and weave in the tail ends

β€” Assembly :

Info :

Head and Body assembly steps and finishing details.

Step 1 :

Cut a long strand of white yarn. Thread your needle with the strand. Insert the needle into a hole on the head. Bring the needle up to a corner on the lower eye. Bring the needle around the eye to a corner on the upper eye. Pull tightly on the strand. Repeat for the 2nd eye. This gives the highlight on the eye.

Step 2 :

Take a long strand of black yarn. Thread your needle and insert the needle into a hole on the body. Embroider some black spots for watermelon seeds on the dark pink part of the dress.

Step 3 :

Take a long strand of black embroidery thread and embroider eyelashes on the face.

Step 4 :

Pin the head to the body for extra support. You may need to add more stuffing as you sew.

Step 5 :

Sew the head onto the body.

Step 6 :

Pin the ears onto the head approximately between rounds 21 and 22, then sew the ears onto the head.

Step 7 :

Pin the tail onto the body right underneath the skirt and sew the tail onto the body.

Step 8 :

Pin the arms onto the side of the body approximately between rounds 23 and 24 and sew the arms onto the body.

Assembly Instructions

  • Attach the head to the body by pinning the head in place and sewing securely; you may need to add extra stuffing as you sew for support.
  • Position ears between rounds 21 and 22 on the head and sew them on, folding each ear in half and single crocheting the opening closed before attaching.
  • Pin the tail directly underneath the skirt and sew through the body to secure it firmly, leaving no loose tails.
  • Place the arms on either side between rounds 23 and 24, pinning to check placement, then sew with a long tail for a secure attachment.
  • Embroider eyelashes and small black seed spots on the dark pink dress with black embroidery thread for final facial and dress details.

Important Notes

  • πŸ’‘Do not join rounds unless stated; work in a continuous spiral for smoother amigurumi shaping.
  • πŸ’‘Use a stitch marker to mark the beginning of each round, especially during shaping and color changes.
  • πŸ’‘All stitches are worked in both loops unless stated otherwise; follow BLO notes where given for texture.
  • πŸ’‘Stuff gradually as you work to keep even shaping and avoid lumps - stuff legs first and the body as you continue.

Millie the Melon Pig is a bright, playful amigurumi designed to bring a smile to any handmade collection. The watermelon-inspired skirt and tiny embroidered seeds give her a whimsical personality that makes her perfect as a special gift or cheerful decor. Enjoy making this character and personalize colors and details to make Millie your own! 🧢🐷

You ask,

we answer.

FAQs

What size will the finished piece be?

The finished amigurumi measures approximately 12 inches from foot to top of head using weight 4 yarn and a 3.25 mm hook.

Can I use different yarn weights for this pattern?

Yes, you can use different yarn weights, but the final size will change; adjust your hook size accordingly and test eye placement before securing.

Do I need prior crochet experience for this pattern?

This pattern is rated intermediate, so basic crochet skills like working in the round, increases, decreases, and reading patterns are recommended.

How long does this project typically take to complete?

Most crocheters complete this project in 5-7 hours, depending on experience, yarn familiarity, and assembly time.