🧢 Beautiful ✨ Detailed πŸ’ Adorable

Tulip Model Placemat Pattern

Tulip Model Placemat Pattern
4.5β˜… Rating
5-7 Hours Time Needed
1.2K Made This
βœ‚οΈ

Intermediate Level

Ideal for those with basic crochet experience, featuring slightly more advanced stitches and techniques to expand your skills.

⏱️

Weekend Treat

Takes 5-7 hours, making it an enjoyable project to finish over a couple of days.

β˜•

Warm Welcome

A comforting piece for home or gifts that brings handmade warmth to everyday moments and special occasions.

About This Tulip Model Placemat Pattern

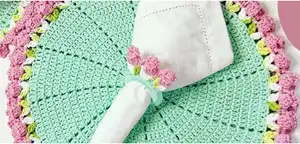
This pattern creates a round placemat with tulip-shaped edging and decorative green leaves for a delicate spring look. It uses double crochet rounds to form the base and finishes with popcorn and picot stitches for textured tulips. The design is perfect for cotton yarn to give a washable, sturdy finish.

Tulip Model Placemat Pattern crochet pattern - detailed view of completed project

You will practice the magic ring, increases, popcorn and picot stitches while creating a functional decorative placemat. The pattern is sized by rows so you can make it larger or smaller to suit your table.

Why You'll Love This Tulip Model Placemat Pattern

I absolutely love this pattern because it combines simple circular crochet with playful, textured edging to create a piece that is both useful and decorative. The tulip motifs add a handmade charm that brightens any table setting and makes a lovely seasonal gift. Working the popcorn and picot stitches is a fun way to add 3D detail without complicated shaping. I enjoy how easily you can adapt the size and colors to match different decor while practicing a few new stitches.

Tulip Model Placemat Pattern step 1 - construction progress Tulip Model Placemat Pattern step 2 - assembly progress Tulip Model Placemat Pattern step 3 - details and accessories Tulip Model Placemat Pattern step 4 - final assembly and finishing

Switch Things Up

I love how easy it is to personalize this placemat by changing color palettes to suit your table decor.

I often swap the tulip color for a tonal gradient to give a subtle ombre effect around the edge.

If you want a larger placemat, I simply add more rounds to the base until it reaches my desired diameter.

For a smaller coaster version, I use finer cotton thread and a 2.5mm hook to scale down the whole motif.

I sometimes replace the popcorn stitch with a cluster or bobble stitch for a different textured look on the tulips.

I also experiment with variegated yarn for the base and solid colors for the tulips to highlight the edge motifs.

Try embroidering small veins on the green leaves after attaching them for extra detail and realism.

I occasionally back the placemat with a thin interfacing and felt to make it stiffer and heat-resistant for practical use.

Mixing metallic or sheen cotton for a holiday version gives a festive sparkle while keeping the same construction.

I recommend testing one full tulip and leaf motif in your chosen yarn before committing so you can tweak size and placement confidently.

Common Mistakes & How to Fix Them

βœ— Skipping the magic ring tightening step can leave a visible hole in the center; make sure to close the ring firmly and weave the tail into the first rounds to secure it. βœ— Not counting increases each round leads to a warped or ruffled placemat edge; count your stitch groups after each round to ensure even growth. βœ— Pulling chains or stitches too tight when making the tulip fans can distort the fan shape; keep consistent, relaxed tension especially when forming popcorn and picot stitches. βœ— Forgetting to place separating chains between fans will make tulips crowded and uneven; always add the specified separating chains and single crochets to space motifs correctly.

Tulip Model Placemat Pattern

Make a charming tulip-edge placemat using 100% cotton yarn and simple crochet motifs. This pattern walks you through a circular double crochet foundation, decorative green leaves, and tulip fan motifs to create a fresh, spring-inspired table accent. You will learn popcorn and picot techniques to add delicate texture and visual interest to your placemat.

Intermediate 5-7 Hours

Materials Needed for Tulip Model Placemat Pattern

β€” Main Fabric

  • 01
    100% cotton yarn N 4 (as required for one placemat; choose colors for base, leaves and tulips)

β€” Tools Required

  • 01
    Crochet hook number 3.5 (3.5 mm)
  • 02
    Scissors
  • 03
    Upholstery needle
  • 04
    Fabric glue

Progress Tracker

0% Complete

β€” Pattern :

Round 1 :

Start with a magic circle, add two chains and one more chain for separation. Inside the magic circle make 12 double crochets separated by a chain, including the beginning chains. Close the magic ring and close the third starting chain.

Round 2 :

Go up three chains where you closed the magic circle and in the same place make another double crochet (INC) with a separating chain. In each base double crochet make two double crochets in the same place (inc) until the end. Close with a slip stitch in the third chain.

Round 3 :

Go up 3 chains, and in the next stitch make two double crochets in the same place, separate with a chain. On every row, make a double crochet by itself and in the next base stitch, make two double crochets in the same place, separated by a chain. Close with a slip stitch in the third chain.

Round 4 :

Let's work on each fan now. Raise 3 chains symbolizing a double crochet, in the next one, make a double crochet and in the next two double crochets with a separating chain. The sequence of this row is two single crochets and finally an increase separated by a chain.

Info :

Follow this sequence until the size of the placemat is to your liking. I usually do until I reach 12 double crochets alone and finally the increase.

Info :

We would have 14 rows.

β€” Green Leaves :

Info :

Start at the next double crochet after the low point of the previous row.

Info :

Make an initial knot, lacquer once on the needle, start with a double crochet.

Info :

Let's lacquer, remove 2 stitches and leave 2 loops on the hook, lacquer again, make the double crochet, remove two and leave three loops on the hook. Then remove the three threads from the needle, so they stay together, separate with 3 chains. And at the same point repeat the same process, separate with a chain.

Info :

Skip 3 base double crochets and in the fourth double crochet repeat the same process. End with a slip stitch.

β€” Tulips :

Info :

In the space where we made 3 chains, let's start the tulips.

Info :

Lacquer on the needle and start with a double crochet, make 5 more double crochets, totaling 6 double crochets.

Info :

Make a popcorn stitch with these seven double crochets (place the needle in the first double crochet, catch the final loop closing with a slip stitch.

Info :

On the back, make 3 chains, enter the middle of the tulip and make a single crochet, repeat this process twice more, totaling 3 picot stitches, separate with a chain and between the fans make a single crochet to separate the tulips

Assembly Instructions

  • Arrange the green leaf motifs evenly around the edge of the placemat, starting at the next double crochet after each low point; sew in place with an upholstery needle and matching yarn.
  • Position tulip fan motifs in the spaces of 3 chains around the edge, securing the base of each tulip with a few whipstitches so the popcorn detail sits firmly.
  • Use small single crochet stitches between fans to anchor and separate tulips evenly, keeping spacing consistent so each tulip fan lines up symmetrically.
  • Weave in all yarn ends neatly on the wrong side of the placemat and lightly press the finished piece; if desired, add fabric glue to secure any loose motifs or for extra durability.

Important Notes

  • πŸ’‘Work with consistent tension for even round expansion and smooth circular shaping of the placemat.
  • πŸ’‘Count your increases regularly to maintain a flat, non-rippled circle and match the suggested number of rows for the desired size.
  • πŸ’‘Pin and check placement of leaves and tulips before sewing to ensure symmetrical spacing and alignment around the edge.

This tulip placemat adds charming seasonal detail to any table with playful fans and delicate picot edges. It is made in washable cotton yarn and is perfect as a handmade gift or a bright spring accent. Your table will feel special and inviting with this floral crochet touch. 🧢🌷

You ask,

we answer.

FAQs

What size will the finished piece be?

The finished size depends on your yarn and tension; following the pattern with cotton N4 and 3.5mm hook typically yields a medium placemat about dinner-plate sizeβ€”adjust by adding or removing rounds.

Can I use different yarn weights for this pattern?

Yes, you can change yarn weight but it will affect final size and drape; use a larger hook for bulky yarn for a chunky placemat or thinner yarn with a smaller hook for a delicate mini version.

Do I need prior crochet experience for this pattern?

This pattern is rated intermediate and assumes you know basics like magic ring, double crochet, slip stitch, popcorn and picot stitches, but clear step-by-step instructions help guide you.

How long does this project typically take to complete?

Most crocheters complete this placemat in 5-7 hours, though time may vary based on experience and whether you add extra motifs or larger sizes.