🧢 Beautiful ✨ Detailed πŸ’ Adorable

Turtle Memory Game Amigurumi Pattern

Turtle Memory Game Amigurumi Pattern
4.4β˜… Rating
5-7 Hours Time Needed
2.5K Made This
βœ‚οΈ

Intermediate Level

Ideal for those with basic crochet experience, featuring slightly more advanced stitches and techniques to expand your skills.

⏱️

Weekend Treat

Takes 5-7 hours, making it an enjoyable project to finish over a couple of days.

🧸

Cute Companion

An adorable friend to cherish, handcrafted with love to bring comfort and joy for years to come.

About This Turtle Memory Game Amigurumi Pattern

This pattern teaches you how to crochet a plush Turtle Memory Game: one large turtle and multiple small baby turtles for a fun matching game. It uses soft Himalaya Dolphin Baby chenille yarn for a squishy, tactile finish and includes full round-by-round instructions. Photos and assembly tips are provided to help you place legs, head, and baby turtles correctly.

Turtle Memory Game Amigurumi Pattern crochet pattern - detailed view of completed project

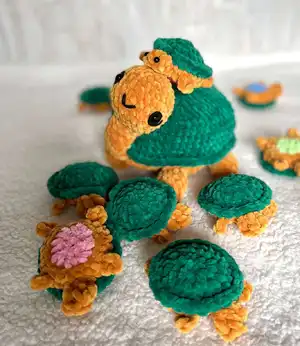
You will learn shaping techniques, attaching parts, and changing colors for tummies and shell. The finished large turtle measures about 12 x 5 inches while baby turtles are about 4 x 2.5 inches.

Why You'll Love This Turtle Memory Game Amigurumi Pattern

I absolutely love this pattern because it transforms plush chenille yarn into a playful and tactile memory game that both kids and adults enjoy. I enjoyed designing the tiny baby turtles that tuck under the mama shell β€” they add character and a fun interactive element. The pattern balances simple amigurumi techniques with a bit of assembly, making it satisfying to complete without being overwhelming. I also love how the soft yarn yields a squishy, cuddly finish that feels luxurious in hand.

Turtle Memory Game Amigurumi Pattern step 1 - construction progress Turtle Memory Game Amigurumi Pattern step 2 - assembly progress Turtle Memory Game Amigurumi Pattern step 3 - details and accessories Turtle Memory Game Amigurumi Pattern step 4 - final assembly and finishing

Switch Things Up

I love experimenting with color schemes for this pattern; try pastel shades for baby turtles to create a softer, nursery-friendly set.

I sometimes swap the chenille yarn for a velvet-style plush in contrasting colors to make the shell pop and the tummies more visible.

To change the size, I use thicker bulky yarn and a larger hook for a chunkier, cuddle-friendly version or finer yarn and a smaller hook for mini keychain turtles.

I often add tiny embroidered numbers or symbols to the baby tummies to make a learning game for children, turning the set into an educational matching toy.

I like to make removable babies by lightly sewing them in place with a couple of stitches so kids can tuck them under the shell and remove them during play.

If I want more personality, I embroider different facial expressions or add tiny felt eyebrows and blush with fabric markers for subtle detail.

For a posable version, I have experimented by inserting thin craft wire into the legs before stuffing to allow slight movement and posing.

I sometimes create themed sets by changing the tummy colors or adding tiny crocheted accessories like hats or bows for each baby turtle.

When gifting, I like to attach a small loop to one baby to hang it as an ornament or keychain while keeping the rest as the game pieces.

I recommend trying different eye styles: beads for a shiny look, embroidered eyes for baby-safe toys, or tiny safety eyes for a traditional amigurumi finish.

Common Mistakes & How to Fix Them

βœ— Skipping stitch markers during rounds will cause you to lose track of the beginning; place a marker at the start of every round and move it up as you crochet. βœ— Overstuffing the small details creates misshapen legs or head pieces; stuff gradually with small amounts until you reach the desired firmness. βœ— Not counting stitches after increases or decreases leads to incorrect shaping and mismatched joins; count stitches every few rounds and correct mistakes immediately. βœ— Changing color or finishing the loop without hiding ends can leave visible tails; fasten off and weave ends inside or hide them with a yarn needle before final assembly.

Turtle Memory Game Amigurumi Pattern

Create a charming crochet turtle memory game with this step-by-step pattern. You'll make one large mama turtle and multiple baby turtles using plush Himalaya Dolphin Baby yarn. The pattern includes clear rounds, assembly notes, and helpful photos to guide your project. Perfect for gifting or playful handmade decor, this pattern brings a tactile, cuddly game to life.

Intermediate 5-7 Hours

Materials Needed for Turtle Memory Game Amigurumi Pattern

β€” Main Fabric

  • 01
    HIMALAYA DOLPHIN BABY chenille yarn 131 yards / 3.5 oz (120 m / 100 g) - Beige (1 skein for one large turtle and many babies)
  • 02
    HIMALAYA DOLPHIN BABY chenille yarn 131 yards / 3.5 oz (120 m / 100 g) - Green (1 skein for one large turtle and many babies)
  • 03
    Small amounts of colored yarn for baby turtle tummies (assorted small scraps, 10-20g each)
  • 04
    A short piece of black yarn for mouth/eyelashes details

β€” Tools Required

  • 01
    Crochet hook size 7 (4.5 mm)
  • 02
    Scissors
  • 03
    Polyester stuffing
  • 04
    Black beads or safety eyes 8-10 mm (2 pcs for big turtle; 2 pcs for each baby if desired)
  • 05
    Transparent glue
  • 06
    A sewing needle
  • 07
    Yarn needle for sewing parts
  • 08
    Stitch markers
  • 09
    Elastic band for hair - diameter 2" (5 cm) (as listed)

Progress Tracker

0% Complete

β€” Necessary Materials :

Info :

1. Yarn. The main yarn: HIMALAYA DOLPHIN BABY 131 yards / 3.5oz (120 m/100 g), beige and green color. 2. Stuffing. 3. Hook 7 (4,5 mm). 4. Eyes. Black beads for eyes 1/3 inch (8-10 mm) - 2 pcs. 5. Transparent glue. 6. A sewing needle. 7. A piece of any black yarn, some colored yarn for baby turtle tummies. 8. Stitch markers. 9. Elastic band for hair - diameter 2" (5 cm). The size of the toy is 12 x 5 inches (30 x 12 cm), baby turtles - 4 x 2 1/2 inches (9 x 4 cm). Attention! You will need 1 skein of beige and 1 skein of green yarn to crochet a big turtle and 9-12 baby turtles.

β€” Abbreviation :

Info :

MR - magic ring (you can make 2 ch and crochet 6 sc in the second chain from the hook). sc - single crochet. inc - increase. dec - decrease. ch - chain. sl st - slip stitch. dc - double crochet. tc - treble crochet. (...) * N - repeat N times.

β€” Legs :

Info :

Crochet with beige color.

Round 1 :

5 sc in MR (5)

Round 2 :

5 inc (10)

Round 3-5 :

10 sc (10)

Round 6 :

(3 sc, dec) x 2 (8)

Info :

Stuff the detail. Fold the detail in half and crochet 3sc, grasping the stitches of the both edges. Fasten off and cut the yarn, hide the end. Crochet the rest of the legs in the same way.

β€” Head :

Info :

Crochet with beige color.

Round 1 :

6 sc in MR (6)

Round 2 :

6 inc (12)

Round 3 :

(1 sc, inc) x 6 (18)

Round 4 :

(inc, 2 sc) x 6 (24)

Round 5-8 :

24 sc (24)

Round 9 :

12 dec (12)

Round 10 :

(4 sc, dec) x 2 (10)

Round 11-17 :

10 sc (10)

Info :

Stuff the detail. Fold the detail in half and crochet 4 sc, grasping the stitches of the both edges. Fasten off and cut the yarn, hide the end.

β€” Shell / Body :

Info :

Crochet with beige color.

Round 1 :

24 sc in elastic (picture 1-2)

Round 2 :

(3 sc, inc) x 6 (30)

Round 3 :

(inc, 4 sc) x 6 (36)

Round 4 :

(5 sc, inc) x 6 (42)

Round 5 :

(inc, 6 sc) x 6 (48)

Round 6 :

(7 sc, inc) x 6 (54)

Round 7 :

(inc, 8 sc) x 6 (60) In the next round crochet together the stitches of the body, legs and head (pic.4).

Round 8 :

7 sc, 3 sc with leg, 10sc, 3 sc with leg, 5 sc, 4 sc with head, 5 sc, 3 sc with leg, 10 sc, 3 sc with leg, 7 sc, crochet the tail: 4 ch, sl st in 2nd ch from hook, 2 sc, sl st. Change the color to green.

Round 9 :

60 sc (60)

Round 10 :

crochet for the front loops only (pic. 5): (9 sc, inc) x 6 (66), crochet for the back loops only (pic. 6): 60sc (60)

Round 11-15 :

60 sc (60)

Round 16 :

(dec, 8 sc) x 6 (54)

Round 17 :

(7 sc, dec) x 6 (48)

Round 18 :

(dec, 6 sc) x 6 (42)

Round 19 :

(5 sc, dec) x 6 (36)

Round 20 :

(dec, 4 sc) x 6 (30)

Round 21 :

(3 sc, dec) x 6 (24)

Round 22 :

(dec, 2 sc) x 6 (18)

Round 23 :

(1 sc, dec) x 6 (12)

Round 24 :

6 dec

Info :

Cut the yarn, tighten the hole. Fasten the yarn, hide the end inside. Sew the neck to the shell. Glue or sew eyes. You can add black felt circles. Embroider eyelashes and mouth.

β€” Baby Turtle :

Info :

Crochet with green color.

Round 1 :

6 sc in MR (6)

Round 2 :

6 inc (12)

Round 3 :

(1 sc, inc) x 6 (18)

Round 4 :

(inc, 2 sc) x 6 (24)

Round 5 :

24 sc for the front loops only (pic. 2). Change the color to beige.

Round 6 :

crochet the body, legs and head for the back loops only of the 4th round (pic. 4-6): 2 sc, 1st leg: (1 sc, 4 ch, 1 sc) in one loop, 5 sc, 2nd leg: (1 sc, 4 ch, 1 sc) in one loop, 2 sc, head: (1 sc, 2 ch, 2 tc) in one loop, (1 tc, 1 dc, sl st) in one loop, 2 sc, 3rd leg: (1 sc, 4 ch, 1 sc) in one loop, 5 sc, 4th leg: (1 sc, 4 ch, 1 sc) in one loop, 2 sc.

Round 7 :

(1 sc, dec) x 7, 1sc, sl st (16)

Info :

Do not crochet the legs and head, leave them between the stitches of the decrease (pic. 7). Change the color to blue (or any other).

Round 8 :

crochet for the back loops only: 8 dec (8)

Info :

Stuff the body. Cut the yarn, leaving a long end enough for sewing the hole. Tighten the hole (pic. 8-9). You can glue on the eyes. Baby is ready! Crochet 9-12 of these babies with tummies of different colors.

β€” Assembly :

Info :

Cut the yarn, tighten the hole. Fasten the yarn, hide the end inside. Sew the neck to the shell. Glue or sew eyes. You can add black felt circles. Embroider eyelashes and mouth as desired. Tuck baby turtles under the shell in the joined stitches as shown in pictures.

Assembly Instructions

  • Sew the neck of the head securely into the opening at the front of the shell after tightening the shell hole; use a yarn needle and whipstitch around the neck base for a firm join.
  • Position four legs evenly around the bottom of the shell where indicated in Round 8 and sew them through the shell stitches to secure, making sure the turtle sits flat.
  • Attach baby turtles to the underside or inside of the shell openings created in the joining round; tuck them into place and sew a few stitches to hold them, or leave removable for the memory game.
  • Glue or sew on eyes for both big and baby turtles; use transparent glue for beads or sew safety eyes securely and add embroidered mouth and eyelashes.
  • Hide all yarn tails inside the body by weaving them into adjacent stitches and trim excess, then lightly tighten holes and close securely before final finishing.

Important Notes

  • πŸ’‘Use stitch markers to mark the beginning of each round and any join points when attaching head and legs for accurate alignment.
  • πŸ’‘Stuff pieces firmly but gradually to maintain rounded shapes without overstuffing, which can distort the plush texture.
  • πŸ’‘Change colors exactly where indicated (after Round 8 on the shell and Round 5 on baby turtle) to achieve clear tummy and shell contrast.
  • πŸ’‘Weave in ends and hide tails inside pieces before final assembly to keep the finished toy neat and secure.

This Turtle Memory Game pattern brings playful charm and tactile fun to your crochet projects. Make a mama turtle and a set of tiny babies for a sweet matching game. Perfect as a handmade gift or a cozy nursery toy. 🧢🐒✨

You ask,

we answer.

FAQs

What size will the finished piece be?

The finished large turtle measures approximately 12 x 5 inches (30 x 12 cm) and each baby turtle measures about 4 x 2.5 inches (9 x 4 cm) using the recommended yarn and hook.

Can I use different yarn weights for this pattern?

Yes, you can use different yarn weights, but this will change the final size; choose an appropriate hook for your yarn and expect the proportions to vary.

Do I need prior crochet experience for this pattern?

This pattern is rated intermediate and uses basic amigurumi techniques like magic ring, increases, decreases, and joining pieces; basic crochet experience is recommended.

How long does this project typically take to complete?

Most crocheters complete the project in 5-7 hours for the large turtle and several baby turtles, though total time varies with experience and number of babies made.