🧢 Beautiful ✨ Detailed πŸ’ Adorable

Twinkletoes the Tiny Gecko Amigurumi Pattern

Twinkletoes the Tiny Gecko Amigurumi Pattern
4.0β˜… Rating
2-3 Hours Time Needed
1.2K Made This
βœ‚οΈ

Beginner Friendly Level

Perfect for those just starting their crochet journey, with clear instructions and simple techniques

⏱️

Bite-Sized Project

Finishes in 2-4 hoursβ€”perfect for an afternoon of creative relaxation.

🎁

Tiny Treasure

Small, sweet, and gift-worthy creations that fit perfectly in the palm of your hand with detailed charm.

About This Twinkletoes the Tiny Gecko Amigurumi Pattern

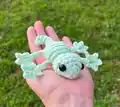
Twinkletoes the Tiny Gecko is a sweet, palm-sized amigurumi you can crochet in a single piece. The design is no-sew and beginner friendly, featuring a special leg stitch tutorial to make adorable curled toes. It finishes with a curled tail technique and clear placement guidance for safety eyes. This pattern is perfect for quick makes, gifts, and practicing small-amigurumi techniques.

Twinkletoes the Tiny Gecko Amigurumi Pattern crochet pattern - detailed view of completed project

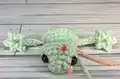
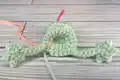
The pattern works in continuous rounds from head to tail and includes full step-by-step rounds and photo-tutorial references. You will learn to create five-toed limbs and a curled tail with simple slip stitch techniques.

Why You'll Love This Twinkletoes the Tiny Gecko Amigurumi Pattern

I absolutely love this pattern because it turns out an irresistibly cute little gecko with minimal fuss and no sewing required. I enjoy how the special leg stitch creates expressive toes that give the gecko so much personality. The design is compact and satisfying to finish in just a few sittings, which makes it perfect for gifting or experimenting with colors. I also love that the pattern includes a photo tutorial for the leg stitch, making it accessible even if you're new to small amigurumi details. Every finished Twinkletoes always brings a smile and feels quick and rewarding to make.

Twinkletoes the Tiny Gecko Amigurumi Pattern step 1 - construction progress Twinkletoes the Tiny Gecko Amigurumi Pattern step 2 - assembly progress Twinkletoes the Tiny Gecko Amigurumi Pattern step 3 - details and accessories Twinkletoes the Tiny Gecko Amigurumi Pattern step 4 - final assembly and finishing

Switch Things Up

I love how easy it is to customize Twinkletoes by switching yarn colors to create vibrant or subtle geckos.

Try pastel shades for a delicate, whimsical look or bright neon colors for a fun, modern take.

You can change the yarn weight and hook to adjust size β€” bulky yarn with a larger hook makes a cuddle-friendly version while lighter yarn and a smaller hook creates a tiny keychain buddy.

I often swap safety eyes for embroidered eyes for a softer, child-safe option.

For added personality, embroider spots or stripes onto the back using a contrasting yarn color.

I sometimes add a tiny felt heart or bow as an accessory, sewn on with the yarn tail before finishing.

If you want a poseable gecko, consider running a thin wire through the limbs before stuffing to make them adjustable.

Experiment with fuzzy or textured yarns for an extra-squishy finish that changes the overall feel of the toy.

Try making a matching pair in complementary colors to gift as a set, or create a whole family of different sizes using the same pattern scaled by yarn and hook.

I also enjoy adding small crocheted props like leaves or tiny bugs to create a little scene for display or photography.

Common Mistakes & How to Fix Them

βœ— Not placing a stitch marker at the start of rounds leads to lost counts and shaping errors; place a stitch marker and move it each round to stay accurate. βœ— Working the leg base chain incorrectly will cause toes to misalign; follow the leg tutorial steps precisely and mark the base chain stitch before slip stitching. βœ— Overstuffing the head or body creates a lumpy shape that distorts the piece; stuff gradually and evenly, adding small amounts as you shape. βœ— Forgetting to leave a long tail at the end of the tail prevents secure finishing and curling; fasten off with a long tail and weave it through rounds to secure the curl. βœ— Placing safety eyes too close together changes the facial expression and can make assembly difficult; insert safety eyes between R3 & R4 with 4 or 5 stitches visible between them, using the stitch marker as a guide. βœ— Crocheting into the leg chain stitch by accident will lock the limb inward; move limbs outward and avoid single crocheting into the chain stitch when working rounds 12-14.

Twinkletoes the Tiny Gecko Amigurumi Pattern

Create an adorable tiny gecko you can hold in the palm of your hand with this beginner-friendly pattern. Twinkletoes is a no-sew, one-piece design with a simple special leg stitch tutorial included. Perfect for quick handmade gifts, keychains, or a cute desk companion. The pattern guides you step-by-step so you can enjoy a relaxed, satisfying crochet session.

Beginner Friendly 2-3 Hours

Materials Needed for Twinkletoes the Tiny Gecko Amigurumi Pattern

β€” Main Fabric

  • 01
    Medium weight yarn (for tiny Twinkletoes)
  • 02
    Premier Parfait Chunky (for chunky Twinkletoes)
  • 03
    10mm safety eyes (recommended for tiny Twinkletoes)
  • 04
    14mm safety eyes (recommended for chunky Twinkletoes)
  • 05
    Fiber fill stuffing (for stuffing head, body, and tail)

β€” Tools Required

  • 01
    Crochet hook size 4.0mm (for medium weight yarn)
  • 02
    Crochet hook size 5.0mm (for Premier Parfait Chunky)
  • 03
    10mm safety eyes (2 pieces)
  • 04
    14mm safety eyes (2 pieces)
  • 05
    Scissors
  • 06
    Yarn needle for sewing and weaving tails
  • 07
    Stitch markers
  • 08
    Pins for assembly (optional)

Progress Tracker

0% Complete

β€” Body :

Info :

Special stitch: Leg *picture tutorial on page 5* β€’ Ch 10, sl st in 2nd ch from hook and the third ch. That third ch will be your "base chain". β€’ *Ch 2, sl st in 2nd ch from hook, sl st in base stitch* β€’ Repeat * * 3 more times, for a total of 5 toes β€’ Sl st in the 7 stitches back down the chain, then continue on with the round

Round 1 :

Make 4 sc in a mc (4)

Round 2 :

Inc x 4 (8)

Round 3 :

*inc, 3 sc* x 2 (10)

Round 4 :

Inc x 5, 5 sc (15)

Round 5 :

3 sc in the next st, 8 sc, 3 sc in the next st, 5 sc (19)

Round 6 :

Sc in each st (19) *Place a SM between the 6th & 7th sc of this row. This is a guide for the center/top of the body.* (Pink SM)

Round 7 :

Sc in in each st (19)

Info :

Insert safety eyes between r3 & r4, with 4 or 5 st visible in between them. Use the SM from r6 as a visual guide to place each eye equal distance away from the SM.

Round 8 :

Dec x 6, 7 sc (13)

Info :

Stuff head

Round 9 :

Dec x 4, 5 sc (9)

Round 10 :

3 sc in the next st, inc x 3, 3 sc in the next st, 4 sc (16)

Round 11 :

Leg, sc, inc, *2 sc, inc* x 2, sc, inc, leg, 6 sc (20)

Round 12-14 :

Sc in each st (20) *Make sure to move the limbs outward and be careful not to sc in the chain stitch from the leg*

Round 15 :

Leg, sc, *dec, sc* x 4, sc, leg, 6 sc (16)

Round 16 :

*2 sc, dec* x 3, 4 sc (13)

Info :

Stuff body

Round 17 :

*sc, dec* x 4, sc (9)

Info :

continued on next page

Info :

You will now be making the tail - Stuff the tail lightly as you go, until it gets too narrow to stuff

Round 18 :

Sc in each st (9)

Round 19 :

*dec, sc* x 2, 3 sc (7)

Round 20 :

Sc in each st (7)

Round 21 :

Dec, 5 sc (6)

Round 22 :

Sc in each st (6)

Round 23 :

Dec, 4 sc (5)

Round 24 :

Sc in each st (5)

Round 25 :

Dec, 3 sc (4)

Round 26 :

Sc in each st (4)

Info :

Fasten off and leave a long tail

Infos :

Sew the hole closed, keep the yarn on your needle. Slightly curve the tip of the gecko-tail to the side so that the tip of the gecko-tail is beside R23/R24. Pic A. Insert your needle between the rounds to bring the tip of the gecko-tail to it. Pic B. Weave the yarn-tail through the stitches a few more times, to secure the curl. Pic C. *Don't weave the yarn-tail to the opposite side, it will give it an indent!* Pic D.

β€” Leg Tutorial :

Step 1 :

Ch 10

Step 2 :

Sl st in 2nd ch from hook and the third ch. That third ch will be your "base chain".

Step 3 :

Ch 2

Step 4 :

sl st in 2nd ch from hook, sl st in base stitch

Step 5 :

Ch 2

Step 6 :

sl st in 2nd ch from hook, sl st in base stitch

Step 7 :

Ch 2

Step 8 :

sl st in 2nd ch from hook, sl st in base stitch

Step 9 :

Ch 2

Step 10 :

sl st in 2nd ch from hook, sl st in base stitch

Step 11 :

Sl st in the 7 stitches back down the chain

Info :

Finished view of R10

Assembly Instructions

  • Insert safety eyes between R3 and R4 leaving 4 or 5 stitches visible between them, using the stitch marker placed between the 6th and 7th stitch of R6 to space each eye equally.
  • After completing R26, fasten off leaving a long tail, sew the final hole closed with the yarn needle while keeping the yarn on the needle to finish securely.
  • Curve the tip of the gecko tail so it sits beside R23/R24, then insert your needle between rounds and weave the tail through several times to secure the curl.
  • When working rounds 12-14, move the limbs outward and make sure not to single crochet into the chain stitch from the leg to avoid tucking the limb inward.
  • Use stitch markers while making the legs and when creating the base chain so toes align correctly, and pin positions before final weaving if needed.

Important Notes

  • πŸ’‘This pattern is written in US crochet terminology.
  • πŸ’‘The stitch count at the end of each round does not include the limbs.
  • πŸ’‘This design is made all in one piece; it starts at the head and finishes at the tail.
  • πŸ’‘This pattern is worked in continuous rounds unless otherwise specified; place a stitch marker at the beginning of each round.

Twinkletoes is a tiny, lovable gecko designed to be quick, satisfying, and endlessly adorable. Make one in soft pastels or bright colors to match your mood and gifting needs. Each gecko is a perfect little present to bring a smileβ€”handmade with heart and fun details. 🦎🧢

You ask,

we answer.

FAQs

What size will the finished piece be?

The finished Twinkletoes measures approximately palm-sized when using the recommended medium weight yarn and 4.0mm hook; using chunky yarn will result in a larger version.

Can I use different yarn weights for this pattern?

Yes, you can use different yarn weights; the pattern suggests medium weight with a 4.0mm hook for tiny Twinkletoes and Premier Parfait Chunky with a 5.0mm hook for a chunkier version, but your finished size will change accordingly.

Do I need prior crochet experience for this pattern?

This pattern is beginner friendly and no-sew, so basic knowledge of single crochet, increases, decreases, and slip stitches is all you need to complete it successfully.

How long does this project typically take to complete?

Most crocheters complete this project in about 2-3 hours using the recommended yarn and hook sizes, though time may vary based on experience and detailing.

Where should I place the safety eyes?

Insert the safety eyes between R3 and R4 with 4 or 5 stitches visible between them; use the stitch marker placed between the 6th and 7th stitch of R6 as a visual guide to space the eyes evenly.