🧢 Beautiful ✨ Detailed πŸ’ Adorable

Twinkletoes the Tiny Gecko Amigurumi Pattern

Twinkletoes the Tiny Gecko Amigurumi Pattern
4.8β˜… Rating
2-3 Hours Time Needed
1.9K Made This
βœ‚οΈ

Beginner Friendly Level

Perfect for those just starting their crochet journey, with clear instructions and simple techniques

⏱️

Bite-Sized Project

Finishes in 2-4 hoursβ€”perfect for an afternoon of creative relaxation.

🎁

Tiny Treasure

Small, sweet, and gift-worthy creations that fit perfectly in the palm of your hand with detailed charm.

About This Twinkletoes the Tiny Gecko Amigurumi Pattern

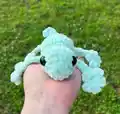
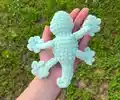
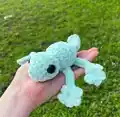
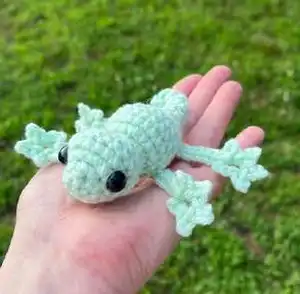
This pattern makes Twinkletoes, a tiny amigurumi gecko worked all in one piece from head to tail. It includes a step-by-step leg tutorial and helpful photos to guide you through the special toe construction. The design is no-sew and beginner friendly, using continuous rounds and simple shaping.

Twinkletoes the Tiny Gecko Amigurumi Pattern crochet pattern - detailed view of completed project

Two size options are included: a small version using medium weight yarn and a chunky version using Premier Parfait Chunky yarn. Materials, abbreviations, and clear assembly/finishing steps are provided for a fuss-free finish.

Why You'll Love This Twinkletoes the Tiny Gecko Amigurumi Pattern

I absolutely love this pattern because it transforms simple stitches into a charming little gecko that fits in your hand. I love how the special leg stitch creates those sweet splayed toes with minimal fuss. I enjoy that it's a no-sew design β€” everything is crocheted in one continuous piece, which makes finishing quick and satisfying. I also love sharing the leg tutorial photos because they make the trickiest part approachable for beginners.

Twinkletoes the Tiny Gecko Amigurumi Pattern step 1 - construction progress Twinkletoes the Tiny Gecko Amigurumi Pattern step 2 - assembly progress Twinkletoes the Tiny Gecko Amigurumi Pattern step 3 - details and accessories Twinkletoes the Tiny Gecko Amigurumi Pattern step 4 - final assembly and finishing

Switch Things Up

I love customizing Twinkletoes by changing yarn color to create different personalities β€” try bright neons or soft pastels for different moods.

You can scale the pattern easily by switching yarn weight and hook size: use a thinner yarn for a tiny keychain or bulky yarn for a cuddly chunky gecko.

I often swap safety eyes for embroidered eyes on toys intended for very young children to make them fully soft and safe.

Try embroidering small spots or stripes along the back to give your gecko a unique pattern and more character.

I sometimes add a tiny crocheted scarf or bow to make a seasonal or gift-ready version that feels extra special.

For posable limbs, I experiment with thin wire wrapped in yarn inside the legs before stuffing; this lets the gecko hold poses on display.

Make a family set by changing only the hook size and keep the same stitch counts β€” everyone will be matched but different sizes.

I recommend swapping the color of the stitch marker yarn (my coral SM note) to help you visualize eye placement during construction.

If you want a flatter toy, reduce the stuffing slightly and use a firmer tension; for a plush look, stuff a bit more firmly and use a softer yarn.

I sometimes attach a keychain ring to the tail or head loop to turn Twinkletoes into a portable charm perfect for bags and keys.

Common Mistakes & How to Fix Them

βœ— Skipping a stitch marker at the beginning of each round leads to lost rounds and mis-shaping; place a stitch marker at the start of every round and move it as you go. βœ— Forgetting to insert safety eyes at the recommended placement will misalign the face; insert the safety eyes between R3 and R4 using the marker placed in R6 as a guide so the eyes are evenly spaced. βœ— Overstuffing the head or body causes distortion in shape and makes the tail curl difficult; stuff gradually and lightly, especially when working the tail, stuffing only until the piece is full but not tight. βœ— Crocheting the limbs inward instead of outward will trap toes inside the body and ruin the look; make sure to move the limbs outward during rounds 12-14 and avoid crocheting into the chain stitches from the leg base.

Twinkletoes the Tiny Gecko Amigurumi Pattern

Create an adorable mini gecko with this friendly Twinkletoes pattern. You will enjoy a no-sew design that starts at the head and finishes at the tail, including a clear leg tutorial and photo guidance. Perfect for small gifts, keychains, or sweet shelf decor β€” ideal if you want a quick, satisfying crochet make.

Beginner Friendly 2-3 Hours

Materials Needed for Twinkletoes the Tiny Gecko Amigurumi Pattern

β€” Main Fabric

  • 01
    Medium weight yarn (recommended for Tiny Twinkletoes)
  • 02
    Premier Parfait Chunky (recommended for Chunky Twinkletoes)

β€” Tools Required

  • 01
    Crochet hook size 4.0mm (for medium weight yarn)
  • 02
    Crochet hook size 5.0mm (for Premier Parfait Chunky option)
  • 03
    10mm safety eyes (for medium version)
  • 04
    14mm safety eyes (for chunky version)
  • 05
    Fiber fill stuffing
  • 06
    Yarn needle for sewing and weaving ends
  • 07
    Stitch markers
  • 08
    Scissors

Progress Tracker

0% Complete

β€” Body :

Infos :

Special stitch: Leg *picture tutorial on page 5* β€’ Ch 10, sl st in 2nd ch from hook and the third ch. That third ch will be your "base chain". β€’ *Ch 2, sl st in 2nd ch from hook, sl st in base stitch* β€’ Repeat * * 3 more times, for a total of 5 toes β€’ Sl st in the 7 stitches back down the chain, then continue on with the round

Round 1 :

Make 4 sc in a mc (4)

Round 2 :

Inc x 4 (8)

Round 3 :

*inc, 3 sc* x 2 (10)

Round 4 :

Inc x 5, 5 sc (15)

Round 5 :

3 sc in the next st, 8 sc, 3 sc in the next st, 5 sc (19)

Round 6 :

Sc in each st (19) *Place a SM between the 6th & 7th sc of this row. This is a guide for the center/top of the body.* (Pink SM)

Round 7 :

Sc in in each st (19)

Info :

Insert safety eyes between r3 & r4, with 4 or 5 st visible in between them. Use the SM from r6 as a visual guide to place each eye equal distance away from the SM.

Round 8 :

Dec x 6, 7 sc (13)

Info :

Stuff head

Round 9 :

Dec x 4, 5 sc (9)

Round 10 :

3 sc in the next st, inc x 3, 3 sc in the next st, 4 sc (16)

Round 11 :

Leg, sc, inc, *2 sc, inc* x 2, sc, inc, leg, 6 sc (20)

Rounds 12-14 :

Sc in each st (20) *Make sure to move the limbs outward and be careful not to sc in the chain stitch from the leg*

Round 15 :

Leg, sc, *dec, sc* x 4, sc, leg, 6 sc (16)

Round 16 :

*2 sc, dec* x 3, 4 sc (13)

Info :

Stuff body

Round 17 :

*sc, dec* x 4, sc (9)

Info :

continued β€” You will now be making the tail - Stuff the tail lightly as you go, until it gets too narrow to stuff

Round 18 :

Sc in each st (9)

Round 19 :

*dec, sc* x 2, 3 sc (7)

Round 20 :

Sc in each st (7)

Round 21 :

Dec, 5 sc (6)

Round 22 :

Sc in each st (6)

Round 23 :

Dec, 4 sc (5)

Round 24 :

Sc in each st (5)

Round 25 :

Dec, 3 sc (4)

Round 26 :

Sc in each st (4)

Info :

Fasten off and leave a long tail

Info :

Sew the hole closed, keep the yarn on your needle.

Info :

Slightly curve the tip of the gecko-tail to the side so that the tip of the gecko-tail is beside R23/R24. Pic A

Info :

Insert your needle between the rounds to bring the tip of the gecko-tail to it. Pic B

Info :

Weave the yarn-tail through the stitches a few more times, to secure the curl. Pic C

Info :

*Don't weave the yarn-tail to the opposite side, it will give it an indent!* Pic D

β€” Leg Tutorial :

Step 1 :

Ch 10

Step 2 :

Sl st in 2nd ch from hook and the third ch. That third ch will be your "base chain".

Step 3 :

Ch 2

Step 4 :

Sl st in 2nd ch from hook, sl st in base stitch

Step 5 :

Ch 2

Step 6 :

Sl st in 2nd ch from hook, sl st in base stitch

Step 7 :

Ch 2

Step 8 :

Sl st in 2nd ch from hook, sl st in base stitch

Step 9 :

Ch 2

Step 10 :

Sl st in 2nd ch from hook, sl st in base stitch

Step 11 :

Sl st in the 7 stitches back down the chain

Info :

Finished view of R10

Assembly Instructions

  • Insert safety eyes between R3 and R4 with 4 or 5 stitches visible between them, using the stitch marker placed at R6 as a visual guide to space the eyes equally.
  • When tail is complete, fasten off leaving a long tail, sew the hole closed, then curve the tip beside R23/R24 and weave the yarn tail through rounds to secure the curl.
  • Move limbs outward during rounds 12-14 and ensure you do not single crochet into the chain stitches used for the legs to keep toes free and visible.
  • Weave the yarn tail through a few extra stitches when securing the tail curl to prevent it from uncoiling, and avoid weaving to the opposite side to prevent an indent.

Important Notes

  • πŸ’‘This pattern is written in US crochet terminology.
  • πŸ’‘The stitch count at the end of each round does not include the limbs.
  • πŸ’‘This design is made all in one piece, starting at the head and finishing at the tail.
  • πŸ’‘This pattern is worked in continuous rounds unless otherwise specified; place a stitch marker at the beginning of each round.

Twinkletoes the Tiny Gecko is a sweet pocket-sized amigurumi perfect for gifting or collecting. The no-sew construction and clear leg tutorial make this a quick, enjoyable project for crocheters of all levels. Make a whole family of geckos in different colors and sizes β€” they bring instant smiles! 🦎🧢

You ask,

we answer.

FAQs

What size will the finished piece be?

The finished amigurumi measures approximately 8-12 cm tall depending on your yarn weight and hook size; use the recommended hooks for the intended tiny or chunky size.

Can I use different yarn weights for this pattern?

Yes, you can use different yarn weights: medium weight yarn with a 4.0mm hook for the tiny version or Premier Parfait Chunky with a 5.0mm hook for a chunkier version; your finished size will vary accordingly.

Do I need prior crochet experience for this pattern?

This pattern is rated beginner friendly; basic knowledge of single crochet, increases, decreases, slip stitches, and continuous rounds is helpful to follow the instructions.

How long does this project typically take to complete?

Most crafters finish Twinkletoes in about 2-3 hours for the tiny version; time may vary depending on experience and chosen yarn.