🧢 Beautiful ✨ Detailed πŸ’ Adorable

Harry Potter Amigurumi Pattern

Harry Potter Amigurumi Pattern
4.5β˜… Rating
8-10 Hours Time Needed
3.0K Made This
βœ‚οΈ

Intermediate Level

Ideal for those with basic knitting experience, featuring slightly more advanced stitches and techniques to expand your skills.

⏱️

All-Day Adventure

Requires 8-10 hours, ideal for a full day of immersive knitting.

🧸

Cute Companion

An adorable friend to cherish, handcrafted with love to bring comfort and joy for years to come.

About This Harry Potter Amigurumi Pattern

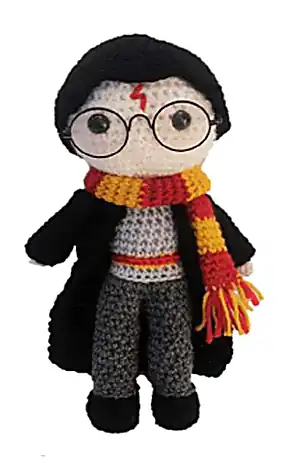
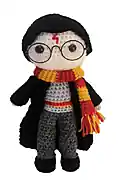
This Harry Potter amigurumi pattern brings the beloved wizarding world character to life in adorable crochet form. The pattern includes detailed instructions for creating Harry's distinctive features including his messy black hair, lightning bolt scar, and iconic round glasses. With his Gryffindor scarf and black wizard cloak, this amigurumi captures all the magical details that make Harry Potter so recognizable and beloved.

Harry Potter Amigurumi Pattern crochet pattern - detailed view of completed project

The pattern is designed to be worked from the feet up, incorporating color changes and detailed assembly instructions. Multiple size options are provided depending on your yarn weight and hook size preferences.

Why You'll Love This Harry Potter Amigurumi Pattern

I absolutely love how this pattern captures the essence of Harry Potter in such a charming, huggable form! The attention to detail is incredible - from the carefully crafted lightning bolt scar to the authentic Gryffindor house colors in the scarf. What makes this pattern special is how it combines classic amigurumi techniques with those beloved character elements we all recognize. I find the process of creating each component, from the expressive face to the flowing wizard cloak, incredibly satisfying and magical in its own right.

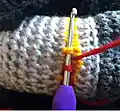
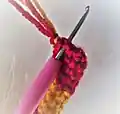
Harry Potter Amigurumi Pattern step 1 - construction progress Harry Potter Amigurumi Pattern step 2 - assembly progress Harry Potter Amigurumi Pattern step 3 - details and accessories Harry Potter Amigurumi Pattern step 4 - final assembly and finishing

Switch Things Up

I love how versatile this Harry Potter pattern can be with just a few creative tweaks! You could easily transform this into other Hogwarts students by changing the scarf colors - imagine creating Hermione with a bushy brown hair modification, or Ron with his characteristic red hair. The cloak could be modified into different house robes by adding colored trim or house emblems.

For a more advanced project, I'd suggest adding wire armature to the arms and legs to make the doll poseable - perfect for displaying in different magical poses! You could also create additional accessories like a tiny wand, the Sorting Hat, or even miniature spell books. The hair section could be adapted to create different hairstyles for various characters, and facial features could be embroidered differently to represent other beloved characters from the series.

Consider making a whole collection of Hogwarts amigurumi - the basic body construction would work perfectly for creating Hagrid (just scale up the pattern), Professor McGonagall, or even magical creatures like Hedwig the owl. The possibilities are truly magical when you let your creativity flow with this foundational pattern!

Common Mistakes & How to Fix Them

βœ— Forgetting to stuff the body firmly enough which can result in a floppy finished piece βœ— Placing safety eyes too close together or off-center which affects the character's expression βœ— Not maintaining consistent tension throughout color changes which creates uneven fabric texture βœ— Rushing through the hair attachment process without proper pinning which leads to crooked placement

Harry Potter Amigurumi Pattern

Create your very own magical Harry Potter amigurumi with this enchanting crochet pattern! This detailed guide walks you through crafting the beloved Boy Who Lived, complete with his iconic lightning bolt scar, round glasses, and Gryffindor colors. Perfect for Harry Potter fans and crochet enthusiasts alike, this pattern combines classic amigurumi techniques with beloved character details. The finished doll stands approximately 30cm tall and makes a wonderful gift for wizarding world enthusiasts of all ages.

Intermediate 8-10 Hours

Materials Needed for Harry Potter Amigurumi Pattern

β€” Main Fabric

  • 01
    Yarn in flesh, black, light grey, dark grey, yellow and red colors
  • 02
    DK/Light Worsted Weight acrylic yarn recommended for best results

β€” Tools Required

  • 01
    Crochet hook (3mm recommended)
  • 02
    Safety eyes (optional - can be embroidered instead)
  • 03
    Glasses
  • 04
    Stuffing
  • 05
    Tapestry needle
  • 06
    Scissors
  • 07
    Stitch markers

Progress Tracker

0% Complete

β€” Arms (Make 2) :

Round 1 :

Using flesh coloured yarn: 4 sc into magic ring (4)

Round 2 :

4 inc (8)

Rounds 3-4 :

8 sc (2 rounds)

Info :

Change to light grey coloured yarn

Round 5 :

8 sl

Round 6 :

8 sc blo

Rounds 7-14 :

8 sc (8 rounds). Fasten off.

β€” Body Starting at Feet :

Info :

Stuff as you go. Using black coloured yarn for legs

Round 1 :

6 sc into magic ring (6)

Round 2 :

6 inc (12)

Round 3 :

(3 sc, 3 inc) 2 times (18)

Round 4 :

18 sc blo (18)

Round 5 :

18 sc

Round 6 :

2 sc, 7 dec, 2 sc (11)

Info :

Change to dark grey coloured yarn

Round 7 :

11 sl

Round 8 :

11 sc blo

Round 9-18 :

11 sc (10 rounds). Fasten off. Make second leg, but do not fasten off.

Info :

If you are not already at the side of leg with foot facing forward, sc until there. Chain 1 stitch.

Round 1 :

11 sc around leg that you fastened off, 1 sc in ch, 11 sc around second leg, 1 sc in ch (24)

Round 2 :

10 sc, dec, 10 sc, dec (22)

Round 3 :

22 sc. Sc until at centre of back

Info :

Change to light grey coloured yarn

Round 4 :

22 sl

Round 5 :

22 sc blo

Info :

Change to yellow coloured yarn

Round 6 :

22 sc

Info :

Change to light grey coloured yarn

Round 7-8 :

22 sc (2 rounds)

Round 9 :

5 sc, 1 dec, 9 sc, 1 dec, 4 sc (20)

Round 10-11 :

20 sc (2 rounds). Sc to side of body with feet facing forward if not already there

Round 12 :

8 sc around arm, 10 sc on body, 8 sc around other arm, 10 sc on body (36)

Round 13 :

(1 sc, 1 dec) x 12 (24)

Round 14 :

12 dec (12)

Info :

Change to flesh coloured yarn

Round 15 :

12 sl

Round 16 :

12 sc blo

Round 17 :

12 inc (24)

Round 18 :

24 inc (48)

Round 19-26 :

48 sc (8 rounds)

Info :

Place safety eyes between rounds 24 and 25, making sure they are centre on face and 8 stitches apart

Round 27 :

(6 sc, 1 dec) x 6 (42)

Round 28 :

(5 sc, 1 dec) x 6 (36)

Round 29 :

(4 sc, 1 dec) x 6 (30)

Round 30 :

(3 sc, 1 dec) x 6 (24)

Round 31 :

(2 sc, 1 dec) x 6 (18)

Round 32 :

(1 sc, 1 dec) x 6 (12)

Round 33 :

dec x 6 (6). Fasten off, gather around fasten off stitches and pull tight to close hole at top of head.

β€” Hair :

Round 1 :

Using black coloured yarn: 7 sc into magic ring

Round 2 :

7 inc (14)

Round 3 :

(1 sc, 1 inc) (21)

Round 4 :

(2 sc, 1 inc) (28)

Round 5 :

(3 sc, 1 inc) (35)

Round 6 :

(4 sc, 1 inc) (42)

Round 7 :

(5 sc, 1 inc) (49)

Rounds 8-13 :

49 sc (6 rounds)

Round 14 :

(1 sc, 1 dc, 1 dc, 1 tr, 1 dc, 1 dc, 1 sc) x 7. Fasten off.

Info :

Pin hair to head and then sew into place. Using red yarn, embroider lightning bolt scar on forehead. Working around posts of yellow stitches on jersey, 20 sl stitches in red.

β€” Scarf :

Round 1 :

Using red coloured yarn: 8 ch and join in a loop

Rounds 2-5 :

8 sc (4 rounds)

Info :

Using yellow coloured yarn

Rounds 6-9 :

8 sc (4 rounds)

Info :

Using red coloured yarn

Round 10-13 :

8 sc (4 rounds). Repeat the previous 8 rounds until you have 13 stripes in total. Fasten off.

Info :

Fold scarf flat, sew together cast on stitches, sew together cast off stitches. Cut eight 10 cm lengths of yellow yarn and eight 10 cm lengths of red yarn. Using one length of red and one length of yellow, fold lengths in half, draw loop through scarf and then pull cut ends through loop.

β€” Cloak :

Sleeves (make two) :

Using black colour yarn

Round 1 :

12 ch and join in a loop

Rounds 2-11 :

12 sc (10 rounds)

Main body of cloak :

Using black coloured yarn

Row 1 :

21 ch

Row 2 :

starting in second chain from hook 20 sc

Row 3-24 :

1 ch, starting in second chain from hook 20 sc (22 rows)

Row 25 :

1 ch 5 sc, 12 sc around arm, 10 sc, 12 sc around other arm, 5 sc (44)

Row 26 :

1 ch, 22 dec (22)

Row 27-28 :

1 ch, 22 sc (2 rounds)

Row 29 :

1 ch, 11 dec (11). Fasten off. Weave in yarn ends.

Assembly Instructions

  • Attach the completed arms to the body at Round 12 during the body construction process
  • Pin the hair piece to the head before sewing to ensure proper placement and coverage
  • Embroider the lightning bolt scar on the forehead using red yarn with straight stitches
  • Place safety eyes between rounds 24 and 25, ensuring they are centered and 8 stitches apart
  • Attach the striped scarf around the neck, positioning it naturally with the fringe hanging down
  • Slip the cloak sleeves over the arms and attach the main cloak body to cover the shoulders and back
  • Add the round glasses as the final touch to complete Harry's iconic look

Important Notes

  • πŸ’‘Use stitch markers to keep track of your rounds, especially during frequent color changes
  • πŸ’‘Maintain consistent tension throughout the project for an even finished appearance
  • πŸ’‘Stuff the body and head firmly but not overly tight to maintain the proper shape
  • πŸ’‘Pin all pieces in place before final assembly to ensure correct positioning
  • πŸ’‘Take care when embroidering the lightning bolt scar to make it recognizable and neat
  • πŸ’‘Use a hook at least two sizes smaller than recommended on yarn label for tight stitches

This enchanting Harry Potter amigurumi pattern brings the magic of Hogwarts right into your hands! With his iconic lightning scar, round glasses, and Gryffindor house colors, this lovable doll captures everything we adore about the Boy Who Lived. The pattern combines classic amigurumi techniques with character-specific details that make this project truly special. Whether you're a Harry Potter fan or simply love creating magical amigurumi, this pattern will cast a spell on your heart! 🧢✨⚑

You ask,

we answer.

FAQs

What size will my finished Harry Potter doll be?

The finished size depends on your yarn weight and hook size. Using worsted weight yarn with a 3mm hook creates approximately 30cm (12 inches) tall doll, while DK weight yarn produces a 28cm (11 inches) tall doll.

Can I use embroidered eyes instead of safety eyes?

Yes! The pattern notes that safety eyes are optional and can be embroidered instead. This is especially recommended if making the doll for young children.

Do I need to make the cloak and scarf?

While the cloak and scarf complete Harry's iconic look, they are separate accessories. You could make just the basic doll first and add the accessories later if preferred.

What's the best way to attach the messy hair?

Pin the hair piece to the head first to check positioning, then sew it securely in place. The pattern creates a textured edge on Round 14 to give that characteristic messy Harry Potter hair look.

How do I make the Gryffindor scarf stripes even?

The pattern alternates between 4 rounds of red and 4 rounds of yellow to create the house stripes. Count carefully and use stitch markers to keep track of your color changes.