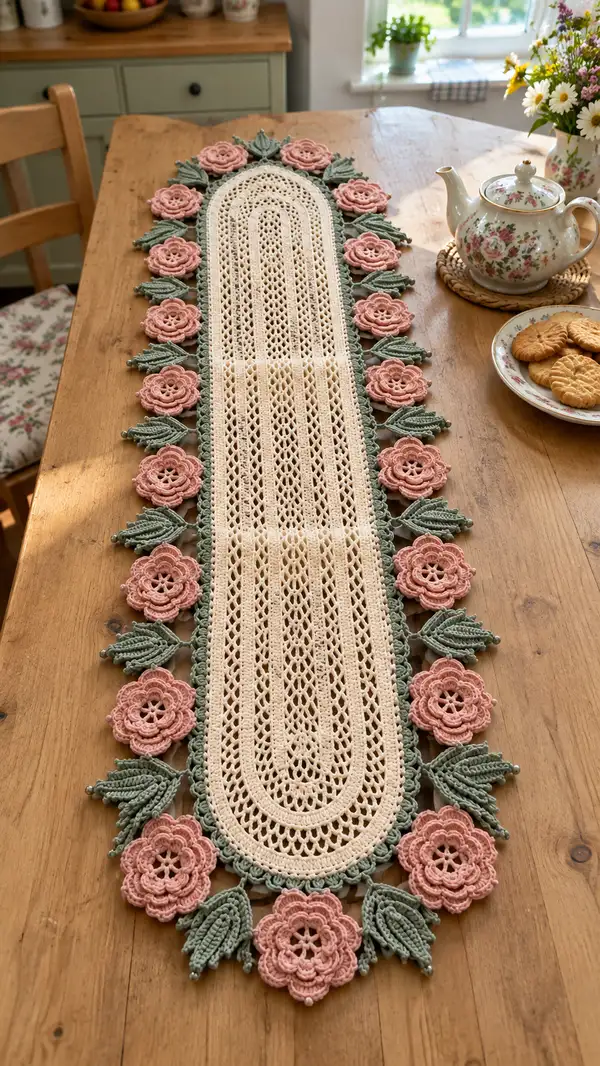
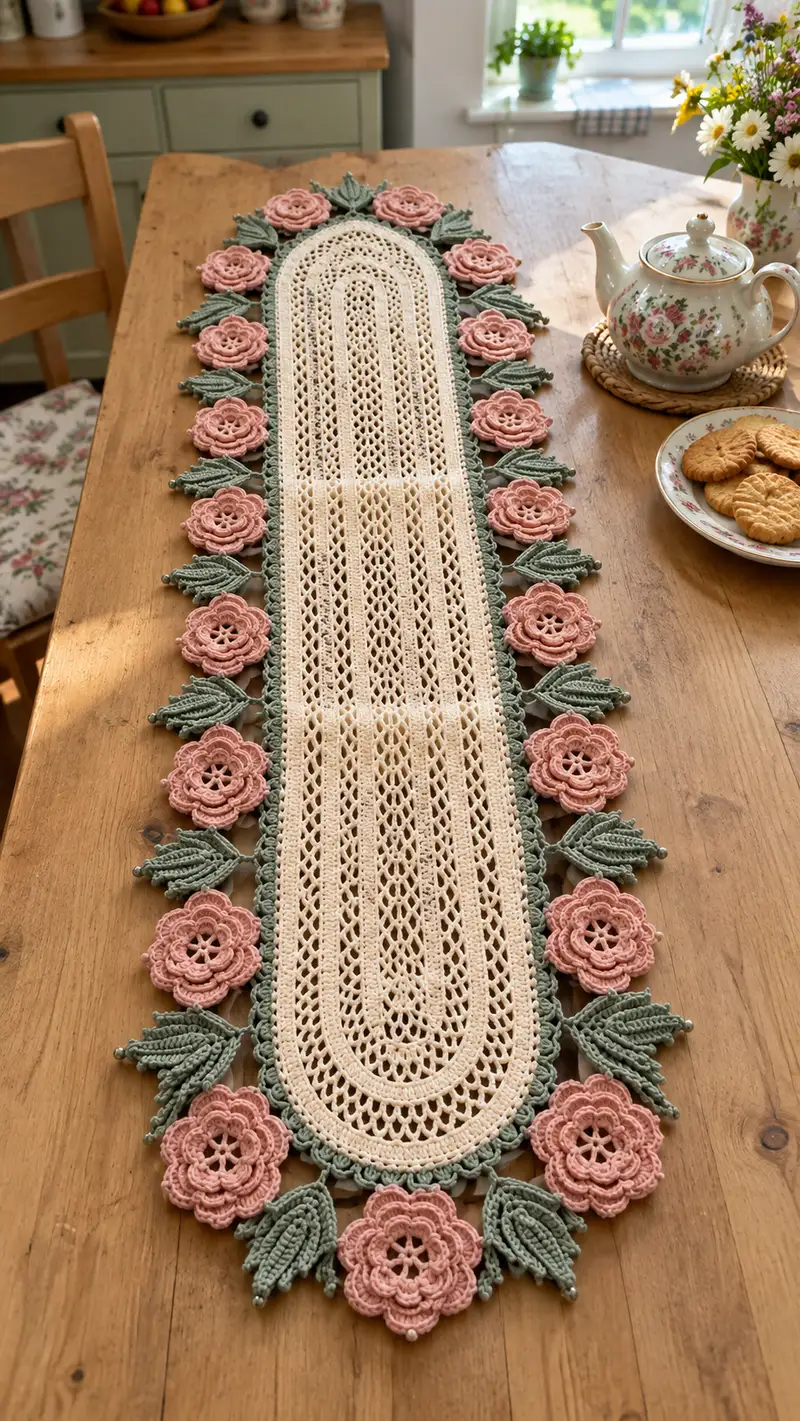
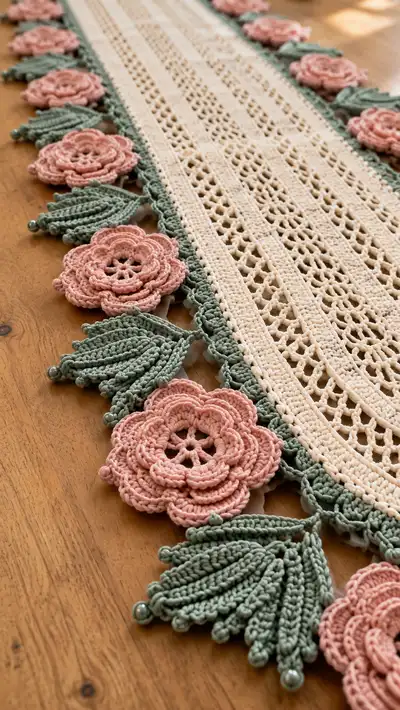
A long, elegant vintage-style table runner worked in soft cream with dusty rose 3D roses and muted sage leaves. The central oval lace panel features alternating openwork columns and solid ridges, framed by a scalloped sage border and a repeating motif of layered pink roses with beaded leaf tips. Perfect for a kitchen table or dresser, this runner combines delicate lace with sculptural floral appliques for a beautiful handmade accent.
Progress Tracker
0% Complete
— Long Oval Center Panel :
Notes :
This runner's center is worked flat in joined rounds from a long foundation chain to create a long oval. The example uses a foundation chain of 60 for a finished width of approximately 6.5-7 inches; adjust chain length in multiples of 6 if you wish a wider or narrower runner. The counts below are based on ch60 foundation and produce a center circumference of 126 stitches after the first round. Use stitch markers to mark the quarter points and the turning points at each end.
Round 1 :
Ch60, 1 sc in 2nd ch from hook and in next 57 ch (58 sc), 3 sc in last ch to turn, now working down the opposite side of the foundation chain work 1 sc in each of the remaining 58 ch, 3 sc in the first ch (joining point) - total (58+3+58+3 = 122)?
Correction Info :
To give an even oval with a smooth math total we will use foundation ch60 then: 1 sc in each of 60 ch (60), 3 sc in last ch (3), 1 sc in each of 60 ch along opposite side (60), 3 sc in first ch (3) = total 126 sc. The counts below assume the corrected total (126).
Round 2 :
1 sc in each st around (126)
Round 3 :
1 sc in each st around (126)
Round 4 :
1 sc in each st around (126)
Info :
Place 4 evenly spaced markers at quarter points (divide 126 by 4 = 31.5 ≈ place two markers at 31 and 32 stitches apart). These markers help keep the lace repeats lining up and help with later applique placement.
Round 5 :
1 sc in each st around (126)
Round 6 :
1 sc in each st around (126)
Round 7 :
1 sc in each st around (126)
Info :
We will now begin alternating lace columns with solid columns to create the delicate ribbed lace. Each lace repeat consumes 3 base stitches (1 dc+ch2 or similar) so plan repeats across the 126 stitch total. For this pattern the repeat unit is 3 stitches wide repeated 42 times (3 x 42 =126).
Round 8 :
*Dc in next st, ch2, sk 2 sts* repeat across complete round (42 reps) - join with sl st to first dc (126 theoretical positions composed of 42 dc + chains)
Round 9 :
*In the ch2 sp: (1 dc, ch2, 1 dc) (a small arch), sk next dc; in next dc work 1 sc* Repeat from * to * 42 times to rebuild the fabric over 126 positions (126)
Round 10 :
1 sc in each st and in each ch space around keeping an even tension (126)
Round 11 :
*Ch3 (counts as dc), tr in same sp, ch1, sk 2 sts, 1 dc in next st* repeat across (42 reps) - this builds a tall open motif column (126)
Round 12 :
1 sc in each st around to even the row and stabilize the open columns (126)
Info :
If following a chart you may repeat Rounds 8-12 in sequence to grow the length of the runner. Each 5-round sequence creates a single set of decorative open columns and stabilizing sc rows. Work these repeats until your runner center measures about the desired length leaving room for the rounded end repeats (the pictured runner has approximately 10 repeats of the 5-row sequence for a long runner).
Round 13-32 :
Repeat Rounds 8-12 ten times (each set = 5 rounds) maintaining the 126 st count (126)
Info :
After working the central repeats, stop when your center body measures the intended straight length between the end ovals. In the pictured example, after the repeated lace sequence there are three short rows of solid sc before beginning the end oval shaping.
Round 33 :
1 sc in each st around (126)
Round 34 :
1 sc in each st around (126)
Info :
We will now shape the rounded terminal oval by adding increases evenly in the next 8 rounds to ease the fabric around the end. Maintain markers at quarter points to ensure even distribution of increases.
Round 35 :
(10 sc, inc) x 11 + (remaining adjustments) → For even math across 126 sts we will do (10 sc, inc) x 11 = (11 x 11 = 121? Math explanation follows)
Correction Info :
To increase evenly by 22 stitches to form a gentler curve, perform (5 sc, inc) x 22 = (6 x 22 = 132). That would change the count. To preserve the center width while rounding, use small increases at each corner: divide 126 by 8 corner increase points = place 2 increases at each of the 4 end turning areas across two rounds. Practically: Round 35: in the 8 end-turning areas, work 2 incs (2 sc in the same st twice) per end area total + 1 sc elsewhere to keep flat—this yields a gentle shape. For clarity follow the steps below which preserve a simple math and shape.
Round 35 Revised :
Work 1 sc in each st to the first end-turning marker, then in that turning section work: (1 sc, 1 inc, 1 sc, 1 inc) across four turning sections total. Continue 1 sc in each st between turning sections. This results in an added 8 increases across the round: new total (126 + 8 = 134).
Round 36 :
1 sc in each st around (134)
Info :
Continue an additional round with small increases at the same turning sections to reach the rounded profile — we will now set final end-round shaping across the next two rounds to firm the curve.
Round 37 :
At each turning area work (1 sc, inc, inc, 1 sc) and 1 sc across straight sections between turning areas. This adds 8 more increases: total now (142)
Round 38 :
1 sc in each st around (142)
Info :
To form the scalloped join where the rose border will be attached, we will work a decorative picot round followed by a base round worked in sage color. Change to sage green now if you plan a colored border.
Round 39 :
Change to sage green. *1 sc in next 5 sts, (ch3, sl st in base of ch to make picot)* Repeat around placing a picot every 6 sts. Total stitch base remains (142) though picots create a textured edge.
Round 40 :
1 sc in each st around through back loops only (BLO) to create a defined ridge for sewing appliques (142)
Info :
Fasten off and block the center panel flat now. Blocking helps the lace open and gives accurate measurement before attaching floral motifs. Use pins and steam or spray blocking depending on yarn instructions. Let dry completely before continuing.
— Scalloped Border Base :
Round 1 :
With sage green and starting at one long side seam of the dry-blocked center, join yarn with sl st to an anchor picot, ch1, 1 sc in same st to secure
Round 2 :
*Ch4, sl st into the base 2 rounds back to form a shell chain loop, sc in next 4 sts* repeat around the long edges between turning ovals to create small shell loops for flower join points. On short oval ends work (sc, ch3, 3 sc in next chain sp) to form larger scallops. Continue until you reach starting point - exact number of repeats varies to match edge curvature.
Info :
The scalloped base creates loops and small open arches where the roses and leaves will be sewn. Keep loops consistent; pin spacing if necessary.
Round 3 :
Work 1 sc around edge through back loop of base chain spaces to stabilize scallops. Work evenly to maintain consistent scallop width.
Round 4 :
*(1 sc, ch3, 3 sc) in each large scallop; in small scallops work (5 sc)* repeat completely. Fasten off with long tails for sewing. Total base stitch count is variable dependent on foundation length but should mirror center edge spacing so appliques are evenly spaced.
Info :
Count scallop points across one long side and divide by the number of roses you plan to attach on that side to determine even spacing. The pictured runner has 12 roses in total (6 down each long edge) plus two on each short rounded end.
— Rose Motif (Make 12) :
Notes :
Each rose is a layered motif consisting of a small central wheel and three rounds of petals to create a full 3D rose. Work each rose with dusty rose yarn and a 3.0-3.5mm hook to keep petals crisp. Each round's stitch count has been checked for consistency with petal increases.
Round 1 :
Ch6, sl st to first ch to form a ring, ch1 (work into ring) (6)
Round 2 :
Into ring: *(1 sc, ch3)* repeat 6 times, sl st to first sc to close (6 sc + 6 ch3 loops) - this forms 6 spokes for petal bases
Round 3 :
Into each ch3 loop: (sc, hdc, 3 dc, hdc, sc) - make full petals. Repeat in each of the 6 loops (6 petals) - approximate stitch count placement corresponds to 6 petal units.
Info :
Round 3 forms the first, small petal layer. Keep tension consistent; do not over-tighten the last dc of each petal to ensure petals sit slightly proud rather than flat.
Round 4 :
Slip stitch between petals to the base of each ch loop then ch4, sl st into the base again to create a small spacer chain round around the first petals (this creates a defined layer for the next petals)
Round 5 :
Into each ch4 loop: *(sc, hdc, 5 dc, hdc, sc)* - this is the second petal layer. Work 6 such petals creating larger, fuller petals (visual effect is 6 larger petals overlapping the small ones)
Round 6 :
Sl st around to space, then ch5, sl st to base to create loops for final ruffled petal edge
Round 7 :
Into each ch5 loop: *(sc, hdc, 7 dc, hdc, sc)* - final large ruffled petals producing a layered 3D rose. After last petal sl st to base and fasten off leaving a 20-25cm tail for sewing (petal edge complete)
Info :
Make 12 roses in total. Slight variations in hook size will change fullness; if petals are too floppy try one hook size smaller for rounds 5-7. Weave the working tail into the center underside for secure sewing later.
— Leaf Motif (Make 24) :
Notes :
Each leaf is an elongated scalloped leaf worked in rows from a foundation chain, then joined at the tip and base to form a symmetric leaf. The leaves are slightly cupped using raised ridges and finished with a bead at the tip if desired.
Round/Row 1 :
Ch18, 1 sc in 2nd ch from hook and in next 15 ch (16 sc), ch1, turn (foundation)
Round/Row 2 :
Work along chain foundation: (1 sc, 1 hdc, 4 dc, 1 hdc, 1 sc) across to shape tip; now working down the opposite side of base chain: 1 sc in each of the chain bumps back to base join. Join with sl st to first sc - this forms an oval leaf body.
Round/Row 3 :
Work BLO on entire leaf: 1 sc in each st BLO to create a raised midrib effect (total variable approx 34 sts)
Round/Row 4 :
Using surface crochet, make 3 raised ridges along leaf: *Skip 3 sts, sl st down body placing 8 spaced sl sts to form ridges, fasten off leaving long tail for sewing (these ridges create the characteristic multi-vein leaf look)
Round/Row 5 :
Optional bead: using a beading needle attach a 6mm bead to the leaf tip and finish by incorporating bead thread into final sl st to secure. Fasten off (work 24 leaves)
Info :
Work leaves with the sage green yarn and a slightly smaller hook than the rose so leaves remain slightly firm and cup under the roses. Make two leaves for each rose position (one on each side) if desired or one centered between roses as pictured.
— Small Connective Motifs and Picot Beads :
Round 1 :
To make small connectors that join leaves and roses to the scalloped base, ch6, sl st to form ring, ch2 (counts as hdc), 6 hdc into ring, join (6)
Round 2 :
*Ch4, sl st into base to create a loop* repeat 6 times to make small loops along the connector. Fasten off leaving long tail for sewing.
Info :
These small connectors help hold the layered rose and leaf assemblies away from the center showing the scalloped sage edge. They also provide small spaces to stitch beads if using beads.
— Assembly & Joining Rounds :
Info :
Layout: After blocking the center and making all appliques, lay the center right side up. Pin the scalloped base in place around the edge. Then pin the roses around the scallops evenly — typically 6 roses per long side and 2 at each short rounded end for the pictured layout (12 total on long edges + 4 on ends = 16 flowers depending on your runner length). Place leaves between and behind roses to create fullness.
Round 1 :
Using long tails from scalloped base, whip stitch the scallop base to the blocked center by sewing through both back loops of the base and the adjacent center stitches. Use even spacing and hide knots on the back side.
Round 2 :
Sew rose centers to the scalloped base: bring the rose tail through the underside of the scallop and use mattress or ladder stitch to secure around three points on the rose underside. Pull moderately tight so the rose sits proud but not crushed.
Round 3 :
Position leaves under and between rose petals and sew through leaf base and scalloped edge. Add a small whip stitch at leaf base and one or two anchor stitches along the leaf midrib so the leaves sit slightly angled outward.
Info :
Add connectors: Use the small connective rings to attach between leaf base and rose underside if extra separation is desired. Sew connectors to scallop loops first, then to rose underside to create a small stem effect.
Round 4 :
With sage yarn and a long tail, sew tiny beads to the ends of each leaf if desired. Secure bead knots with a dab of fabric glue on the backside and weave in the thread tail through several stitches before trimming.
Round 5 :
Once all appliques are sewn, run a finishing edge round of sc in sage around the entire perimeter through both the scalloped base and the outer edges of the appliques where they meet to lock all pieces together. Work carefully to avoid visible stitches on the rose tops. This locking round will unify the runner border.
Info :
After assembly, lightly steam or press the made runner from the back to settle seams. If any facing appears uneven, carefully unstitch and reposition before final finishing.
— Alternative Edge Variation (Optional) :
Round 1 :
Instead of fixed scallops, you may crochet a corded edging: *ch5, sl st into scallop base across* to create hanging loops then embellish with beads and tassels between roses. This requires minor adjustments in sewing spacing.
Info :
If you elect for the corded edge variation, make sure to test one length before applying all around to ensure beads and loops are consistent and do not tug the scalloped base out of shape.
— Finishing & Care Instructions :
Info :
Weave all ends on the back side of the runner. Use gentle hand washing with mild detergent when needed. Reshape and block while damp. Avoid machine washing or tumble drying which can distort cotton appliques and beads. Remove beads before washing if using glass beads glued in place.
Final Info :
Enjoy your finished runner! The layered roses will flatten slightly with age and use; if you prefer them firmer, lightly starch or use textile stiffener according to manufacturer instructions applied only to the underside of the petals.
This vintage rose table runner pattern combines delicate lacework and sculptural floral appliques to create a stunning handmade centerpiece. Each carefully worked section — from the filigree oval center to the layered roses and beaded leaves — comes together to form a cohesive, romantic design. Working this runner is a lovely slow-craft experience that rewards patience with a truly heirloom result. 🌸🧶 Display it proudly on a wooden table or dresser and enjoy the compliments! 🌿