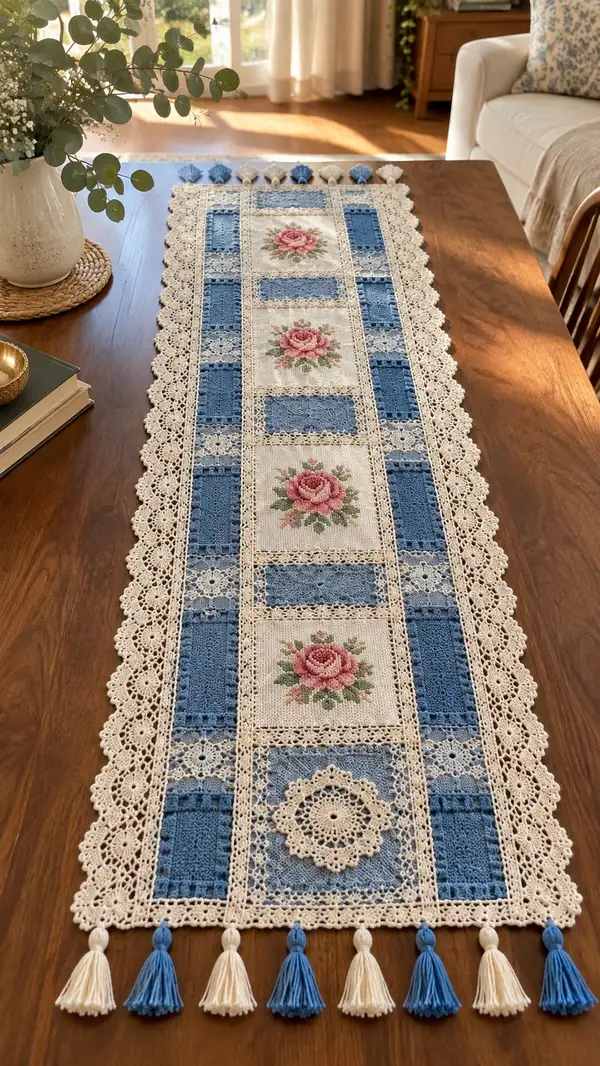
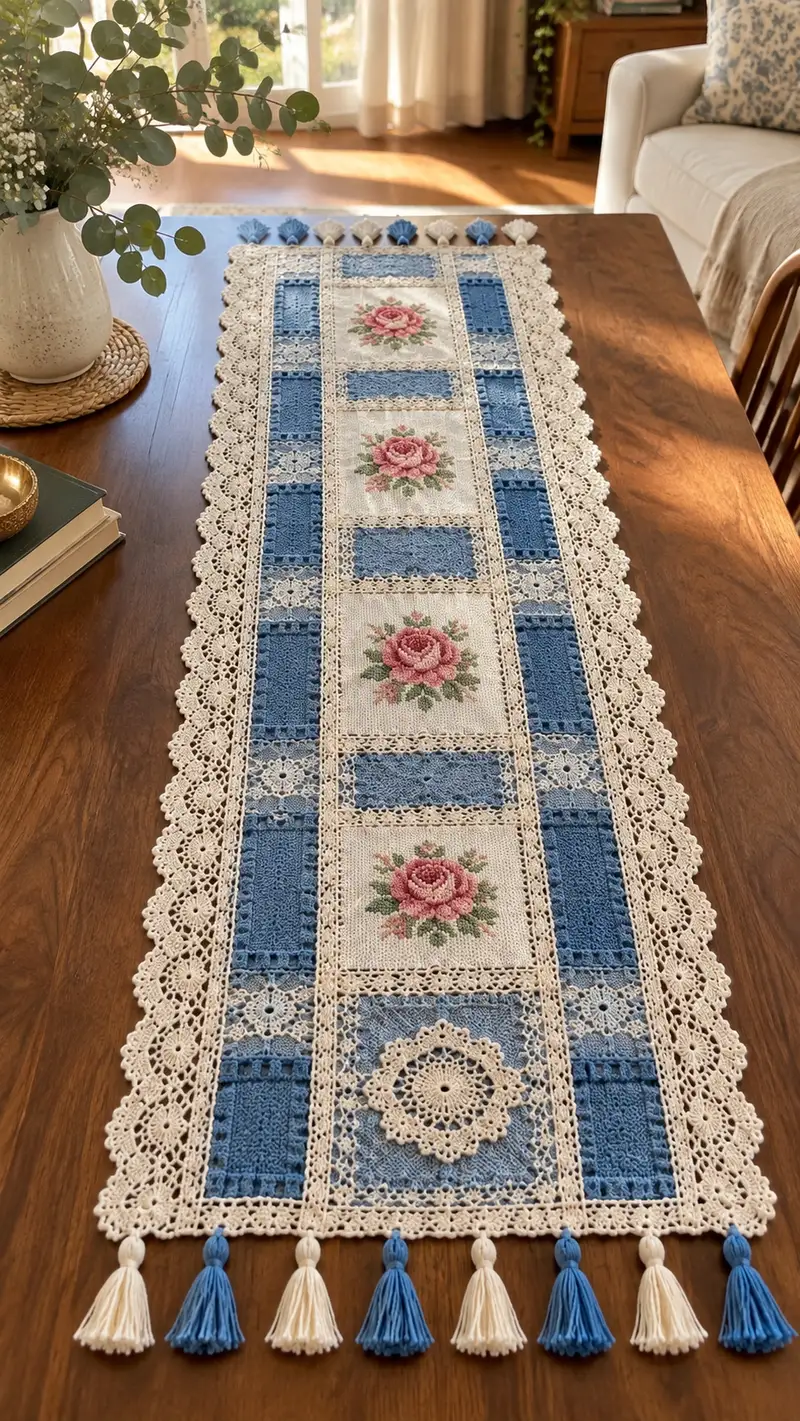
A delicate vintage-inspired table runner featuring three embroidered rose panels framed by textured blue crochet blocks and a lacy cream scalloped border. Finished with alternating blue and cream tassels, this runner brings an elegant, handmade touch to dining tables and sideboards. Designed to combine surface embroidery (or pre-stitched fabric squares) with crocheted motifs and a join-as-you-go lace assembly for a classic heirloom finish.
Progress Tracker
0% Complete
— Overview & Preparation :
Info :
Before beginning motifs, decide whether you will use pre-stitched embroidered squares (recommended for perfect floral detail) or create the roses with tapestry crochet. This pattern assumes three pre-stitched squares approximately 12cm (4.7") finished; crochet frames will be worked around them to integrate into the runner. Block all fabric squares and yarn gauge squares first to ensure consistent finished dimensions.
Info :
Gauge note: With worsted cotton and 3.5mm hook, a 10cm (4") swatch in single crochet in rows should measure approximately 16 sc x 20 rows. Adjust hook size if necessary. The pattern uses rounds for square frames and rows for rectangular panels; counts below are based on that gauge.
— Embroidered Center Squares (Make 3) :
Materials :
One pre-stitched embroidered square approx 11.5-12.5cm (4.5-5") finished. Use cream/linen background. The crocheted frame will add approximately 1.5-2.0cm per side to reach the final motif size.
Round 1 :
With cream yarn and 3.5mm hook, hold the embroidered square with RS facing. Attach yarn in the middle of one side with a sl st, ch1, work 1 sc evenly along the edge of the fabric every 4-5mm (approx 12 sc along each side depending on fabric edge) until you reach the corner. Work 3 sc into the corner fabric fold to create a rounded corner. Continue around the square. Aim for 48 sc total around the square (48).
Info :
If your fabric edge spacing places you at a different stitch count, adjust to reach a multiple that will work with corner increases later. The target for this pattern's frames is 48 sc base so motif joins align.
Round 2 :
Ch1, turn. 1 sc in each sc around, working 3 sc into each corner stitch from previous round to widen corner (48).
Round 3 :
Ch1, 2 sc in next st, 1 sc in next 10 sts, 2 sc in next st (corner), 1 sc in next 11 sts, 2 sc in next st (corner), 1 sc in next 11 sts, 2 sc in next st (corner), 1 sc in next 11 sts (52).
Round 4 :
1 sc in each st around (52)
Round 5 :
(3 sc, 1 inc) x 4 times across each side and corner sequence as follows: 3 sc, 2 sc in next st, repeat until end (56)
Round 6 :
1 sc in each st around (56)
Info :
At this stage the crocheted frame will be snug against the embroidered square and should lie flat when blocked. If it begins to ripple, undo last round and reduce increases or switch to a slightly smaller hook and retest.
Round 7 :
(4 sc, 1 inc) x 4 times (60)
Round 8 :
1 sc in each st around (60)
Round 9 :
(5 sc, 1 inc) x 4 times (64)
Round 10 :
1 sc in each st around (64)
Info :
If you prefer a visible frame ridge, work the next 2 rounds in BLO to create a subtle ledge for the blue panels to abut.
Round 11 :
1 sc in each st BLO around (64)
Round 12 :
1 sc in each st around (64)
Round 13 :
(7 sc, 1 inc) x 8 (72)
Round 14 :
1 sc in each st around (72)
Round 15 :
(8 sc, 1 inc) x 8 (80)
Round 16 :
1 sc in each st around (80)
Info :
Now the framed square will measure about the intended center square dimension plus a built frame of roughly 1.2-1.8cm; adjust rounds if your pre-stitched center differs. Make three identical framed squares using the same counts and blocking to ensure all three match.
Round 17 :
(9 sc, 1 inc) x 8 (88)
Round 18 :
1 sc in each st around (88)
Round 19 :
(10 sc, 1 inc) x 8 (96)
Round 20 :
1 sc in each st around (96)
Round 21 :
(11 sc, 1 inc) x 8 (104)
Round 22 :
1 sc in each st around (104)
Info :
If your framed squares now measure approximately 14-15cm square (including frame), proceed. These frames are intentionally a little larger than the stitched centers so the blue panels will nestle between them neatly when motifs are joined.
Round 23 :
(12 sc, 1 inc) x 8 (112)
Round 24 :
1 sc in each st around (112)
Round 25 :
(13 sc, 1 inc) x 8 (120)
Round 26 :
1 sc in each st around (120)
Round 27 :
(14 sc, 1 inc) x 8 (128)
Round 28 :
1 sc in each st around (128)
Info :
Fasten off leaving long tail for join-as-you-go connections. We will use the outermost round of each framed square as the anchor for joining to blue panels and lace connectors. Make sure all three framed squares are identical in stitch count and blocked flat.
— Blue Textured Panels (Make 8) :
Info :
Blue panels are rectangular textured blocks that alternate vertically along both sides of the runner between the framed rose squares. Each panel is worked flat in rows (we list 'Round' as row for consistency). Target finished rectangle size: approximately 14cm x 6.5cm to fit between frames with narrow seam allowances.
Round 1 :
With blue yarn and 3.5mm hook, ch48. Turn. (48)
Round 2 :
Row 1: 1 sc in 2nd ch from hook and in each ch across (47)
Round 3 :
Ch1, turn. 1 sc in BLO in each st across to create a subtle ridge edge (47)
Round 4 :
Ch1, turn. 1 sc in each st across (47)
Info :
Create a textured band by alternating rows of sc and rows of front/post stitch. Keep stitch counts consistent across rows to ensure edge alignment with framed squares.
Round 5 :
Ch2 (counts as hdc), turn. Hdc in BLO across (47)
Round 6 :
Ch1, turn. 1 sc in each st across (47)
Round 7 :
Ch3 (counts as dc), turn. 1 dc in each st across (47)
Round 8 :
Ch1, turn. 1 sc in each st across (47)
Round 9 :
Ch2, turn. *FPdc around next st, BPdc around next st* repeat across to create raised square texture (47)
Round 10 :
Ch1, turn. 1 sc in each st across (47)
Round 11 :
Repeat Rounds 5-10 two more times to build height. After these repeats you should have 16 rows total; adjust repeats to reach desired height (47)
Round 12 :
Ch1, turn. 1 sc in each st across (47)
Info :
Fasten off leaving long tail for seam. Make eight identical blue panels. When blocked they should measure approx the same height as the framed squares' side-to-side spacing. If panels are slightly smaller or larger, you can add or remove textured repeat rows to match dimensions.
— Small Lace Connector Squares (Make 6) :
Info :
Small lace connector squares are decorative cream squares that alternate between blue panels and framed squares to create a checkerboard layout. They are worked in rounds to create a delicate motif.
Round 1 :
With cream yarn and 3.5mm hook, 6 sc in magic ring (6)
Round 2 :
Inc in each stitch around (12)
Round 3 :
(1 sc, inc) x 6 (18)
Round 4 :
(2 sc, inc) x 6 (24)
Round 5 :
Ch3, *skip next st, sc in next st, ch3* repeat around to create looped spokes; end with sl st to base (24 loops)
Round 6 :
Work into each ch-3 loop: (sc, hdc, 3 dc, hdc, sc) in each loop to form petal clusters (24 petals)
Round 7 :
1 sc in each st around to tidy (96)
Round 8 :
Work shell edgings: *(skip 2 sts, 5 dc in next st, skip 2 sts, sl st)* repeat around (approx 12 shells depending on exact stitch count)
Info :
Fasten off leaving long tail for join-as-you-go. Make six connector squares. Block flat, centering decorative petal motifs. The exact counts above scale depending on your initial magic ring tension; ensure final square measures approximately 4.5-5cm to match runner spacing.
— End Corner Medallions (Make 2) :
Info :
Two large circular medallions sit near each short end of the runner as pictured (one centrally in the bottom band nearest tassels, one near top). They are worked in rounds to create a focal rosette which is later attached via join-as-you-go.
Round 1 :
10 sc in magic ring (10)
Round 3 :
(1 sc, inc) x 10 (30)
Round 4 :
1 sc in each st around (30)
Round 5 :
Ch3, *sk next st, 1 sc in next st, ch3* repeat to make ch-3 loop mesh around outer circle (30 loops)
Round 6 :
Into each ch-3 loop: (sc, hdc, 5 dc, hdc, sc) to form dramatic petals around the rosette
Round 7 :
1 sc around to tidy (approx 180)
Round 8 :
Work 2 rounds of picot scallop: *1 sc in next 3 sts, sl st, ch3, sl st (picot made) in same st*, repeat around
Round 9 :
1 sc round; fasten off leaving long tail for attachment
Info :
Blocking the medallion carefully will ensure petals are even and it lays flat against a blue panel. Attach one medallion centrally to the endmost framed square/band as pictured, then mirror at the other end.
— Join-As-You-Go Assembly (Main Runner Layout) :
Info :
Layout the motifs in the following order down the center strip: framed rose square, blue panel on left and right (two panels spanning both sides), connector squares interspersed, second framed rose square, repeat, finishing with medallion band. The runner in the photo is: [medallion row] - blue block - framed square - blue block - framed square - blue block - framed square - blue block - medallion row. Use block and measure spacing to confirm exact counts.
Round 1 :
Start with a framed rose square as base. Using the long tail from outer round, join cream yarn at a corner stitch where a blue panel will adjoin. Work sl st to the adjacent side along outermost round to the midpoint where the blue panel will sit.
Round 2 :
Align one edge of a blue panel to the framed square side. With RS facing, use join-as-you-go: work sc through the edge stitch of the blue panel and into the outer round stitch of the framed square across the length: *insert hook through next stitch of panel, pull up loop, insert into corresponding outer stitch of framed square, sc through both loops* repeat across the seam to join (number of joins equals width of panel, roughly 47 joining points).
Round 3 :
When you reach the corner, build a corner join by working sc, ch2, sc into corner tip of framed square and then continue joining along the adjacent side. The ch2 forms a flexible corner to reduce crowding (continue joining until blue panel is fully affixed).
Round 4 :
Next, attach a small lace connector square between the outer edge of the blue panel and the side of the adjacent framed square by slip-stitching into both motifs in corresponding outer rounds, then secure with a round of sc around the connector’s outer round to tidy if needed.
Info :
Use tapestry needle and tidy whip-stitch where join-as-you-go leaves gaps. Keep tension even across joins; if seams pull, gently ease the seam on motif being joined by blocking after joining the first few motifs and re-joining next section.
Round 5 :
Continue joining motifs in the predetermined layout, alternating blue panels and connector squares. For long edges where two blue panels meet at the runner center, use sc across both panel edges and add a decorative row of chain loops on the seam to emulate the openwork vertical bars seen in the photo.
Round 6 :
After all central motifs are joined, check length and symmetry. Adjust by adding or subtracting a textured repeat row in the blue panels before final assembly if runner is too long or short.
Info :
It is helpful to pin motifs on a flat surface and align the outer edges before final joining. Blocking individual motifs prior to join ensures consistent flatness and seam alignment.
— Outer Scalloped Lace Border :
Info :
The scalloped cream lace border is worked around the entire perimeter of the assembled central strip using a join-as-you-go edging. For ease, we’ll establish an outer perimeter round of single crochet to create a base to which shells and picots are applied.
Round 1 :
Join cream yarn to any outer corner stitch of the assembled runner. Work 1 sc evenly into each outermost stitch around all motifs, placing 3 sc into corners to round them out. Maintain consistent spacing. This round should produce approximately 400-480 sc stitches depending on runner length and motif counts (exact count will vary by your gauge).
Round 2 :
1 sc in each st around to build base (same count as Round 1)
Round 3 :
Ch3, skip 2 sts, sl st in next st; repeat to form a chain-lace foundation around the edge (approx 1 ch-3 loop every 3 stitches). Adjust loops to match inside motifs and prevent puckering.
Round 4 :
Into each ch-3 loop: (sc, hdc, 5 dc, hdc, sc) forming generous scallop petals around the perimeter (one shell per ch-3 loop)
Round 5 :
One sc round to anchor shells (same stitch count as number of shells)
Round 6 :
Working in shell centers, *sl st, ch5, sl st* to create tall picot arches between scallops; this creates the airy openwork seen along the edge
Round 7 :
In each arch: work 5 dc shell to create a second layered scallop for depth. Fasten off leaving long tail for final weaving.
Info :
Use steam blocking to gently shape scallops into beautiful arcs. Pin each scallop into place while it cools so it stays in desired curve. If scallops appear too loose, use a smaller hook for the scallop rounds next time.
— Finishing Motif Medallions and Small Details :
Round 1 :
Sew the large end medallions into position using the long tails from medallion rounds. Attach medallion to center of endmost blue panel cluster by whip stitch through medallion outer round and base panel outer stitches (make sure medallion sits centered - approx centered on the short end alignment).
Round 2 :
Stitch small decorative cream rings (optional) at each corner where the blue panels meet framed squares to match the photograph’s small rosette motifs. Use a 10-12 st circular motif: 6 sc in magic ring, two rounds of sc increasing to produce approx 24 sc, then a small shell round and fasten off.
Info :
Weave in all tails from motif joins on the WS with a yarn needle. Trim carefully. If the runner edges gaped slightly at join points, use tiny invisible whip stitches to flatten seam before final blocking.
— Tassels (Alternate Cream and Blue) :
Info :
The runner pictured shows alternating tassels (cream, blue, cream, blue, etc.) along both short edges, approximately 9 tassels per edge. Make tassels with about 20-22 strands each to create fluffy tassels about 7cm long.
Round 1 :
Wrap yarn 24 times around a 7cm piece of cardboard for medium fullness. Slide off and tie a short piece of yarn tightly about 1cm from top to form the tassel head. Cut the bottom loops open and trim to even length (approx 7cm).
Round 2 :
Use a small length of yarn to create a hanging loop by threading through the top knot and knotting. Use the hanging loop to attach the tassel to the runner along the outermost scalloped edge, stitching through the head and around the base scallop to secure.
Round 3 :
Attach tassels evenly spaced by measuring the runner width and dividing by number of tassels. For the pictured runner, 9 tassels per short edge work well; attach at shell midpoints for a balanced look.
Info :
For extra polish, wrap a small length of contrasting yarn around the tassel head to form a decorative band. You may add a tiny dab of fabric glue to secure band if needed.
— Final Blocking and Care :
Info :
After assembly, wet-block the entire runner: pin to blocking board with scallops shaped, allow to dry completely. This step is crucial to set the lace and ensure all motifs sit flat and seams are invisible. Use low steam if necessary to coax stubborn scallops into place.
Round 1 :
Trim any stray fibers, weave in all tails (make sure ends are buried through at least 3-4 motifs worth of stitches for security). Double-check tassel knots and re-tie if loose.
Info :
Store flat or rolled to avoid crushing lace scallops. Hand-wash gently with mild soap and lay flat to dry; avoid machine washing to keep lace crisp.
Completing this vintage rose runner is such a satisfying project — every framed flower, textured blue block, and scalloped edge comes together to create a heirloom-ready centerpiece. The alternating tassels add a playful flourish while the lace border keeps the look timeless and elegant. Whether you display it for everyday charm or special occasions, this runner becomes a conversation piece and a handmade treasure. Happy stitching and enjoy the slow, meditative process of creating something beautiful! 🧶🌹