🧢 Beautiful ✨ Detailed πŸ’ Adorable

Wallace and Wanda Whales Amigurumi Pattern

Wallace and Wanda Whales Amigurumi Pattern
4.8β˜… Rating
5-7 Hours Time Needed
1.5K Made This
βœ‚οΈ

Intermediate Level

Ideal for those with basic crochet experience, featuring slightly more advanced stitches and techniques to expand your skills.

⏱️

Weekend Treat

Takes 5-7 hours, making it an enjoyable project to finish over a couple of days.

🧸

Cute Companion

An adorable friend to cherish, handcrafted with love to bring comfort and joy for years to come.

About This Wallace and Wanda Whales Amigurumi Pattern

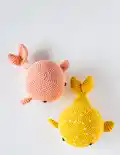
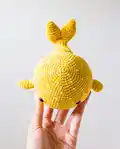
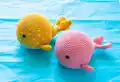
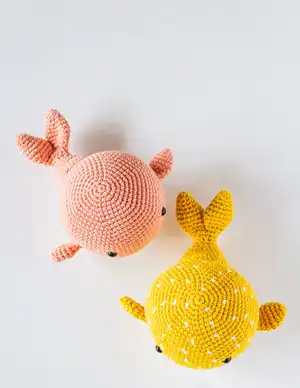
This pattern creates two sweet whale amigurumi, Wallace and Wanda, complete with fins and a joined tail. The design features a smooth round body and an optional Fair Isle dotted color pattern for extra personality. Youll work from the top down in continuous rounds and finish with simple sewing and stuffing.

Wallace and Wanda Whales Amigurumi Pattern crochet pattern - detailed view of completed project

Includes full round-by-round instructions, Fair Isle color dot guidance, and assembly tips. Perfect for gifting or adding a handmade companion to your collection.

Why You'll Love This Wallace and Wanda Whales Amigurumi Pattern

I absolutely love this pattern because the rounded whale shape is both simple and satisfying to crochet, producing a super cute result every time. I enjoy how the Fair Isle dots add a playful texture and a professional touch without being difficult to execute. The pattern walks you through every round and the joining steps for the tail which makes assembly feel approachable. I also love that the finished whales are sturdy, huggable, and make lovely gifts or nursery decor.

Wallace and Wanda Whales Amigurumi Pattern step 1 - construction progress Wallace and Wanda Whales Amigurumi Pattern step 2 - assembly progress Wallace and Wanda Whales Amigurumi Pattern step 3 - details and accessories Wallace and Wanda Whales Amigurumi Pattern step 4 - final assembly and finishing

Switch Things Up

I love how easy it is to customize these whales by changing colors; try pastel shades for a nursery-friendly pair or bold brights for a playful look.

If you want a larger whale, I often use a thicker yarn and larger hook to scale up the pattern; conversely use thinner yarn for keychain-sized minis.

I sometimes swap safety eyes for embroidered eyes to make the toy suitable for babies and to create a softer expression.

To give the whale different personalities, change the spacing of the eyes or add a small embroidered smile to alter its expression.

Try using variegated or speckled yarn for a textured, organic finish without doing Fair Isle colorwork.

For extra durability if selling or gifting, I reinforce firmly sewn pieces with a few hidden whipstitches and knot yarn ends securely.

I like adding tiny accessories like a crocheted bow, scarf, or a felt patch to personalize each whale for the recipient.

Experiment with different stuffing levels to get a squishy or more structured whale; I recommend stuffing firmly but not overpacking to maintain shape.

Consider adding a small weighted pouch (rice in a sachet) in the bottom for a slightly weighted, cuddle-friendly toy if desired.

I also enjoy making a matching set of different sizes and colors to display togetherβ€”mix and match techniques from this pattern for variety.

Common Mistakes & How to Fix Them

βœ— Forgetting to use a stitch marker can make you lose track of the beginning of rounds; place a marker at the start of every round to keep your stitch count accurate. βœ— Not stuffing gradually leads to lumps or a misshapen body; stuff little by little as you work and shape the whale consistently before closing. βœ— Cutting yarn during Fair Isle color changes will create many tails to weave in; carry the unused color on the wrong side and work over it as instructed. βœ— Skipping the invisible decrease can leave gaps in your decreases; use an invisible decrease method to keep the stitches neat and gap-free.

Wallace and Wanda Whales Amigurumi Pattern

Make two adorable whale friends with this full crochet pattern. Youll learn to shape a round whale body, add cute fins and a tail, and optionally create a fair isle dotted design. The pattern includes every round and clear assembly instructions so you can follow along easily and create a charming handmade toy.

Intermediate 5-7 Hours

Materials Needed for Wallace and Wanda Whales Amigurumi Pattern

β€” Main Fabric

  • 01
    Rico Creative Ricorumi DK cotton - Color A Tangerine (2 x 0.9 oz ball)
  • 02
    Rico Creative Ricorumi DK cotton - Color B White (1 x 0.9 oz ball)

β€” Tools Required

  • 01
    Crochet hook size 2.75 mm (US size C)
  • 02
    Fiberfill for stuffing
  • 03
    Safety eyes 8 mm (2 pieces)
  • 04
    Tapestry needle
  • 05
    Stitch marker
  • 06
    Scissors
  • 07
    Pins for positioning parts during assembly

Progress Tracker

0% Complete

β€” Stats :

Info :

The whale is approximately 6.5 inches long (15.24 cm)

β€” Materials :

Infos :

YARN: Rico creative Ricorumi DK cotton: A - Tangerine (2 x 0.9 oz ball) B - White (1 x 0.9 oz ball). HOOK: 2.75 mm (US size C). OTHER: Fiberfill for stuffing. Safety eyes (8 mm). Tapestry needle. Stitch marker.

β€” Terminology :

Info :

This pattern uses US terminology. MR - magic ring. st(s) - stitch(es). ch(s) - chain(s). sc - single crochet. inc - increase. dec - decrease. sl st - slip stitch. F/O - fasten off. BLO - back loop only. [ ] - total # of sts per round. hdc - half double crochet. ( ) - repeat steps in brackets.

β€” Notes :

Infos :

1. The basic pattern for both of the whales is the same. If you want to make the whale with color dots (Wallace), follow the fair isle pattern instructions listed below, along with the basic pattern beginning from round 1 to round 25 of the head and body. 2. Work in continuous rounds without joining the round with a slip stitch. Do not turn at the end of each round unless directed to. 3. Use a stitch marker to keep track of the beginning of each round. 4. The whale's body is constructed from top to bottom. The fins and tail are made separately and attached to the body during assembly. 5. I recommend using an invisible decrease to avoid getting a gap in the stitches. 6. Firmly stuff as you work and overstuff slightly before finishing the section you are working on. This will allow for the stuffing to fill out the shape once crocheting is done. 7. For the whale with colored dots (Wallace) carry the yarn on the wrong side technique is used for changing colors, instead of cutting and rejoining a new strand each time. To carry a strand on the wrong side, work over the unused strand every few stitches with the second color.

β€” Fair Isle Color Dot Pattern :

Round 1 :

sc in color A around

Round 2 :

sc in color A around

Round 3 :

(5 sc in color A, 1 sc in color B) around

Round 4 :

sc in color A around

Round 5 :

sc in color A around

Round 6 :

2 sc in color A, (1 sc in color B, 5 sc in color A) around until last four stitches. End with 1 sc in color B, 3 sc in color A.

Info :

Repeat Rounds 1-6 for the color dot pattern.

β€” Body :

Info :

Using the color A (Tangerine) yarn, begin with an MR

Round 1 :

6 sc in MR [6]

Round 2 :

(inc in each st) x 6 [12]

Round 3 :

(sc, inc) x 6 [18]

Round 4 :

(2 sc, inc) x 6 [24]

Round 5 :

(3 sc, inc) x 6 [30]

Round 6 :

(4 sc, inc) x 6 [36]

Round 7 :

(5 sc, inc) x 6 [42]

Round 8 :

(6 sc, inc) x 6 [48]

Round 9 :

(7 sc, inc) x 6 [54]

Round 10 :

(8 sc, inc) x 6 [60]

Round 11 :

sc in each st around [60]

Round 12 :

(9 sc, inc) x 6 [66]

Round 13 :

(10 sc, inc) x 6 [72]

Round 14-24 :

sc in each st around [72]

Round 25 :

(10 sc, dec) x 6 [66]

Info :

Insert the safety eyes between rounds 17 and 18, approx 13 sts apart. Stuff and shape the body as you work.

Info :

F/O color A (Tangerine) yarn, join and continue in color B (White) yarn.

Round 26 :

sc in each st through BLO around [66]

Round 27 :

(9 sc, dec) x 6 [60]

Round 28 :

(8 sc, dec) x 6 [54]

Round 29 :

(7 sc, dec) x 6 [48]

Round 30 :

(6 sc, dec) x 6 [42]

Round 31 :

(5 sc, dec) x 6 [36]

Round 32 :

(4 sc, dec) x 6 [30]

Round 33 :

(3 sc, dec) x 6 [24]

Round 34 :

(2 sc, dec) x 6 [18]

Round 35 :

(1 sc, dec) x 6 [12]

Round 36 :

(dec) x 6 [6]

Info :

Fill the body with fiberfill firmly. F/O and thread tail end of yarn onto a tapestry needle, insert the needle in and out of the remaining sts, pull tight to close, and weave in end.

β€” Tail :

Info :

Start by making two fins (these will be joined together later in the pattern to complete the tail).

Info :

Using the color A (Tangerine) yarn, begin with an MR

Round 1 :

6 sc in MR [6]

Round 2 :

(sc, inc) x 3 [9]

Round 3 :

sc in each st around [9]

Round 4 :

(2 sc, inc) x 3 [12]

Round 5 :

(3 sc, inc) x 3 [15]

Round 6 :

(4 sc, inc) x 3 [18]

Round 7 :

sc in each st around [18]

Round 8 :

(4 sc, dec) x 3 [15]

Round 9 :

(3 sc, dec) x 3 [12]

Round 10 :

(1 sc, dec) x 4 [8]

Info :

For the first fin you make, F/O and cut the yarn. For the second fin, stop after round 10 and follow the joining instructions given on the next page below.

β€” Tail Joining :

Round 11 :

Joining round

Info :

Insert your hook into the st next to the closing st of the first fin and draw up a loop and yarn through as you would for any sc stitch. Mark this as the first sc of this round and continue crocheting around through both fins. You should have 16 sts by the end of this round.

Round 12 :

(2 sc, dec) around [12]

Round 13 :

sc in each st around [12]

Round 14 :

(inc) x 2; sc in next 9 sts; inc around [15]

Round 15 :

(1 sc, inc) x 2; sc in next 10 sts; inc around [18]

Round 16 :

(2 sc, inc) around [24]

Round 17 :

sc in each st around [24]

Round 18 :

(inc) x 6 times; sc in next 18 sts around [30]

Round 19 :

(inc, 2 sc) x 4; sc in next 4 sts; hdc in next 10 sts; sc in next 4 sts around [34]

Round 20 :

sc in next 20 sts; hdc in next 10 sts; sc in next 4 sts around [34]

Info :

Sl st into the next stitch and F/O leaving a long tail for sewing.

β€” Side Fins (Make 2) :

Info :

Using the color A (Tangerine) yarn

Round 1 :

6 sc in MR [6]

Round 2 :

(1 sc, inc) x 3 [9]

Round 3 :

(2 sc, inc) x 3 [12]

Round 4 :

(3 sc, inc) x 3 [15]

Round 5 :

sc in each st around [15]

Round 6 :

(3 sc, dec) x 3 [12]

Round 7 :

(1 sc, dec) x 4 [8]

Round 8 :

sc in each st around [8]

Info :

Sl st into the next stitch and F/O leaving a long tail for sewing. Do not stuff the fins.

β€” Assembly :

Info :

1. Position the fins evenly on each side of the body. I have placed them on rounds 24 and 25 beginning from the top. Before sewing the fins on, ensure that they are symmetrically placed and are parallel to the eyes. 2. The side with hdc is the bottom side of the tail. Use fiberfill to stuff the front of the tail (not the fins). Using the side fins as a guide pin the tail centrally to the back of the body. Sew the tail neatly and carefully.

Assembly Instructions

  • Position the side fins evenly on each side of the body around rounds 24 and 25 from the top, ensuring they are symmetrically placed and parallel to the eyes before sewing.
  • Using the side fins as a guide, pin the joined tail centrally to the back of the body with the hdc side facing down, stuff the front of the tail only, and sew the tail neatly and carefully.
  • Insert safety eyes between rounds 17 and 18, approximately 13 stitches apart, then stuff and shape the body as you work to maintain form.
  • Weave in ends and close the body by threading the tail onto a tapestry needle, running the needle in and out of the remaining stitches, pulling tight to close, and securing the yarn end.

Important Notes

  • πŸ’‘Work in continuous rounds without joining the round with a slip stitch unless otherwise directed to maintain an invisible seam.
  • πŸ’‘Use a stitch marker to mark the beginning of each round for accurate stitch counting during increases and decreases.
  • πŸ’‘Firmly stuff sections as you go and slightly overstuff before finishing a section so the stuffing fills the shape once crocheting is done.
  • πŸ’‘For color dots (Wallace), carry the unused color on the wrong side and work over it instead of cutting to avoid many loose ends.

Thank you for choosing this Wallace and Wanda Whales pattern β€” I hope these whales bring a smile to your day and a warm handmade touch to your home. πŸ‹πŸ§Ά This pattern is perfect for gifting, nursery decor, or making a matching pair to brighten someone's shelf. 🧡 Happy crocheting and please share your finished whales with #loveandstitchco so I can see your lovely creations!

You ask,

we answer.

FAQs

What size will the finished piece be?

The finished whale measures approximately 6.5 inches long (15.24 cm) when made with the recommended Ricorumi DK cotton and 2.75 mm hook.

Can I make the whale without the Fair Isle color dots?

Yes, the basic pattern is the same for both whales; simply skip the Fair Isle instructions and work entirely in color A for a solid-colored whale.

Do I need to know any special techniques for the Fair Isle dots?

The Fair Isle dots use a carried yarn technique on the wrong side; carry the unused color across the wrong side and work over it every few stitches to secure it.

How long does it typically take to finish one whale?

Most crocheters complete one whale in about 5-7 hours, depending on experience, yarn handling, and how much time you spend on assembly and finishing.