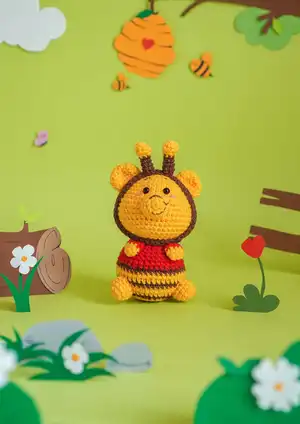
Create an adorable collection of Winnie the Pooh and friends as charming amigurumi characters. This pattern set includes step-by-step instructions to crochet Pooh (Bee), Piglet, Eeyore and Tigger with clear rounds, assembly notes and materials. Perfect for makers who enjoy small, detailed toys you can finish and gift with love. Follow the rounds exactly for consistent, professional results.
Progress Tracker
0% Complete
— Winnie The Pooh (Bee) :
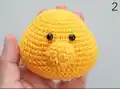
Round 1 :
Head (yarn A) - sc 6 into a magic loop (6)
Round 3 :
[sc 1, inc] 6x (18)
Round 4 :
[sc 1, inc, sc 1] 6x (24)
Round 5 :
[sc 3, inc] 6x (30)
Round 7 :
[sc 2, inc, sc 2] 6x (36)
Round 9 :
sc 8, [sc 1, inc] 3x, sc 8, [sc 1, inc] 3x, sc 8 (42)
Round 11 :
sc 8, [sc 1, inc, sc 1] 3x, sc 8, [sc 1, inc, sc 1] 3x, sc 8 (48)
Round 12-17 :
sc 48 (6 rnds), insert safety eyes between rnd 8&9, 2-3 sts apart (48)
Round 18 :
[sc 6, dec] 6x (42)
Round 19 :
[sc 5, dec] 6x (36)
Round 20 :
[sc 4, dec] 6x (30)
Round 21 :
[sc 3, dec] 6x (24)
Info :
Break the yarn, stuff firmly.
Round 1 :
Nose (yarn A) - sc 6 into a magic loop (6)
Round 3 :
[sc 3, inc] 3x (15)
Round 4-5 :
sc 15 (2 rnds) (15)
Info :
Break the yarn, stuff slightly. Sew the nose under the eyes.
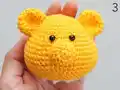
Round 1 :
Ears (yarn A, X2) - sc 6 into a magic loop (6)
Round 3 :
[sc 1, inc] 6x (18)
Round 4-5 :
sc 18 (2 rnds) (18)
Round 6 :
[sc 1, dec] 6x (12)
Info :
Break the yarn, sew 2 edges together. Sew the ears between rnd 5&8 of the head, 7-8 sts apart.
Round 1 :
Body (yarn A) - sc 6 into a magic loop (6)
Round 2 :
inc 6, change to yarn B (12)
Round 3 :
[sc 1, inc] 6x, change to yarn A (18)
Round 4 :
[sc 1, inc, sc 1] 6x (24)
Round 5 :
[sc 3, inc] 6x, change to yarn B (30)
Round 6 :
[sc 2, inc, sc 2] 6x, change to yarn A (36)
Round 7 :
[sc 5, inc] 6x (42)
Round 8 :
sc 42, change to yarn B (42)
Round 9 :
sc 42, change to yarn A (42)
Round 10-11 :
sc 42 (2 rnds), break yarn A, change to yarn B (42)
Round 12 :
sc 42, break yarn B, change to yarn C (42)
Round 13 :
[sc 5, dec] 6x (36)
Round 14-15 :
sc 36 (2 rnds) (36)
Round 16 :
[sc 4, dec] 6x (30)
Round 18 :
[sc 3, dec] 6x (24)
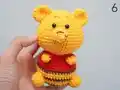
Info :
Break the yarn, stuff firmly. Sew the body to the head.
Round 1 :
Legs (yarn A, X2) - sc 6 into a magic loop (6)
Round 3-5 :
sc 12 (3 rnds) (12)
Info :
Break the yarn, stuff slightly. Sew the legs between rnd 6&9 of the body.
Round 1 :
Arms (yarn A, X2) - ch 4, start on the 2nd st from the hook, sc 2, (sc 3) on the last st, continue on the opposite side, sc 1, inc (8)
Round 2 :
sc 8, break yarn A, change to yarn C (8)
Info :
Break the yarn, sew 2 edges together. Sew the arms between the body & the head.
Info :
Use brown thread to sew the eyebrows (3 rnds above the eyes, 2 sts apart), the nose & the mouth.
Round 1 :
Bee Headband (yarn B) - ch 45, slst on the 1st ch to make a ring, sc 45 (45)
Info :
Break the yarn, hide the remaining yarn.
Round 1 :
Bee's Antennas (yarn A, X2) - sc 6 into a magic loop (6)
Round 2 :
[sc 1, inc] 3x (9)
Round 4 :
[sc 1, dec] 3x, change to yarn B (6)
Round 5-8 :
sc 6 (4 rnds) (6)
Info :
Break the yarn, stuff slightly, sew the Antennas on the headband, 1-2 sts apart. Wear the Bee headband on the Pooh's head.
— Piglet :
Round 1 :
Head (yarn A) - sc 6 into a magic loop (6)
Round 3 :
[sc 1, inc] 6x (18)
Round 4 :
[sc 1, inc, sc 1] 6x (24)
Round 5 :
[sc 3, inc] 6x (30)
Round 7 :
[sc 2, inc, sc 2] 6x (36)
Round 9 :
sc 8, [sc 1, inc] 3x, sc 8, [sc 1, inc] 3x, sc 8 (42)
Round 11 :
sc 8, [sc 1, inc, sc 1] 3x, sc 8, [sc 1, inc, sc 1] 3x, sc 8 (48)
Round 12-17 :
sc 48 (6 rnds), insert safety eyes between rnd 8&9, 2-3 sts apart (48)
Round 18 :
[sc 6, dec] 6x (42)
Round 19 :
[sc 5, dec] 6x (36)
Round 20 :
[sc 4, dec] 6x (30)
Round 21 :
[sc 3, dec] 6x (24)
Info :
Break the yarn, stuff firmly.
Round 1 :
Nose (yarn B) - sc 6 into a magic loop (6)
Round 2 :
[sc 1, (sc 3) on the next st] 3x, break yarn B, change to yarn A (12)
Round 3 :
(blo) sc 12 (12)
Info :
Break the yarn, stuff slightly. Sew the nose under the eyes.
Round 1 :
Ears (yarn B, X2) - sc 4 into a magic loop (4)
Round 2 :
sc 1, inc 2, sc 1 (6)
Round 3 :
sc 2, inc 2, sc 2 (8)
Round 4-5 :
— sc 8 (2 rnds) (8)
Round 4 :
Legs (yarn A, X2) - sc 6 into a magic loop (6)
Round 6-8 :
sc 12 (3 rnds) (12)
Info :
Break the yarn, stuff slightly. Sew the legs between rnd 6&9 of the body.
Round 1 :
Arms (yarn A, X2) - ch 4, start on the 2nd st from the hook, sc 2, (sc 3) on the last st, continue on the opposite side, sc 1, inc (8)
Round 2-3 :
sc 8 (2 rnds) (8)
Info :
Break the yarn, sew 2 edges together. Sew the arms between rnd 17&18 of the body.
Round 1 :
Sunflower (yarn C) - ch 45, slst on the 1st ch to make a ring, break yarn C, change to yarn D, *sc 2, slst on the next st, ch 6, start on the 2nd st from the hook, sc 5*, repeat ** till the end, slst on the 1st st (45)
Round 2 :
sc on the next st, *skip the next st, crochet on the sc 5 string, slst 1, hdc 1, (dc 2) on the next st, hdc 1, slst 1, ch 1, continue to crochet on the opposite side, slst 1, hdc 1, (dc 2) on the next st, hdc 1, slst 1, skip the next st, sc 1*, repeat ** till the end (we have total 15 petals)
Info :
Break the yarn, hide the remaining yarn. Wear the sunflower on the head.
Info :
Use brown thread to sew the eyebrows (2 rnds above the eyes, 2 sts apart) and the mouth (2 rnds under the nose). Use yarn B to sew the cheeks under the eyes.
— Eeyore :
Round 1 :
Head (yarn A) - sc 6 into a magic loop (6)
Round 3 :
[sc 1, inc] 6x (18)
Round 4 :
[sc 1, inc, sc 1] 6x (24)
Round 5 :
[sc 3, inc] 6x (30)
Round 7 :
[sc 2, inc, sc 2] 6x (36)
Round 9 :
sc 8, [sc 1, inc] 3x, sc 8, [sc 1, inc] 3x, sc 8 (42)
Round 11 :
sc 9, [inc, sc 2] 2x, inc, sc 10, inc, [sc 2, inc] 2x, sc 9 (48)
Round 12 :
sc 16, sc 16, break yarn B (48)
Round 13-17 :
sc 15, sc 18, sc 15 (5 rnds), insert safety eyes between rnd 8&9, 3-4 sts apart (48)
Round 18 :
[sc 6, dec] 2x, [sc 6, dec] 2x, sc 1, sc 5, dec, sc 6, dec (42)
Round 19 :
[sc 5, dec] 2x, sc 1, sc 4, dec, sc 5, dec, sc 1, sc 4, dec, sc 5, dec (36)
Round 20 :
[sc 4, dec] 2x, sc 2, sc 2, dec, sc 4, dec, sc 1, sc 3, dec, sc 4, dec (30)
Round 21 :
[sc 3, dec] 2x, sc 3, dec, sc 3, dec, sc 1, sc 2, dec, sc 3, dec (24)
Info :
Break the yarn, stuff firmly.
Round 1 :
Inner Ears (yarn C, X2) - ch 12, start on the 2nd st from the hook, sc 3, hdc 4, dc 3, (dc 6) on the last st, continue on the opposite side, dc 3, hdc 4, sc 3 (26)
Round 1 :
Outer Ears (yarn A, X2) - Repeat rnd 1 of the Inner Ears (26)
Round 2 :
inc, sc 3, hdc 4, dc 3, dc inc 4, dc 3, hdc 4, sc 3, inc, slst on the 1st st (32)
Info :
Do not break the yarn, place the inner ear above the outer ear, continue to use yarn A to crochet both edges rnd 3: sc 1, inc, sc 10, hdc 1, hdc inc, [dc 1, dc inc] 2x, hdc 1, hdc inc, sc 11, inc (32)
Info :
Break the yarn, fold the ears in half, sew 3 first sts together. Sew the ears between rnd 7 & 10 of the head.
Round 1 :
Hair (yarn D) - [ch 5, slst on the 5th st from the hook] 14x
Info :
Break the yarn. Sew the hair in the middle of the head.
Round 1 :
Legs (yarn A, X2) - sc 6 into a magic loop (6)
Round 3-5 :
sc 12 (3 rnds) (12)
Info :
Break the yarn, stuff slightly. Sew the legs between rnd 6&9 of the body.
Round 1 :
Body (yarn A) - sc 6 into a magic loop (6)
Round 3 :
[sc 1, inc] 6x (18)
Round 4 :
[sc 1, inc, sc 1] 6x (24)
Round 5 :
[sc 3, inc] 6x (30)
Round 6 :
[sc 2, inc, sc 2] 6x (36)
Round 7 :
[sc 5, inc] 6x (42)
Round 8-12 :
sc 42 (5 rnds) (42)
Round 13 :
[sc 5, dec] 6x (36)
Round 14-15 :
sc 36 (2 rnds) (36)
Round 16 :
[sc 4, dec] 6x (30)
Round 18 :
[sc 3, dec] 6x (24)
Info :
Break the yarn, stuff firmly. Sew the body to the head.
Round 1 :
Arms (yarn A, X2) - ch 4, start on the 2nd st from the hook, sc 2, (sc 3) on the last st, continue on the opposite side, sc 1, inc (8)
Round 2-3 :
sc 8 (2 rnds) (8)
Info :
Break the yarn, sew 2 edges together. Sew the arms between the head & the body.
Round 1 :
Tail (yarn D) - [ch 5, slst on the 5th st from the hook] 3x, slst on the 1st st, break yarn D, change to yarn A, ch 6
Info :
Break the yarn, sew the tail to the back of the body.
Round 1 :
Carrot's Headband (yarn E) - ch 45, slst on the 1st ch to make a ring, sc 45 (45)
Info :
Break the yarn, hide the remaining yarn.
Round 1 :
Carrots (yarn F, X2) - [ch 11, slst on the 3rd st from the hook] (dc 3) on the same st, dc 3, hdc 2, sc 2, slst 1, ch 1, continue on the opposite side, slst 1, sc 2, hdc 2, dc 3, (dc 3) on the same st, slst on the 1st st, break yarn F, change to yarn E, [ch 5, slst on the 5th st from the hook] 3x
Info :
Break the yarn, sew 2 carrots on the headband, 5-6 sts apart. Wear the headband on Eeyore.
— Tigger :
Round 1 :
Head (yarn A) - sc 6 into a magic loop (6)
Round 3 :
[sc 1, inc] 6x (18)
Round 4 :
[sc 1, inc, sc 1] 6x (24)
Round 5 :
[sc 3, inc] 6x (30)
Round 7 :
sc 2, inc, sc 4, inc, sc 4, inc, sc 4, inc, [sc 4, inc] 2x, sc 2 (36)
Round 8 :
sc 13, sc 10, sc 13 (36)
Round 9 :
sc 8, [sc 1, inc] 2x, sc 1, inc, sc 8, inc, [sc 1, inc] 2x, sc 9 (42)
Round 10 :
sc 15, sc 12, sc 15 (42)
Round 11 :
sc 9, inc, sc 2, inc, sc 2, inc, sc 10, inc, [sc 2, inc] 2x, sc 9 (48)
Round 12 :
sc 17, sc 14, sc 17, break yarn B (48)
Round 13-17 :
sc 48 (5 rnds), insert safety eyes between rnd 10 & 11, 3-4 sts apart (48)
Round 18 :
[sc 6, dec] 6x (42)
Round 19 :
[sc 5, dec] 6x (36)
Round 20 :
[sc 4, dec] 6x (30)
Round 21 :
[sc 3, dec] 6x (24)
Info :
Break the yarn, stuff firmly.
Round 1 :
Ears (yarn B, X2) - sc 6 into a magic loop (6)
Round 2 :
inc 6, break yarn B, change to yarn A (12)
Round 3 :
sc 1, inc, hdc 1, hdc inc, [dc 1, dc inc] 2x, hdc 1, hdc inc, sc 1, inc (18)
Info :
Break the yarn, sew 2 ears between rnd 6 & 8 of the head.
Round 1 :
Eyebrows (yarn C, X2) - ch 6, start on the 2nd st from the hook, slst 1, sc 1, hdc inc, sc 1, slst 1 (6)
Info :
Break the yarn, sew the eyebrows 3 rnds above the eyes.
Round 1 :
Nose (yarn B) - sc 6 into a magic loop (6)
Round 3 :
[sc 3, inc] 3x (15)
Round 4-5 :
sc 15 (2 rnds) (15)
Info :
Break the yarn, stuff slightly. Sew the nose under the eyes.
Round 1 :
Body (yarn A) - sc 6 into a magic loop (6)
Round 3 :
[sc 1, inc] 6x (18)
Round 4 :
[sc 1, inc, sc 1] 6x (24)
Round 5 :
[sc 3, inc] 6x (30)
Round 6 :
[sc 2, inc, sc 2] 6x (36)
Round 7 :
[sc 5, inc] 6x (42)
Round 8-12 :
sc 42 (5 rnds) (42)
Round 13 :
[sc 5, dec] 6x (36)
Round 14-15 :
sc 36 (2 rnds) (36)
Round 16 :
[sc 4, dec] 6x (30)
Round 18 :
[sc 3, dec] 6x (24)
Info :
Break the yarn, stuff firmly. Sew the body to the head.
Round 1 :
Arms (yarn A, X2) - ch 4, start on the 2nd st from the hook, sc 2, (sc 3) on the last st, continue on the opposite side, sc 1, inc (8)
Round 2-3 :
sc 8 (2 rnds) (8)
Info :
Break the yarn, sew 2 edges together.
Round 1 :
Legs (yarn A, X2) - sc 6 into a magic loop (6)
Round 3-5 :
sc 12 (3 rnds) (12)
Info :
Break the yarn, stuff slightly. Sew the legs between rnd 6&9 of the body.
Round 1 :
Belly (yarn B) - ch 4, start on the 2nd st from the hook, sc 2, (sc 3) on the last st, continue on the opposite side, sc 1, inc (8)
Round 2 :
inc, sc 1, inc 3, sc 1, inc 2 (14)
Round 3 :
sc 1, inc, sc 1, [sc 1, inc] 3x, sc 1, [sc 1, inc] 2x (20)
Round 4 :
sc 1, inc, sc 2, [sc 1, inc, sc 1] 3x, sc 1, [sc 1, inc, sc 1] 2x, slst on the 1st st (26)
Info :
Break the yarn, sew the belly to the body. Use the black thread to embroider the eyebrows (1 rnd above the eyes) & the mouth. Use the pink thread to sew the cheeks under 2 eyes & the pink lines on the nose. Use yarn C to embroider 3 lines on the head & the body.
Round 1 :
Tail (yarn A) - sc 6 into a magic loop (6)
Round 2-3 :
sc 6 (2 rnds), change to yarn C (6)
Round 4 :
sc 6, change to yarn A (6)
Info :
Break the yarn, sew the tail to the back of the body.
This charming Winnie the Pooh & Friends collection brings beloved characters to life in cute amigurumi form! 🧶 Each pattern includes complete rounds, helpful photos, and accessory details so you can make a whole set to cherish or gift. Whether you're making Pooh as a bumblebee, Piglet with a sunflower, Eeyore with carrots, or a bouncy Tigger, these little friends are perfect to collect and share. ✨🐻