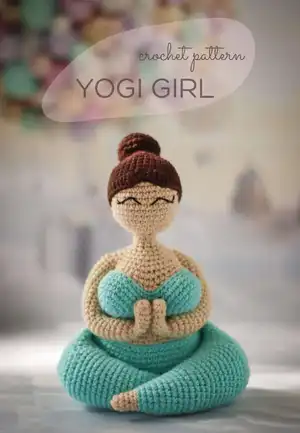
Create a peaceful, poseable Yogi Girl amigurumi with this full crochet pattern. You will make a soft, seated yoga figure with detailed legs, arms, a comfy top, and an elegant topknot. Clear step-by-step rounds, helpful photos, and assembly tips guide you through every stitch so you can enjoy a soothing, creative project.
Progress Tracker
0% Complete
— Arms :
Round 2 :
*1 SC, 1 INC* repeat 3 times (9)
Round 3-6 :
/4 rounds/ 9 SC
Round 7 :
*1 SC, 1 DEC* repeat 3 times (6)
Round 8 :
*1 SC, 1 INC* repeat 3 times (9)
Round 9 :
*2 SC, 1 INC* repeat 3 times (12)
Round 10-29 :
/20 rounds/ 12 SC
Info :
Fasten off in invisible way. To do this: pull the yarn end through the last stitch. Take the needle. Skip one stitch, guide the yarn end through the next stitch. Insert the needle back in the same hole where the yarn comes from. Fasten the stitch. This stitch is called a closing stitch.
Info :
Crochet second arm in the same way. Don’t stuff.
— Body :
Round 3 :
*1 SC, 1 INC* repeat 6 times (18)
Round 4 :
*1 SC, 1 INC, 1 SC* repeat 6 times (24)
Info :
Fasten off in invisible way. Crochet second detail in the same way.
Round 3 :
*1 SC, 1 INC* repeat 6 times (18)
Round 4 :
*1 SC, 1 INC, 1 SC* repeat 6 times (24)
Round 5 :
*3 SC, 1 INC* repeat 6 times (30)
Round 6 :
*2 SC, 1 INC, 2 SC* repeat 6 times (36)
Round 7 :
*5 SC, 1 INC* repeat 6 times (42)
Round 8 :
*3 SC, 1 INC, 3 SC* repeat 6 times (48)
Round 9 :
*7 SC, 1 INC* repeat 6 times (54)
Round 10 :
*4 SC, 1 INC, 4 SC* repeat 6 times (60)
Round 11-17 :
/7 rounds/ 60 SC
Round 18 :
*9 SC, 1 DEC, 9 SC* repeat 3 times (57)
Round 19 :
*17 SC, 1 DEC* repeat 3 times (54)
Round 20 :
*8 SC, 1 DEC, 8 SC* repeat 3 times (51)
Info :
Change color to beige.
Round 21 :
BLO *15 SC, 1 DEC* repeat 3 times (48)
Round 22 :
*7 SC, 1 DEC, 7 SC* repeat 3 times (45)
Round 23 :
*13 SC, 1 DEC* repeat 3 times (42)
Info :
Change color to blue.
Round 24 :
BLO *6 SC, 1 DEC, 6 SC* repeat 3 times (39)
Round 25 :
*11 SC, 1 DEC* repeat 3 times (36)
Round 26 :
10 SC. Take the part of the breast, insert the hook into the closing stitch of the breast and into the 11th stitch of the body. Crochet the next 8 stitches with SC by grabbing both stitches of the breast and body. Please note that the details should be positioned right sides facing each other.
Round 26 (cont) :
2 SC on the body, take second part of the breast and crochet together 8 SC, 8 SC on the body (36)
Round 27 :
10 SC, continue crocheting along the remaining 16 stitches of the breast using SC, skipping 8 stitches from the previous round, 2 SC on the body, 16 SC on the second breast, 8 SC on the body (52)
Round 30 :
14 SC, *1 DEC, 2 SC* repeat 2 times, 1 DEC, 8 SC, *1 DEC, 2 SC* repeat 2 times, 1 DEC, 10 SC (46)
Info :
Change color to beige.
Round 31 :
BLO 11 SC, 2 DEC, *1 DEC, 1 SC* repeat 3 times, 2 SC, *1 DEC, 1 SC* repeat 3 times, 2 DEC, 7 SC (36)
Info :
To stuff the body at this stage.
Round 32 :
6 SC, attach arm in closing stitch, 8 SC on the arm, skip 4 stitches on the body, 19 SC on the body, attach second arm in closing stitch, 8 SC on the arm, skip 4 stitches on the body, 3 SC on the body (44)
Info :
To stuff body, don’t stuff arms.
Info :
Take a needle and beige yarn. Sew the hole with beige yarn between arms and body.
Round 35 :
6 SC, 4 DEC, 19 SC, 4 DEC, 3 SC (36)
Info :
Measure width of shoulders and the length of both arms, add extra 1 cm to each arm, cut a wire of appropriate length and bend creating loops at the ends. Insert the wire into the arms and to stuff body and arms, evenly distributing the stuffing.
Round 36 :
*2 SC, 1 DEC, 2 SC* repeat 6 times (30)
Round 37 :
*3 SC, 1 DEC* repeat 6 times (24)
Round 38 :
*1 SC, 1 DEC, 1 SC* repeat 6 times (18)
Round 39 :
*1 SC, 1 DEC* repeat 6 times (12)
Info :
Fasten off in invisible way. Leave long end for sewing. To stuff. Bend the arms at the elbows and at the hands. Take a needle and beige yarn. Sew the hands together.
— Legs :
Round 3 :
*1 SC, 1 INC* repeat 6 times (18)
Round 4 :
*1 SC, 1 INC, 1 SC* repeat 6 times (24)
Round 5 :
*3 SC, 1 INC* repeat 6 times (30)
Info :
Fasten off in invisible way. Crochet second detail in the same way.
Round 5 :
*1 SC, 1 INC* repeat 3 times (9)
Info :
Change color to blue.
Round 6 :
BLO *1 SC, 1 INC, 1 SC* repeat 3 times (12)
Round 9 :
*3 SC, 1 INC* repeat 3 times (15)
Round 12 :
*2 SC, 1 INC, 2 SC* repeat 3 times (18)
Round 15 :
*5 SC, 1 INC* repeat 3 times (21)
Round 18 :
*3 SC, 1 INC, 3 SC* repeat 3 times (24)
Round 21 :
*7 SC, 1 INC* repeat 3 times (27)
Round 24 :
*4 SC, 1 INC, 4 SC* repeat 3 times (30)
Round 27 :
7 SC. Take the part of the knee, insert the hook into the closing stitch of the knee and into the 8th stitch of the leg. Crochet the next 15 stitches with SC by grabbing both stitches of the knee and leg. Please note that the details should be positioned right sides facing each other. 8 SC on the leg (30)
Round 28 :
7 SC, continue crocheting along the remaining 15 stitches of the breast using SC, skipping 15 stitches from the previous round, 8 SC on the leg (30)
Round 29-33 :
/5 rounds/ 30 SC
Info :
Fold in half. Crochet 14 SC grabbing both parts. Cut the yarn. Leave long end for sewing. Crochet second leg in the same way.
Info :
Sew the legs to the side of the body along the last round of the leg to the body from the 9th to the 20th rounds.
Info :
Take the needle and blue yarn. Fold the legs on top of each other and sew them together.
— Head :
Round 3 :
BLO *1 SC, 1 INC* repeat 6 times (18)
Round 4 :
*1 SC, 1 INC, 1 SC* repeat 6 times (24)
Round 5 :
*3 SC, 1 INC* repeat 6 times (30)
Round 6 :
*2 SC, 1 INC, 2 SC* repeat 6 times (36)
Round 7-13 :
/7 rounds/ 36 SC
Round 14 :
*4 SC, 1 DEC* repeat 6 times (30)
Round 15 :
*3 SC, 1 DEC* repeat 6 times (24)
Round 16 :
*2 SC, 1 DEC* repeat 6 times (18)
Round 17 :
*1 SC, 1 DEC* repeat 6 times (12)
Round 3 :
*1 SC, 1 INC* repeat 6 times (18)
Round 4 :
BLO *1 SC, 1 INC, 1 SC* repeat 6 times (24)
Round 5 :
*3 SC, 1 INC* repeat 6 times (30)
Round 6 :
*2 SC, 1 INC, 2 SC* repeat 6 times (36)
Round 7-11 :
/5 rounds/ 36 SC
Round 12 :
10 SC, 2 HDC, 2 INC DC, 1 HDC, 1 SS, 1 HDC, 2 INC DC, 2 HDC, 16 SC (40)
Info :
Fasten off in invisible way, leave long end for sewing.
Info :
Sew hair to the head.
Info :
Brown yarn. Topknot
Round 3 :
*1 SC, 1 INC* repeat 6 times (18)
Round 4 :
*1 SC, 1 INC, 1 SC* repeat 6 times (24)
Round 7 :
*1 SC, 1 DEC, 1 SC* repeat 6 times (18)
Info :
Fasten off in invisible way, leave long end for sewing. To stuff.
Info :
Sew on the crown for the 4th round of hair.
Info :
Embroider eyes with black thread between 9th and 10th rounds.
Info :
Sew the head behind the front loops of the 3rd round and behind the last round of the body.
Assembly Instructions
- Sew the head to the body by inserting the head behind the front loops of the 3rd round of the head and behind the last round of the body, securing with a whipstitch and hiding the seam.
- Attach arms during Round 32 by inserting the arm closing stitch into the indicated closing stitch on the body, then crochet the connecting stitches as described and secure the arm seams.
- Sew the breast details to the body by matching the breast closing stitch to the 11th stitch of the body and crocheting together 8 SC, then continue joining the second breast in the same way so details face right sides together.
- Insert pre-measured wire into each arm (leave small loops at the ends), then stuff arms and body evenly and position the wire to allow the arms to bend at the elbow.
- Sew legs to the body along the leg’s last round, attaching each leg to the body between rounds 9 and 20 and fold and sew legs together at the top to create the crossed-leg pose.
- Sew hair and topknot onto the head: sew hair to the head base and attach the topknot to the crown (4th round of hair) ensuring the hairline matches the head picture.
- Embroider eyes between rounds 9 and 10 using black thread, following the picture references for placement, and finish by sewing any remaining openings closed invisibly.
Important Notes
- 💡Use a smaller hook size than suggested on the yarn label for tight amigurumi stitches and a neat fabric.
- 💡Use stitch markers to keep track of your rounds, especially when working continuous rounds and shaping sections.
- 💡Stuff firmly but not excessively; if stitches begin to stretch, remove small amounts of stuffing to avoid distortion.
- 💡Change color just before the new color is needed and pull the new color through the last loop to create a clean color transition.
- 💡Do not join every round; work continuously and use stitch markers to avoid visible joining lines for a professional finish.
Thank you for choosing this Yogi Girl pattern — I hope she brings calm and charm to your home. 🌿
This little amigurumi is designed to be both poseable and cuddly, with clear steps and helpful photos to guide you. 🧶
Enjoy making her as a mindful stitch project or a heartfelt handmade gift!