🧶 Beautiful ✨ Detailed 💝 Adorable

Zakladka Zyrafa Amigurumi Pattern

Zakladka Zyrafa Amigurumi Pattern
4.8★ Rating
2-4 Hours Time Needed
3.9K Made This
✂️

Intermediate Level

Ideal for those with basic crochet experience, featuring slightly more advanced stitches and techniques to expand your skills.

⏱️

Bite-Sized Project

Finishes in 2-4 hours—perfect for an afternoon of creative relaxation.

🎁

Tiny Treasure

Small, sweet, and gift-worthy creations that fit perfectly in the palm of your hand with detailed charm.

About This Zakladka Zyrafa Amigurumi Pattern

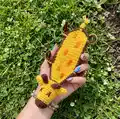
This pattern creates a cute giraffe bookmark (approx. 20 cm) crocheted in YarnArt Jeans yarn with contrasting brown details. The design uses simple amigurumi shaping and a folded head technique to create the flat bookmark shape. You will make separate ears and horns to sew on, then embroider the face and paint spots for character.

Zakladka Zyrafa Amigurumi Pattern crochet pattern - detailed view of completed project

The instructions are given round-by-round with clear notes for changing colors and finishing edges. Perfect for gifting or keeping for yourself, this bookmark combines function and whimsy.

Why You'll Love This Zakladka Zyrafa Amigurumi Pattern

I absolutely love this pattern because it turns basic stitches into a delightful and useful finished piece. I enjoy how the folded head technique creates a realistic muzzle while keeping the bookmark flat and practical. The small components like ears and horns are quick to make, giving instant satisfaction as you assemble them. I also love that the spots and embroidered face let you personalize each giraffe for a unique result. This project is a lovely mix of simple shaping and creative finishing.

Zakladka Zyrafa Amigurumi Pattern step 1 - construction progress Zakladka Zyrafa Amigurumi Pattern step 2 - assembly progress Zakladka Zyrafa Amigurumi Pattern step 3 - details and accessories Zakladka Zyrafa Amigurumi Pattern step 4 - final assembly and finishing

Switch Things Up

I love how easy it is to customize this giraffe by changing yarn colors; try pastel tones for a soft nursery look or bold yellow and orange for a playful effect.

You can make a mini version by using thinner yarn and a smaller hook, perfect for keychains or tiny gifts.

For a chunkier, cuddlier bookmark, use bulky yarn with a larger hook—this will create a plush, eye-catching piece.

I often embroider different facial expressions to give each giraffe its own personality, so experiment with eye placement and mouth shape.

Try adding a tiny crocheted scarf or bow around the neck for a seasonal variation or personalized gift touch.

If you want posable elements, consider inserting thin craft wire into the legs before finishing, then bend them into fun shapes.

Use felt pieces for spots instead of coloring to create a more durable, vibrant pattern that won’t fade with handling.

Make a whole set in a rainbow of colors to create a unique collection — they make adorable teacher gifts or party favors.

Combine embroidery and small beads for sparkly eyes or accents, but ensure beads are secured well if the item is for a child.

I also like to vary the size and curvature of the curled legs to create whimsical poses; try shortening or lengthening the chain used to form each leg.

Common Mistakes & How to Fix Them

✗ Not counting stitches after increases and decreases leads to uneven shaping; count your stitches each round to ensure the correct stitch count. ✗ Changing color without securing ends can cause loose strands later; weave in or secure color changes immediately to keep edges neat. ✗ Stuffing too little or too much makes the head shape look flat or lumpy; stuff gradually and evenly until you reach the desired firmness. ✗ Skipping the folding and seaming step for the head will leave an open shape; fold the head as instructed and join both edges carefully to form the muzzle. ✗ Embroidering eyes without marking placement can look asymmetrical; mark eye positions before stitching to achieve balanced facial features.

Zakladka Zyrafa Amigurumi Pattern

Make a charming giraffe bookmark with this detailed amigurumi pattern. You will crochet a slim, playful giraffe using YarnArt Jeans yarn and simple shaping techniques. The pattern includes full round-by-round instructions, ear and horn pieces, and finishing tips so you can create a 20 cm bookmark perfect for gifts. Follow the steps to embroider the face and add painted spots for the final touch.

Intermediate 2-4 Hours

Materials Needed for Zakladka Zyrafa Amigurumi Pattern

— Main Fabric

  • 01
    YarnArt Jeans (main yellow color) - approximately 50g
  • 02
    YarnArt Jeans (brown accent color for muzzle, horns and edging) - approximately 20g
  • 03
    Small amount black yarn or embroidery thread for facial features
  • 04
    Silicone ball filler (small) for head stuffing
  • 05
    Optional: small leftover yarns for spots or additional accents

— Tools Required

  • 01
    Crochet hook size 2.5mm
  • 02
    Scissors
  • 03
    Yarn needle for sewing and weaving ends
  • 04
    Stitch markers
  • 05
    Small silicone ball or polyester stuffing
  • 06
    Brown colored pencil or fabric crayon for spots
  • 07
    Black embroidery thread for eyes and nose
  • 08
    Pins for assembly

Progress Tracker

0% Complete

— Materiały :

Info :

Włóczka: YarnArt Jeans. Szydełko 2,5. Wypełnienie: kulka silikonowa. Wysokość: 20 cm.

— Objaśnienia :

Infos :

MG – magiczne koło. ch - oczko. sc – półsłupek. dc – słupek. inc – 2 (pół)słupki w jedno oczko (rozszerzanie). dec – 2 (pół)słupki przerabiane razem (zwężanie). blo – półsłupki w tylną część oczka poprzedniego rzędu.

— Mordka :

Round 1 :

6sc w MG (6)

Round 2 :

(inc) – powtórz 6 razy (12)

Round 3 :

(1sc, inc) - powtórz 6 razy (18)

Round 4-5 :

18sc (18) (2 rzędy)

Info :

Zmieniamy kolor na żółty

Round 6-8 :

18sc (18) (2 rzędy)

Round 9 :

(2sc, inc) - powtórz 6 razy (24)

Round 10-16 :

24sc (24) (7 rzędów)

Round 17 :

(2sc, dec) - powtórz 6 razy (18) wypełnić

Round 18 :

(1sc, dec) - powtórz 6 razy (12)

Round 19 :

Składamy głowę na pół, łączymy oba brzegi: 1ch, 6sc (7)

Round 20 :

1ch, inc, 5sc, inc (9)

Round 21 :

1ch, 9sc (9)

Round 22 :

1ch, inc, 7sc, inc (11)

Round 23 :

1ch, 11sc (11)

Round 24 :

1ch, inc, 9sc, inc (13)

Round 25 :

1ch, 13sc (13)

Round 26 :

1ch, inc, 11sc, inc (15)

— Tułów i nogi :

Round 27 :

1ch, 15sc (15)

Round 28 :

1ch, 15sc (15)

Info :

Tutaj robimy zakręcone nóżki ;)

Round 29-30 :

15ch, odwracamy, 14sc wzdłuż łańcuszka, 15sc wzdłuż tułowia

Round 31-50 :

1ch, 15sc (15) (20 rzędów)

Info :

Tutaj robimy zakręcone nóżki ;)

Round 51-52 :

15ch, odwracamy, 14sc wzdłuż łańcuszka, 15sc wzdłuż tułowia

Round 53-54 :

1ch, 15sc (15) (2 rzędy)

Round 55 :

1ch, dec, 11sc, dec (13)

Round 56 :

1ch, dec, 9sc, dec (11)

Round 57 :

1ch, dec, 7sc, dec (9)

Round 58 :

1ch, dec, 5sc, dec (7)

Round 59 :

1ch, dec, 3sc, dec (5)

Info :

Tułów razem z nogami obrabiamy półsłupkami brązową nitką.

— Uszy (x2) :

Info :

Kolor żółty

Round 1 :

4sc w MG (4)

Round 2 :

(inc) – powtórz 4 razy (8)

Round 3-6 :

8sc (8) (4 rzędy)

— Rogi (x2) :

Info :

Kolor brązowy

Round 1 :

6sc w MG (6)

Round 2 :

(inc) – powtórz 6 razy (12)

Round 3 :

(1sc, inc) - powtórz 6 razy (18)

Round 4-5 :

18sc

Round 6 :

(1sc, dec) - powtórz 6 razy (12)

Round 7 :

(2sc, dec) - powtórz 3 razy (9)

Info :

Krzyżykami wyszywamy oczy i nos - czarną nitką. Na tułowiu malujemy brązową kredką łatki.

Assembly Instructions

  • Sew the two ear pieces (Uszy x2) to the top sides of the head, positioning them symmetrically about 6-8 stitches apart and secure with tight stitches.
  • Attach the two horns (Rogi x2) near the top of the head between the ears and the central ridge, sewing firmly through the base rounds for stability.
  • Fold the head as indicated in Round 19 and join both edges with 1ch, then 6sc (7) to form the muzzle seam, making sure the filling is in place before closing.
  • Embroider the eyes and nose using black thread with cross stitches (krzyżykami) as shown; mark placements before stitching to keep symmetry.
  • After assembling ears and horns, paint brown spots on the body with a brown colored pencil or fabric crayon, using photos as a reference for placement.

Important Notes

  • 💡Work with consistent tension to maintain the flat bookmark shape; uneven tension can cause warping or curling.
  • 💡Change yarn colors cleanly and weave in ends as you go to avoid bulky seams or loose ends showing on the flat body.
  • 💡Stuff the head firmly but avoid overstuffing; fill gradually to maintain shape without distorting stitches.
  • 💡Pin ears and horns in place before sewing to check positioning and symmetry for a neat final look.
  • 💡Use stitch markers to track the beginning of rounds, especially during increases and decreases.

This giraffe bookmark pattern turns simple crochet stitches into a playful, functional keepsake you will love gifting or keeping. The slim, folded head and curly legs add character while staying easy to crochet. Personalize each one with embroidered faces and brown crayon spots for endless variety. 🦒🧶

You ask,

we answer.

FAQs

What size will the finished piece be?

The finished bookmark measures approximately 20 cm tall when using YarnArt Jeans and a 2.5 mm hook, as noted in the pattern.

Can I use different yarn weights for this pattern?

Yes, you can change yarn weight, but the final size will vary and you should adjust hook size accordingly for consistent tension.

Do I need prior crochet experience for this pattern?

This pattern is rated intermediate, so familiarity with basic amigurumi techniques, increases/decreases, and magic rings is recommended.

How long does this project typically take to complete?

Most crafters finish this bookmark in 2-4 hours, depending on experience and how much time you spend on embroidery and finishing.