🧢 Beautiful ✨ Detailed πŸ’ Adorable

Amigurumi Holiday Lights Amigurumi Pattern

Amigurumi Holiday Lights Amigurumi Pattern
4.2β˜… Rating
1-2 Hours Time Needed
1.8K Made This
βœ‚οΈ

Beginner Friendly Level

Perfect for those just starting their crochet journey, with clear instructions and simple techniques

⏱️

Quick Make

Complete in under 2 hoursβ€”lightning fast fun for instant gratification and quick gifts.

🎁

Tiny Treasure

Small, sweet, and gift-worthy creations that fit perfectly in the palm of your hand with detailed charm.

About This Amigurumi Holiday Lights Amigurumi Pattern

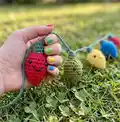
This pattern creates adorable amigurumi holiday light bulbs that are small, stuffed, and perfect for garlands or ornaments. Each bulb is worked in the round with simple increases and decreases to shape the classic light form. You can add safety eyes or embroider faces for extra personality. The bulbs are ideal for using leftover worsted weight yarn and make quick handmade gifts.

Amigurumi Holiday Lights Amigurumi Pattern crochet pattern - detailed view of completed project

A beginner-friendly project using basic single crochet stitches and magic ring starts. Finished bulbs are small and lightweight, perfect for strings and decorations.

Why You'll Love This Amigurumi Holiday Lights Amigurumi Pattern

I absolutely love this pattern because it turns tiny scraps of yarn into a whole string of festive charm. I enjoy how quickly a single bulb comes together, which makes it easy to make a whole garland in an afternoon. The shaping is simple but satisfying, and adding little faces or safety eyes brings each bulb to life. I also love that this pattern is so flexible β€” you can mix colors, sizes, and finishes to match any holiday decor.

Amigurumi Holiday Lights Amigurumi Pattern step 1 - construction progress Amigurumi Holiday Lights Amigurumi Pattern step 2 - assembly progress Amigurumi Holiday Lights Amigurumi Pattern step 3 - details and accessories Amigurumi Holiday Lights Amigurumi Pattern step 4 - final assembly and finishing

Switch Things Up

I love customizing these bulbs with different color combinations to match holiday themes or room decor.

I sometimes use variegated yarn for a marbled bulb effect that looks unique and colorful.

To make mini keychains, I reduce rounds 6-8 by working fewer repeats or using a lighter yarn and smaller hook.

If I want a chunkier look, I switch to bulky yarn and a larger hook to make oversized, cozy bulbs.

I often add metallic or sparkly yarn for special holiday editions to give the garland a festive sheen.

I embroider different facial expressions to create a whole cast of characters from happy to sleepy bulbs.

For a rustic look I use natural or muted yarn colors and twine for stringing instead of a crocheted chain.

I like to mix safety eyes and embroidered eyes on the same garland for a playful, varied look.

Sometimes I add tiny pom-poms or beads to the top cap for extra texture and whimsy.

I recommend experimenting with spacing: try closer bulbs for a dense garland or wide spacing for a delicate, airy display.

Common Mistakes & How to Fix Them

βœ— Skipping the magic ring or starting with loose chains can leave a visible hole at the top of the bulb; use a 3-stitch magic ring and pull tight to close the center. βœ— Forgetting to stuff before the final decreases makes shaping difficult and uneven; stuff gradually and check shape before closing. βœ— Inconsistent tension across rounds can cause bulbs to flare or sag in places; keep a steady, moderate tension and practice a few test bulbs. βœ— Not attaching safety eyes before stuffing can be awkward and misaligned; attach safety eyes when the bulb is still open and you can position them easily.

Amigurumi Holiday Lights Amigurumi Pattern

Create a string of cheerful miniature holiday bulbs with this easy amigurumi pattern. You will make small, stuffed bulbs that can be strung together for garlands, tree decor, or tiny gifts. The pattern uses simple increases and decreases and is perfect for using yarn scraps. Enjoy a fun, festive project that brightens any space.

Beginner Friendly 1-2 Hours

Materials Needed for Amigurumi Holiday Lights Amigurumi Pattern

β€” Main Fabric

  • 01
    Worsted weight yarn (#4) in desired colors (small amounts per bulb, scraps are perfect)
  • 02
    Polyfil (fiberfill) for stuffing bulbs
  • 03
    Black embroidery thread (optional) for mouth and facial details
  • 04
    Safety Eyes (optional) - small size appropriate for mini bulbs

β€” Tools Required

  • 01
    G Hook (US G / 4.0 mm crochet hook)
  • 02
    Needle (tapestry/sewing needle for weaving ends and embroidery)
  • 03
    Safety Eyes (optional)

Progress Tracker

0% Complete

β€” Bulb :

Info :

Make a 3 stitch magic ring

Round 1 :

Inc around (6)

Round 2 :

*sc 2, inc 1. Repeat from * (8)

Round 3 :

*sc 1, inc 1. Repeat from * (12)

Round 4 :

*sc 2, inc 1. Repeat from * (16)

Round 5 :

*sc 3, inc 1. Repeat from * (20)

Round 6-8 :

sc around (20)

Round 9 :

*sc 3, dec 1. Repeat from * (16)

Round 10 :

*sc 2, dec 1. Repeat from * (12)

Info :

Attach safety eyes if desired. Stuff with Polyfil.

Round 11 :

dec around (6)

Round 12 :

switch to green yarn, sc around (6)

Round 13 :

sc around (6)

Info :

Break off yarn, weave in ends.

Info :

Embroider eyes and mouth if desired.

Info :

To string together bulbs, begin a chain with desired color and chain through the top of a bulb every 10 inches or spaced however far apart you wish.

Info :

Pattern by Jill Watt www.dappertoad.com Ravelry: http://www.ravelry.com/designers/jill-watt Craftsy: http://www.craftsy.com/user/754812/pattern-store

Assembly Instructions

  • Attach safety eyes to the bulb before closing the top, position them evenly on the front and secure the washers tightly for safety.
  • Stuff each bulb with Polyfil after round 10 and before completing round 11 to achieve an even, firm shape, then continue with closing rounds.
  • Switch to green yarn at round 12 to form the bulb top; finish round 13, fasten off, and weave in ends neatly on the inside.
  • Embroider eyes and mouth using black embroidery thread if not using safety eyes; use a needle and small stitches to create a neat expression.
  • String bulbs by making a chain in the desired color and passing the chain through the top of each bulb, spacing bulbs about 10 inches apart or to your preference.

Important Notes

  • πŸ’‘Attach safety eyes before stuffing and closing the bulb to make placement easier and more secure for small pieces.
  • πŸ’‘Stuff bulbs gradually and evenly to avoid lumps and to keep the bulb shape smooth and consistent.
  • πŸ’‘Weave in ends securely and hide tails inside the bulb to keep the finished garland looking tidy and professional.
  • πŸ’‘Switch to the green yarn for the top (rounds 12-13) as instructed to create the classic bulb cap and finish neatly.

These tiny amigurumi holiday lights are perfect for gifting, decorating, or using up colorful yarn scraps. 🧢 Make a whole garland in an afternoon and add little faces for extra charm. 🎁 Happy crocheting β€” may your holidays be bright and handmade!

You ask,

we answer.

FAQs

What size will the finished piece be?

Each finished bulb measures a few inches tall depending on your yarn and tension; using worsted weight yarn and a G (4.0 mm) hook produces small, palm-sized bulbs.

Can I use different yarn weights for this pattern?

Yes, you can use different yarn weights but the final size will change; choose an appropriate hook for your yarn and expect larger or smaller bulbs accordingly.

Do I need prior crochet experience for this pattern?

This pattern is beginner friendly and uses single crochet, increases, and decreases; basic knowledge of these stitches and the magic ring is recommended.

How long does this project typically take to complete?

Most crocheters can make several bulbs in an hour, with a single bulb taking around 10-20 minutes; a full garland can be completed in one or two sessions.