🧢 Beautiful ✨ Detailed πŸ’ Adorable

Mini Deadpool Amigurumi Pattern

Mini Deadpool Amigurumi Pattern
4.5β˜… Rating
4-5 Hours Time Needed
3.7K Made This
βœ‚οΈ

Intermediate Level

Ideal for those with basic knitting experience, featuring slightly more advanced stitches and techniques to expand your skills.

⏱️

Weekend Treat

Takes 5-7 hours, making it an enjoyable project to finish over a couple of days.

🧸

Cute Companion

An adorable friend to cherish, handcrafted with love to bring comfort and joy for years to come.

About This Mini Deadpool Amigurumi Pattern

This Mini Deadpool amigurumi pattern brings Marvel's most irreverent superhero to pocket-sized life! Measuring approximately 12-14cm when completed, this detailed pattern includes everything you need to create Deadpool's iconic look - from his signature red and black suit to his distinctive mask with white eyes. The pattern features color-changing techniques to achieve the authentic striped appearance of his costume.

Mini Deadpool Amigurumi Pattern crochet pattern - detailed view of completed project

Created with love by designer Paulina CΓ‘ceres, this pattern combines intermediate-level techniques with clear, step-by-step instructions that make the process enjoyable and rewarding for crocheters ready to take on a fun challenge.

Why You'll Love This Mini Deadpool Amigurumi Pattern

I absolutely love how this pattern captures Deadpool's playful personality in such a compact form! The attention to detail in recreating his iconic costume stripes and mask is incredible, and I find the color-changing techniques really satisfying to work with. What makes this pattern special is how it balances complexity with clarity - you'll learn new skills while creating something truly unique that any Marvel fan would treasure.

Mini Deadpool Amigurumi Pattern step 1 - construction progress Mini Deadpool Amigurumi Pattern step 2 - assembly progress Mini Deadpool Amigurumi Pattern step 3 - details and accessories Mini Deadpool Amigurumi Pattern step 4 - final assembly and finishing

Switch Things Up

I love how versatile this Mini Deadpool pattern can be with just a few creative tweaks! You could easily adapt the color scheme to create different Deadpool variants - maybe try a gray and black version for X-Force Deadpool, or even experiment with different mask designs.

I've found that changing the accessories opens up so many possibilities too. Instead of the traditional swords, you could add tiny crocheted tacos (his favorite food!), or create a mini unicorn companion. The belt area is perfect for adding personalized touches like initials or small symbols.

For those who want to challenge themselves further, I suggest trying different facial expressions by adjusting the eye placement or adding embroidered details. You could even create a whole series - maybe a sitting version, or one with different arm positions.

The size is perfect for experimenting too - I've seen crafters scale this up using thicker yarn and larger hooks for a more substantial figure, or even create tiny keychain versions with thinner materials.

Common Mistakes & How to Fix Them

βœ— Forgetting to stuff the head firmly before closing, which can result in a floppy or misshapen appearance βœ— Not maintaining consistent tension during color changes, leading to uneven stripes in the costume pattern βœ— Placing safety eyes incorrectly between rounds 13-14, which affects the overall facial expression and character recognition βœ— Skipping stitch markers during rounds, especially when working the intricate color pattern sections of the body

Mini Deadpool Amigurumi Pattern

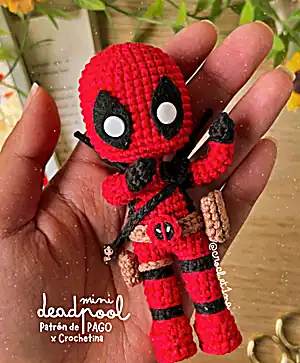
Create your own adorable Mini Deadpool with this detailed amigurumi pattern! This pocket-sized Marvel anti-hero features his iconic red and black costume, complete with mask details and accessories. Perfect for superhero fans and crochet enthusiasts alike, this pattern includes step-by-step instructions for the head, body, arms, and all the finishing touches that bring this beloved character to life in miniature form.

Intermediate 4-5 Hours

Materials Needed for Mini Deadpool Amigurumi Pattern

β€” Main Fabric

  • 01
    Cotton or acrylic yarn in red, black, tan/brown, and white colors
  • 02
    Cotton Revesderecho recommended, colors: 0003 (red), 0002 (black), 0009 (tan), 0001 (white)

β€” Tools Required

  • 01
    Crochet hook size 2
  • 02
    Safety eyes (8mm white)
  • 03
    Pins
  • 04
    Needle
  • 05
    Scissors
  • 06
    Stitch markers
  • 07
    Stuffing
  • 08
    Wire (0.89mm or 1mm)
  • 09
    Black felt

Progress Tracker

0% Complete

β€” Head :

Round 1 :

6 sc in MR (6)

Round 2 :

6 inc (12)

Round 3 :

(1 sc, 1 inc) x 6 (18)

Round 4 :

(2 sc, 1 inc) x 6 (24)

Round 5 :

(3 sc, 1 inc) x 6 (30)

Round 6 :

(4 sc, 1 inc) x 6 (36)

Round 7-17 :

1 sc in each st (36)

Round 18 :

3 sc, 2 dec, 4 sc, 2 dec, 6 sc, 2 dec, 4 sc, 2 dec, 3 sc (28)

Info :

Pause to stuff before continuing

Round 19 :

2 sc, 2 dec, 2 sc, 2 dec, 4 sc, 2 dec, 2 sc, 2 dec, 2 sc (20)

Round 20 :

1 sc, 4 dec, 2 sc, 4 dec, 1 sc (12)

Round 21 :

1 sc in each st BLO (12)

Round 22-25 :

1 sc in each st (12)

Info :

Cut yarn and close the 12 sts with needle help. Insert neck portion (rounds 21-25) into head opening to form hollow for body attachment

β€” Face Details :

Info :

Cut 2 pieces of black felt for mask, secure next to eyes

Info :

Place safety eyes between rounds 13-14, separated by 4 sc

β€” Body :

Round 1 :

7 sc in MR (7)

Round 2 :

7 inc (14)

Round 3 :

1 sc in each st BLO (14)

Round 4 :

1 sc in each st (14)

Round 5 :

3 sc, 4 dec, 3 sc (10)

Info :

Change to black color

Round 6 :

1 sc in each st (10)

Round 7 :

1 sc in each st (10)

Info :

Change to red color

Round 8 :

1 sc in each st BLO (10)

Round 9 :

1 sc in each st BLO (10)

Round 10-11 :

1 sc in each st (10)

Info :

Change to black color

Round 12 :

1 sc in each st (10)

Round 13 :

1 sc in each st (10)

Info :

Change to red color

Round 14 :

1 sc in each st BLO (10)

Round 15 :

1 sc in each st BLO (22)

Round 16-17 :

1 sc in each st (22)

Round 18-21 :

Alternate colors (R) and (N): 2 sc (R), 5 sc (N), 7 sc (R), 5 sc (N), 3 sc (R) (22)

Round 22 :

2 sc (R), 1 dec 3 sc (N), 7 sc (R), 3 sc 1 dec (N), 3 sc (R) (20)

Round 23 :

2 sc (R), 4 sc (N), 7 sc (R), 4 sc (N), 3 sc (R) (20)

Round 24 :

2 sc (R), 4 sc (N), 1 sc 1 dec 1 sc 1 dec 1 sc (R), 4 sc (N), 3 sc (R) (18)

Round 25 :

2 sc (R), 2 dec (N), 1 sc 1 dec3 1 sc (R), 2 dec (N), 3 sc (R) (12)

Round 26 :

2 sc (R), 1 dec (N), 3 sc (R), 1 dec (R), 1 sc 1 dec (R) (9)

Round 27-31 :

1 sc in each st (9)

Info :

Cut yarn and close the 9 sts with needle
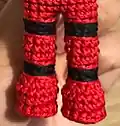
β€” Arms :

Info :

Make 2 pieces in black color

Round 1 :

7 sc in MR (7)

Round 2-3 :

1 sc in each st (7)

Info :

Change to red color

Round 4 :

1 sc in each st (7)

Round 5 :

1 sc in each st (7)

Round 6-10 :

1 sc in each st (7)

Info :

Change to black color

Round 11-12 :

1 sc in each st (7)

Info :

Cut long yarn tail for sewing to body. Add wire inside if desired for posability. Sew arms between rounds 24-25 of body

β€” Accessories :

Belt (P1) :

Tan color: Make 23 ch and crochet 22 sc in return. Cut long yarn tail for sewing to body between rounds 18-19

Pouch (P2) :

Tan color: Make 5 ch and work both sides: V1: 1 inc, 2 sc, 3 sc together, 2 sc, 1 sc (10). V2-3: 1 sc in each st (10). V4-7: Work 5 sc, go up with 1 ch and turn fabric to continue (5). Cut yarn and finish. Attach piece to left side of body

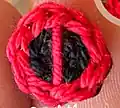
Deadpool Logo (P3) :

Black color: V1: 8 sc in MR (8). Change to red color: V2: 1 sc in each st BLO (8). Cut long yarn tail for sewing to center of P1. Add 1 red line in middle and 2 small white lines as eyes

β€” Support and Swords :

Left Shoulder Pad :

Black color: Make 7 ch and work both sides: V1: 1 inc, 4 sc, 2 inc, 4 sc, 1 inc (16). Cut yarn and finish

Left Shoulder Strap :

Black color: Make 30 ch leaving long yarn tail at beginning and end for sewing one end to each side of shoulder pad. Once piece is assembled, attach to body with stitches on shoulder and pass strap under right shoulder

Wire Swords :

Cut 2 pieces of 7cm wire each and cover with black yarn. Secure ends well so they don't come loose or unravel. Once ready, pass both pieces under shoulder strap with black wire and needle help for stitching so they stay fixed on back

Right Leg Small Pouch (P4 and P5) :

P4: Light tan color strap: Make 12 ch leaving long yarn tail at both ends (beginning and end) to be able to sew to leg

P5 :

Small tan color pouch: Make 3 ch and work return on both sides: V1: 4 inc (8). V2-3: 1 sc in each st (8). Cut yarn and hide with needle

Assembly Instructions

  • Attach head to body by inserting the neck portion (rounds 21-25) into the body opening created during construction.
  • Sew arms to the body between rounds 24-25, adding wire inside if you want them to be posable for dynamic poses.
  • Attach the tan belt around rounds 18-19 of the body and sew the Deadpool logo to the center of the belt.
  • Attach the small tan pouch to the left side of the body using the connecting strap provided in the pattern.
  • Create and attach the left shoulder pad with its black strap, positioning it to cross over the right shoulder.
  • Insert wire swords into the back harness system, securing them with black thread so they stay fixed behind the character.

Important Notes

  • πŸ’‘Use stitch markers consistently to keep track of your rounds, especially during the complex color changes in the body section
  • πŸ’‘Stuff the head firmly but not too tightly to maintain the proper rounded shape and prevent distortion
  • πŸ’‘Be careful when working with wire for the swords if making this for children - ensure all wire ends are properly secured
  • πŸ’‘Pin all accessories and body parts in place before final sewing to ensure correct positioning and proportions
  • πŸ’‘Maintain consistent tension throughout color changes to achieve clean, even stripes in Deadpool's costume pattern

This adorable Mini Deadpool pattern brings Marvel's most beloved anti-hero to life in pocket-sized perfection! The detailed design captures every iconic element from his signature red and black suit to his cheeky personality. With clear instructions and thoughtful construction techniques, you'll create a character that's both durable and irresistibly cute. Whether you're a Marvel fan or just love unique amigurumi projects, this little guy is sure to become a treasured addition to any collection. 🧢 Happy crocheting! 🧡✨

You ask,

we answer.

FAQs

What size will my finished Deadpool be?

The completed Mini Deadpool measures approximately 12-14cm (about 5-5.5 inches) tall, making it perfect for display or as a pocket companion.

Can I make this pattern without the wire swords?

Absolutely! The wire swords are optional. You can skip them entirely or create simple crocheted sword shapes if you prefer a child-safe version.

What if I can't find the exact yarn colors mentioned?

Any red, black, tan/brown, and white yarns will work perfectly. The most important thing is maintaining good contrast between the red and black for Deadpool's distinctive look.

How do I achieve clean color changes in the striped sections?

Use the back loop only (BLO) technique when indicated, and always change colors at the end of a round. Keep consistent tension and use stitch markers to track your progress.

Can I make the arms poseable?

Yes! The pattern includes optional wire insertion instructions for the arms. Just ensure wire ends are properly secured, especially if the amigurumi is intended for children.