🧶 Beautiful ✨ Detailed 💝 Adorable

Baby Bat Amigurumi Pattern

Baby Bat Amigurumi Pattern
4.1★ Rating
6-8 Hours Time Needed
2.1K Made This
✂️

Intermediate Level

Ideal for those with basic crochet experience, featuring slightly more advanced stitches and techniques to expand your skills.

⏱️

Weekend Treat

Takes 5-7 hours, making it an enjoyable project to finish over a couple of days.

🧸

Cute Companion

An adorable friend to cherish, handcrafted with love to bring comfort and joy for years to come.

About This Baby Bat Amigurumi Pattern

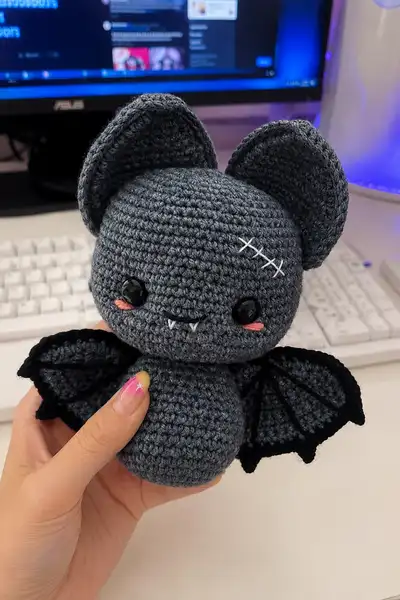
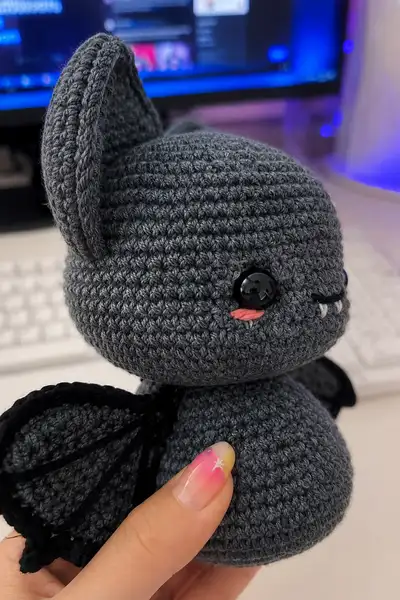
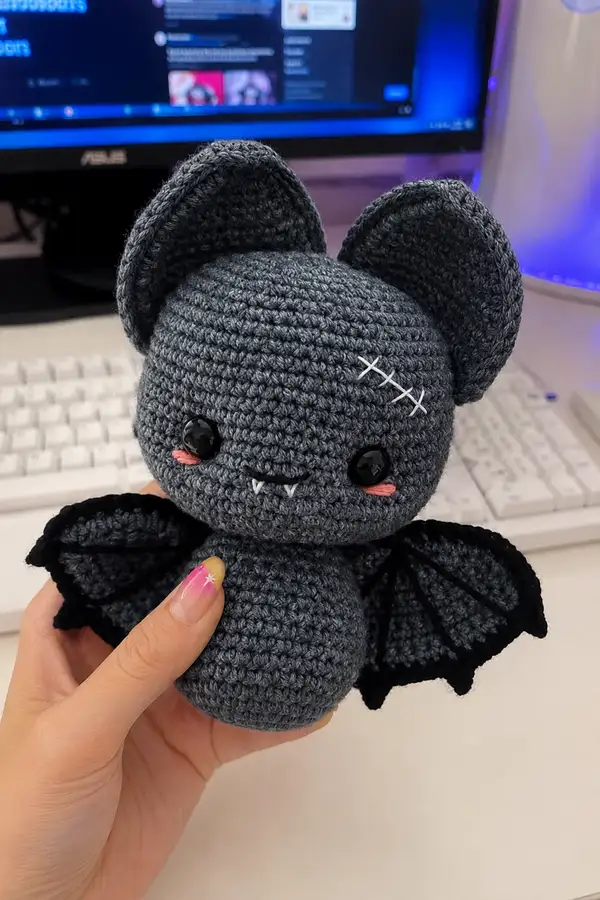
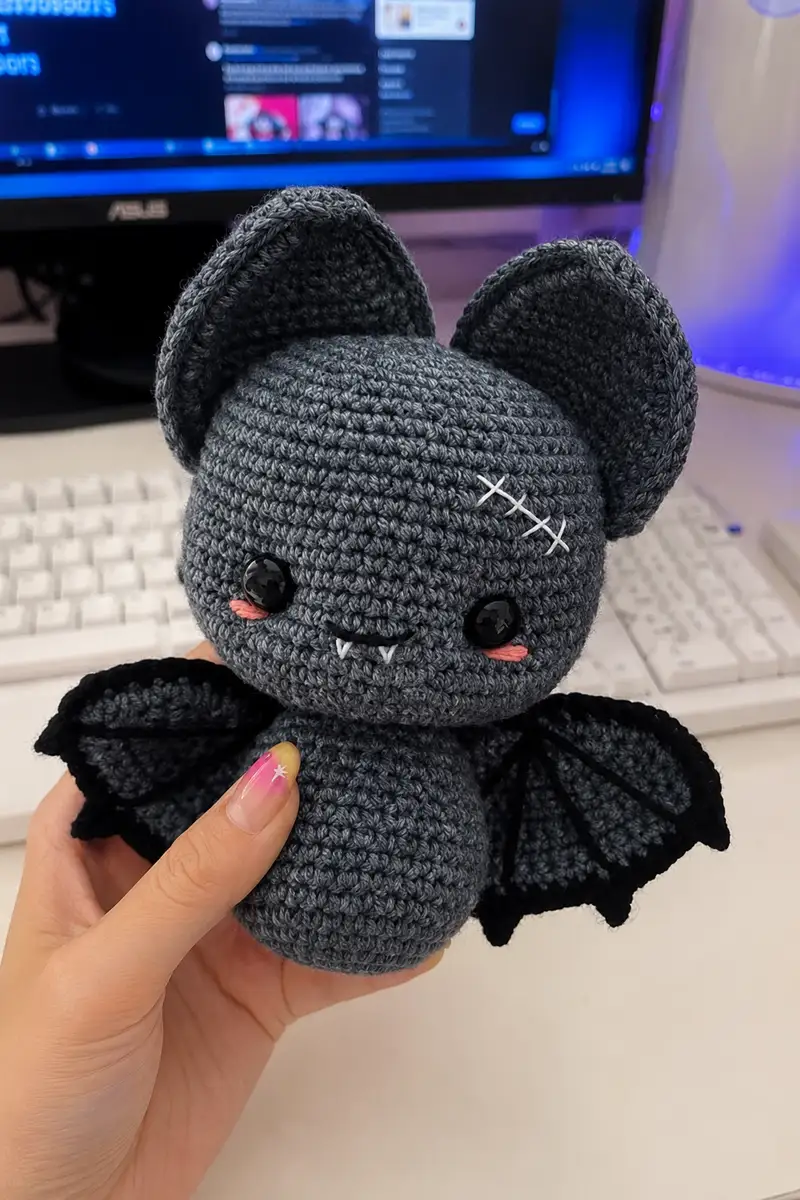
This Baby Bat pattern is worked as a seamless body-and-head piece in continuous rounds, producing a neat, round crown and chubby torso. The pattern includes flat ear and wing panels worked separately then joined together to create tidy, pointed ears and spreadable black membrane wings. Tiny white fang triangles, embroidered smiling mouth, and small coral cheek stitches give your bat a sweet, friendly expression.

Baby Bat Amigurumi Pattern crochet pattern - detailed view of completed project

The wings are worked as two small flat panels per wing and joined, then embroidered with contrasting black yarn to create the familiar wing veins. This makes the finished bat look polished and slightly poseable when placed on a shelf.

Why You'll Love This Baby Bat Amigurumi Pattern

I love how this pattern packs personality into a tiny make — the seam-free body-and-head growth is satisfying to crochet and the little embroidered wing veins are the magic moment for me. The big ears and tiny white fangs make a perfect balance of cute and spooky. I think this design is great to stitch again and again in different colours.

Baby Bat Amigurumi Pattern step 1 - construction progress Baby Bat Amigurumi Pattern step 2 - assembly progress Baby Bat Amigurumi Pattern step 3 - details and accessories Baby Bat Amigurumi Pattern step 4 - final assembly and finishing

Switch Things Up

I absolutely loved designing this pattern because it offers many ways to customize while staying structurally simple. You can make the bat in classic charcoal, a soft pastel, or even a bright seasonal colour — the proportions translate well to many yarn types.

I often change the cheek colour and embroidery for personality: coral for sweet, deep red for a dramatized look, or pale pink for a baby-themed version. Try swapping the black wing edging for a contrasting colour to make the membrane pop, or embroider extra veins for a realistic style.

If you want a hanging ornament, add a small loop at the crown before closing. For a cuddly toy for small children, skip safety eyes and embroider black eyes instead. I hope you enjoy making this tiny bat as much as I do — each small detail gives it a different mood!

Common Mistakes & How to Fix Them

✗ Losing your place in continuous rounds makes the body lopsided; drop a stitch marker into the first stitch of each round and move it up as you go. ✗ Placing safety eyes too far apart throws off the whole face; pin them first and check spacing before locking them in place. ✗ Stuffing the head after it is already closed leaves it soft and dented; add fiberfill firmly through the last decrease rounds before closing. ✗ Working the wing edging too tightly curls the panels; keep an even, relaxed tension along the border so the wings lie flat and spread nicely. ✗ Forgetting that the first ear and wing piece gets cut while the second does not can leave you short of joining yarn; read the join notes before fastening off each panel. ✗ Rushing invisible decreases on the head can leave visible gaps; work each dec through the front loops only for a smooth, hole-free finish.

Baby Bat Amigurumi Pattern

Create a cuddly Baby Bat with big pointy ears, spreadable membrane wings, tiny white fangs and rosy coral cheek stitches. This pattern works the body and head as one seamless piece, with separate flat ear and wing panels that are joined and detailed by hand. Make a spooky-sweet shelf sitter or a handmade gift with personality—perfect for Halloween or anytime you want a cute-not-creepy plush friend.

Intermediate 6-8 Hours

Materials Needed for Baby Bat Amigurumi Pattern

— Main Fabric

  • 01
    Worsted weight yarn (#4) light wool-blend or acrylic for the big bat - approx 84g grey melange plus small 7g black for wing edging and details
  • 02
    Fine weight yarn (#2) cotton-blend for the small bat alternative - approx 28g charcoal grey plus 5g black
  • 03
    Small amount of white yarn (10-15g) for two tiny fang triangles
  • 04
    Small amount of coral yarn (5-10g) for two cheek stitches and embroidery

— Tools Required

  • 01
    3.00mm crochet hook for the big bat (use 2.00mm hook for small bat if using #2 yarn)
  • 02
    2.00mm crochet hook for the small bat (optional with fine yarn)
  • 03
    Black safety eyes 12mm for big bat (10mm for small bat) or use black embroidery yarn for child-safe toy
  • 04
    Polyester fiberfill stuffing
  • 05
    Tapestry / yarn needle for sewing and embroidery
  • 06
    Stitch markers (at least 3-4)
  • 07
    Scissors
  • 08
    Pins for assembly
  • 09
    Optional: small length of florist wire or pipe cleaner if you want slightly poseable wing seams
  • 10
    Optional: fabric glue for extra secure safety eyes (use with caution)

Progress Tracker

0% Complete

— Body :

Info :

Start with grey (or charcoal) yarn. This doll is crocheted from the bottom of the body up and ends at the top of the head. Work in continuous rounds. Place a stitch marker in the first stitch of each round and move it up as you complete the round to keep track.

Round 1 :

8 sc in magic ring (8)

Round 2 :

(inc) x 8 (16)

Round 3 :

(sc, inc) x 8 (24)

Round 4 :

(3 sc, inc) x 6 (30)

Round 5 :

2 sc, inc, (4 sc, inc) x 5, 2 sc (36)

Info :

These early increases shape the rounded base of the body. Work tightly to keep the base neat and avoid visible holes. If your first round ring is loose, pull tight before continuing.

Rounds 6-10 :

36 sc (36)

Info :

At this width the body forms a compact barrel shape. If you prefer a chunkier body, add extra even rounds here in multiples of 6 (e.g., 2 more rounds of 36 sc) before moving on to the narrowing rounds.

Round 11 :

2 sc, dec, (4 sc, dec) x 5, 2 sc (30)

Rounds 12-14 :

30 sc (30)

Info :

Working these even rounds builds height for the chest. You can add a subtle belly ridge here by working the first of these rounds in BLO to create a faint seam line.

Round 15 :

(3 sc, dec) x 6 (24)

Round 16 :

sc, dec, (2 sc, dec) x 5, sc (18)

Info :

By the end of Round 16 the body has tapered to 18 stitches where the neck/head transition begins. Keep your tension even to ensure the head grows smoothly from this point.

— Head :

Round 17 :

18 sc (18)

Round 18 :

sc, inc, (2 sc, inc) x 5, sc (24)

Round 19 :

(3 sc, inc) x 6 (30)

Round 20 :

2 sc, inc, (4 sc, inc) x 5, 2 sc (36)

Round 21 :

(5 sc, inc) x 6 (42)

Info :

Now the head begins to widen into a round crown. Place safety eyes between rounds 28 and 29 later; mark where you plan to pin them now with removable pins so you can check expression and spacing before locking them in place.

Round 22 :

3 sc, inc, (6 sc, inc) x 5, 3 sc (48)

Round 23 :

(7 sc, inc) x 6 (54)

Round 24 :

4 sc, inc, (8 sc, inc) x 5, 4 sc (60)

Rounds 25-36 :

60 sc (60)

Info :

Stuff the body firmly with fiberfill here. Insert the safety eyes between Rnds 28 and 29, at the 23rd and 34th sc across the round (10 stitches apart). Pin carefully and adjust spacing to your taste - 10 stitches gives a sweet expression for this size. Embroider the smiling mouth between Rnds 26 and 28 before the final decreases so you can reach inside easily. Embroider two tiny white fang inserts just beneath the mouth after the smile is stitched; leave them loose to sew in place later if that helps accuracy.

Round 37 :

4 sc, dec, (8 sc, dec) x 5, 4 sc (54)

Round 38 :

(7 sc, dec) x 6 (48)

Round 39 :

3 sc, dec, (6 sc, dec) x 5, 3 sc (42)

Info :

Begin stuffing the head firmly now, adding small amounts of fiberfill at a time and smoothing with your needle or a blunt tool to avoid lumps. Stuff more firmly around the eyes and cheeks to preserve roundness and give a slightly chubby look.

Round 40 :

(5 sc, dec) x 6 (36)

Round 41 :

2 sc, dec, (4 sc, dec) x 5, 2 sc (30)

Round 42 :

(3 sc, dec) x 6 (24)

Round 43 :

(sc, dec) x 8 (16)

Round 44 :

(dec) x 8 (8)

Info :

Stuff the head firmly with fiberfill before closing. Cut the yarn, thread the tail through the remaining 8 stitches and pull tight to close the gap. Weave in the end securely inside the head. If you used safety eyes, ensure they are locked. For a child-safe toy, embroider black eyes instead of using safety eyes.

— Ears (Make 4 pieces) :

Info :

Make four pieces in grey yarn; two joined pieces form one ear. Worked in flat rows, chaining 1 and turning at the end of each row. The first panel is cut and the second remains attached so you can join them together without running out of yarn.

Row 1 :

MR, 3 sc, ch, turn (3)

Row 2 :

inc, sc, inc, ch, turn (5)

Row 3 :

inc, 3 sc, inc, ch, turn (7)

Row 4 :

inc, 5 sc, inc, ch, turn (9)

Row 5 :

9 sc, ch, turn (9)

Row 6 :

inc, 7 sc, inc, ch, turn (11)

Row 7 :

11 sc, ch, turn (11)

Row 8 :

inc, 9 sc, inc, ch, turn (13)

Rows 9-12 :

13 sc, ch, turn (13)

Row 13 :

13 sc (13)

Info :

Single crochet around the edge: 2 sc in the last st of row 13, 1 sc down the side (rows 12 to 2), (sc, ch, sc) into the magic ring point, 11 sc up the other side (rows 2 to 12), 2 sc in the first st of row 13. Cut yarn on the first piece only; leave the second piece attached. Place the two pieces with wrong sides together and single crochet them together around the edge (working sc, ch, sc at the ch space) so the ear becomes a tidy pointed panel. Weave in the tail to shape the ear neatly. Repeat for the second ear. Leave a generous tail (approx 20-30 cm) to sew the ear to the head.

— Wings (Make 4 pieces) :

Info :

Make four wing panels; two joined panels form one wing. Worked in flat rows, chaining 1 and turning at the end of each row. Panels are joined and edged with black yarn, then embroidered with veins using the long tail left after joining.

Row 1 :

ch 6, starting in the 2nd ch from the hook, 5 sc, ch, turn (5)

Row 2 :

2 inc, sc, 2 inc, ch, turn (9)

Row 3 :

2 inc, 5 sc, 2 inc, ch, turn (13)

Row 4 :

inc, 11 sc, inc, ch, turn (15)

Rows 5-7 :

15 sc, ch, turn (15)

Row 8 :

15 sc (15)

Info :

Cut the yarn on the first piece only and leave the second piece attached for joining. Place two panels wrong sides together. Using black yarn, single crochet them together around the outer edge, working: 2 sc in the last st of row 8, 6 sc down the side (rows 7 to 2), then along row 1: skip 1, 3 sc, skip 1, 6 sc (rows 2 to 7), 2 sc in the last sc. Join the inner seam with a small number of scs so the wing curves slightly. Sl st into the first sc and cut the yarn, leaving about 50 cm. Use that tail to embroider the wing veins, passing the needle back and forth to create three main ridges (a central spine and two diagonal veins).

Row 9 - Wing Edging :

With black yarn and working into the outermost edge, sc evenly around the joined wing, placing 2 sc in corners and 1 sc on straighter edges to maintain 15-18 stitches per wing perimeter. This creates a finished black membrane edge that helps wings spread (st count will vary slightly depending on joining tension).

Info :

When embroidering veins, use a long tail and run the yarn back and forth passing under the sc ridges to anchor lines without making holes. Keep tension even so the wing surface stays flat. Leave the long tail for sewing onto the body.

— Wing Vein Embroidery (per wing) :

Vein 1 :

Using black yarn and the long tail from joining, stitch a central spine from the wing root towards the tip with a backstitch or straight stitch, anchoring at 6-8 points evenly.

Vein 2 :

Stitch a diagonal vein from near the wing root to the mid-edge, mimicking the photos. Repeat symmetrically on the other side. Secure the tail inside and leave approx 20 cm for sewing to the body.

— Fangs (Make 2) :

Info :

Make two tiny white fang triangles. These are simple flat pieces that are sewn underneath the embroidered smile.

Rnd 1 :

MR, 3 sc (3)

Rnd 2 :

inc, sc, inc (5)

Rnd 3 :

sc across to shape into tiny triangle; cut leaving long tail for sewing. Flatten the triangle and sew the base closed if it flares, then attach below smile so two little points peek out.

— Cheek Stitches and Facial Embroidery :

Info :

Using coral yarn, make a small satin stitch or duplicate stitch under each eye to create the blushing cheek dots in the sample. Keep stitches small and symmetrical. Use black embroidery yarn to stitch the smiling mouth between Rnds 26 and 28 before the final decreases so you can reach inside the head easily.

Smile :

Use black yarn and a backstitch to embroider a shallow 'U' shape between Rnds 26 and 28. Secure ends inside the head.

Cheeks :

With coral yarn, stitch two small horizontal satin stitches or French knots under each eye (one stitch each) for a subtle blush. Weave ends inside.

Optional :

Embroider a tiny cross-stitch on the forehead for 'scar' detail using contrasting light grey or white if you want a decorative accent as shown in some photos.

— Finishing & Variations :

Info :

For the small bat version, use fine (#2) cotton-blend yarn and a 2.00mm hook, following the same stitch counts — the finished piece will be approx 10 cm tall. For a larger bat, use chunkier yarn and a larger hook, but adjust stitch counts if necessary to maintain proportions.

Edge Tidy :

Weave in all loose ends inside the body to keep the seam neat. Trim stray fibers and shape the head and ears by gently pinching to position and re-stuffing if needed.

Final Check :

Ensure the eyes are positioned symmetrically and that the wings sit evenly on either side of the body when pinned in place. Adjust spacing and re-stitch as needed.

Info :

Seal safety eyes with washer backs and optionally a small dab of fabric glue for extra security if this will be handled frequently.

Assembly Instructions

  • Finish and stuff the seamless body-and-head, closing the top of the head firmly before weaving in the tail.
  • Pin the safety eyes between Rnds 28 and 29 (10 stitches apart as noted), then embroider the smile and white fangs before final decreases so you can reach inside easily.
  • Join each pair of ear panels with wrong sides together and sc around, then weave in the tail to give the ear a tidy pointed shape. Sew the two ears onto the head, placing them between Rnds 31-32 and Rnds 37-38, spaced about 7 stitches apart.
  • Join each pair of wing panels with black yarn and add the embroidered veins, leaving a long tail for sewing. Sew the wings onto the sides of the body between Rnds 7 and 13, spreading them evenly for a symmetrical look.
  • Attach the tiny fangs beneath the embroidered smile and secure with a few small whip stitches. Weave all tails inside the body and trim.
  • Add coral cheek stitches directly under the eyes using a few satin stitch passes and secure ends inside. Optionally embroider a little cross-stitch on the forehead for extra character.
  • Pin all pieces in place before sewing to check positioning and symmetry. Use ladder stitch or whip stitch with matching yarn for a neat, invisible finish.
  • Secure any loose ends by weaving through several stitches and trimming close to work. Optionally give a very light spot of fabric-safe blush to cheeks for extra charm.

Important Notes

  • 💡Use stitch markers consistently at the beginning of each round to avoid counting errors and maintain proper shaping.
  • 💡Stuff body parts gradually as you work rather than waiting until the end, especially for narrow openings like the top of the head.
  • 💡For safety eyes, position and secure before stuffing head fully - they cannot be repositioned once locked in place.
  • 💡Maintain consistent tension throughout the project; too tight creates stiff, small pieces, too loose creates floppy, holey fabric.
  • 💡When sewing pieces together, use yarn slightly thinner than working yarn for neater, less visible seams.
  • 💡Pin all pieces in position before final sewing to ensure proper placement and symmetry.
  • 💡Work invisible decreases through the front loops only if you see small gaps forming around the face; this yields a smoother finish.
  • 💡Leave long tails (approx 50 cm) when joining wing panels so you have enough yarn to embroider veins and to sew wings securely to the body.

This adorable Baby Bat pattern combines classic amigurumi techniques with tiny details that bring the character to life. From the sweet embroidered smile and coral cheeks to the spreadable wing membranes, every stitch adds charm and personality. Whether you make one for yourself or stitch a whole colony in different colours, this friendly bat is sure to delight. 🧶🦇 Happy crocheting and happy haunting! 🎃
You ask,

we answer.

FAQs

What is the finished size of this amigurumi?

Using light worsted (#3) yarn with a 3.00mm hook, the finished bat measures approximately 15 cm tall. Using fine (#2) cotton with a 2.00mm hook produces a smaller bat of about 10 cm. Your exact size will vary with yarn and tension.

Can I use different yarn weights for this pattern?

Yes! You can use any yarn weight, but adjust your hook size accordingly (generally 1–2 sizes smaller than the yarn recommendation for tight amigurumi fabric). Different weights will proportionally change the final size.

Do I need to use safety eyes or can I embroider them?

Both options work beautifully. Safety eyes give a professional look and are secure, perfect for display pieces. Embroidered eyes are ideal for toys intended for babies and young children as they have no small parts.

How much stuffing will I need?

For the larger version, approximately 50–80 grams of polyester fiberfill should be sufficient. Stuff firmly but not overly tight so the piece keeps a soft, plush feel while holding shape.

Can I make the wings poseable?

Yes—insert a thin piece of florist wire or pipe cleaner into the wing seam before finishing the edging and embroidering. Fold over the wire ends and wrap well with yarn so there are no sharp points.

What if my stitch count is off?

If you notice a counting error, unravel back to the last correct round. Compensating later often results in visible distortions. Using a stitch marker at the round start helps avoid counting mistakes.

How do I prevent holes when stuffing?

Work with tight, consistent tension and use a hook slightly smaller than the yarn recommendation. Stuff in small amounts and distribute fiberfill evenly rather than stuffing large lumps at once.

Can I customize colours and details?

Absolutely! Try seasonal colours, a pale body with black wings, or add tiny outfits and accessories. You can also change cheek colour, embroider different expressions, or add a small loop on the head to hang as an ornament.