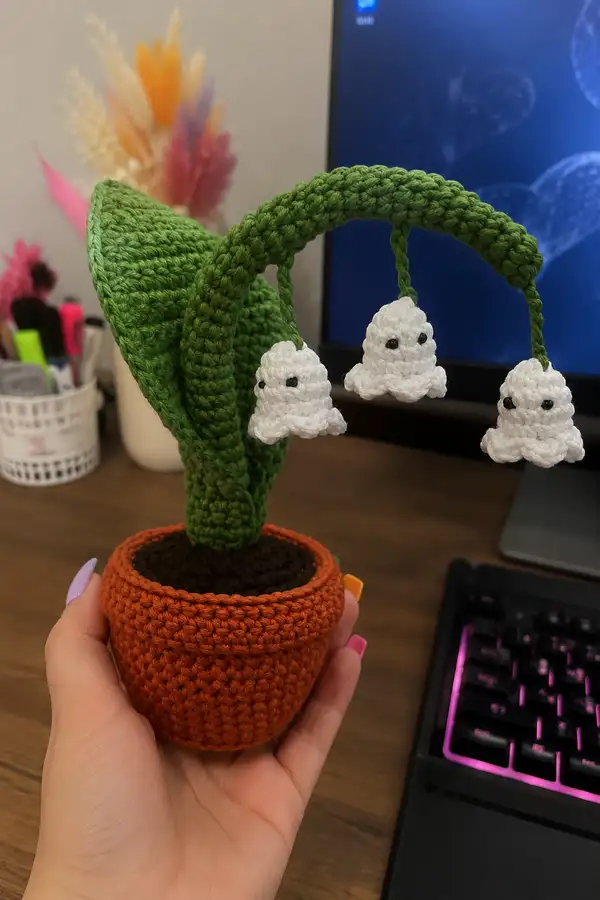
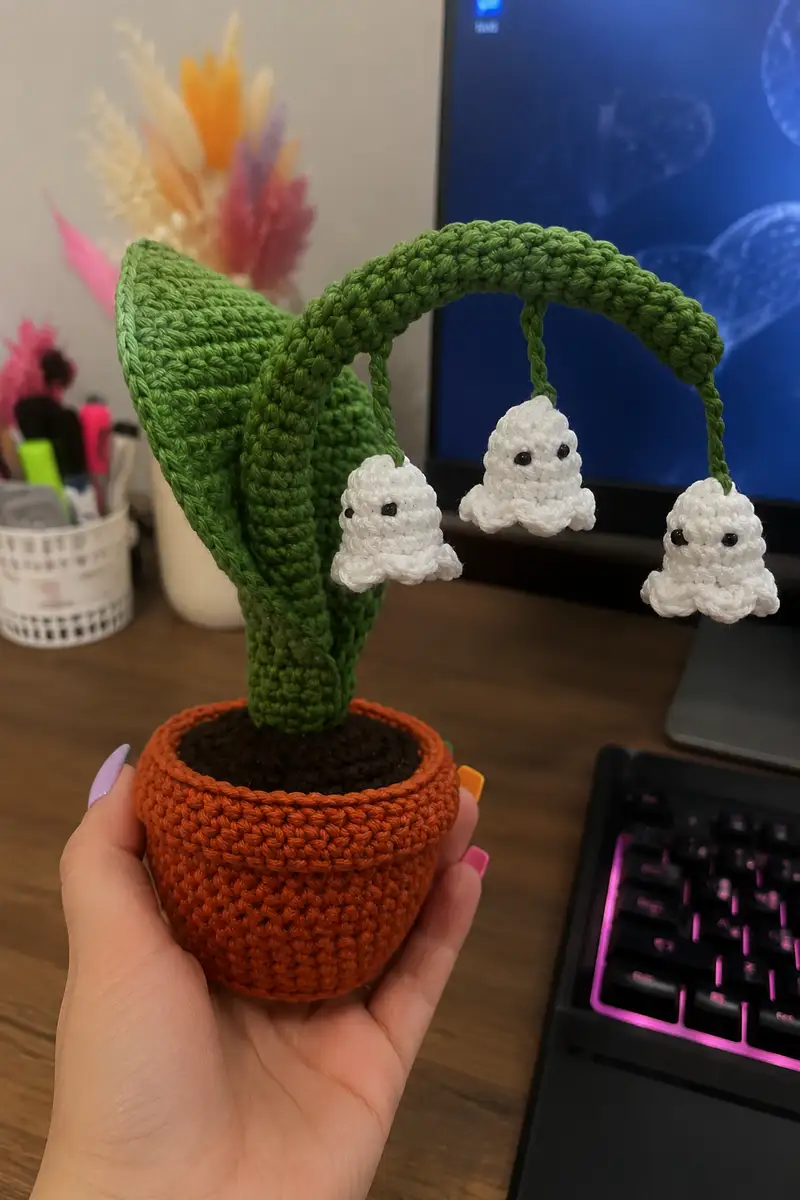
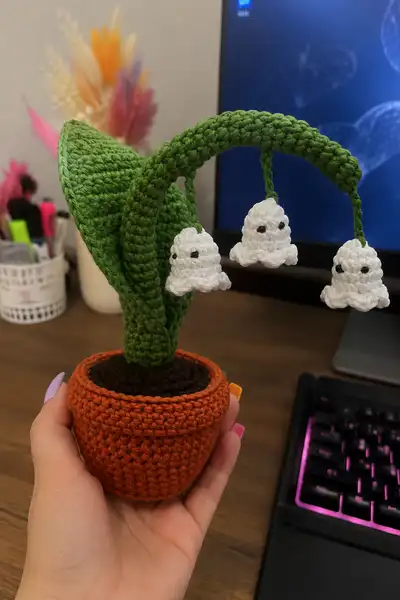
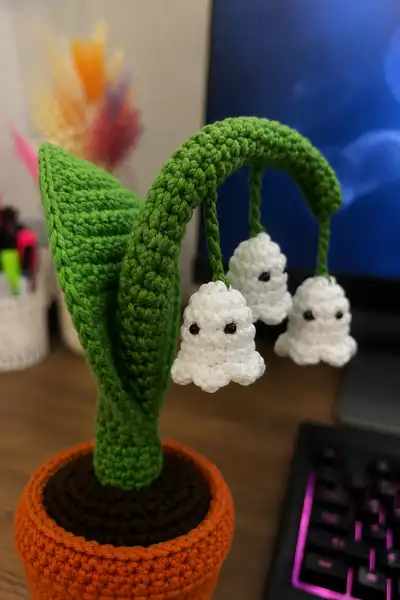
A spooky-cute potted plant featuring a drooping green leaf that cradles three tiny ghost phantoms. This amigurumi combines a sturdy crochet pot, textured soil, a bendable stem and a curved arm with hanging ghosties that have scalloped skirts and tiny safety eyes. Perfect for seasonal decor or a playful desk companion, the finished piece is compact, tactile, and full of personality.
Progress Tracker
0% Complete
— Pot :
Round 1 :
6 sc in magic ring (6)
Round 3 :
(1 sc, 1 inc) x 6 (18)
Round 4 :
(2 sc, 1 inc) x 6 (24)
Round 5 :
(3 sc, 1 inc) x 6 (30)
Round 6 :
(4 sc, 1 inc) x 6 (36)
Round 7 :
(5 sc, 1 inc) x 6 (42)
Round 8 :
(6 sc, 1 inc) x 6 (48)
Info :
The initial rounds create the base of the pot. Work tightly and keep your tension even so the pot holds shape. Use a marker for the first stitch of each round.
Round 9-14 :
1 sc in each st (48)
Info :
Continue working even to build the height of the pot body. If you want a slightly wider pot, add one extra round of increases before working even.
Round 15 :
(6 sc, 1 dec) x 6 (42)
Round 16 :
(5 sc, 1 dec) x 6 (36)
Info :
We are beginning to shape the top edge inward to allow a folded rim later. Stuffing is not added to the pot — the plant sits inside with a removable soil disk.
Round 17 :
(4 sc, 1 dec) x 6 (30)
Round 18 :
(3 sc, 1 dec) x 6 (24)
Round 19 :
1 sc in each st (24)
Info :
To create the folded rim, we will now work additional rounds in BLO to form a lip that folds outward. Mark the first stitch for reference.
Round 20 :
1 sc in each st BLO (24)
Round 21 :
1 sc in each st BLO (24)
Round 22 :
1 sc in each st BLO (24)
Info :
Fold the BLO collar outward to form the pot rim. Pin into place and sew through the folded layers using a whip stitch to keep the rim stable and neat.
Round 23 :
With pot still turned right side out, join with sl st around rim if desired to tidy edge (optional)
Info :
Fasten off leaving long tail for weaving in. The pot will be filled with a removable soil disk; if you prefer a solid pot, sew the soil disk in place after assembly.
— Soil Disk :
Round 1 :
6 sc in magic ring (6)
Round 3 :
(1 sc, 1 inc) x 6 (18)
Round 4 :
(2 sc, 1 inc) x 6 (24)
Round 5 :
(3 sc, 1 inc) x 6 (30)
Round 6 :
(4 sc, 1 inc) x 6 (36)
Round 7 :
(5 sc, 1 inc) x 6 (42)
Round 8 :
(6 sc, 1 inc) x 6 (48)
Info :
Make the soil disk slightly smaller than the pot interior so it can sit inside snugly. Work flat and stuff the center very lightly with fiberfill to give a slight mound. Close with a few rounds of sc decrease if desired to raise the center.
Round 9 :
1 sc in each st (48) — optional single round to tidy edge
Info :
Fasten off leaving long tail for tacking disk into pot or leave removable for cleaning/rearranging. Use a few whip stitches around the inside of the pot to secure if you want a permanent finish.
— Stem (Make 1) :
Round 1 :
6 sc in magic ring (6)
Round 3 :
(1 sc, 1 inc) x 6 (18)
Round 4-6 :
1 sc in each st (18)
Info :
The stem is a hollow tube. Work tightly and consider stuffing lightly as you go to keep a round, consistent tube. For a bendable stem, do not insert wire here — wire goes in the arch arm only. Use a marker to track round starts.
Round 7 :
(2 sc, 1 inc) x 6 (24)
Round 8-18 :
1 sc in each st (24)
Info :
Work 11 rounds here to create a tapered mid-stem. If you want a more tapered base, add 1-2 dec rounds near the bottom after the next step.
Round 19 :
(2 sc, 1 dec) x 6 (18)
Round 20 :
(1 sc, 1 dec) x 6 (12)
Round 21 :
1 sc in each st (12)
Info :
Leave a long tail to sew the stem to the soil disk and pot interior. Stuff the stem moderately at the base so the plant stands upright inside the pot when the soil disk is in place.
Round 22 :
Fasten off leaving long tail for sewing (or continue to attach leaf and arch directly if you prefer seamless construction)
— Leaf (Make 1) :
Info :
This leaf is worked in the round starting from a wide base and increasing to a full teardrop/oval. The central rib is created by folding and stitching. Work with bright green yarn. Keep tension a bit looser for a flat leaf that lies nicely.
Round 1 :
6 sc in magic ring (6)
Round 3 :
(1 sc, 1 inc) x 6 (18)
Round 4 :
(2 sc, 1 inc) x 6 (24)
Round 5 :
(3 sc, 1 inc) x 6 (30)
Info :
At this point the leaf is forming a circular disk. We will shape one side longer so the leaf has a point and one short side for the stem attachment. Place a marker at the first stitch of each round.
Round 6 :
(4 sc, 1 inc) x 6 (36)
Round 7 :
(5 sc, 1 inc) x 6 (42)
Round 8-10 :
1 sc in each st (42)
Info :
We will start adding asymmetrical increases along one half of the leaf to create a teardrop shape. Work the following rounds by increasing across the next 18 stitches only, leaving the opposite half in even rounds.
Round 11 :
Along half section: (2 sc, 1 inc) x 6; remaining half: 1 sc in each st (48)
Round 12 :
Along half section: 1 sc in each st (48)
Round 13 :
Along half section: (3 sc, 1 inc) x 6; remaining half: 1 sc (54)
Round 14-16 :
1 sc in each st (54)
Info :
If you prefer a more pointed leaf, continue asymmetrical increases another round. For the pictured large drooping leaf, these increases will create a broad teardrop that we will flatten and seam.
Round 17 :
(5 sc, 1 dec) x 7 (48) — begin gentle shaping toward tip
Round 18 :
(4 sc, 1 dec) x 8 (40)
Round 19 :
(3 sc, 1 dec) x 8 (32)
Round 20 :
(2 sc, 1 dec) x 8 (24)
Info :
Fasten off leaving long tail for sewing to stem. Flatten leaf along its center and use the long tail to sew the two long sides together lightly to create a central rib that encourages droop. Alternatively, embroider a central rib using backstitch with same yarn.
Round 21 :
Optional decorative rounds: join and work 1 sc around edge, or work 1 hdc around for a smoother edge
Info :
To make the leaf hold a graceful curve, use a small length of plastic canvas or gently insert a thin florist wire near the folded seam before sewing fully closed. Avoid poking wire ends into the plant base.
— Curved Arm (Arch) with Wire Core :
Info :
This arch is crocheted as a tube around a length of wire for a sturdy, poseable arm. Use the green yarn and a slightly smaller hook if you like a tighter fabric. Prepare a piece of 24-30cm wire and wrap the ends with tape to blunt them before insertion.
Round 1 :
6 sc in magic ring (6)
Round 3 :
(1 sc, 1 inc) x 6 (18)
Round 4 :
(2 sc, 1 inc) x 6 (24)
Round 5-8 :
1 sc in each st (24)
Info :
At the end of round 8, fold the tube flat and insert the taped wire. You will crochet over the wire in subsequent rounds, enclosing it inside the tube. Make sure the wire extends a little beyond both ends if you plan to anchor one end into the stem/soil.
Round 9-40 :
1 sc in each st (24) — work 32 rounds to create length for arch (adjust to desired length)
Info :
Once the full length is worked and wire is enclosed, bend the arm gently into the desired arch shape. If you prefer a thicker arm, add one round of inc distributed every 8-10 rounds near the middle before enclosing wire. Fasten off leaving a long tail to sew the base to the stem.
Round 41 :
Join ends if you like and tidy with sl st across final round. Fasten off leaving long tail for anchoring to the stem.
— Hanging Twist Cords (Make 3) :
Info :
Each cord is a simple chain twisted rope. Make three cords of about 6-8cm length each so ghosts dangle at different heights. Use the same green yarn as the arm.
Cord :
ch 20 (or ch 16-24 to desired length). Fasten off leaving long tail. Hold both ends and twist until rope coils then fold in half and let coil tighten; tie ends to anchor under the arch. Alternatively, use a simple 4-strand braid from three lengths to create stronger cord.
Info :
Sew the top of each cord securely inside the arm tube before closing so they do not slip. Space the cords across the inner curve of the arch to match the photos — roughly evenly spaced with center cord slightly longer.
— Phantom Ghost (Make 3) :
Info :
Each ghost is a small bell-shaped amigurumi worked in the round and finished with a scalloped edge to form the ghost skirt. Place small safety eyes between rounds 5-7, about 4-6 stitches apart depending on desired expression.
Round 1 :
6 sc in magic ring (6)
Round 3 :
(1 sc, 1 inc) x 6 (18)
Round 4 :
(2 sc, 1 inc) x 6 (24)
Info :
Insert safety eyes between rounds 5 and 6. For the small scale shown, use 6mm or 5mm eyes. Place eyes approximately 6 stitches apart (center-to-center) for a friendly expression.
Round 5 :
1 sc in each st (24)
Round 6 :
1 sc in each st (24)
Round 7 :
(3 sc, 1 inc) x 6 (30)
Info :
We will begin the bell flare and scalloped skirt. Work one or two rounds even to make a small neck join point for the hanging cord.
Round 8 :
1 sc in each st (30)
Round 9 :
(4 sc, 1 dec) x 5 (25) — gentle shaping before scallop
Round 10 :
1 sc in each st (25)
Round 11 :
Scallop round: *skip 1, (1 sc, 1 hdc, 1 dc, 1 hdc, 1 sc) in next st, skip 1, sl st in next* rep around to make 6 scallops (approx 24-30 stitches depending on placement)
Info :
The scallop uses taller stitches to form waves for the ghost skirt. If you prefer to stay with only sc, make 6 picot bumps by working (1 sc, ch2, sl st in ch2) into spaced stitches instead.
Round 12 :
Fasten off leaving long tail for sewing cord into top. Weave in tails and shape scallops with fingers or a steam press (careful with cotton). Repeat to make three ghosts.
Info :
Attach the hanging cord by inserting the cord end into the top of the ghost and securing with a few sewing stitches from inside. Add a dab of glue inside for extra security if desired (avoid visible glue around eyes).
— Assembly :
Info :
Before assembly, position the soil disk in the pot to determine the correct height for stem and arch. Test-fit the arch and leaf positions to get the droop and spacing that matches the photos: leaf on one side of the stem drooping over, arch anchored slightly above the leaf junction with cords hanging at staggered heights.
Step 1 :
Sew stem to the center of the soil disk from the underside, using the long tail left on the stem. Make tight stitches through the base of the stem and the thick center of the soil disk to secure.
Step 2 :
Place soil disk inside pot and test stand. If stable, remove and stuff disk more or less as needed. Tuck the pot interior and sew a few stitches through soil to pot interior if you want a permanent placement.
Step 3 :
Position the arch and sew its base around the upper side of the stem. Use the long tail from the arch and sew through several rounds of the stem to anchor. Add a few stitches to the underside of the soil disk if needed to stabilize arch base.
Step 4 :
Attach the leaf to the stem using the long tail from the leaf. Sew near the base where the leaf meets the stem, tacking the folded rib in place so the leaf droops forward naturally.
Step 5 :
Sew the hanging cords securely inside the arch tube. Knot cords at the top and bury knots inside for a clean finish. Attach each ghost to the end of a cord with stitches around the top of the ghost to secure.
Step 6 :
Adjust ghost heights and spacing, trim excess cord tails, and weave in all remaining yarn tails. Use a yarn needle to pull ends inside pieces so nothing is visible.
Info :
For final shaping, gently bend the arch to form a natural curve and arrange the leaf so it droops over the arch slightly. If using wire in the leaf, shape after all attachments are secured.
— Final Details & Embellishments :
Info :
You can embroider small mouths or blush cheeks using embroidery floss or a tiny bit of fabric paint for added expression. Use black yarn or embroidery thread for small stitched mouths under the eyes on rounds 5-6 of each ghost.
Tip :
If the arch is too floppy, remove and reinsert a thicker wire or add a second wire taped alongside the first for extra stiffness. For a softer arch, use a shorter wire and rely more on the crocheted tube to hold shape.
Care :
Spot clean with damp cloth. Avoid submerging wire-core pieces in water. Store indoors to keep small safety eyes secure if given to young children.
This charming Halloween-themed amigurumi mixes structural crochet with cute character details to create a memorable handmade piece. The bendable arch and dangling phantom ghosts give it playful motion, while the sturdy pot and soil disk ensure it sits nicely on any shelf or desk. I hope you enjoy every stitch of making this whimsical plant — it makes a lovely gift or seasonal decoration. 🎃👻