🧢 Beautiful ✨ Detailed πŸ’ Adorable

Cuddle-Worthy Jedi Amigurumi Pattern

Cuddle-Worthy Jedi Amigurumi Pattern
3.9β˜… Rating
5-7 Hours Time Needed
3.6K Made This
βœ‚οΈ

Intermediate Level

Ideal for those with basic crochet experience, featuring slightly more advanced stitches and techniques to expand your skills.

⏱️

Weekend Treat

Takes 5-7 hours, making it an enjoyable project to finish over a couple of days.

Cute Companion 🧸 β€” An adorable friend to cherish, handcrafted with love to bring comfort and joy for years to come.

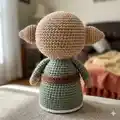
About This Cuddle-Worthy Jedi Amigurumi Pattern

Cuddle-Worthy Jedi Amigurumi Pattern crochet pattern - detailed view of completed project

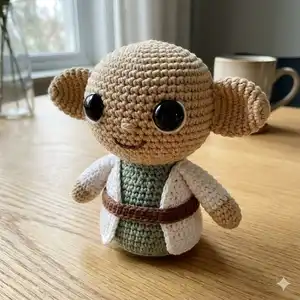
What sets this pattern apart is the attention to detail in the clothing and facial features, which truly bring this character to life. With the option to customize colors and add personal touches, each creation will be unique!

Why You'll Love This Cuddle-Worthy Jedi Amigurumi Pattern

I absolutely love this pattern because of the delightful combination of simplicity and detail! The oversized ears and flowing robe give it such character, making it a joy to work on. Plus, the satisfaction of watching this little Jedi come to life stitch by stitch is truly rewarding. I can't wait to see how different colors can transform this design!
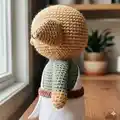
Cuddle-Worthy Jedi Amigurumi Pattern step 1 - construction progress Cuddle-Worthy Jedi Amigurumi Pattern step 2 - assembly progress Cuddle-Worthy Jedi Amigurumi Pattern step 3 - details and accessories Cuddle-Worthy Jedi Amigurumi Pattern step 4 - final assembly and finishing

Switch Things Up

I absolutely love this pattern for its versatility and charm! You can easily switch up the colors to create your unique version, whether with vibrant shades or subtle earthy tones.

Adding personalized details like different expressions or unique accessories enhances its personality. You could even make themed variations for holidays or parties!

This design offers a fantastic canvas for experimentations with textures or embellishments, enriching the final piece. Don't hesitate to get creative and make it truly your own!

Common Mistakes & How to Fix Them

βœ— Skipping stitch markers at round starts can cause misaligned features and uneven shaping; always mark your first stitch of each round. βœ— Inconsistent tension between rounds creates lumpy or uneven surfaces; practice maintaining steady, even tension throughout the entire project. βœ— Not adequately stuffing the limbs makes them floppy; be sure to stuff as you create to maintain structure. βœ— Forgetting to attach safety eyes early leads to later difficulties; secure them before completely stuffing the head. βœ— Neglecting to weave in loose ends properly can cause unraveling; always ensure ends are secured by weaving within the stitches.

Cuddle-Worthy Jedi Amigurumi Pattern

Create your own adorable Jedi amigurumi with this detailed crochet pattern! This lovable character features oversized ears, a soft, cuddly body, and a robe that adds charm and personality. With realistic stitching details and expressive features, this pattern is perfect for both beginner and intermediate crocheters looking to add a bit of magic to their creations. Bring your own unique twist to this beloved character with customizable colors and accessories, making it a wonderful gift or a charming addition to your own collection!

Intermediate 5-7 Hours

Materials Needed for Cuddle-Worthy Jedi Amigurumi Pattern

β€” Main Fabric

  • 01
    Worsted weight yarn (#4), approximately 150g in main color (light beige for head and body)
  • 02
    20g in accent color A (light brown for robe)
  • 03
    10g in accent color B (white for robe details)
  • 04
    Small amount (5-10g) in dark brown for the belt

β€” Tools Required

  • 01
    3.5mm (E) crochet hook for main work
  • 02
    Safety eyes 10mm
  • 03
    Polyester fiberfill stuffing
  • 04
    Yarn needle for sewing
  • 05
    Stitch markers (at least 3-4)
  • 06
    Scissors
  • 07
    Pins for assembly
  • 08
    Optional: Wire for poseable ears
  • 09
    Optional: Fabric glue for securing eyes

Progress Tracker

0% Complete

β€” Head :

Round 1 :

6 sc in magic ring (6)

Round 2 :

6 inc (12)

Round 3 :

(1 sc, 1 inc) x 6 (18)

Round 4 :

(2 sc, 1 inc) x 6 (24)

Round 5 :

(3 sc, 1 inc) x 6 (30)

Round 6 :

(4 sc, 1 inc) x 6 (36)

Round 7 :

(5 sc, 1 inc) x 6 (42)

Round 8 :

(6 sc, 1 inc) x 6 (48)

Round 9-14 :

1 sc in each st (48)

Info :

Place safety eyes between rounds 12-13, about 8 stitches apart depending on expression of the character.

Round 15 :

(6 sc, 1 dec) x 6 (42)

Round 16 :

(5 sc, 1 dec) x 6 (36)

Round 17 :

(4 sc, 1 dec) x 6 (30)

Info :

Begin stuffing head firmly, ensuring even distribution. Continue stuffing as you decrease.

Round 18 :

(3 sc, 1 dec) x 6 (24)

Round 19 :

(2 sc, 1 dec) x 6 (18)

Round 20 :

(1 sc, 1 dec) x 6 (12)

Round 21 :

6 dec (6)

Info :

Fasten off leaving long tail for sewing. Finish stuffing and close opening securely.

β€” Body :

Round 1 :

6 sc in magic ring (6)

Round 2 :

6 inc (12)

Round 3 :

(1 sc, 1 inc) x 6 (18)

Round 4 :

(2 sc, 1 inc) x 6 (24)

Round 5 :

(3 sc, 1 inc) x 6 (30)

Round 6-10 :

1 sc in each st (30)

Info :

If adding clothing, change to clothing color now. Work next rounds in BLO to create a ridge at the clothing line.

Round 11 :

1 sc in each st BLO (30)

Round 12-18 :

1 sc in each st (30)

Info :

Begin stuffing body moderately, not too firm to allow for neck attachment later.

Round 19 :

(3 sc, 1 dec) x 6 (24)

Round 20 :

(2 sc, 1 dec) x 6 (18)

Round 21 :

(1 sc, 1 dec) x 6 (12)

Info :

Continue stuffing as you decrease. Fasten off leaving long tail for closing.

β€” Arms (Make 2) :

Round 1 :

6 sc in magic ring (6)

Round 2 :

6 inc (12)

Round 3-6 :

1 sc in each st (12)

Round 7 :

(1 sc, 1 inc) x 6 (18)

Info :

For hands, you may wish to add a small amount of white yarn at the end for detail.

Round 8-9 :

1 sc in each st (18)

Round 10 :

(1 sc, 1 dec) x 6 (12)

Info :

Stuff hands moderately and continue shaping the arm lightly as you decrease until you reach the final piece.

Round 11-12 :

1 sc in each st (12)

Round 13 :

6 dec (6)

Info :

Fasten off leaving long tail for sewing to body.

β€” Legs (Make 2) :

Round 1 :

6 sc in magic ring (6)

Round 2 :

6 inc (12)

Round 3-5 :

1 sc in each st (12)

Round 6 :

(2 sc, 1 inc) x 4 (16)

Round 7-10 :

1 sc in each st (16)

Round 11 :

(1 sc, 1 dec) x 6 (12)

Round 12 :

(2 sc, 1 dec) x 4 (8)

Round 13 :

4 dec (4)

Info :

Fasten off leaving long tail for sewing, ensuring legs are stuffed firmly for stability.

β€” Ears (Make 2) :

Round 1 :

6 sc in magic ring (6)

Round 2 :

6 inc (12)

Round 3 :

(1 sc, 1 inc) x 6 (18)

Round 4-5 :

1 sc in each st (18)

Round 6 :

(2 sc, 1 dec) x 6 (12)

Round 7 :

6 dec (6)

Info :

Fasten off leaving long tails to sew. Attach to head by positioning between rounds 5-6, spacing about 10 stitches apart.

β€” Tail :

Round 1 :

6 sc in magic ring (6)

Round 2 :

6 inc (12)

Round 3-5 :

1 sc in each st (12)

Round 6 :

(2 sc, 1 inc) x 4 (16)

Info :

Shape tail as desired, can make it longer or shorter as preferred.

Round 7-10 :

1 sc in each st (16)

Round 11 :

(1 sc, 1 dec) x 6 (10)

Round 12 :

5 dec (5)

Info :

Wait to attach until after the body is complete.

Assembly Instructions

  • Attach head to body by inserting the neck portion into the body opening. Pin in place first, then sew securely using whip stitch all around, ensuring even attachment.
  • Position arms on sides of body at rounds 18-20 for natural look. Sew through both arm and body using ladder stitch for invisible seam.
  • Attach legs to bottom of body at rounds 1-3, spacing them evenly. Sew securely, adding extra stitches for stability if character will be posed.
  • Sew ears to top of head at rounds 5-8, spacing them 10-12 stitches apart and curvature slightly forward for natural appearance.
  • Attach tail at back center of body using the same whip stitch method. Ensure tail is secure for stability.
  • Add any facial embroidery: nose, mouth, eyebrows using yarn needle and matching colors; feel free to customize expressions!
  • Secure any loose ends by weaving through several stitches and trimming close to work after assembly is complete.
  • Optional: Add rouge to cheeks using fabric paint or makeup for extra cheerfulness.

Important Notes

  • πŸ’‘Use stitch markers consistently at the beginning of each round to avoid counting errors and maintain proper shaping.
  • πŸ’‘Stuff body parts gradually as you work rather than waiting until the end, especially for narrow openings like arms and legs.
  • πŸ’‘For safety eyes, position and secure before stuffing head fully - they cannot be repositioned once locked in place.
  • πŸ’‘Maintain consistent tension throughout the project; too tight creates stiff, small pieces, too loose creates floppy, holey fabric.
  • πŸ’‘When sewing pieces together, use yarn slightly thinner than working yarn for neater, less visible seams.
  • πŸ’‘Pin all pieces in position before final sewing to ensure proper placement and symmetry.
  • πŸ’‘For amigurumi, work tightly enough that stuffing doesn't show through stitches.
  • πŸ’‘Keep a row counter or notepad to track rounds, especially in long even-stitch sections.

This enchanting Jedi amigurumi combines classic crochet techniques with captivating details to create a truly special handmade friend! Each carefully crafted section comes together to form a character full of personality and charm. The detailed instructions ensure your finished piece will be a delightful addition to your collection. πŸŽ‰ Whether you’re making this as a gift or keeping it for yourself, you'll cherish every stitch of your creative journey. Happy crocheting! 🧢✨

You ask,

we answer.

FAQs

What is the finished size of this amigurumi?

Based on the specified materials and hook size, the finished piece will measure approximately 10 inches tall. Using different yarn weights will proportionally change the final size.

Can I use different yarn weights for this pattern?

Yes! You can use any yarn weight, but remember to adjust your hook size accordingly; generally, 1-2 sizes smaller than yarn recommendation for tight amigurumi fabric. Different weights will change the final size proportionally.

Do I need to use safety eyes or can I embroider them?

Both options work beautifully! Safety eyes give a professional look and are very secure, perfect for gifts. Embroidered eyes are ideal for young children as they have no small parts and allow for more expression customization.

How much stuffing will I need?

For this size project, approximately 50-80 grams of polyester fiberfill should be sufficient. Stuff firmly but not overly tight, allowing the piece to maintain its shape while still being cuddly.

Can I make the arms and legs poseable?

Absolutely! Insert pipe cleaners or floral wire before stuffing limbs completely. Bend wire to desired shape, ensuring ends are folded over safely, then continue stuffing around the wire for poseable limbs.

What if my stitch count is off?

If you notice a counting error, it's best to unravel back to where the count was correct. Trying to compensate later often creates visible distortions. Using a stitch marker at round starts helps prevent counting mistakes.

How do I prevent holes when stuffing?

Work with tight, consistent tension throughout, using a hook slightly smaller than yarn recommendation. When stuffing, distribute fiberfill evenly in small amounts rather than large chunks.

Can I customize colors and details?

Definitely! Feel free to use any color combinations you love. You can also add accessories, change facial expressions, or adjust proportions slightly to make your creation unique while following the basic structure.