🧢 Beautiful ✨ Detailed πŸ’ Adorable

Basic Crochet Basket Pattern

Basic Crochet Basket Pattern
4.2β˜… Rating
2-3 Hours Time Needed
2.6K Made This
βœ‚οΈ

Beginner Friendly Level

Perfect for those just starting their crochet journey, with clear instructions and simple techniques

⏱️

Bite-Sized Project

Finishes in 2-4 hoursβ€”perfect for an afternoon of creative relaxation.

🏑

Cozy Accent

A warm touch for your space that transforms ordinary corners into inviting nooks filled with handmade charm.

About This Basic Crochet Basket Pattern

This pattern makes a rectangular crochet basket using Paintbox Simply Aran yarn and a 10mm hook. The design is worked flat for the base, then joined to create even sides worked in rounds for a neat finish. It is a practical, beginner-friendly project that results in a functional storage solution for home or gifts.

Basic Crochet Basket Pattern crochet pattern - detailed view of completed project

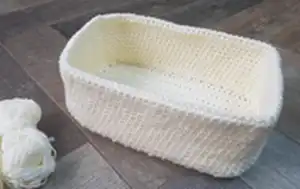
The basket finishes approximately 30cm x 25cm x 14cm and uses simple half trebles and double crochets. Minimal sewing is required β€” fold, sew the sides, and shape for a polished look.

Why You'll Love This Basic Crochet Basket Pattern

I absolutely love this pattern because it transforms bulky yarn into a stylish, functional storage piece with very little effort. I enjoy the satisfying rhythm of the half treble base and the quick progress when working the tall sides with a large hook. The finished basket is sturdy and so useful around the house, which makes it a joy to give as a handmade gift. I also love how easy it is to customize the size and color to match any room.

Basic Crochet Basket Pattern step 1 - construction progress Basic Crochet Basket Pattern step 2 - assembly progress Basic Crochet Basket Pattern step 3 - details and accessories Basic Crochet Basket Pattern step 4 - final assembly and finishing

Switch Things Up

I love experimenting with color changes across the sides to create striped or block color baskets instead of a single cream shade.

I sometimes make the basket taller or shorter by working more or fewer rounds on the sides to suit different storage needs.

I often change the base chain length to alter the overall dimensions; increasing chains and adjusting the side dc counts gives a wider basket.

I like to switch stitch patterns on the sides, using half double crochets or textured stitches to add interest and structure.

I also add handles by leaving gaps in the side rounds or crocheting simple strap handles and sewing them in place for easy carrying.

I sometimes line the basket with fabric for extra stability and a finished interior β€” I measure the inside and sew a fabric rectangle to fit.

I enjoy using different yarn types like chunky rope or t-shirt yarn for a sturdier, rustic look and a completely different feel.

I occasionally add a decorative top edge by working a round of slip stitches or picot for a delicate finish.

I recommend experimenting with two-tone yarn for a marled effect that looks professional and hides minor tension inconsistencies.

I also try adding small sewn-on labels or embroidered initials to personalize baskets for gifts or storage organization.

Common Mistakes & How to Fix Them

βœ— Not checking your gauge can result in a base that is too small or too large; measure a 10cm x 10cm swatch to match the stated gauge of 10 htr and 7 rows and adjust hook size if needed. βœ— Skipping the turning chain or miscounting the second chain from hook can change the stitch count at the base edge; always count your stitches after the first row to confirm you have 30 sts. βœ— Crocheting too tightly on the base can make the basket misshape and hard to fold; maintain a relaxed tension so the base lays flat and measures 25cm before starting sides. βœ— Uneven distribution of dc along the sides leads to lumpy corners; work the specified 18 dc along short sides and 30 dc along long sides evenly to total 96 dc for neat corners. βœ— Failing to leave a long tail when fastening off makes sewing the sides difficult; fasten off leaving a long thread and use a tapestry needle for secure seams every few stitches.

Basic Crochet Basket Pattern

Create a simple, sturdy rectangular crochet basket perfect for organizing small items around your home. This pattern uses aran weight yarn and a large hook to work up quickly, giving you a firm, neat structure. You will enjoy the straightforward instructions and minimal finishing β€” ideal for a practical handmade accent.

Beginner Friendly 2-3 Hours

Materials Needed for Basic Crochet Basket Pattern

β€” Main Fabric

  • 01
    Paintbox Simply Aran - Cream - 3 x 100g (approx 300g total, aran weight #4)

β€” Tools Required

  • 01
    10mm crochet hook
  • 02
    Tapestry needle

Progress Tracker

0% Complete

Infos :

3 x 100g Paintbox simply aran in cream. 10mm hook. Tapestry needle. Dc - double crochet. Htr - half treble.

Infos :

Size: 30cm x 25cm x 14cm. Gauge: 10cm x 10cm = 10 htr and 7 rows.

β€” Base :

Round 1 :

Chain 31, htr in 2nd chain from hook. Htr to end (30 sts). Turn.

Round 2 :

Htr in each stitch to the end. Turn.

Round 3 :

Repeat until base measures 25cm.

β€” Sides (working in rounds) :

Round 1 :

Working along 1st short side, dc 18 sts evenly along the edge, dc 30 along long edge, dc 18 sts evenly along 2nd short side, 30 dc along long edge. (96 dc).

Round 2 :

Continue working in rounds until sides measure 28cm or double the required height.

Round 3 :

Fasten off leaving a long thread to sew.

β€” Assembly :

Info :

Fold sides in half and secure along the base where htr row and dc row meet.

Info :

Shape and enjoy!

Assembly Instructions

  • Fold the sides in half so the short sides meet and align the base htr row with the first dc row to form the corners.
  • Using the long tail left when fastening off, sew the folded sides together along the base where the htr row and dc row meet using a whipstitch or mattress stitch for a clean seam.
  • Weave in all loose ends securely with the tapestry needle and trim any excess yarn for a neat finish.
  • Block or shape the basket by hand after sewing to ensure straight sides and crisp corners; press gently or steam lightly if needed.
  • Place the basket on a flat surface and adjust the seams and top edge before final securing to ensure symmetry.

Important Notes

  • πŸ’‘Work a gauge swatch to match 10 htr and 7 rows over 10cm x 10cm to ensure the finished size is accurate.
  • πŸ’‘Distribute dc evenly along edges when picking up stitches for the side to maintain neat, squared corners.
  • πŸ’‘Fasten off leaving a long thread for sewing to make assembly easier and more secure.
  • πŸ’‘Use a large hook and consistent tension to keep the fabric flexible yet sturdy for a usable storage basket.

This Basic Crochet Basket is a quick, useful project that adds handmade style to any room. It works up fast with aran yarn and a 10mm hook, producing a sturdy, attractive storage solution. Make it in cream or customize colors to match your decor. 🧢🏑

You ask,

we answer.

FAQs

What size will the finished piece be?

The finished basket measures approximately 30cm x 25cm x 14cm when using the recommended yarn and 10mm hook.

Can I use different yarn weights for this pattern?

You can use different yarn weights, but this will affect the final size and stitch gauge; make a gauge swatch and adjust the hook to achieve similar measurements.

Do I need prior crochet experience for this pattern?

This pattern is beginner friendly and uses basic stitches like chain, half treble, and double crochet, so beginners with basic stitch knowledge can follow it.

How long does this project typically take to complete?

Most crocheters complete this project in 2-3 hours, though time may vary based on experience level and working pace.