About This Basic Crochet Basket Pattern
This pattern teaches you how to crochet a rectangular storage basket using Paintbox Simply Aran yarn and a 10mm hook. The basket works from a flat base worked in rows, then the sides are worked in rounds for neat edges. It is sturdy, functional, and finished with a simple fold-and-sew assembly for a clean look. Great for beginners wanting a quick and useful project.
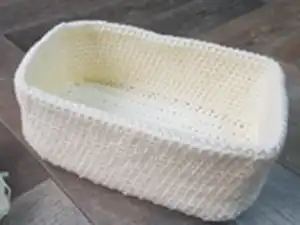
Clear, concise instructions guide you through the base, sides, and finishing steps. Make it in cream as shown or customize with your favorite aran-weight shades.
Why You'll Love This Basic Crochet Basket Pattern
I absolutely love this pattern because it turns simple stitches into a useful, attractive storage solution with very little effort. I enjoy how quickly the base grows and how satisfying it is to fold and sew the sides into a neat box. The technique is reassuringly straightforward, so I can relax and crochet while still creating something practical. It also gives me the freedom to personalize size and color easily, which keeps this pattern fresh and fun every time I make it.
Switch Things Up
I love customizing this basket by changing the yarn color to create stripes or blocks of color; alternating two colors every few rows makes a lovely effect.
I often switch to a thicker or thinner yarn and adjust the hook to make larger or smaller baskets based on what I need for storage.
I sometimes add handles by chaining a suitable length and joining into the side rounds to create easy carry grips for the basket.
I will line the basket with fabric for a polished finish; using a simple fabric rectangle stitched inside adds structure and hides seams.
I enjoy adding decorative edging such as a round of slip stitch or a contrasting color single crochet to give the top a finished look.
I sometimes stiffen the basket by brushing the exterior with diluted PVA glue and shaping it over a form until dry for a rigid storage box.
I also experiment with different shapes by changing the base stitch count; increasing base length and width creates larger rectangular baskets or square versions.
I like to sew on small labels or attach a wooden tag so the basket can be used as a labeled storage solution in a child’s room or craft area.
I sometimes replace the top rounds with a decorative bobble or popcorn stitch to create a textured rim for a more decorative piece.
I recommend trying contrasting yarn textures, like mixing wool with acrylic, for a unique rustic or plush finish depending on your home decor.
Common Mistakes & How to Fix Them
✗ Not checking your gauge can make the finished basket too small or too large; measure a 10cm x 10cm swatch and adjust hook size to match the recommended gauge.
✗ Skipping the turn at the end of base rows can create an uneven edge and awkward joins; always turn your work as instructed and count stitches after turning.
✗ Crocheting the dc stitches unevenly along the short edges can make the corners look lumpy; space the 18 dc evenly and use pins to mark placement before stitching.
✗ Fastening off too short a tail will make sewing the sides awkward and weak; leave a long thread when fastening off to comfortably sew the sides to the base.
✗ Working with inconsistent tension will distort the rectangle and side walls; maintain even tension and adjust hook or yarn handling if rows begin to cup or ripple.


