🧢 Beautiful ✨ Detailed πŸ’ Adorable

Basic Granny Square Pattern

Basic Granny Square Pattern
4.1β˜… Rating
1-2 Hours Time Needed
3.2K Made This
βœ‚οΈ

Beginner Friendly Level

Perfect for those just starting their crochet journey, with clear instructions and simple techniques

⏱️

Quick Make

Complete in under 2 hoursβ€”lightning fast fun for instant gratification and quick gifts.

πŸ€—

Soft Hug

Gentle, plush, and full of warmth, creating a sense of comfort and coziness wherever they find a home.

About This Basic Granny Square Pattern

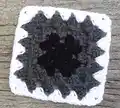
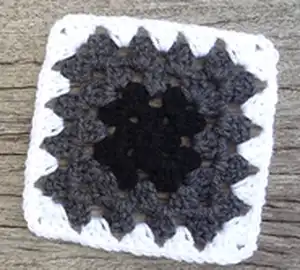
This pattern produces a classic basic granny square that can be worked in just a few rounds. You can make little squares or continue adding rounds to grow larger pieces for blankets or accessories. The instructions use US terminology and are written to be easy to follow for beginners.

Basic Granny Square Pattern crochet pattern - detailed view of completed project

Use any yarn weight or colors you like β€” gauge is not critical for this design. Each square is quick to make and easy to sew together into larger projects.

Why You'll Love This Basic Granny Square Pattern

I absolutely love this pattern because it captures the timeless simplicity of the granny square while remaining highly versatile. I enjoy how quickly a square can be made, making it satisfying to see progress in a short time. The ability to mix and match colors keeps the project endlessly creative and fun. I also appreciate that the pattern is forgiving with gauge, so makers of all levels can achieve beautiful results.

Basic Granny Square Pattern step 1 - construction progress Basic Granny Square Pattern step 2 - assembly progress Basic Granny Square Pattern step 3 - details and accessories Basic Granny Square Pattern step 4 - final assembly and finishing

Switch Things Up

I love changing colors every round to create vibrant striped granny squares that really pop.

I sometimes use a thinner yarn with a smaller hook to make delicate, lace-like squares for shawls or scarves.

I also like to make oversized squares by using bulky yarn and a larger hook for cozy blankets that work up fast.

I often experiment with different join methods β€” slip stitch joins for a neat edge or whipstitch for a softer seam β€” to change the final look.

I add a round of single crochet around the finished square to give a clean border and make joining easier.

I switch up color placement by using gradient or ombre yarns to create flowing color transitions across multiple squares.

I sometimes embroider simple motifs onto finished squares for extra detail and personality.

I enjoy assembling squares into unconventional layouts, like diagonal or offset grids, for modern blanket designs.

I occasionally add a scalloped edging around joined blankets for a decorative finish that elevates the whole piece.

I recommend trying contrasting yarn for joins to make a graphic grid effect that highlights each square.

Common Mistakes & How to Fix Them

βœ— Skipping the slip stitch join after ch 4 can make your centre loose; always join ch 4 to the first chain with a slip stitch to form a neat ring. βœ— Not tying off and turning work after finishing rounds can cause corners to pull left; tie off and turn work as directed to keep corners flat and even. βœ— Using inconsistent tension when making 3-dc clusters causes uneven corners; maintain consistent tension and count stitches in each cluster carefully. βœ— Forgetting to weave in ends after the final round results in untidy edges; weave in all ends securely after tying off to finish cleanly.

Basic Granny Square Pattern

Make classic granny squares you can combine into blankets, cushion covers, shawls, or scarves. This simple, flexible pattern lets you use any number of colors and yarns to create unique motifs. Perfect for practicing your double crochet clusters and creating quick, beautiful motifs for larger projects. Follow the clear steps to make small squares or continue rounds to make larger pieces.

Beginner Friendly 1-2 Hours

Materials Needed for Basic Granny Square Pattern

β€” Main Fabric

  • 01
    Yarn - any weight and colour as desired (amount depends on project; small quantities required per square)

β€” Tools Required

  • 01
    Crochet hook to match yarn (gauge is not important for this pattern)
  • 02
    Darning needle

Progress Tracker

0% Complete

β€” Basic Granny Square :

Start :

make slip knot on hook with yarn, ch 4, join with sl st to first ch to form ring

Round 1 :

ch 2 (counts as dc), 2 dc in centre of ring, ch 2 (to make corner), *3 dc in centre of ring, ch 2*, repeat 2 more times, sl st to top of ch 2, tie off, turn work (prevents each corner of square from pulling left, so no blocking of work is needed at the end)

Round 2 :

with sl st, attach yarn to any corner space, ch 2 (counts as dc), 2 dc in same space, *ch 2, 3 dc in same space, ch 1, 3 dc in next space*, repeat 2 more times, ch 2, 3 dc in same space, ch 1, sl st to top of ch 2, tie off, turn work

Round 3 :

with sl st, attach yarn to any corner space, ch 2 (counts as dc), 2 dc in same space, *ch 2, 3 dc in same space, ch 1, 3 dc in next space*, repeat 2 more times, ch 2, 3 dc in same space, ch 1, 3 dc in next space, ch 1, sl st to top of ch 2, tie off, turn work

Round 4 :

with sl st, attach yarn to any corner space, ch 2 (counts as dc), 2 dc in same space, *ch 2, 3 dc in same space, ch 1, 3 dc in next space, ch 1, 3 dc in next space*, repeat 2 more times, ch 2, 3 dc in same space, ch 1, 3 dc in next space, ch 1, sl st to top of ch 2, tie off, and weave in all ends

Info :

Use any number of colours, in any number of combinations. This pattern can be used for making little squares (or larger ones - simply continue the pattern for as many rounds as desired) to sew together for blankets, cushion covers, shawls, or scarves.

Info :

* This is my pattern for a granny square; others may have slight variations in some of the steps, but the final product usually works out the same.

Assembly Instructions

  • Sew squares together to form blankets or cushion covers by arranging squares in your chosen layout, then joining with whipstitch or slip-stitch join for a flat seam.
  • For shawls or scarves, continue adding rounds to individual squares until desired size is reached, or join multiple squares and block gently if preferred.
  • When joining squares, align corners carefully and use a contrasting or matching yarn depending on the look you want; weave in join ends securely to prevent unraveling.
  • Weave in all loose ends after joining and press lightly or block finished pieces if you want a flatter, more finished appearance.

Important Notes

  • πŸ’‘Gauge is not critical for this pattern β€” use a hook that suits your yarn and desired drape.
  • πŸ’‘Tie off and turn work as directed after rounds to prevent corners from pulling and to keep square shape.
  • πŸ’‘Weave in all ends after the final round to secure the motif and create a tidy finish.

This classic Basic Granny Square pattern is perfect for quick, colorful projects you can build into blankets, shawls, or cushions. Mix and match yarns and colors to create unique combinations that reflect your style. Enjoy the meditative rhythm of making squares and watching your project grow! 🧢✨

You ask,

we answer.

FAQs

What size will the finished piece be?

The size of each granny square depends on your yarn weight and hook; a single 4-round square is typically a few inches across with standard DK/worsted yarn and a matching hook.

Can I use different yarn weights for this pattern?

Yes, you can use different yarn weights, but the final size and drape will change. Choose a hook size appropriate to the yarn and adjust your project layout accordingly.

Do I need prior crochet experience for this pattern?

This pattern is beginner friendly and uses basic stitches (chain, slip stitch, double crochet), so a little familiarity with these stitches will help you follow the instructions easily.

How long does this project typically take to complete?

A single small granny square can be completed in under 2 hours; larger projects made from many squares will take proportionally longer depending on size and assembly.