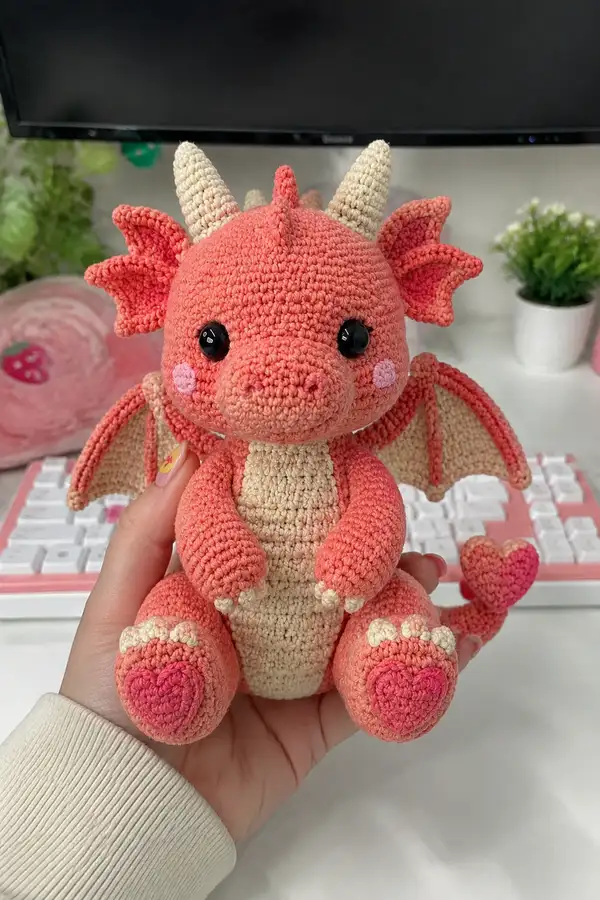
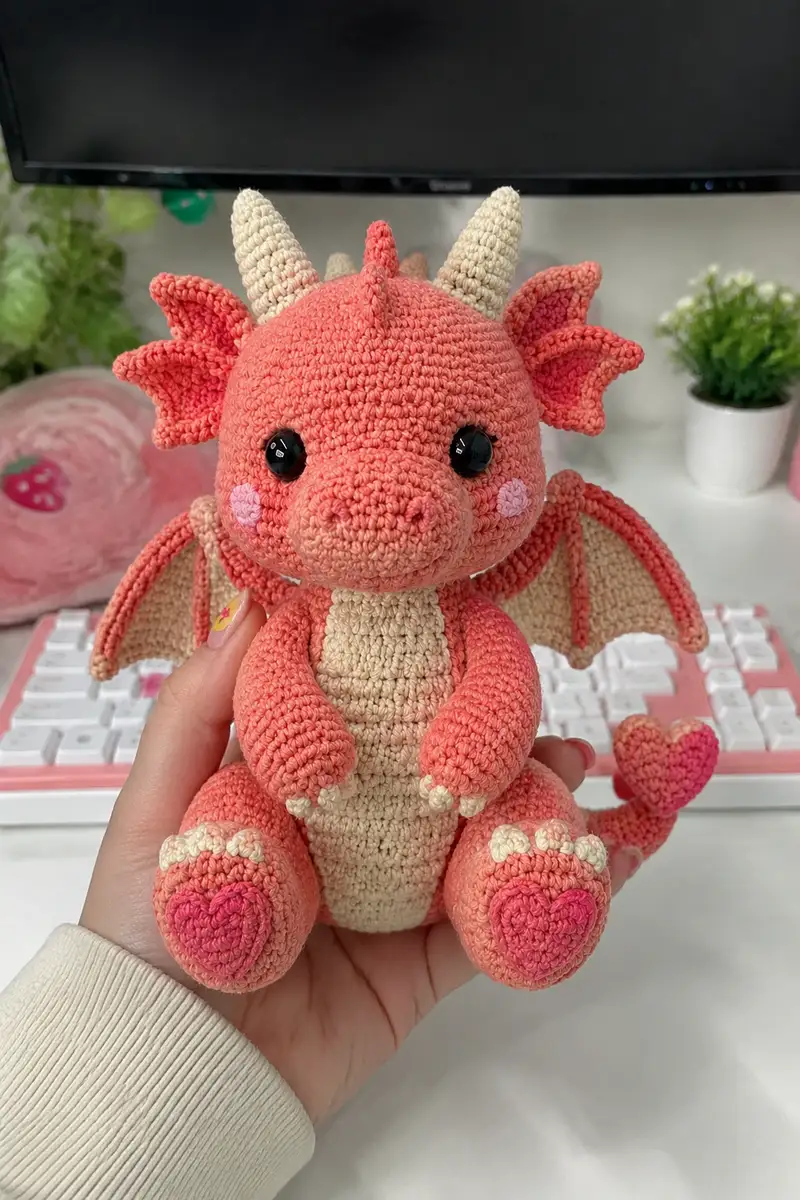
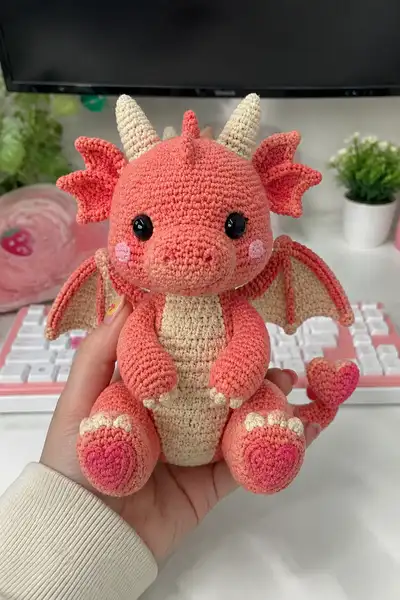
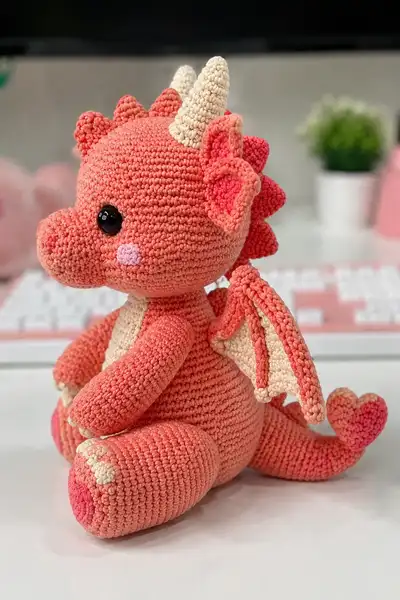
Create a cuddly Big Coral Love Dragon with a heart-shaped tail tip, soft cream belly, pink blush cheeks and tiny winged ears. This adorable amigurumi features expressive safety eyes, scalloped dorsal spikes, curled cream horns and detailed heart paw pads. The pattern uses simple amigurumi construction with plenty of shaping and finishing tips to help you create a plush-ready, poseable little dragon.
Progress Tracker
0% Complete
— Head :
Round 1 :
6 sc in magic ring (6)
Round 3 :
(1 sc, inc) x 6 (18)
Round 4 :
(2 sc, inc) x 6 (24)
Round 5 :
(3 sc, inc) x 6 (30)
Round 6 :
(4 sc, inc) x 6 (36)
Round 7 :
(5 sc, inc) x 6 (42)
Round 8 :
(6 sc, inc) x 6 (48)
Round 9-14 :
1 sc in each st around (48)
Info :
Place safety eyes between rounds 12 and 13, approximately 8-10 stitches apart depending on desired expression. Pin and step back to ensure symmetry before attaching. Use washers if using safety eyes.
Round 15-18 :
1 sc in each st around (48)
Info :
If you plan to embroider nostrils or add a blush patch, mark those positions now with pins. The snout will be added later so leave the center front area free.
Round 19 :
(6 sc, dec) x 6 (42)
Round 20 :
(5 sc, dec) x 6 (36)
Info :
Begin light stuffing from the top now to keep the head round. Use small amounts of fiberfill and work evenly, rotating the head as you fill to avoid lumps.
Round 21 :
(4 sc, dec) x 6 (30)
Round 22 :
(3 sc, dec) x 6 (24)
Round 23 :
(2 sc, dec) x 6 (18)
Round 24 :
(1 sc, dec) x 6 (12)
Info :
Fasten off leaving a long tail for sewing the head to the body later, but do not close completely — this head will be stuffed further after snout and final shaping.
— Snout (Muzzle) :
Round 1 :
6 sc in magic ring (6)
Round 3 :
(1 sc, inc) x 6 (18)
Round 4 :
(2 sc, inc) x 6 (24)
Round 5-6 :
1 sc in each st (24)
Round 7 :
(2 sc, dec) x 6 (18)
Round 8 :
(1 sc, dec) x 6 (12)
Info :
Stuff the snout fairly firmly so it keeps the rounded shape. Flatten slightly and leave a long tail to sew. Before closing fully, embroider two small nostrils with matching coral yarn on rounds where it will face forward (about two stitches apart).
— Head Details: Spikes and Cheeks :
Spike (Make 5) :
Round 1: 6 sc in mr (6). Round 2: (1 sc, inc) x3 (9). Round 3-4: 1 sc around (9). Round 5: (2 sc, dec) x3 (6). Fasten off leaving tail for sewing.
Ear Frill (Make 2 - Outer) :
Round 1: 6 sc in mr (6). Round 2: inc around (12). Round 3: (1 sc, inc) x6 (18). Round 4: 1 sc around (18). Round 5: *ch1, sl st into next st* around to create scallop edge, fasten off leaving tail for sewing.
Ear Inner (Make 2 - Inner Pink) :
Round 1: 6 sc in mr (6). Round 2: inc around (12). Round 3: (1 sc, inc) x6 (18). Round 4: 1 sc around (18). Fasten off and stitch inner to outer, shaping into ear by folding slightly at base before sewing to head.
Info :
Sew spikes down the crown of the head, spacing them evenly from the forehead to the back. Position ear assemblies at the sides of the head aligned with the eyes (roughly between rounds 12-14) and curve slightly forward.
— Horns (Make 2) :
Round 1 :
6 sc in magic ring (6)
Round 2 :
(1 sc, inc) x 3 (9)
Round 3 :
(2 sc, inc) x 3 (12)
Round 4-7 :
1 sc around (12)
Round 8 :
(2 sc, dec) x 3 (9)
Round 9 :
(1 sc, dec) x 3 (6)
Info :
Use cream yarn. Do not stuff horns fully; add a small amount to keep shape. Leave long tail to sew to the head; make two identical horns and position them symmetrically above the ears. You can insert a short length of floral wire if you want stiff poseable horns; fold the wire end and embed inside the horn before sewing.
— Neck & Neck Seam Prep :
Round 1 :
6 sc in magic ring (6)
Round 3 :
(1 sc, inc) x 6 (18)
Round 4-6 :
1 sc in each st (18)
Info :
Work the neck as a short tube that will be sewn into the body top opening later. Leave long tail for sewing. Stuff lightly so neck is pliable for sewing and shaping.
— Body :
Round 1 :
6 sc in magic ring (6)
Round 3 :
(1 sc, inc) x 6 (18)
Round 4 :
(2 sc, inc) x 6 (24)
Round 5 :
(3 sc, inc) x 6 (30)
Round 6 :
(4 sc, inc) x 6 (36)
Round 7 :
(5 sc, inc) x 6 (42)
Round 8 :
(6 sc, inc) x 6 (48)
Round 9-12 :
1 sc in each st around (48)
Info :
Change to cream yarn for belly panel now. We will create a separate belly strip that is later stitched in place for a neat contrast. Work the next rounds to create a tall body tube for sitting posture.
Round 13-18 :
1 sc in each st around (48)
Round 19 :
(6 sc, dec) x 6 (42)
Round 20 :
(5 sc, dec) x 6 (36)
Info :
Begin stuffing the body well now. Add stuffing in small increments so the bottom remains flat and the torso keeps shape for allowing the dragon to sit. Use firmer stuffing in the lower rounds to stabilize.
Round 21 :
(4 sc, dec) x 6 (30)
Round 22 :
(3 sc, dec) x 6 (24)
Round 23 :
(2 sc, dec) x 6 (18)
Round 24 :
(1 sc, dec) x 6 (12)
Info :
Fasten off leaving a long tail for sewing. Alternatively, stop at round 18 and leave an opening for inserting the neck tube — sew neck in before final closure for a stronger attachment.
— Belly Panel (Cream) :
Round 1 :
6 sc in magic ring (6)
Round 3 :
(1 sc, inc) x 6 (18)
Round 4-10 :
1 sc in each st around (18)
Info :
The belly panel is crocheted as an oval/tube and flattened into a long strip by folding and sewing down the center. You can also work a longer oval by continuing even rounds (18) until the length matches the body height when placed on the front. Leave tails for sewing and stitch the panel to the front center of the body from neck to base.
— Arms (Make 2) :
Round 1 :
6 sc in magic ring (6)
Round 3 :
(1 sc, inc) x 6 (18)
Round 4-6 :
1 sc in each st (18)
Round 7 :
(3 sc, inc) x 4 + 2 sc at end (22) — shaping wrist slight increase
Round 8-12 :
1 sc in each st (22)
Info :
Stuff the hand and lower arm firmly but leave upper arm softer for sewing. If you add wire for poseability, insert wire now along center of arm before finishing stuffing and bend the wire tip and secure inside with a few stitches so it does not poke out.
Round 13 :
(3 sc, dec) x 4 + 2 sc at end (18)
Round 14-18 :
1 sc in each st (18)
Round 19 :
(2 sc, dec) x 4 + 2 sc at end (14)
Round 20 :
1 sc in each st around (14)
Info :
Fasten off leaving a long tail to sew to the body. Position arms on sides of the torso, approx around body rounds 12-15 height. Sew using mattress or whip stitch for an invisible seam, slightly flatting base to make arms look attached and natural.
— Hands: Claws (Make 6 small claws) :
Round 2 :
1 sc in each st (3)
Info :
Make small cream claws and sew three across the top of each hand (two hands) and three across each foot top as shown in photos. Leave tails and stitch securely.
— Legs (Make 2) :
Round 1 :
6 sc in magic ring (6)
Round 3 :
(1 sc, inc) x 6 (18)
Round 4 :
(2 sc, inc) x 6 (24)
Round 5 :
(3 sc, inc) x 6 (30)
Round 6-9 :
1 sc around (30)
Round 10 :
(4 sc, inc) x 6 (36)
Round 11-14 :
1 sc around (36)
Round 15 :
(4 sc, dec) x 6 (30)
Round 16 :
(3 sc, dec) x 6 (24)
Round 17 :
(2 sc, dec) x 6 (18)
Info :
Stuff feet firmly to create a flat base for sitting. Insert more stuffing into the bottom rounds and shape the top of the thigh to taper into the body attachment region.
Round 18 :
(1 sc, dec) x 6 (12)
Round 20 :
Fasten off leaving long tail for sewing
Info :
Sew legs to the bottom of the body facing forward so the dragon can sit. Place legs roughly 8-10 stitches apart on the base, and reinforce with multiple passes to secure.
— Paw Heart Pads (Make 2 for feet) :
Round 3 :
(1 sc, inc) x 6 (18)
Round 4 :
1 sc around (18) — shape into heart by sewing center dips
Info :
Use bright pink yarn. After crocheting, flatten and stitch two small top lobes and a point to create a heart shape. Sew the heart to the front of the foot, centered on the round that shows most prominently (usually round 5 or 6 from the base).
— Tail & Heart Tip :
Tail Base :
Round 1: 6 sc in mr (6). Round 2: 6 inc (12). Round 3: (1 sc, inc) x 6 (18). Round 4-8: 1 sc around (18). Round 9: (2 sc, dec) x 6 (12). Round 10-14: 1 sc around (12) tapering slowly by doing (1 sc, dec) x 3 on rounds 12 and 13 to take to 9 then 6. Fasten off leaving long tail for sewing.
Heart Tail Tip (Make 1) :
Round 1: 6 sc in mr (6). Round 2: 6 inc (12). Round 3: (1 sc, inc) x6 (18). Round 4-5: 1 sc around (18). Round 6: (1 sc, dec) x6 (12). Round 7: dec around to 6 and fasten off leaving tail for sewing. Shape into heart and sew to tail end with neat stitches, placing the heart so it appears attached as a curl.
Info :
Insert a thin length of floral wire along the tail center before stuffing if you want the tail to be poseable; secure the wire ends inside the body so they cannot poke out. Sew heart tip to tail and reinforce with extra stitches.
— Wings (Make 2: Outer Coral & Inner Cream Membrane) :
Wing Outer (Coral) :
Round 1: ch 11, sc in 2nd ch from hook and across (10). Work around opposite side of chain: 3 sc in last chain, sc across back to first chain (rough oval). Join with sl st. Rnd2: sc in each st around, inc in corner stitches to widen (approx 30). Rnd3-4: 1 sc around (30). Fasten off and set aside.
Wing Inner Membrane (Cream) :
Round 1: ch 9, sc in 2nd ch from hook across (8). Work back along chain to form an oval, increasing at the tip to create a curved membrane (approx 24 sts total by the end of round 2). Rnd2-3: 1 sc around. Rnd4: Work BLO 1 sc in each st to create a ridge for attaching finger ridges. Fasten off leaving tail for sewing.
Wing Fingers (Make 3 per wing - Coral thin cords) :
Make 3 thin tubes: ch 12, sc in 2nd ch and across (11), continue in rounds for 6 more rows to make a tube (11 sts). Fasten off leaving long tail to sew these as ribs on the inner membrane, shaping them slightly curved.
Info :
Sew inner cream membrane onto the coral outer wing, then sew the three finger ribs across the membrane at equal spacing. Attach wings to the body on either side of the upper back around body rounds 6-9. Slightly curve them and make sure the wing base is anchored with multiple passes.
— Wing Edging Detail :
Round 1 :
With coral yarn, join at wing base and sc around the outer edge of the wing, placing 2 sc in points to emphasize scallops (approx 40 sc total depending on wing size)
Info :
Work the edging tidily to emphasize the bat-like wing rim. Sew wings to the back using strong thread and weave tails inside the body to hide them. If you want flexible wings, insert thin wire along the wing base inside before closing seams.
— Assembly Instructions :
Info :
Before sewing any piece, pin everything in place and photograph from the front to verify symmetry. Use mattress stitch or whip stitch and always stitch from inside outward, hiding knots inside the body when possible.
Step 1 :
Attach head to body by inserting the neck tube into the body opening. Pin in place first, then sew securely using ladder stitch all around, ensuring even attachment and correct forward tilt for the snout.
Step 2 :
Position arms on sides of body at rounds 13-15 for natural look. Sew through both arm and body using ladder stitch for an invisible seam. Reinforce with extra passes at the top of each arm.
Step 3 :
Attach legs to bottom of body at rounds 1-3 while the body is seated on a flat surface. Space them evenly and sew through the base of the leg and the body many times to ensure the dragon will sit stably.
Step 4 :
Sew ears and spikes to the head. Position ears approx between head rounds 11-14; place spikes down the center back of the head and continue down the neck if desired. Sew horns symmetrically above the ears.
Step 5 :
Sew wings to the back on either side around body rounds 6-9 so they sit naturally. Anchor with multiple stitches and weave tails inside the body. If wings feel floppy, add an internal wire or extra rows of reinforcement.
Step 6 :
Attach tail to back center at lower back rounds (approx body rounds 4-6). Sew securely in a spiral pattern and tuck the tail seam into the base of the body to appear as one piece.
Step 7 :
Sew heart paw pads and claws into place on both feet and hands. Add blush to cheeks with light pink yarn or fabric safe paint. Weave all remaining tails inside and trim.
— Finishing Touches: Embroidery & Blush :
Info :
To make the rosy cheeks, embroider a light pink oval with several surface slip stitches on each cheek base or use a small dab of fabric-safe blush. Embroider a mouth under the snout with a few small back stitches in slightly darker coral. Add two tiny nostril stitches on the snout tip if not done earlier.
Info :
Secure safety eyes with washers and check that they are locked. Weave all ends through several stitches and hide knots inside the body. Optionally apply a small amount of fabric glue to knots for additional security.
— Extra Tips & Troubleshooting :
Info :
If your work becomes too loose, go down one hook size for tighter stitches. If too stiff, go up one size. Keep a stitch marker at the beginning of each round and record row counts for each piece in a notebook for consistent repeats. For color transitions, carry the unused yarn inside the stitches or fasten off and weave in tails neatly to avoid bulk.
Info :
When stuffing, compress the fiberfill a little and pull small tufts into tight corners such as wing bases and around horns to maintain shape. For heavily handled toys, consider adding a few stitches of upholstery thread through the body and legs to anchor stuffing and prevent shifting over time.
This Big Coral Love Dragon is a joy to complete — every small detail from the heart paw pads to the scalloped spikes adds personality and charm. Stitch by stitch you’ll watch a friendly companion come to life, perfect for gifting or keeping. The pattern balances shaping and simplicity so you can enjoy the process and the result. 🧶💕 Share your finished dragon and savor the handmade magic! ✨