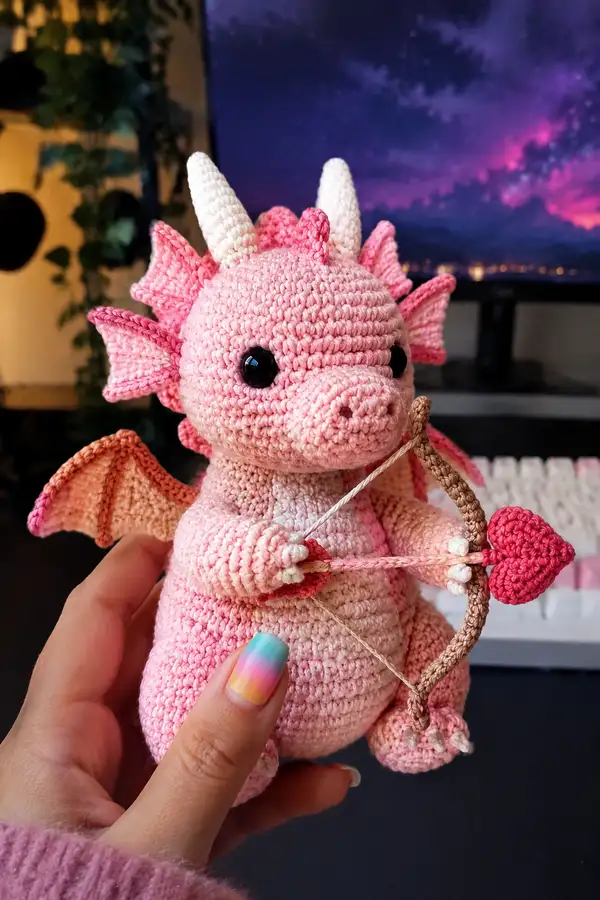
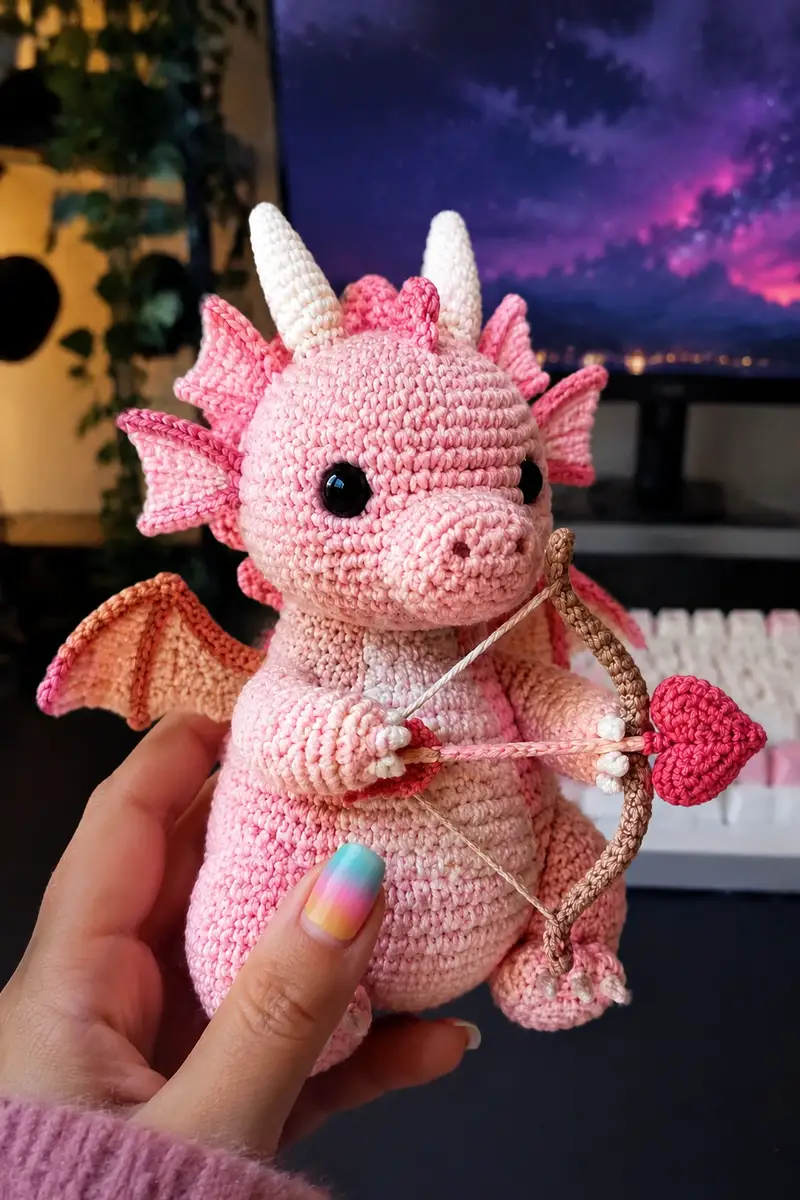
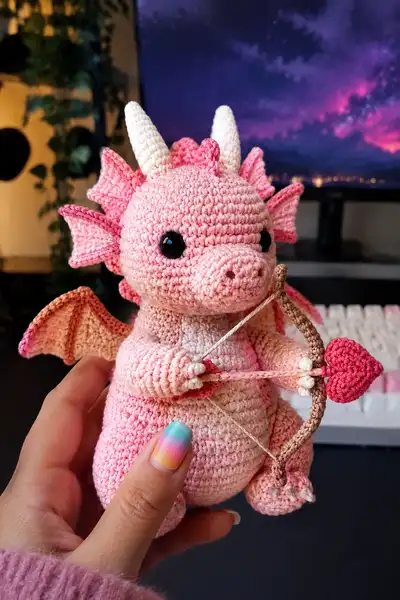
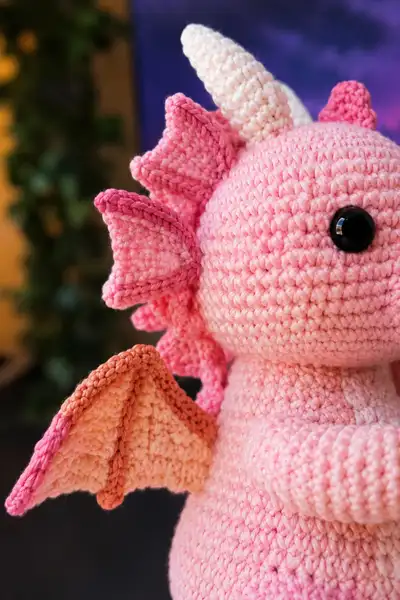
Create an irresistibly cuddly Cupid-style dragon with tiny bat-like wings, ruffled spine ridges, curved ivory horns and a sweet heart-tipped arrow. This pattern uses variegated pink shades, small safety eyes, and a combination of simple shaping, textured ridges and sewn accessories to produce a charming, gift-ready plush. Perfect for a thoughtful handmade valentine or a whimsical desktop companion.
Progress Tracker
0% Complete
— Head :
Round 1 :
6 sc in magic ring (6)
Round 3 :
(1 sc, inc) x 6 (18)
Round 4 :
(2 sc, inc) x 6 (24)
Round 5 :
(3 sc, inc) x 6 (30)
Round 6 :
(4 sc, inc) x 6 (36)
Round 7 :
(5 sc, inc) x 6 (42)
Round 8 :
(6 sc, inc) x 6 (48)
Round 9-12 :
1 sc in each st (48)
Info :
Place safety eyes between rounds 12-13 with approximately 9-11 stitches between centers for the large, expressive look. Mark the round start with a stitch marker and ensure eyes are level before securing washers.
Round 13 :
1 sc in each st (48)
Round 14 :
1 sc in each st (48)
Round 15-17 :
1 sc in each st (48)
Info :
Use this area (rounds 13-17) for optional embroidery: eyelids, eyelashes, or blush placement. Hold back any heavy embroidery until after the head is stuffed so shape is not affected.
Round 18 :
(6 sc, dec) x 6 (42)
Round 19 :
(5 sc, dec) x 6 (36)
Round 20 :
(4 sc, dec) x 6 (30)
Info :
Begin stuffing the head firmly but not overstuffed. Work in small bits of fiberfill, packing evenly around eyes and snout for smooth shaping.
Round 21 :
(3 sc, dec) x 6 (24)
Round 22 :
(2 sc, dec) x 6 (18)
Round 23 :
(1 sc, dec) x 6 (12)
Info :
Fasten off leaving a long tail for sewing head to body. Finish stuffing to desired firmness and close the opening using needle and yarn tail with ladder stitch for an invisible seam.
— Snout (Make 1, sew to head) :
Round 1 :
6 sc in magic ring (6)
Round 3 :
(1 sc, inc) x 6 (18)
Round 4 :
(2 sc, inc) x 6 (24)
Round 5 :
1 sc in each st (24)
Round 6 :
(2 sc, dec) x 6 (18)
Info :
Lightly stuff snout. Flatten top slightly so it sits flush against the head and pin into desired position before sewing, aligning nostril embroidery with the alignment in the photo.
Round 7 :
(1 sc, dec) x 6 (12)
Info :
Sew snout to head between rounds 11-14 centered under eyes. Use a whip stitch around the base, stuffing slightly while you sew for natural projection.
— Neck Collar (worked as short tube, attach to head and body) :
Round 1 :
6 sc in magic ring (6)
Round 3-6 :
1 sc in each st (12)
Info :
This short neck tube helps provide a neat sewing surface and space between head and body. Stuff very lightly or leave unstuffed depending on the join you prefer.
— Body :
Round 1 :
6 sc in magic ring (6)
Round 3 :
(1 sc, inc) x 6 (18)
Round 4 :
(2 sc, inc) x 6 (24)
Round 5 :
(3 sc, inc) x 6 (30)
Round 6 :
(4 sc, inc) x 6 (36)
Round 7 :
(5 sc, inc) x 6 (42)
Round 8-12 :
1 sc in each st (42)
Info :
If you want to make the tummy slightly lighter in color, now is a good place to switch to a paler variegated or single light pink for 4-6 rounds. Carry yarn inside or fasten off and reattach for stripes.
Round 13-16 :
1 sc in each st (42)
Round 17 :
(6 sc, inc) x 6 (48)
Round 18-22 :
1 sc in each st (48)
Info :
Begin stuffing body from bottom up once you have a stable midsection. Add fiberfill in layers to create a rounded lower belly then less in the top to form the shoulder/neck area.
Round 23 :
(6 sc, dec) x 6 (42)
Round 24 :
(5 sc, dec) x 6 (36)
Round 25 :
(4 sc, dec) x 6 (30)
Round 26 :
(3 sc, dec) x 6 (24)
Round 27 :
(2 sc, dec) x 6 (18)
Round 28 :
(1 sc, dec) x 6 (12)
Info :
Leave a long tail and do not fasten off. This opening is used to attach the neck tube; use mattress stitch to join body and neck for a sturdy, almost invisible join. Add final stuffing after joining head and body for perfect proportions.
— Arms (Make 2) :
Round 1 :
6 sc in magic ring (6)
Round 3 :
(1 sc, inc) x 6 (18)
Round 4-6 :
1 sc in each st (18)
Info :
Create a slightly flattened hand by increasing the amount of stuffing in rounds 1-6. If you want poseable arms, insert a short length of wire now, reaching the wrist but not protruding.
Round 7 :
(2 sc, dec) x 6 (12)
Round 8-10 :
1 sc in each st (12)
Round 11 :
(1 sc, inc) x 4 then 4 sc (16)
Round 12-14 :
1 sc in each st (16)
Round 15 :
(3 sc, dec) x 4 (12)
Round 16 :
1 sc in each st (12)
Round 17 :
(1 sc, dec) x 4 (8)
Info :
Stuff arms firmly at the hand and lightly in the upper arm so they sit naturally against the body. Sew arms to body between rounds 16-20 on the sides for a hugging pose; use whip stitch and weave tail through several times for secure attachment.
— Hands / Claws (Make 2 small tips for each arm) :
Round 1 :
5 sc in magic ring (5)
Info :
Sew three small claw tips to the end of each arm to mirror the small pale claws in the photo. Use contrasting lighter yarn and embroider tiny toe lines with a needle after placement.
— Legs (Make 2) :
Round 1 :
6 sc in magic ring (6)
Round 3 :
(1 sc, inc) x 6 (18)
Round 4 :
(2 sc, inc) x 6 (24)
Round 5-7 :
1 sc in each st (24)
Info :
Create a rounded foot by adding padding and shaping rounds 1-7. Add a little more stuffing to the toe area to maintain a flat bottom for standing or sitting stability.
Round 8 :
(3 sc, inc) x 6 (30)
Round 9-12 :
1 sc in each st (30)
Round 13 :
(4 sc, dec) x 5 (25)
Round 14 :
1 sc in each st (25)
Round 15 :
(3 sc, dec) x 5 (20)
Round 16 :
1 sc in each st (20)
Round 17 :
(2 sc, dec) x 5 (15)
Round 18 :
(1 sc, dec) x 5 (10)
Round 20 :
Fasten off leaving a long tail for sewing.
Info :
Sew legs to bottom of body spaced roughly 10-12 stitches apart on rounds 2-4 of the base so the dragon sits evenly. Reinforce with extra stitches if toy will be handled frequently.
— Tail :
Round 1 :
6 sc in magic ring (6)
Round 3-6 :
1 sc in each st (12)
Round 7 :
(2 sc, dec) x 3 (9)
Round 8-12 :
1 sc in each st (9)
Round 13 :
Fasten off leaving long tail for sewing
Info :
Sew tail to the back lower center of body just above the base. Add a small tuft or heart-shaped spike to the tip if desired, using bright pink yarn to echo the arrow theme.
— Horns (Make 2) :
Round 1 :
6 sc in magic ring (6)
Round 3 :
(1 sc, inc) x 6 (18)
Round 4 :
(2 sc, inc) x 6 (24)
Round 5-9 :
1 sc in each st (24)
Round 10 :
(2 sc, dec) x 6 (18)
Round 11 :
(1 sc, dec) x 6 (12)
Info :
Stuff lightly so horns hold a tapered cone shape. Sew horns to top of head, slightly angled outward and back, between head rounds 2-5 for a balanced look.
— Dorsal Spikes / Frill (Make 7 small spikes and 1 larger central crest) :
Small Spike Round 1 :
5 sc in magic ring (5)
Small Spike Round 2 :
5 sc (5)
Small Spike Round 3 :
5 sc in FLO (5)
Info :
Make 6 small spikes and 1 larger spike (larger: 6, 6 inc (12), 12 sc x2 rounds then shape). Attach along the center of the head and back starting between head rounds 2-4 and continuing down the spine to the body around rounds 8-16. Alternate small/large to mimic the ruffled ridges.
— Wings (Make 2 halves and join) :
Wing Inner Panel (peach) Round 1 :
6 sc in magic ring (6)
Round 3 :
(1 sc, inc) x 6 (18)
Round 4 :
(2 sc, inc) x 6 (24)
Round 5-8 :
1 sc in each st (24)
Info :
Shape the inner membrane: work in back loops on one edge to create a slight scallop line. For a tapered wing, begin decreasing along one side on round 7-8 by 1-2 stitches.
Wing Outer Panel (edge color) Round 1 :
Ch 15, sc in 2nd ch from hook across (14), turn and sc in each st back along other side to form a narrow strip; join ends to create a rounded edge with 14 sc perimeter
Info :
Sew inner and outer panels together along the scalloped edge. Add a raised ridge for the wing bone by working a short row of sc over the join in darker brown/copper yarn and folding slightly, then sew to body.
Wing Assembly Rounds :
After joining panels, work 1 rnd sc around the entire assembled wing to neaten edge and add color-change accent on rim (approx 60 sc depending on shape)
Info :
Attach wings symmetrically to the upper back between body rounds 14-18. Pin first to check angle; wings should tilt slightly forward and outward. Reinforce with several stitches along the base.
— Wing Bone / Ridge :
Round 1 :
6 sc in magic ring (6)
Round 2-5 :
1 sc in each st (6)
Info :
Make two or three narrow tubes to sew along the wing fold to create structure; sew with a small whip stitch and slightly flatten to give the wing its bat-like silhouette.
— Bow :
Bow Body Round 1 :
6 sc in magic ring (6)
Round 3-6 :
1 sc in each st (12)
Info :
Use brown/copper yarn. After making a long oval shape by working several rows in BLO to create a flattened ribbon, fold and stitch middle tightly to form a bow. Leave long tail for attaching to dragon's hands.
— Bow String (working with cream yarn) :
Round 1 :
Ch 40 (or length to fit from arm to arm), sl st back along chain to strengthen (40 approx)
Info :
Use a chain reinforced by a slip-stitch chain or a twisted cord for a tidy string that will sit across the dragon's belly. Secure ends into the bow and hook the arms around the string when sewing arms on.
— Heart Arrowhead :
Round 1 :
6 sc in magic ring (6)
Round 3 :
(1 sc, inc) x 6 (18)
Round 4 :
1 sc in each st (18)
Round 5 :
(2 sc, dec) x 4 then 2 sc (14)
Round 6 :
1 sc in each st (14)
Round 7 :
Flatten and fold the rounded piece to form the heart lobes, sew center with a few whip stitches to shape the cleft. Fasten off leaving a long tail for attaching to shaft.
Info :
Make the arrow shaft using a small twisted cord of contrasting pinks and a small wooden dowel or crocheted tube of brown yarn inside for straightness; secure heart to the tip with a few stitches.
— Arrow Shaft :
Round 1 :
Ch 20, sc in 2nd ch from hook across (19), fasten off
Info :
Fold and stitch ends over a central twist or dowel for rigidity. The shaft in photo appears thin and slightly flexible—use a strong twisted chain or thread if you want a soft arrow.
— Assembly and Finishing Touches :
Info :
Position and pin head to the body first using the neck tube as guide. Sew securely with mattress stitch, checking the front view frequently so the head faces slightly forward. After head attachment, sew arms, legs, wings, horns and dorsal spikes in that order; this helps keep proportions balanced while you check placement.
Info :
Sew the bow between the hands with the bowstring taut so the dragon looks like it's holding it. Secure the heart arrow into the bowstring with a couple of invisible stitches and tack to the hand so the arrow appears 'held' between fingers.
Info :
Weave in all ends, use small backstitches to secure any heavy pieces, and add optional blush with fabric-safe pastel or paint on cheeks. Check all attachments and add extra stitches where stress will occur.
This adorable Cupid dragon blends whimsical details and classic amigurumi shaping into a lovable keepsake you can gift or display. Every scalloped ridge, tiny horn and heart-tipped arrow adds personality and charm to your finished piece. The detailed instructions will guide you through assembly so the final dragon is sturdy, balanced and absolutely adorable. 🧶💘 Create this sweet dragon for someone special or keep it as a cheerful companion on your shelf. Happy stitching! ✨