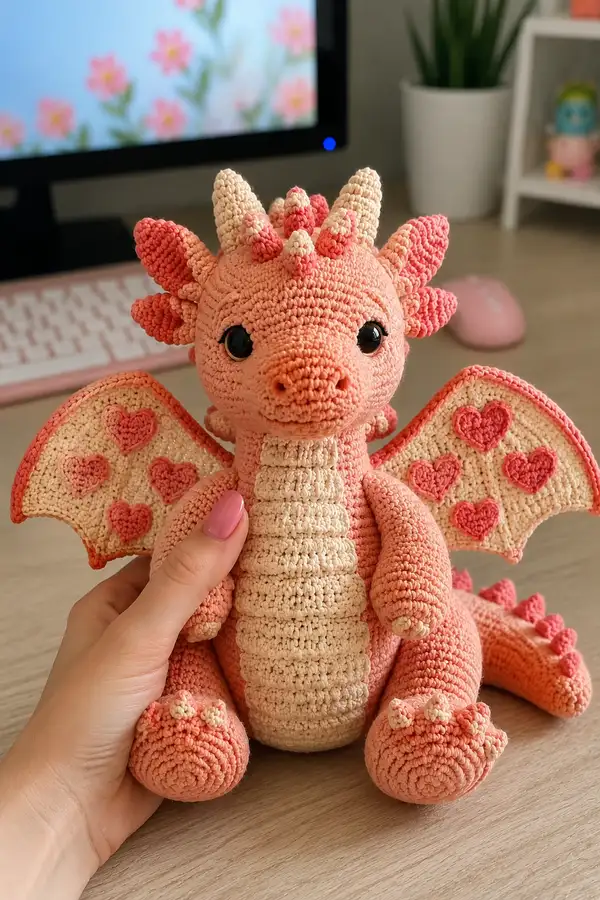
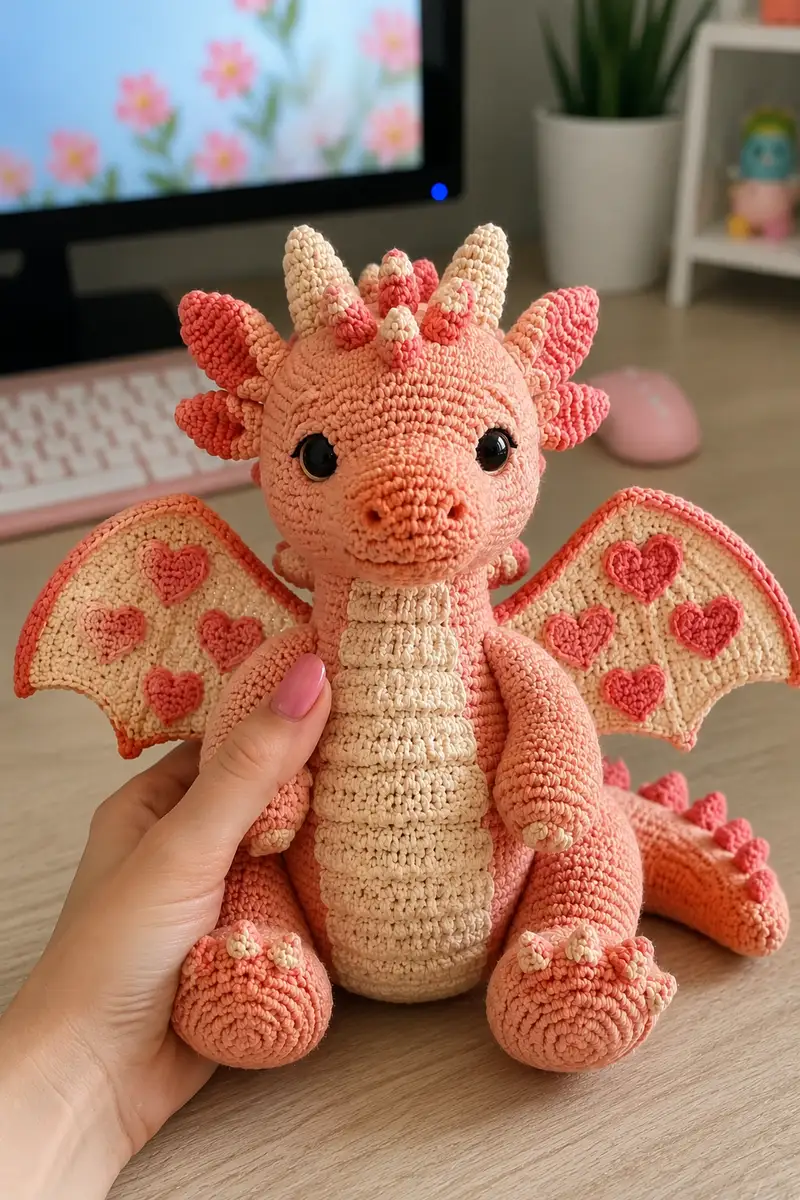
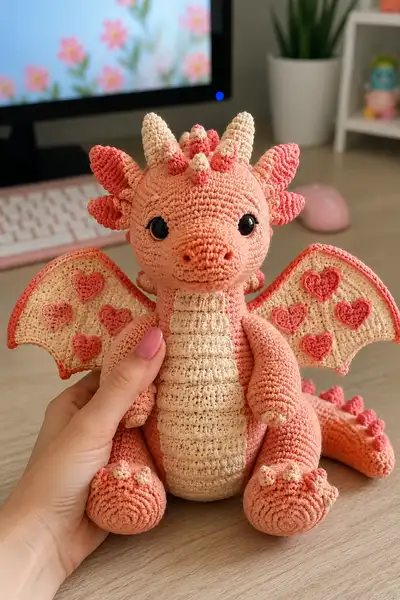
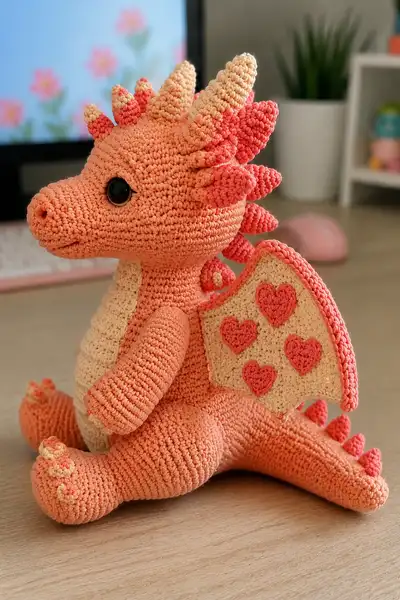
Bring this sweet Big Peachy Love Dragon to life with soft, squishy shaping, heart-patterned wings and a friendly face. This pattern uses two warm coral/peach tones and a creamy contrast for belly and details. It includes step-by-step round-by-round instructions for head, body, limbs, tail, spikes, horns and decorative wings so you can recreate the exact lovable dragon in the photos.
Progress Tracker
0% Complete
— Head :
Round 1 :
6 sc in magic ring (6)
Round 3 :
(1 sc, inc) x 6 (18)
Round 4 :
(2 sc, inc) x 6 (24)
Round 5 :
(3 sc, inc) x 6 (30)
Round 6 :
(4 sc, inc) x 6 (36)
Round 7 :
(5 sc, inc) x 6 (42)
Round 8 :
(6 sc, inc) x 6 (48)
Round 9 :
(7 sc, inc) x 6 (54)
Info :
At rounds 9-13 the head becomes wider. Keep tension even. Plan eye placement between rounds 13-15 depending on desired expression.
Round 10 :
1 sc in each st (54)
Round 11 :
1 sc in each st (54)
Round 12 :
1 sc in each st (54)
Round 13 :
1 sc in each st (54)
Info :
Attach safety eyes between R13-14 spaced 10-12 sts apart center-to-center for the large 12mm eyes shown. Mark the round and stitch for later face embroidery.
Round 14 :
1 sc in each st (54)
Round 15 :
(7 sc, dec) x 6 (48)
Round 16 :
(6 sc, dec) x 6 (42)
Info :
Begin stuffing the head fairly firmly now, focusing under the eye area and around the snout base so the muzzle will keep shape. Use small amounts of stuffing gradually.
Round 17 :
(5 sc, dec) x 6 (36)
Round 18 :
(4 sc, dec) x 6 (30)
Round 19 :
(3 sc, dec) x 6 (24)
Round 20 :
(2 sc, dec) x 6 (18)
Info :
Stop increasing/decreasing to sculpt the snout region. The dragon's muzzle is built by working additional rounds forward into the snout area—we will shape the muzzle by continuing centered rounds and front-facing shaping.
Round 21 :
1 sc in each st (18) — move marker each round
Round 22 :
1 sc in each st (18)
Round 23 :
(1 sc, inc) x 6 (24)
Round 24 :
1 sc in each st (24)
Round 25 :
(2 sc, inc) x 6 (30)
Round 26 :
1 sc in each st (30)
Info :
These rounds build the forward projection of the muzzle. Keep the front stitches slightly firmer to keep shape. Add a small amount of stuffing directly into the muzzle after round 26.
Round 27 :
(3 sc, inc) x 6 (36)
Round 28 :
1 sc in each st (36)
Round 29 :
(3 sc, dec) x 6 (30)
Round 30 :
(2 sc, dec) x 6 (24)
Round 31 :
(1 sc, dec) x 6 (18)
Info :
Use your fingers to pinch and form the nose indentation. For nostrils, embroider two small vertical stitches or insert 2 short french knots now before closing. Continue stuffing head to desired firmness.
Round 33 :
Fasten off leaving a long tail for sewing. Use tail to close remaining opening by threading through front loops and pulling tight. Weave end into head for hidden finish.
Info :
If you prefer a removable head seam for faux-joints, stop closing and leave a longer opening to sew to neck later using mattress stitch for a hidden seam.
— Muzzle Detail (optional small muzzle shaping) :
Round 1 :
6 sc in magic ring (6)
Round 3 :
1 sc in each st (12)
Round 4 :
(1 sc, dec) x 4, 4 sc (10)
Round 5 :
Fasten off leaving long tail for sewing. Sew muzzle onto front center of head just below eyes for added snout definition if desired.
Info :
This small muzzle is optional — many makers achieve the muzzle purely by head shaping above. If you add it, position so nostrils align with head embroidery.
— Horns & Head Spikes :
Info :
There are two larger horns (cream tipped) and multiple smaller cone spikes along the crown and nape. Work horns in contrast cream and coral for the dipped look.
Large Horn (make 2) Round 1 :
6 sc in magic ring (6)
Round 3 :
(1 sc, inc) x 6 (18)
Round 4 :
(2 sc, inc) x 6 (24)
Round 5 :
1 sc in each st (24)
Round 6 :
(3 sc, dec) x 6 (18)
Round 7 :
(2 sc, dec) x 6 (12)
Round 8 :
(1 sc, dec) x 4, sc x 4 (8)
Round 9 :
1 sc in each st (8) — switch to cream color
Round 10 :
1 sc in each st (8). Fasten off leaving a long tail for sewing. Stuff lightly — horns are firm but not overstuffed.
Info :
Sew larger horns symmetrically on the top of head. Angle slightly outward. Use extra stitches through base to anchor firmly to head rounds 10-12.
Small Spike (make 8-10) Round 1 :
6 sc in magic ring (6)
Round 2 :
1 sc in each st (6)
Round 3 :
(1 sc, inc) x 3 (9)
Round 4 :
1 sc in each st (9) — switch tip color on last round if you want dipped look
Round 5 :
(2 sc, dec) x 3 (6)
Round 6 :
Fasten off leaving tail. Lightly stuff, then sew spikes along head and down neck as in photo spacing about 2-3 sts between spikes depending on head circumference.
Info :
Stagger spikes: place a larger horn pair near the crown and smaller cones alternating down the nape and tail. Use pins to experiment positioning before sewing.
— Body :
Round 1 :
6 sc in magic ring (6)
Round 3 :
(1 sc, inc) x 6 (18)
Round 4 :
(2 sc, inc) x 6 (24)
Round 5 :
(3 sc, inc) x 6 (30)
Round 6 :
(4 sc, inc) x 6 (36)
Round 7 :
(5 sc, inc) x 6 (42)
Round 8 :
(6 sc, inc) x 6 (48)
Round 9-12 :
1 sc in each st (48)
Info :
These rounds create a stable circumference for the body base. Use a stitch marker to mark the front center for belly panel alignment later.
Round 13 :
(6 sc, dec) x 6 (42)
Round 14 :
(5 sc, dec) x 6 (36)
Round 15 :
1 sc in each st (36)
Round 16 :
1 sc in each st (36)
Info :
At round 16 begin to plan placement for head attachment. Leave an opening at the top of the body to sew the head later. Do not close the top completely yet.
Round 17 :
(4 sc, dec) x 6 (30)
Round 18 :
(3 sc, dec) x 6 (24)
Round 19 :
(2 sc, dec) x 6 (18)
Round 20 :
(1 sc, dec) x 6 (12)
Info :
Begin stuffing the body firmly from the bottom up. Add fiberfill gradually to create a stable base and avoid lumps. Keep stuffing moderate so the neck seam will be easy to sew.
Round 21 :
1 sc in each st (12)
Round 22 :
1 sc in each st (12)
Round 23 :
(1 sc, inc) x 6 (18)
Round 24 :
(2 sc, inc) x 6 (24)
Round 25 :
1 sc in each st (24)
Round 26 :
1 sc in each st (24)
Round 27 :
(3 sc, inc) x 6 (30)
Round 28 :
1 sc in each st (30)
Round 29 :
Fasten off leaving a long tail for sewing the head. If you prefer to join the head while the body is open, stop here and pin the head in place to test position. Otherwise, close remaining opening using sl sts and sew to head later.
Info :
If you plan a slightly elongated neck, do not close the top fully: leave 6-8 sts open and use those to slip-stitch the head later for a smooth neck join.
— Belly Panel (Front Ridges) :
Info :
Worked separately in cream color and sewn onto the front, belly panel is worked in short rows around a central ridged column (FLO or tbl used). This creates the horizontal rib look shown.
Round 1 :
ch 8, 1 sc in 2nd ch from hook and across (7), ch 1, turn
Round 2 :
Work 1 sc in each st across in BLO (7)
Round 3-18 :
Repeat Round 2 until you have 16 rows total (7 sts x 16 rows). Fasten off leaving long tail for sewing. When attaching, center on body front, and stitch around edges with matched coral for invisible join.
Info :
Use FLO or BLO on alternating rows to create ridges. Pin belly panel centered aligning its top approximately under R12 of body so it extends down the body front as in photo.
— Arms (Make 2) :
Round 1 :
6 sc in magic ring (6)
Round 3 :
(1 sc, inc) x 6 (18)
Round 4 :
1 sc in each st (18)
Round 5 :
(2 sc, inc) x 6 (24)
Round 6-8 :
1 sc in each st (24)
Info :
The arms are slightly tapered. Stuff the hand area fairly firmly and the arm tube more lightly so they rest against the body naturally when attached.
Round 9 :
(3 sc, dec) x 6 (18)
Round 10-14 :
1 sc in each st (18)
Round 15 :
(2 sc, dec) x 4, 2 sc x 2 (14)
Round 16 :
1 sc in each st (14)
Round 17 :
1 sc in each st (14)
Round 18 :
(1 sc, dec) x 4, 2 sc x 2 (10)
Round 19 :
1 sc in each st (10). Fasten off leaving long tail for sewing. Stuff hand firmly and arm lightly.
Info :
Sew arms to body on rounds corresponding to body side — typically attach at body R12-15 for seated position shown. Pin, check symmetry and stitch through several rounds for secure attachment.
Round 20 :
Add small toe nub (optional) — make 3 tiny cones as described for spikes but with 3 rounds each, then sew to end of arm for hand claws if desired.
— Legs (Make 2) :
Round 1 :
6 sc in magic ring (6)
Round 3 :
(1 sc, inc) x 6 (18)
Round 4 :
(2 sc, inc) x 6 (24)
Round 5 :
(3 sc, inc) x 6 (30)
Round 6 :
1 sc in each st (30)
Round 7 :
1 sc in each st (30)
Info :
Foot rounds are worked in the round to form a squat foot. Stuff firmly as you go to keep a rounded, stable foot for sitting.
Round 8 :
(4 sc, dec) x 6 (24)
Round 9 :
1 sc in each st (24)
Round 10 :
(3 sc, dec) x 6 (18)
Round 11 :
1 sc in each st (18)
Round 12 :
1 sc in each st (18)
Round 13 :
(2 sc, inc) x 6 (24)
Round 14-18 :
1 sc in each st (24) — these create the lower leg tube; stuff moderately
Round 19 :
(2 sc, dec) x 6 (18)
Round 20 :
(1 sc, dec) x 6 (12)
Round 21 :
1 sc in each st (12)
Round 22 :
Fasten off leaving long tail for sewing. Position legs at body bottom and sew securely; reinforce with extra passes through foot base if toy will be played with often.
Info :
To create the toe/claw detail, sew 3 tiny cones onto the front of each foot as shown in the photos using the small spike pattern but making each spike only 3 rounds high.
— Tail :
Round 1 :
6 sc in magic ring (6)
Round 3 :
(1 sc, inc) x 6 (18)
Round 4 :
(2 sc, inc) x 6 (24)
Round 5-8 :
1 sc in each st (24)
Round 9 :
(2 sc, dec) x 6 (18)
Round 10-14 :
1 sc in each st (18)
Round 15 :
(1 sc, dec) x 6 (12)
Round 16 :
1 sc in each st (12)
Round 17 :
Fasten off leaving long tail. Stuff tail lightly. Tail will be curved and placed along one side of body so attach to lower back center and sew along underside to anchor for sitting stability.
Info :
After attaching tail, sew small cone spikes along the top of the tail at intervals of 4-6 stitches. Alternate colors if you want the dipped tip effect.
— Tail Spikes (small cones) :
Round 1 :
6 sc in magic ring (6)
Round 2 :
1 sc in each st (6)
Round 3 :
(1 sc, inc) x 3 (9)
Round 4 :
1 sc in each st (9)
Round 5 :
(2 sc, dec) x 3 (6)
Round 6 :
Fasten off leaving tail for sewing. Make 6-8 spikes and sew along top of tail evenly spaced.
Info :
Mix and match colors: some spikes are cream tipped and some coral to recreate the photo's playful color gradient.
— Wings (Make 2) :
Info :
Each wing is worked flat in cream, edged with coral and decorated with small heart appliques in coral. Work right and left mirror images.
Wing Panel Round 1 :
ch 28, 1 sc in 2nd ch from hook and across (27)
Round 2 :
ch1, turn, 1 sc in each st across (27)
Round 3 :
ch1, turn, 1 sc in each st (27)
Round 4 :
At end of row, ch 1 and sc 10 along side of chain to create rounded corner, continue to work around to form a leaf shape: 1 sc in next 9 chs, sc in last st, sc along base chain back to beginning to create a semi-oval panel (work evenly to make smooth curve)
Round 5-12 :
Work 1 sc in each st around the entire panel to build thickness. Aim for 8 rounds so panel measures about 11-12 cm tall when finished. Maintain even tension.
Info :
When your panels are symmetrical, add a final coral edging: sl st around in coral color, working 2 sl st in each corner stitch to create a scallop effect similar to the picture.
Round 13-14 :
Switch to coral and sl st around edge; fasten off and weave in ends.
Info :
Position wings just behind arms and slightly above the body center. When sewing, make sure wing bases are anchored through several rounds of the body to prevent drooping.
— Wing Hearts (Make 6 small hearts) :
Heart Round 1 :
ch 4, in 3rd ch from hook: 3 dc, 3 hdc, 1 dc in last ch, rotate to work on other side of chain: 3 hdc, 3 dc, sl st to first dc, fasten off (7-9 sts shaped heart)
Round 2 :
With coral, embroider a small heart outline if you prefer raised heart; otherwise make 6 hearts and sew them onto the cream wing panels spaced evenly: 3 hearts per wing as shown.
Info :
Glue is optional for initial placement but secure all hearts by stitching through both applique and wing body so they survive wash and play.
— Wing Edge Decorative Picot (optional) :
Round 1 :
With coral, join at any point and *sl st, ch3, sl st in base* around the edge making small picots every 3-4 stitches to recreate the delicate scalloped rim visible in photo. Fasten off and hide ends.
Info :
Picot edging adds a lacy finish and helps wings keep a slight curl. Block wings flat if needed before attaching.
— Ears / Side Frills (Make 2 pairs small) :
Round 1 :
6 sc in magic ring (6)
Round 3 :
1 sc in each st (12)
Round 4 :
(1 sc, inc) x 4, 4 sc (16)
Round 5 :
1 sc in each st (16) — fold slightly and sew base to head sides aligned behind eyes for the ear/flap look visible in the pictures.
Info :
Create 2 larger outer ear flaps and 2 slightly smaller inner frills using same technique but stop increasing earlier for the smaller size. Layer them when sewing for depth.
— Small Decorative Cones (toes, small spikes on cheeks) :
Round 1 :
6 sc in magic ring (6)
Round 2 :
1 sc in each st (6)
Round 3 :
(1 sc, inc) x 3 (9)
Round 4 :
Fasten off leaving tail. Make 3 small toes per foot and 2-3 tiny cones for cheek decoration; stitch in place.
Info :
Use a contrasting lighter cream for toe tips for cute detail. Sew firmly with multiple passes at the base.
— Finishing & Face Embroidery :
Info :
Embroider mouth by threading yarn needle with coral and using a short curved stitch under snout to create smiling mouth. Add small stitches for nostrils and subtle eyebrows if desired. Place blush using soft pastel or fabric paint sparingly.
Round 1 :
Ensure all pieces are sewn and ends woven in. Tighten any loose joins and go over seams to reinforce.
Info :
For a professional finish, use ladder stitch to join pieces invisibly, and weave tails through several rounds before trimming. Keep seam tension firm but not puckering the fabric.
This Big Peachy Love Dragon combines cuddly shaping with playful, heart-detailed wings to create a truly special friend. Each step of the pattern is crafted to bring out the dragon's friendly personality and charming posture. With patient assembly and careful stuffing you’ll end up with a plush companion that’s as lovely to make as it is to gift. 🧶💕 Keep a camera ready — this dragon loves being shown off!