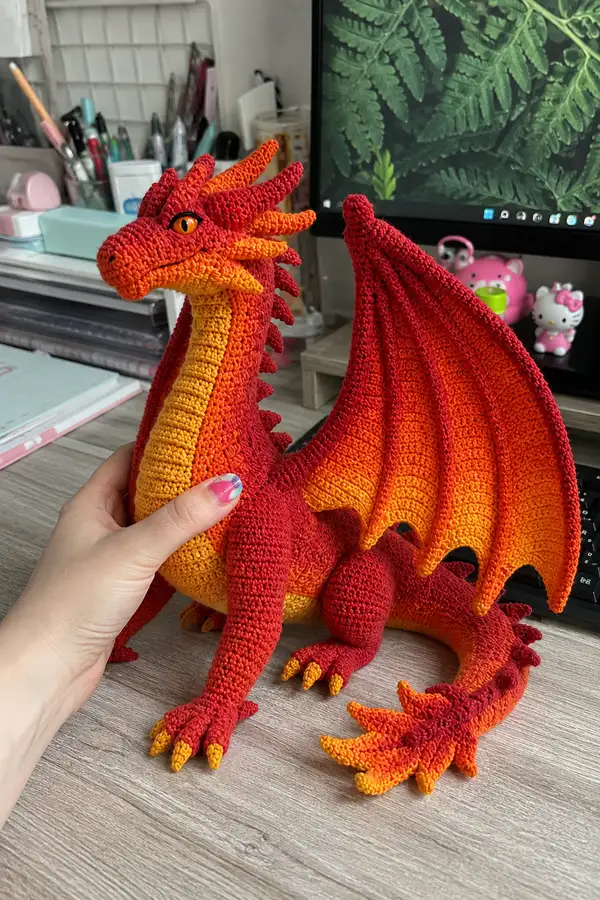
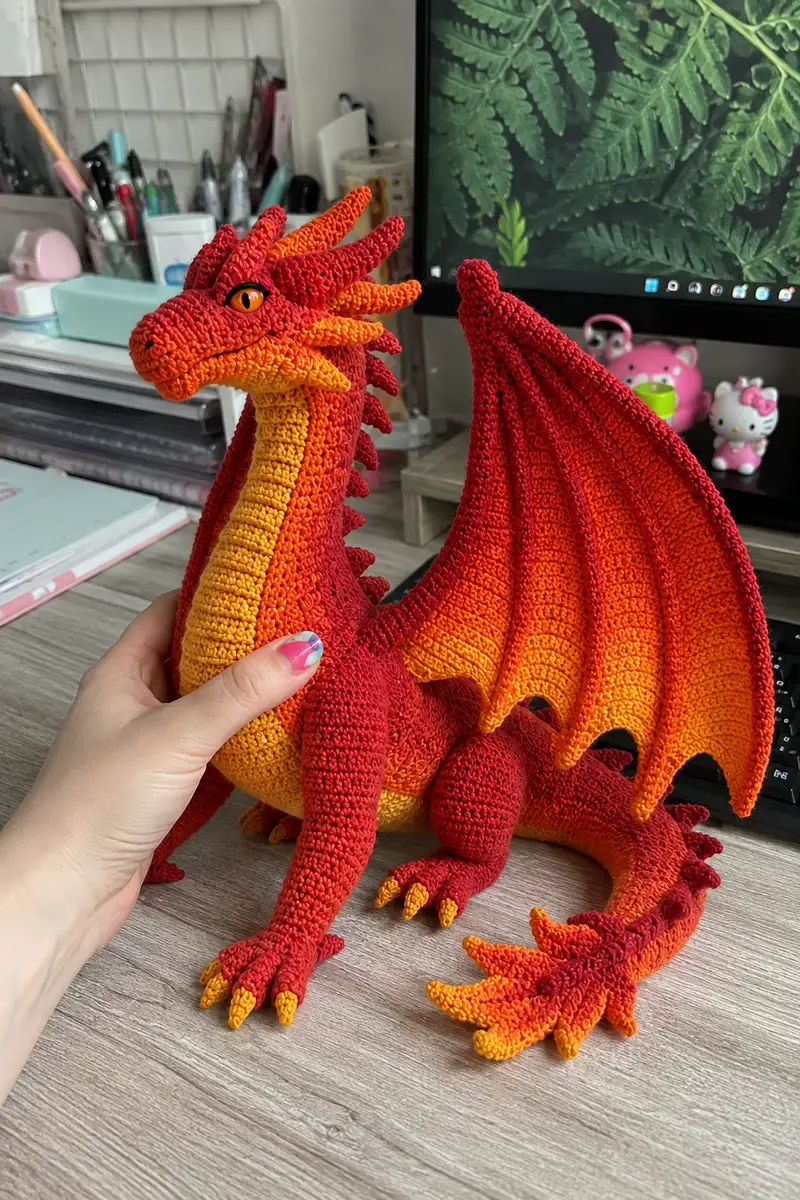
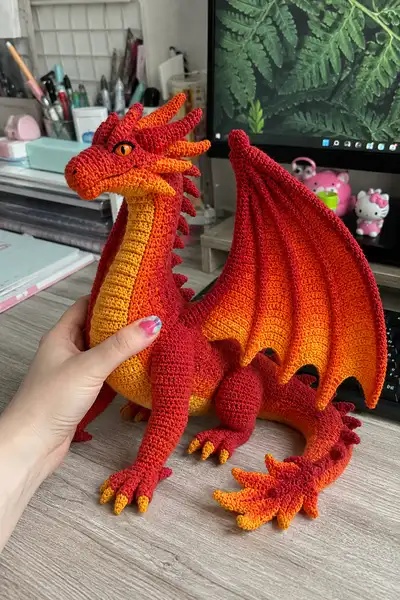
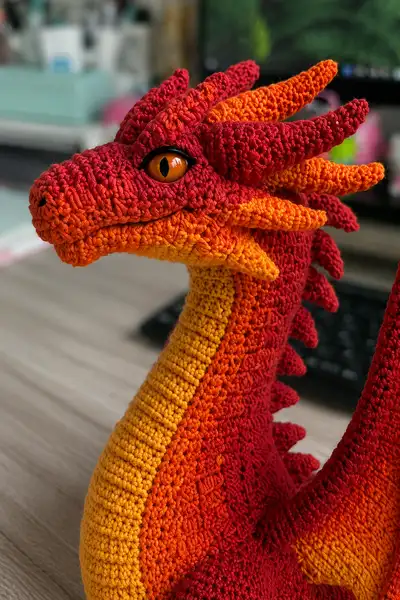
A large, dramatic fire dragon amigurumi crocheted in sunset ombre shades of red, orange and golden yellow. This pattern recreates the sculpted muzzle, long elegant neck, articulated wings with ribbed membranes, curving tail and layered spines running down the head and back. Perfect as a decorative plush or a bold handmade gift, the finished dragon sits upright and measures roughly the size of a small pillow.
Progress Tracker
0% Complete
— Head and Upper Neck :
Round 1 :
6 sc in magic ring (6)
Round 3 :
(1 sc, 1 inc) x 6 (18)
Round 4 :
(2 sc, 1 inc) x 6 (24)
Round 5 :
(3 sc, 1 inc) x 6 (30)
Round 6 :
(4 sc, 1 inc) x 6 (36)
Round 7 :
(5 sc, 1 inc) x 6 (42)
Round 8 :
(6 sc, 1 inc) x 6 (48)
Info :
Work head in deep red (main color). Keep work in continuous rounds (no joining) and use a stitch marker at the first stitch of each round. This creates the dome shape for the skull.
Round 9 :
1 sc in each st (48)
Round 10 :
1 sc in each st (48)
Round 11 :
1 sc in each st (48)
Round 12 :
1 sc in each st (48)
Info :
Place safety eyes between rounds 14-16 later, approximately 10-12 stitches apart (for a large expressive look). Do not secure them yet; we will mark positioning first.
Round 13 :
(6 sc, 1 inc) x 6 (54)
Round 14 :
1 sc in each st (54)
Round 15 :
1 sc in each st (54)
Info :
Test eye placement: From center top of head, count down 12 rounds along head front and mark left and right positions about 10-12 sts apart across round 15. When satisfied, insert eyes and secure backs (or mark placement if embroidering).
Round 16 :
(7 sc, 1 inc) x 6 (60)
Round 17 :
1 sc in each st (60)
Round 18 :
1 sc in each st (60)
Round 19 :
1 sc in each st (60)
Info :
Begin forming muzzle by planning a separate muzzle section to be attached. The head rounds above create the skull and upper jaw area. Muzzle will project forward—see the separate Muzzle section below for precise shaping and attachment rounds.
Round 20 :
(8 sc, 1 inc) x 6 (66)
Round 21 :
1 sc in each st (66)
Round 22 :
1 sc in each st (66)
Round 23 :
(8 sc, 1 dec) x 6 (60)
Round 24 :
(7 sc, 1 dec) x 6 (54)
Info :
Start light stuffing in skull area so the head keeps a rounded shape but leave the front open for muzzle sewing. Stuff gently and add fiberfill as you progress down into the neck area.
Round 25 :
(6 sc, 1 dec) x 6 (48)
Round 26 :
(5 sc, 1 dec) x 6 (42)
Round 27 :
1 sc in each st (42)
Round 28 :
1 sc in each st (42)
Info :
Change to orange yarn here if you prefer a gradual color shift already in head/neck. This sample keeps the deep red dominating the skull and introduces orange at the throat for a natural ombre. Carry yarn inside if you're doing short color shifts to avoid many ends.
Round 29 :
(5 sc, 1 dec) x 6 (36)
Round 30 :
(4 sc, 1 dec) x 6 (30)
Round 31 :
(3 sc, 1 dec) x 6 (24)
Round 32 :
(2 sc, 1 dec) x 6 (18)
Info :
Neck begins below the head — work elongation rounds next to create the long graceful neck. Keep rounds even and stretch slightly after stuffing to check length and curvature.
Round 33 :
1 sc in each st (18)
Round 34 :
1 sc in each st (18)
Round 35 :
1 sc in each st (18)
Round 36 :
(2 sc, 1 inc) x 6 (24)
Round 37 :
1 sc in each st (24)
Round 38 :
1 sc in each st (24)
Info :
At this stage you can optionally add a thin piece of wire into the neck for poseability. Insert wire centered and cover with a narrow tube of stuffing before continuing. Ensure wire ends are bent and wrapped with yarn to prevent poking through fabric.
Round 39 :
(3 sc, 1 inc) x 6 (30)
Round 40 :
1 sc in each st (30)
Info :
Fasten off head when you reach the neck top where you will join to body opening later. Leave a long tail for sewing (approximately 40-60 cm). Finish stuffing head firmly but not overpacked to keep clean facial shaping.
— Muzzle (Make 1) :
Round 1 :
6 sc in magic ring (6)
Round 3 :
(1 sc, 1 inc) x 6 (18)
Round 4 :
(2 sc, 1 inc) x 6 (24)
Round 5 :
1 sc in each st (24)
Round 6 :
(3 sc, 1 dec) x 6 (18)
Round 7 :
(2 sc, 1 dec) x 6 (12)
Round 8 :
1 sc in each st (12)
Round 9 :
1 sc in each st (12)
Info :
Flatten muzzle slightly and stuff lightly to create the forward projection. Leave top opening raw to sew to the head. You can add slight shaping by decreasing on top row stitches once attached.
Round 10 :
(1 sc, 1 inc) x 6 (18)
Round 11 :
1 sc in each st (18)
Round 12 :
Fasten off leaving long tail for sewing; use mattress stitch or whip stitch to attach muzzle flush to head area between rounds 13-18 of head. Make sure mouth seam aligns symmetrically and shape jaw with stuffing during sewn attachment.
— Lower Jaw (Make 1) :
Round 1 :
6 sc in magic ring (6)
Round 3 :
(1 sc, 1 inc) x 6 (18)
Round 4 :
1 sc in each st (18)
Round 5 :
1 sc in each st (18)
Round 6 :
1 sc in each st (18)
Round 7 :
(2 sc, 1 dec) x 6 (12)
Round 8 :
Fasten off leaving long tail for sewing. Stuff lower jaw lightly and attach under muzzle forming the mouth cavity. Add a narrow ridge of stitches to emulate closed mouth line if desired.
— Head Spines, Horns and Brow Ridges (Make 12-16 small spikes of varying sizes) :
Spike Small - Round 1 :
6 sc in magic ring (6)
Spike Small - Round 2 :
1 sc in each st (6)
Spike Small - Round 3 :
(1 sc, inc) x 2 then 2 sc (8)
Spike Small - Round 4 :
1 sc in each st (8)
Spike Info :
Fasten off leaving long tails. Make spikes in graduated sizes: 6 small spikes (4 rounds), 4 medium spikes (6 rounds), 4 longer horns (8-10 rounds). Alternate colors (red base to orange tips) by switching yarn mid-spike for ombre effect. Stuff bases lightly and sew along head crest and down neck from top of skull to shoulder area. Use longer spikes at crown and shorter along throat.
— Body (Main Torso) :
Round 1 :
8 sc in magic ring (8)
Round 3 :
(1 sc, inc) x 8 (24)
Round 4 :
(2 sc, inc) x 8 (32)
Round 5 :
(3 sc, inc) x 8 (40)
Round 6 :
(4 sc, inc) x 8 (48)
Round 7 :
(5 sc, inc) x 8 (56)
Round 8 :
(6 sc, inc) x 8 (64)
Info :
Work body in rounds; begin in deep red and plan color transitions to orange and then yellow for the belly panel region. This wide base will create a stable sitting surface for the finished dragon. Keep rounds continuous and mark first stitch.
Round 9 :
1 sc in each st (64)
Round 10 :
1 sc in each st (64)
Round 11 :
1 sc in each st (64)
Round 12 :
(6 sc, 1 dec) x 8 (56)
Round 13 :
1 sc in each st (56)
Round 14 :
1 sc in each st (56)
Info :
Before you continue increasing or shaping, plan where the neck will be attached. The body opening where the neck meets should finish at approximately this round. If you would like longer torso, work extra even rounds here before decreasing toward hips.
Round 15 :
(4 sc, 1 dec) x 8 (48)
Round 16 :
1 sc in each st (48)
Round 17 :
1 sc in each st (48)
Round 18 :
(3 sc, 1 dec) x 8 (40)
Round 19 :
1 sc in each st (40)
Round 20 :
1 sc in each st (40)
Info :
Change yarn to orange at round 21 for a visible ombre mid-body section. Carry the red yarn or fasten off and weave in later depending on how neat you want transitions. Working the belly panel separately and sewing on later makes clean color bands possible.
Round 21 :
Change to orange yarn. 1 sc in each st (40)
Round 22 :
1 sc in each st (40)
Round 23 :
(3 sc, 1 inc) x 8 (48)
Round 24 :
1 sc in each st (48)
Round 25 :
(4 sc, 1 inc) x 8 (56)
Round 26 :
1 sc in each st (56)
Info :
Begin to shape chest and belly. If adding a separate belly strip (recommended for clean color change), now is a good time to crochet the belly panel in golden yellow as a flat oval strip in rows, then sew into the belly opening later. See Belly Panel section.
Round 27 :
(5 sc, 1 inc) x 8 (64)
Round 28 :
1 sc in each st (64)
Round 29 :
1 sc in each st (64)
Round 30 :
(6 sc, 1 dec) x 8 (56)
Round 31 :
(5 sc, 1 dec) x 8 (48)
Round 32 :
1 sc in each st (48)
Round 33 :
1 sc in each st (48)
Info :
At this point, stop to prepare leg and wing attachment placement. The front legs will attach at rounds 28-32 on the body’s front slope. Mark positions with pins and ensure symmetry left-right before attaching limbs.
Round 34 :
(4 sc, 1 dec) x 8 (40)
Round 35 :
(3 sc, 1 dec) x 8 (32)
Round 36 :
1 sc in each st (32)
Round 37 :
1 sc in each st (32)
Round 38 :
(2 sc, 1 dec) x 8 (24)
Round 39 :
1 sc in each st (24)
Round 40 :
(1 sc, 1 dec) x 8 (16)
Round 41 :
1 sc in each st (16)
Round 42 :
Fasten off leaving long tail; stuff body firmly but maintain softness in torso. Leave the top opening large enough to insert neck from head and sew securely. Weave in color change ends after assembly for clean finish if you carried yarn inside.
— Belly Panel (Flat Strip, Make 1) :
Row 1 :
With golden yellow, ch 40, sc in 2nd ch from hook and across (39)
Row 2-6 :
Ch 1, turn, sc across (39)
Info :
Belly panel is worked flat as a long oval strip then sewn into the belly opening. Block or steam lightly to shape; taper ends slightly before attaching by decreasing a few sts on each end over 2 rows to form a tapered fit to body base.
Row 7 :
Ch 1, turn, (sc 5, dec) across last 6 sts twice to taper ends, sc remaining center (37)
Row 9 :
Fasten off leaving long tail for sewing; pin into body's belly opening and sew with ladder stitch for invisible join. Stuff body lightly around the panel as you close to create a smooth belly curve.
— Front Legs (Make 2) :
Round 1 :
6 sc in magic ring (6)
Round 3 :
(1 sc, 1 inc) x 6 (18)
Round 4 :
1 sc in each st (18)
Round 5 :
1 sc in each st (18)
Round 6 :
(2 sc, 1 inc) x 6 (24)
Round 7 :
1 sc in each st (24)
Round 8 :
1 sc in each st (24)
Info :
Work legs in deep red. Keep the foot slightly wider than the leg shaft. Start stuffing foot firmly once shape forms; legs should be stable so the dragon sits naturally.
Round 9 :
(3 sc, 1 dec) x 6 (18)
Round 10 :
1 sc in each st (18)
Round 11 :
1 sc in each st (18)
Round 12 :
(1 sc, 1 dec) x 6 (12)
Round 13 :
1 sc in each st (12)
Round 14 :
1 sc in each st (12)
Round 15 :
(1 sc, 1 inc) x 6 (18)
Round 16 :
1 sc in each st (18)
Round 17 :
(2 sc, 1 inc) x 6 (24)
Round 18 :
1 sc in each st (24)
Round 19 :
Fasten off leaving long tail for sewing; stuff leg firmly. Attach to body at marked front leg positions between rounds 28-32 of body. Sew securely through both leg and body making several passes for stability.
— Hind Legs and Hips (Make 2) :
Round 1 :
8 sc in magic ring (8)
Round 3 :
(1 sc, 1 inc) x 8 (24)
Round 4 :
(2 sc, 1 inc) x 8 (32)
Round 5 :
1 sc in each st (32)
Round 6 :
1 sc in each st (32)
Round 7 :
(3 sc, 1 inc) x 8 (40)
Round 8 :
1 sc in each st (40)
Info :
Hind legs are chunkier for weight-bearing. Stuff feet very firmly and legs moderately so the dragon sits upright. If adding wire for poseability, insert here before fully stuffing.
Round 9 :
(4 sc, 1 inc) x 8 (48)
Round 10 :
1 sc in each st (48)
Round 11 :
1 sc in each st (48)
Round 12 :
(5 sc, 1 dec) x 8 (40)
Round 13 :
(4 sc, 1 dec) x 8 (32)
Round 14 :
1 sc in each st (32)
Round 15 :
(3 sc, 1 dec) x 8 (24)
Round 16 :
1 sc in each st (24)
Round 17 :
Fasten off leaving long tail for sewing; stuff foot and lower leg firmly. Attach hind legs to bottom rear of body between rounds 36-40. Pin placement so feet peek slightly forward to support sitting posture.
— Claws (Make 8 small claws total) :
Claw Round 1 :
4 sc in magic ring (4)
Claw Round 2 :
(1 sc, inc) x 2 (6)
Claw Round 3 :
1 sc in each st (6)
Claw Round 4 :
Fasten off leaving long tail; stuff very lightly and sew three claws to each foot front. Make two smaller claws for tail tip details if desired.
— Tail :
Round 1 :
6 sc in magic ring (6)
Round 3 :
(1 sc, 1 inc) x 6 (18)
Round 4 :
(2 sc, 1 inc) x 6 (24)
Round 5-8 :
1 sc in each st (24)
Round 9 :
(3 sc, 1 dec) x 6 (18)
Round 10-12 :
1 sc in each st (18)
Round 13 :
(2 sc, 1 dec) x 6 (12)
Round 14-18 :
1 sc in each st (12)
Round 19 :
(1 sc, 1 dec) x 4 then 4 sc (8)
Round 20 :
Fasten off leaving long tail; stuff tail lightly while maintaining a tapered, flexible shape. For the decorative tail flounce, crochet 6 petal shapes (3-4 rounds each) and sew onto tail tip in overlapping fan formation to recreate flame-like fringe seen in the photo.
— Wing (Make 2 large membrane wings) :
Wing Center Round 1 :
With deep red, ch 4, join to form ring; ch 1 and make 6 sc into ring (6)
Round 3 :
(1 sc, 1 inc) x 6 (18)
Round 4 :
(2 sc, 1 inc) x 6 (24)
Round 5 :
(3 sc, 1 inc) x 6 (30)
Round 6 :
Switch to orange yarn. 1 sc in each st (30)
Round 7 :
1 sc in each st (30)
Round 8 :
(4 sc, 1 inc) x 6 (36)
Info :
To create the elongated fan shape of the wing, subsequent rounds will increase more on the outer side while keeping inner curve tighter. Work wings flat in continuous rounds by spiralling outward to a semi-oval panel. Use BLO ribs later to add structural raised ridges.
Round 9 :
1 sc in each st (36)
Round 10 :
(5 sc, 1 inc) x 6 (42)
Round 11 :
1 sc in each st (42)
Round 12 :
Switch to yellow at the outermost rows. (6 sc, 1 inc) x 6 (48)
Round 13 :
1 sc in each st (48)
Round 14 :
1 sc in each st (48)
Round 15 :
(7 sc, 1 inc) x 6 (54)
Round 16 :
1 sc in each st (54)
Info :
To create the ribs: work 6 vertical ribs by crocheting in FLO or BLO and using slip stitches to create raised lines. Mark positions evenly across the wing membrane starting at inner curve and stretching to outer edge. Ribs should be made by working sc rows in FLO to leave a ridge on the outer surface.
Round 17 :
BLO row: 1 sc in each st BLO (54) — this gives first rib texture
Round 18 :
1 sc in each st (54)
Round 19 :
Insert marker at inner curve and work a chain-rib technique: Ch 1 at designated rib stitch, sc down chain backbone for rib, attach and continue sc across panel. Repeat to create 6 ribs spaced every 8-9 sts.
Round 20 :
Work 1 sc in each st (54)
Round 21 :
(6 sc, 1 dec) x 6 (48)
Round 22 :
1 sc in each st (48)
Round 23 :
(5 sc, 1 dec) x 6 (42)
Round 24 :
1 sc in each st (42)
Round 25 :
(4 sc, 1 dec) x 6 (36)
Round 26 :
1 sc in each st (36)
Round 27 :
Fasten off leaving long tail for attaching wing heel to body. Make second wing mirror-image. Sew wings to body at side openings between rounds 20-30; angle the wing base so the wing membrane arches outward.
— Wing Fingers and Edge Points (Make 6 per wing) :
Finger Round 1 :
6 sc in magic ring (6)
Finger Round 2 :
1 sc in each st (6)
Finger Round 3 :
(1 sc, inc) x 3 (9)
Finger Round 4 :
1 sc in each st (9)
Finger Round 5 :
Fasten off leaving long tail; shape slightly curved pointed ribs and sew to wing outer edge to recreate the scalloped tips shown in the photo.
— Neck Spines & Back Spikes (Make 12-18) :
Spine Round 1 :
6 sc in magic ring (6)
Spine Round 2 :
(1 sc, inc) x 3 (9)
Spine Round 3 :
1 sc in each st (9)
Spine Round 4 :
(1 sc, dec) x 3 (6)
Spine Info :
Make spines in graduated sizes and mix colors for ombre effect. Sew them down the center of the back beginning at the head crown and continuing to tail base. Secure firmly to the body with hidden whip stitch and ensure spikes point upward and outward slightly for natural look.
Spine Round 5 :
Fasten off leaving long tail for sewing
— Eye Details and Face Embroidery :
Info :
Insert amber safety eyes at marked positions (rounds 14-16 of head). If using 10-12mm eyes, secure back washers firmly. Use a small circle of black felt or embroidered black ring around eye to create a deep-set appearance. Embroider vertical slit pupil if eyes are flat; otherwise attach painted safety eyes for realistic look. Use embroidery floss or yarn to create nostrils and small smile lines.
Embro Round 1 :
Using black yarn, embroider two small horizontal nostril lines on muzzle tip, each 2-3 stitches long; knot securely on WS and weave in tail.
Embro Round 2 :
Optionally use brown or dark orange to stitch light eyelid ridge above eye to add expression. Keep stitches short and neat.
— Assembly Instructions and Final Shaping :
Info :
Pin head to body: insert neck tube into body opening and sew using a mattress stitch around the opening, matching round counts. Use extra passes at front and back for a stable join. Ensure head angle slightly forward to create majestic pose.
Info :
Sew legs evenly: front legs attach at body rounds 28-32; hind legs attach at rounds 36-40. Use extra reinforcement stitches through body rounds for weight-bearing security. Sew wings to body between rounds 20-30—angle slightly outward.
Info :
Sew belly panel into place before fully closing body bottom to make an invisible seam. Weave in all tails into seams and trim close to fabric. After assembly, add light shaping using hand-sewing under the chin and between wing sockets to create a natural curve. Brush or steam lightly to settle fibers if using natural fiber yarn.
Info :
Finish by adding tiny additional ridge stitches down the belly seam to emulate the segmented belly seen in the photo. Add optional weighted pellets into base before final closure if you want the dragon to sit more firmly on a shelf.
This Giant Sunset Ombre Fire Dragon is a labor of love — each ridge, spike and wing rib adds personality and drama to the finished piece. The ombre transition from deep red through orange to golden yellow makes it glow like a pocket of fire. As you stitch, the dragon comes alive: head first, then spine, then the powerful wings that give it presence. I hope you enjoy every stitch and display this majestic friend proudly! 🔥🧶