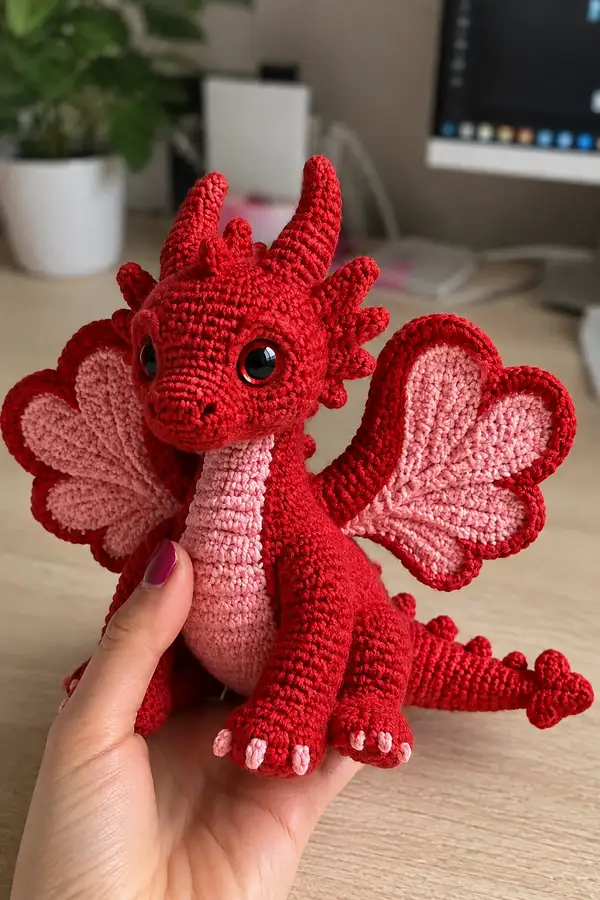
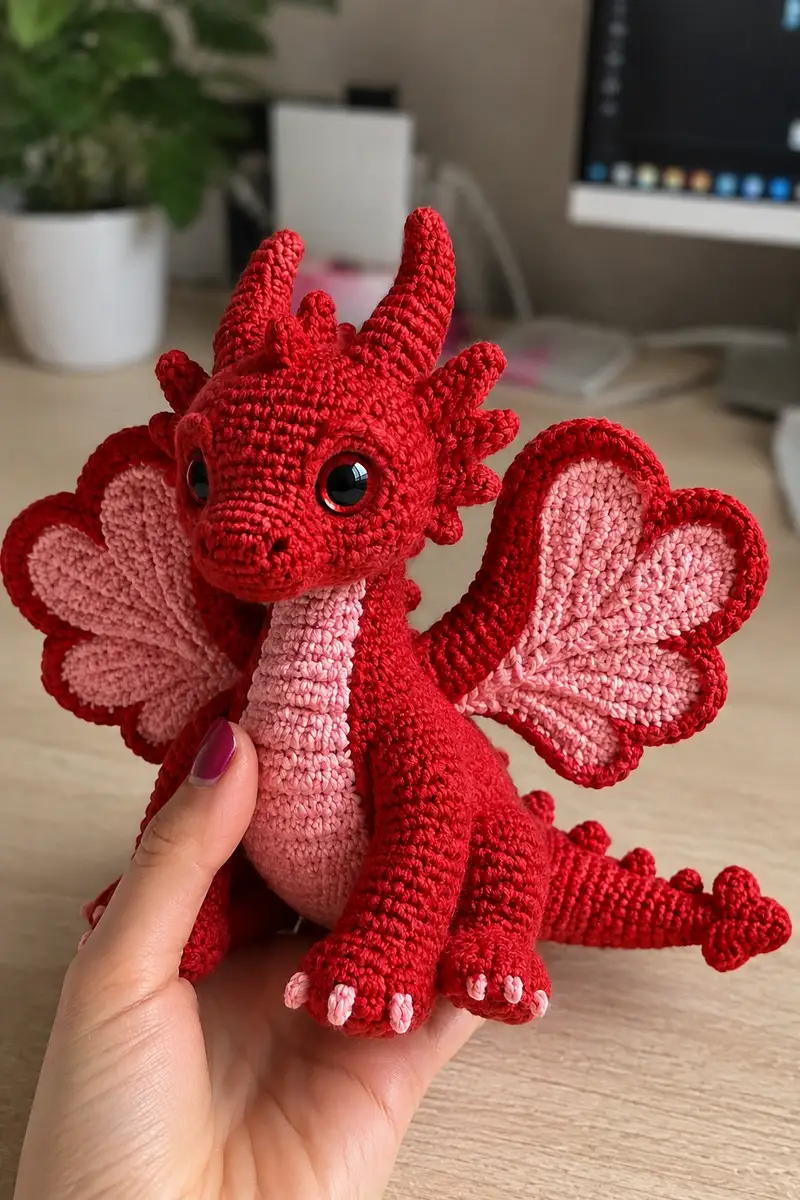
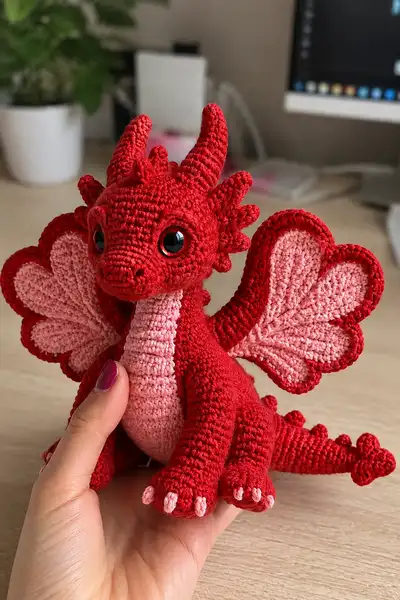
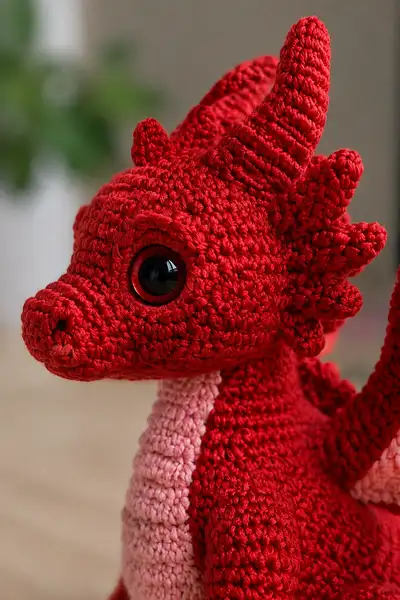
Create a charming rose-red dragon with heart-shaped wings and a soft pink belly. This detailed amigurumi pattern includes textured horns, spiky crest, tiny claws, and scalloped heart wings. Designed to be slightly poseable and full of personality, the finished dragon is a cuddly display piece or a heartfelt handmade gift.
Progress Tracker
0% Complete
— Head :
Round 1 :
6 sc in magic ring (6)
Round 3 :
(1 sc, inc) x 6 (18)
Round 4 :
(2 sc, inc) x 6 (24)
Round 5 :
(3 sc, inc) x 6 (30)
Round 6 :
(4 sc, inc) x 6 (36)
Round 7 :
(5 sc, inc) x 6 (42)
Round 8 :
(6 sc, inc) x 6 (48)
Round 9-12 :
1 sc in each st (48)
Info :
Place safety eyes between rounds 11-12; on this head 12 rounds from the start places them slightly above mid-face. Position eyes about 10-12 stitches apart depending on desired expression; mark with pins before locking eyes
Round 13-16 :
1 sc in each st (48)
Round 17 :
(6 sc, dec) x 6 (42)
Round 18 :
(5 sc, dec) x 6 (36)
Info :
Begin stuffing head moderately firmly now, leaving the lower neck area slightly less full so a neck piece can be attached later. Ensure stuffing sits between the eyes and above the snout to keep a rounded forehead
Round 19 :
(4 sc, dec) x 6 (30)
Round 20 :
(3 sc, dec) x 6 (24)
Round 21 :
(2 sc, dec) x 6 (18)
Round 22 :
(1 sc, dec) x 6 (12)
Round 23 :
6 dec (6) - Finish shaping the head top. Fasten off leaving a long tail for sewing if you plan to close by hand. We will attach a separate snout and neck elements below for more realistic shaping.
Info :
Snout shaping: this pattern uses a short separate snout piece worked flat and sewn into the front opening and additionally a long embroidered nostril/shading detail. Make sure the head opening is left larger than fully closed if you intend to sew in snout and neck pieces inside.
— Snout (Make 1, sew to front of head) :
Round 1 :
6 sc in magic ring (6)
Round 3 :
(1 sc, inc) x 6 (18)
Round 4 :
1 sc in each st (18)
Round 5 :
(3 sc, dec) x 4 + 2 sc (14) - reshape the front
Round 6 :
1 sc in each st (14)
Info :
Lightly stuff snout so it keeps shape but remains soft. Position and sew to the front opening of the head, aligning the nose tip to sit slightly below the eyes. Embroider nostrils with short satin stitches using dark pink or very dark yarn for contrast
— Neck Tube (Make 1, Pink Belly Tube) :
Round 1 :
6 sc in magic ring (6) — using soft pink
Round 3 :
(1 sc, inc) x 6 (18)
Round 4 :
(2 sc, inc) x 6 (24)
Round 5-14 :
1 sc in each st (24) — work 10 rounds to create a long neck tube (total length approximates 10-12 rounds depending on gauge)
Info :
Stuff the neck tube lightly as you go — the neck should be softer than the head so it attaches smoothly. Leave top opening unfastened to be sewn into the head opening and the bottom joined to the body later
Round 15 :
(2 sc, dec) x 6 (18)
Round 16 :
(1 sc, dec) x 6 (12)
Round 17 :
6 dec (6) - leave long tail for sewing to body
Info :
Do not completely close bottom of neck if you want the belly panel to be stitched underneath; alternatively finish and sew belly panel over the seam for a neat look
— Body :
Round 1 :
6 sc in magic ring (6) - using rose red
Round 3 :
(1 sc, inc) x 6 (18)
Round 4 :
(2 sc, inc) x 6 (24)
Round 5 :
(3 sc, inc) x 6 (30)
Round 6 :
(4 sc, inc) x 6 (36)
Round 7 :
(5 sc, inc) x 6 (42)
Round 8 :
(6 sc, inc) x 6 (48)
Round 9-14 :
1 sc in each st (48)
Info :
At this point the body has a rounded torso. You can use BLO on round 15 to create a shallow ridge where the belly panel will attach. Place markers for legs attachment - legs will be sewn to lower front portion; mark symmetrical positions.
Round 15 :
1 sc in each st BLO (48)
Round 16-20 :
1 sc in each st (48)
Info :
Begin stuffing the body firmly after round 18 but leave top opening loose for sewing the neck and head. Stuff evenly so the body sits flat and stable later.
Round 21 :
(6 sc, dec) x 6 (42)
Round 22 :
(5 sc, dec) x 6 (36)
Round 23 :
1 sc in each st (36)
Round 24 :
(4 sc, dec) x 6 (30)
Round 25 :
(3 sc, dec) x 6 (24)
Round 26 :
(2 sc, dec) x 6 (18)
Round 27 :
(1 sc, dec) x 6 (12)
Round 28 :
6 dec (6) - leave long tail for sewing bottom or attach tail here as written in tail section
Info :
If you plan to attach the belly panel separately, leave the lower body opening slightly larger and sew belly panel over opening after head and neck are attached. Otherwise close and stitch in tail base and reinforce with a few extra passes.
— Belly Panel (Pink) :
Round 1 :
6 sc in magic ring (6) - soft pink
Round 3 :
(1 sc, inc) x 6 (18)
Round 4 :
(2 sc, inc) x 6 (24)
Round 5-8 :
1 sc in each st (24) - form an oval by working lengthwise if desired: on the last stitch of round, ch2, rotate and work along side to elongate (optional)
Info :
Make belly panel long enough to reach from under the neck to just above the tail join. You can shape into an oval by adding short rows at the turn if you prefer a flatter belly.
Round 9 :
1 sc in each st (24)
Round 10 :
Fasten off leaving long tail for sewing to the body center front; stitch using ladder stitch for a neat invisible seam
— Front Legs (Make 2) :
Round 1 :
6 sc in magic ring (6)
Round 3 :
(1 sc, inc) x 6 (18)
Round 4 :
1 sc in each st (18)
Round 5 :
(3 sc, inc) x 4 + 2 sc (22) - flatten a little to form the foot base shape
Round 6-8 :
1 sc in each st (22)
Info :
Claw detail: Use soft pink to embroider or crochet tiny three-claw tips later. Stuff the foot base firmly so it supports the front of the toy.
Round 9 :
(4 sc, dec) x 4 + 2 sc (18)
Round 10-14 :
1 sc in each st (18) - lengthen the leg by several rounds to desired arm length (work 5 rounds for short arms or 8 for longer reach)
Round 15 :
(2 sc, dec) x 4 + 2 sc (14)
Round 16 :
(1 sc, dec) x 4 + 2 sc (10)
Round 17 :
1 sc in each st (10)
Round 18 :
Fasten off leaving long tail for sewing. Add three small embroidered claw tips with soft pink at the front of each foot and reinforce by stitching around the toes
Info :
Sew arms to the body sides at rounds 18-22 on the body. Pin positions before stitching to ensure symmetrical placement. Insert a short piece of wire if you want the limb slightly poseable; fold wire ends inward to avoid sharp points.
— Back Legs (Make 2) :
Round 1 :
6 sc in magic ring (6)
Round 3 :
(1 sc, inc) x 6 (18)
Round 4 :
(2 sc, inc) x 6 (24)
Round 5 :
(3 sc, inc) x 6 (30)
Round 6-9 :
1 sc in each st (30)
Info :
Back legs are chunkier to support sitting posture. Stuff foot area firmly and work extra passes through the foot base for stability when the dragon sits.
Round 10 :
(4 sc, dec) x 5 + 2 sc (26)
Round 11 :
(3 sc, dec) x 5 + 1 sc (21)
Round 12-16 :
1 sc in each st (21) - lengthen or shorten to desired thigh length, typically 5 rounds here
Round 17 :
(2 sc, dec) x 5 + 1 sc (16)
Round 18 :
(1 sc, dec) x 5 + 1 sc (11)
Round 19 :
1 sc in each st (11)
Round 20 :
Place small stuffing in leg, then Fasten off leaving long tail for sewing to bottom of body at previously marked positions
Info :
Sew legs to body bottom between rounds 6-10 of the body (measured from the base) so the dragon sits upright. Reinforce by sewing through a few stitches of the body interior.
— Tail :
Round 1 :
6 sc in magic ring (6)
Round 3 :
(1 sc, inc) x 6 (18)
Round 4-12 :
1 sc in each st (18) - lengthen these rounds to form a tapered tail body (work 9 rounds here)
Round 13 :
(4 sc, dec) x 3 (15)
Round 14 :
(3 sc, dec) x 3 (12)
Round 15 :
(2 sc, dec) x 3 (9)
Round 16 :
(1 sc, dec) x 3 (6)
Round 17 :
6 sc (6) - leave long tail to sew to body base
Info :
Create a row of rounded bobbles (spike-bobbles) along the top of the tail by stitching small spike pieces and sewing them on or crocheting bobbles directly by using small circular motifs sewn in place. Space the bobbles evenly along the top 8-10 rounds of the tail.
Round 18 :
Optional: add 3-5 small spike bobbles at the tail tip made from 6 sc in mr, 2 rounds and sewn on. Fasten off and sew tail securely to the bottom center of the body.
— Horns (Make 2 Large, 2 Small, plus Crest Spikes) :
Large Horn - Round 1 :
6 sc in magic ring (6)
Large Horn - Round 2 :
6 inc (12)
Large Horn - Round 3 :
(1 sc, inc) x 6 (18)
Large Horn - Round 4-12 :
1 sc in each st (18) - crochet in spiral to form a tapered cone
Large Horn - Round 13 :
(2 sc, dec) x 6 (12)
Large Horn - Round 14 :
(1 sc, dec) x 4 + 4 sc (8) - finish shaping to a point
Large Horn - Round 15 :
Fasten off leaving tail to sew to top of head. Stuff lightly but firmly so horns stand upright
Small Horn - Round 1 :
6 sc in magic ring (6)
Small Horn - Round 2 :
6 inc (12)
Small Horn - Round 3-6 :
1 sc in each st (12) - taper quickly by decreasing on last two rounds: Round 7 (1 sc, dec) x 3 (9) Round 8 3 dec (3)
Info :
Make a row of 8-12 small crest spikes (tiny cones) around the back of the head and the neck top. Work each spike as a short 3-6 round cone; sew in a row at even spacing. Use slightly tighter tension or smaller hook so they are firm and upright.
— Head Spikes / Crest (Make 10-12 small spikes) :
Spike - Round 1 :
4 sc in magic ring (4)
Spike - Round 2 :
4 sc (4)
Spike - Round 3 :
(1 sc, dec) x 1 + 1 sc (3)
Spike - Round 4 :
dec (1) - close and leave tail to sew. Make 10-12 spikes and space evenly along the back of the skull and start of the neck
Info :
Sew larger horns to the top of the head slightly rearward of the eyes. Sew smaller horns midline and spikes around the crown; secure each with multiple passes to prevent wobble.
— Wings (Make 2 Heart-Shaped Wings) :
Wing Inner Panel (Pink) - Round 1 :
6 sc in magic ring (6) - soft pink
Round 3 :
(1 sc, inc) x 6 (18)
Round 4 :
(2 sc, inc) x 6 (24)
Round 5 :
1 sc in each st (24)
Round 6 :
(3 sc, inc) x 6 (30)
Round 7 :
1 sc in next 8 sts, ch4, skip 4 sts, 1 sc in next 10 sts, ch4, skip 4 sts (this creates two lobes start)
Round 8 :
Work around, making 1 sc in each sc, and in chain spaces work 6 sc to make rounded lobes for the hearts; keep counts to 36 total (adjust the lobes to make two top rounded heart lobes)
Round 9-12 :
Continue working 1 sc around to flesh out the wing panel length. Aim for a flat fan shape approximately 10-14 rounds depending on gauge (counts will vary as you shape)—finish inner panel when the heart silhouette looks correct
Info :
Make two matching inner panels in pink. Block or flatten slightly by pinning flat and steam lightly if using cotton yarn for a crisp heart shape.
Wing Outer Border (Red) - Round 1 :
Join red to outermost stitches of the pink panel. Sc evenly around the edge, working more stitches in the lobes to accentuate the heart scallops. Aim for 48-56 sts depending on size
Round 2 :
Work 1 sc in each st around (same count)
Round 3 :
Sc in next 2 sts, 5 dc in next st (scallop) x around to create scalloped outer edge. Where the lobes meet work extra dc shells so the heart outline is pronounced. Final count ~56
Round 4 :
1 sc in each st to tidy scallop edges (56)
Round 5 :
Using BLO for one round at the connection edge (the part that will be stitched to the body) makes it sit nicer. 1 sc in each st BLO (56)
Info :
Sew each wing to the body back just below the neck line on rounds 8-12 of the body, spacing them symmetrically. Add a hidden seam at the wing root and reinforce with several passes. Pin wings in position before sewing to be sure the hearts face outward.
— Eye-rings (Optional, make 2) :
Round 1 :
ch4, join in ring with sl st, 8 sc into ring (8) - red or darker pink
Round 2 :
1 sc in each st (8) - make small flat rings to frame safety eyes; sew to head and insert eyes through the center
Info :
Eye-rings make the eyes look larger and match the red palette. Insert safety eyes through the head and eye-rings together, lock washers inside the head, then cover with stitches to firm the seating.
— Claws and Toe Tips (Make small tips for each foot) :
Claw Tip :
ch2, 3 sc in 2nd ch from hook (3), sl st to base and fasten off. Use soft pink to sew three tips across each front foot and back feet if desired
Info :
Sew claw tips into place with short backstitches. A dab of fabric glue under each claw helps them hold shape for display only (not recommended if toy is for a small child).
— Small Detail Ridges and Texture :
Round Info :
Create textured ridges along the back and tail by single crocheting in BLO on alternating rounds or by attaching small vertical lines of chains worked into the body then stitched down. For scale-like texture, work small corded ridges with surface slip stitches every 3-5 rounds.
— Assembly & Finishing Touches :
Info :
Weave in ends and sew all components together: attach neck tube into head opening and secure with matching yarn, then attach the neck bottom to the body opening and stitch around. Sew the belly panel onto the body center front and cover any visible seams. Pin wings, horns, legs and tail in place and stitch through both piece and body for a stable join. Add spikes along the tail and neck by sewing prepared spikes or crocheting small cones directly onto work.
Info :
Use extra reinforcement stitches for joints that will bear weight or frequent handling; hide knots inside the body and weave tails through to prevent loosening.
Bringing this rosy red dragon to life is such a joyful process — every little spike and scalloped wing makes it feel extra special. The textured horns and heart-shaped wings are charming finishing touches that give the dragon personality and poise. Keep it as a cuddly display companion or gift it to someone who adores whimsical creatures. 🧶💕✨