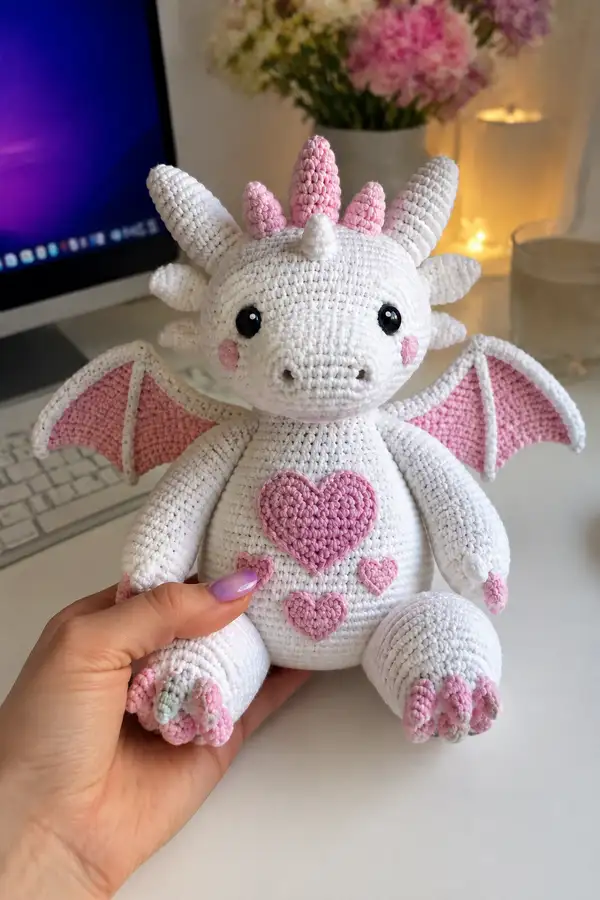
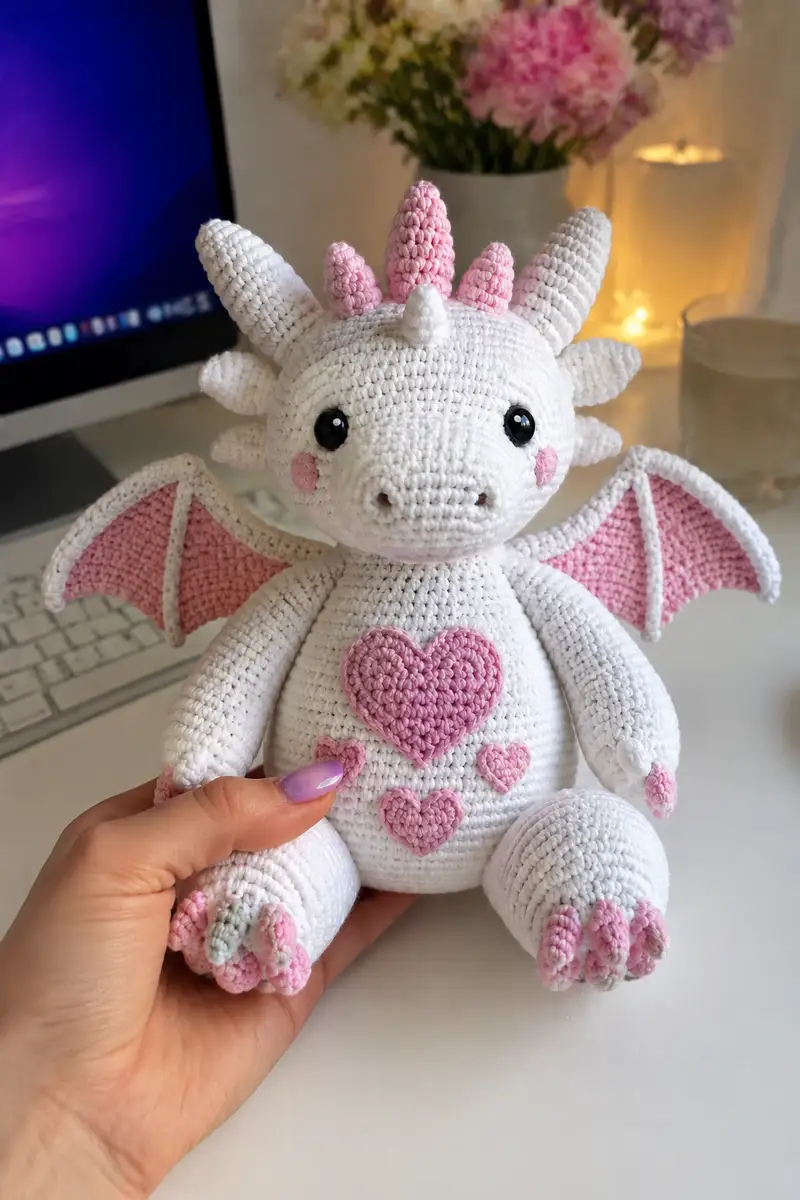
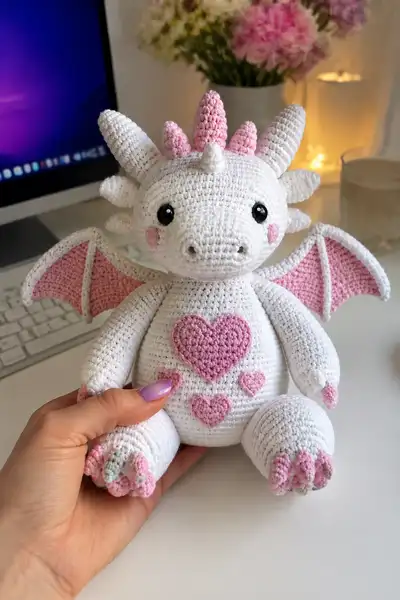
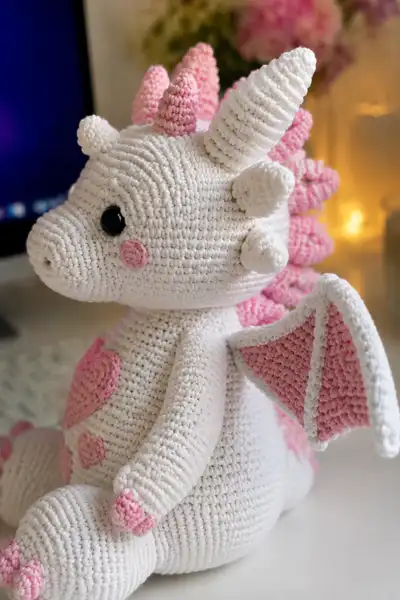
Create an irresistibly squishy white dragon with soft pink accents, heart appliques on its belly, and charming wing details. This pattern includes step-by-step round-by-round instructions to crochet the head, body, limbs, horns, spikes and wings, plus applique hearts and finishing tips. Perfect as a gift or a cuddly desk companion — the finished dragon has a rounded body, expressive black safety eyes, and textured horns and spikes for extra personality.
Progress Tracker
0% Complete
— Head :
Round 1 :
6 sc in magic ring (6)
Round 3 :
(1 sc, 1 inc) x 6 (18)
Round 4 :
(2 sc, 1 inc) x 6 (24)
Round 5 :
(3 sc, 1 inc) x 6 (30)
Round 6 :
(4 sc, 1 inc) x 6 (36)
Round 7 :
(5 sc, 1 inc) x 6 (42)
Round 8 :
(6 sc, 1 inc) x 6 (48)
Round 9 :
1 sc in each st (48)
Round 10 :
1 sc in each st (48)
Info :
Place safety eyes between rounds 12 and 13, 10-12 stitches apart depending on desired expression. Mark first stitch of round with marker and keep continuous rounds (do not join)
Round 11 :
1 sc in each st (48)
Round 12 :
1 sc in each st (48)
Round 13 :
1 sc in each st (48)
Info :
Insert safety eyes now. If using 12mm eyes, place approximately 10 sts between centers; for 10mm place 8 sts between centers. Note row counts where eyes sit for reference when attaching spikes and horns later
Round 14 :
1 sc in each st (48)
Round 15 :
1 sc in each st (48)
Round 16 :
1 sc in each st (48)
Round 17 :
1 sc in each st (48)
Info :
Start light stuffing at round 16-17 to keep front snout shape firm; push stuffing toward the front to emphasize snout and cheeks while keeping crown softer
Round 18 :
(6 sc, 1 inc) x 6 (54)
Round 19 :
1 sc in each st (54)
Round 20 :
1 sc in each st (54)
Round 21 :
(7 sc, 1 inc) x 6 (60)
Round 22 :
1 sc in each st (60)
Info :
Begin shaping forehead back to neck. Add additional stuffing gradually; head should be firm but not rock-hard so you can shape neck later
Round 23 :
(8 sc, 1 inc) x 6 (66)
Round 24 :
1 sc in each st (66)
Round 25 :
(8 sc, 1 dec) x 6 (60)
Round 26 :
(7 sc, 1 dec) x 6 (54)
Info :
Work decreases evenly and continue stuffing to shape the back of the head and base for neck attachment; check eye spacing and facial symmetry
Round 27 :
(6 sc, 1 dec) x 6 (48)
Round 28 :
(5 sc, 1 dec) x 6 (42)
Round 29 :
(4 sc, 1 dec) x 6 (36)
Round 30 :
(3 sc, 1 dec) x 6 (30)
Info :
Leave a long tail for sewing to the body. Stuff head firmly now to retain shape; do not overstuff around eyes which can cause them to pop out of alignment
Round 31 :
(2 sc, 1 dec) x 6 (24)
Round 32 :
(1 sc, 1 dec) x 6 (18)
Round 34 :
Fasten off leaving long tail for sewing. Close small opening with yarn through front loops for neat finish (6)
Info :
Set head aside. You will reinforce neck seam by sewing through several rounds of head and body for stability. Keep position marks from final decrease for alignment
— Snout and Nostrils :
Round 1 :
6 sc in magic ring (6)
Round 3 :
(1 sc, 1 inc) x 6 (18)
Round 4 :
1 sc in each st (18)
Round 5 :
(2 sc, 1 inc) x 6 (24)
Round 6 :
1 sc in each st (24)
Round 7 :
1 sc in next 6 sts, FO leaving tail and sew flat onto front of head at rounds 13-16 centered between eyes to create pronounced snout (24)
Info :
Sew snout into place using mattress stitch around the base, then embroider two tiny nostril slits with pale grey yarn. Make sure snout sits flush and symmetric
— Cheeks (Make 2) :
Round 1 :
6 sc in magic ring with pink (6)
Round 3 :
1 sc in each st (12)
Round 4 :
FO leaving tail to sew. Attach slightly below and to the side of each eye (12)
Info :
Use pink yarn to embroider soft blush effect around the cheek circle with tiny running stitches or use a pastel blush powder if preferred
— Body :
Round 1 :
6 sc in magic ring (6)
Round 3 :
(1 sc, 1 inc) x 6 (18)
Round 4 :
(2 sc, 1 inc) x 6 (24)
Round 5 :
(3 sc, 1 inc) x 6 (30)
Round 6 :
(4 sc, 1 inc) x 6 (36)
Round 7 :
(5 sc, 1 inc) x 6 (42)
Round 8-12 :
1 sc in each st (42)
Info :
Work these rounds firmly for belly structure. If attaching heart appliques, plan their placement now and mark center point on round 10-12
Round 13 :
1 sc in each st (42)
Round 14 :
1 sc in each st (42)
Round 15 :
1 sc in each st (42)
Info :
Begin stuffing body from bottom after round 12 so that base is firm. Add stuffing gradually as you work upward to maintain a round, even shape
Round 16 :
(5 sc, 1 dec) x 6 (36)
Round 17 :
1 sc in each st (36)
Round 18 :
(4 sc, 1 dec) x 6 (30)
Round 19 :
1 sc in each st (30)
Info :
If you plan to position the head slightly forward, shape the top of the body now by tightening stuffing near the neck area; leave opening wide enough to sew head on neatly
Round 20 :
(3 sc, 1 dec) x 6 (24)
Round 21 :
(2 sc, 1 dec) x 6 (18)
Round 22 :
(1 sc, 1 dec) x 6 (12)
Info :
Fasten off leaving long tail for sewing head. Stuff body firmly and shape bottom so the dragon sits flat; reinforce base by sewing a few stitches through center if needed
— Arms (Make 2 identical) :
Round 1 :
6 sc in magic ring (6)
Round 3 :
(1 sc, 1 inc) x 6 (18)
Round 4 :
1 sc in each st (18)
Info :
This small rounded start forms the hand. Stuff the hand area firmly so fingers will show when you add tip shaping
Round 5 :
(2 sc, 1 inc) x 6 (24)
Round 6-8 :
1 sc in each st (24)
Round 9 :
Change to pink for fingertip (Info : Change to pink yarn. Carry unused white inside if you want no join line)
Round 9 :
1 sc in each st (24)
Round 10 :
(3 sc, 1 dec) x 6 (18)
Round 11 :
1 sc in each st (18)
Info :
Stuff hand tip firmly and continue stuffing down into arm as you work. Leave arm slightly understuffed for natural flop when attached to body
Round 12 :
1 sc in each st (18)
Round 13 :
(4 sc, 1 inc) x 3 (since 18 total) -> (4 sc, 1 inc) x 3 = 21 sts (21)
Round 14-18 :
1 sc in each st (21)
Round 19 :
(4 sc, 1 dec) x 3 (21 -> 18)
Round 20 :
1 sc in each st (18)
Info :
Fasten off leaving long tail for sewing. Make sure arm is lightly stuffed; shape by pinching a little at wrist to create subtle elbow curve
— Legs (Make 2 identical) :
Round 1 :
6 sc in magic ring (6)
Round 3 :
(1 sc, 1 inc) x 6 (18)
Round 4 :
(2 sc, 1 inc) x 6 (24)
Round 5 :
(3 sc, 1 inc) x 6 (30)
Round 6-8 :
1 sc in each st (30)
Info :
These rounds form the foot. Stuff firmly to form a rounded toe area. Mark center front for toe claw placement later
Round 9 :
(3 sc, 1 dec) x 6 (24)
Round 10 :
1 sc in each st (24)
Round 11 :
Change to pink for toes (Info : Switch to pink yarn now and carry white inside or fasten off and join pink. Pink toes will be crocheted as small bumps)
Round 11 :
1 sc in each st (24)
Round 12 :
(3 sc, 1 dec) x 6 (18)
Round 13 :
1 sc in each st (18)
Round 14 :
Make 3 small toe bumps across front: slip to front center, ch1, 3 sc in same st, sl st into next appropriate st to form small curl, repeat for 3 toes. (Info : Alternatively, embroider three little toes using looped stitches)
Round 15 :
Change to white and continue up leg: 1 sc in each st (18)
Round 16-20 :
1 sc in each st (18)
Round 21 :
(2 sc, 1 inc) x 6 (24)
Round 22 :
1 sc in each st (24)
Info :
Stuff legs firmly for stability. Fasten off leaving long tail for sewing. Sew legs to bottom of body at marked positions spread evenly for a sitting pose
— Big Horns (Make 2) :
Round 1 :
6 sc in magic ring (6)
Round 3 :
(1 sc, 1 inc) x 6 (18)
Round 4 :
1 sc in each st (18)
Round 5 :
(2 sc, 1 inc) x 6 (24)
Round 6 :
1 sc in each st (24)
Round 7 :
(3 sc, 1 inc) x 6 (30)
Round 8 :
1 sc in each st (30)
Round 9 :
(3 sc, 1 dec) x 6 (24)
Round 10 :
(2 sc, 1 dec) x 6 (18)
Round 11 :
(1 sc, 1 dec) x 6 (12)
Info :
Stuff lightly, leave bottom opening to sew to head. To create ridged horn effect, you can instead work several rounds in BLO every second round before decreasing so the horn shows ridges
Round 13 :
Fasten off leaving tail for sewing. Sew horns to head top sides at rounds 6-8 measuring back from snout approximately 13-16 stitches from center
— Central Small Horn (Snout Top) :
Round 1 :
4 sc in magic ring (4)
Round 3 :
1 sc in each st (8)
Round 4 :
(1 sc, 1 dec) x 2 (6)
Round 5 :
Fasten off leaving tail. Sew small horn centered above snout between eyes using several passes to secure
Info :
Sew horns so they tilt slightly forward for a playful look. Use pins to test placement before stitching
— Spikes / Back Scales (Make 7 alternating sizes) :
Spike Small - Round 1 :
6 sc in magic ring (6)
Spike Small - Round 2 :
6 inc (12)
Spike Small - Round 3 :
1 sc in each st (12)
Spike Small - Round 4 :
1 sc in next 6 sts then FO to create a tapered point (12)
Spike Medium - Round 1 :
6 sc in magic ring (6)
Spike Medium - Round 2 :
6 inc (12)
Spike Medium - Round 3 :
(1 sc, 1 inc) x 6 (18)
Spike Medium - Round 4 :
1 sc in each st (18)
Spike Medium - Round 5 :
FO leaving tail for sewing. Slightly flatten base when sewing to body to create rowed spikes
Info :
Make a sequence of spikes: small, medium, large, medium, small, medium, small to follow the reference photo down the back. Use pink for the tallest center spikes and alternate white for smaller ones
— Wings (Make 2) :
Inner Panel (pink) - Round 1 :
6 sc in magic ring (6)
Inner Panel - Round 2 :
6 inc (12)
Inner Panel - Round 3 :
(1 sc, 1 inc) x 6 (18)
Inner Panel - Round 4 :
(2 sc, 1 inc) x 6 (24)
Inner Panel - Round 5 :
(3 sc, 1 inc) x 6 (30)
Inner Panel - Round 6-8 :
1 sc in each st (30)
Info :
These rounds form a slightly elongated semicircular inner wing. Work flat rows in continuous rounds to keep smooth curve
Outer Border (white) - Round 1 :
Join white to edge of pink panel and sc evenly around (approx. 30-34 sc depending on tension) (34)
Outer Border - Round 2 :
Work 1 sc BLO around to create a raised ridge on the outer edge for definition (34)
Outer Border - Round 3 :
Fasten off leaving tail for sewing. Use this tail to sew the wing to the body at the upper back on either side of the spike row
Info :
Sew wings so the inner pink panel faces forward when the dragon is seated. Add a few stitches attaching the lower wing edge into the body seam for stability
— Tail :
Round 1 :
6 sc in magic ring (6)
Round 3 :
(1 sc, 1 inc) x 6 (18)
Round 4-6 :
1 sc in each st (18)
Round 7 :
(2 sc, 1 dec) x 6 (12)
Round 8-10 :
1 sc in each st (12)
Round 11 :
(1 sc, 1 dec) x 4 (8)
Round 12 :
Fasten off leaving tail for sewing. Stuff lightly and sew along lower back center at round 14-18 so tail curves slightly outward
Info :
Add one or two small pink spikes along the tail base stitched in a staggered pattern to mimic photo shape
— Heart Applique (Large) :
Round 1 :
Ch 5, join with sl st to form ring, (or mr method), sc 5 in ring (5)
Round 2 :
(sc, inc) around to shape wide base (8-10 approx). Example: (1 sc, 1 inc) x 5 (10)
Round 3 :
Work increases and short rows to form two lobes: sc across 4 sts, in next st make (sc, hdc, dc) to make lobe peak, continue across, repeat mirrored lobe. (Info : Use photos as guide — shape heart so top lobes are round and lower joins taper to a point)
Round 4 :
Fasten off leaving long tail for sewing. Block or pin into heart shape then sew to body center on rounds 10-12
Info :
Make smaller hearts using same technique but fewer increases. Arrange three hearts on belly: one large centered and two smaller ones staggered below, matching photographed layout
— Small Heart (Make 3 variations) :
Round 1 :
6 sc in magic ring (6)
Round 3 :
1 sc in next 6 sts then shape into heart point with tiny decreases and FO leaving tail for sewing (12)
Info :
Sew hearts to belly using ladder stitch and use a dab of fabric glue if you want extra security for gifts that will be handled a lot
— Wing Ridge / Vein (Optional Decorative Piping) :
Round 1 :
With white yarn, ch about 18, sl st along inner edge of wing to create piping, FO and sew ends in (18)
Info :
This creates the raised white rib shown in the photo; follow the curve and tack every few stitches to prevent flaring
— Assembly Preparation :
Info :
Pin head to body aligning neck openings: match head base rounds around opening (head rounds 29-32 correspond to body top rounds 20-23). Use pins to adjust tilt so snout leans slightly forward
Info :
Sew limbs: arms attach at body rounds ~12-14 on each side; legs attach at base of body centered left/right around rounds 1-4 of base. Reinforce with 3-6 passes of yarn for durability
Info :
Sew horns and spikes: align the large horns on either side of head (head rounds 6-8). Center small horn above snout (head rounds 13-14). Sew back spikes down the center back from head crown to tail base using base of spikes and flattening slightly for proper shape
Info :
Attach wings along sides of spike row on rounds 10-14 so they sit naturally; tack lower wing point to body so wings don't flop too widely
Info :
Weave in all ends, apply final stuffing adjustments, and sew on heart appliques and cheek circles as shown in the reference photo for the sweetest finished look
Info :
Optional: add a few mattress stitch passes through head and body to make the neck sturdy. Use a backstitch and knot securely, hiding ends inside the body
This adorable love dragon brings together classic amigurumi construction with sweet, modern details — textured horns, pink-lined wings, and heart appliques that make it truly special. Each carefully stitched section builds into a cuddly companion full of personality and charm. I hope you enjoy every stitch of bringing this little dragon to life. 🧶💕 Share your finished creation and spread the handmade love! ✨