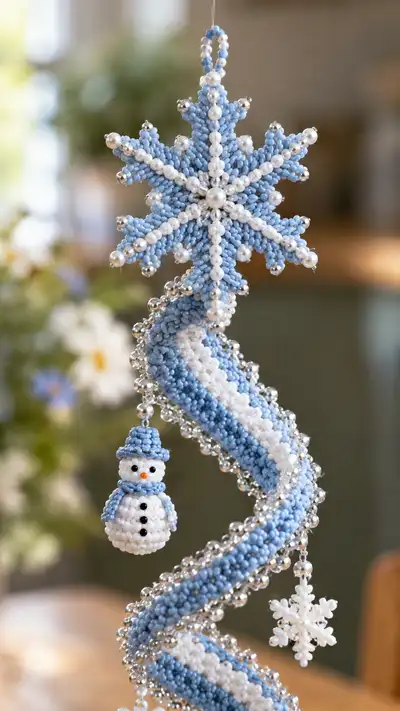
An elegant, spiraling beaded hanging garland in soft blue and white with silver accents. This project features a textured tubular spiral, a beaded snowflake topper, tiny beaded snowmen and gift charms, and pearly bead edging. Perfect for seasonal decor, a mantel or window hanging — detailed, decorative and made with seed beads for a polished, sparkly finish.
Progress Tracker
0% Complete
— Materials & Prep :
Info :
Before beginning, string all beads needed for the spiral edging and charms onto the blue and white yarn where indicated. Use a small beading needle or fine threader. Organize beads in small labeled containers for quick access. Test tension with a 10 cm swatch and a handful of beads to make sure beads sit snugly but not crushed.
Info :
Decide finished length. Pattern as written creates a 55–65 cm hanging spiral (including topper and bottom beads). To lengthen or shorten, add or remove even rounds from the Spiral Tube section (maintain same stitch count per round).
— Snowflake Topper :
Round 1 :
Make a magic ring, 6 sc in MR (6)
Round 3 :
(1 sc, inc) x6 (18)
Round 4 :
(2 sc, inc) x6 (24)
Info :
Change to white pearl seed beads for central highlights now. You will be working in flat rounds—lay the piece flat as you form arms. Use slip stitch joins at each round end as needed to keep flat shape.
Round 5 :
1 sc in each st (24)
Round 6 :
(3 sc, inc) x6 (30)
Round 7 :
1 sc in each st (30)
Info :
Create eight arms by working spokes: you will form small triangular points in next rounds. Use stitch markers for the start of each arm placed every 3–4 stitches to guide shaping.
Round 8 :
*Ch3, sl st in 2nd ch from hook to form small picot base, 4 sc into next 3 sts, picot, sl st into base; rep from * 8 times to form 8 tiny points. Work remaining stitches as sc to maintain shape (total stitches remain approx 30 but points extend)
Round 9 :
Work 1 sc in all visible stitches around adding a pearl bead on the point tip every other arm: before completing a point, slide a pearl bead up the yarn and slip it into position, then finish the picot (approx 30 sts)
Round 10 :
Using white larger pearl bead, sew a center bead through three central stitches, then reinforce with a small knot on the WS. Fasten off leaving long tail for sewing to spiral top.
Info :
Block flat the snowflake by pinning onto foam and misting lightly. The snowflake should measure ~7–9 cm across when finished. Reinforce bead loop at top center with a small extra stitch and a sturdy length of monofilament for hanging.
— Spiral Tube (Main Body) :
Info :
This tubular spiral is worked in continuous rounds (no joining) to create a long tube that will be shaped onto a spiral. We use a 48-st circumference to produce a width similar to the photo (~2.2–2.8 cm). If you want a thicker spiral, increase circumference in multiples of 6.
Round 1 :
Make a magic ring, 6 sc in MR (6)
Round 3 :
(1 sc, inc) x6 (18)
Round 4 :
(2 sc, inc) x6 (24)
Round 5 :
(3 sc, inc) x6 (30)
Round 6 :
(4 sc, inc) x6 (36)
Round 7 :
(5 sc, inc) x6 (42)
Round 8 :
(6 sc, inc) x6 (48)
Info :
At this point the tube measures its circumference. We will work long even rounds to lengthen the tube. String beads for the silver edging on a separate length of thread if you will crochet edging later, or pre-string the small silver beads on the main yarn if you'd like bead-in-stitch placement.
Round 9-16 :
1 sc in each st (48)
Info :
Begin color stripe insertion: to create the central white stripe seen in the photo, change to white yarn at the first stitch of Round 17. Carry blue yarn up the inside of the tube, catching it into interior loops every 8–10 rounds to secure and hide tails.
Round 17-32 :
Working in white yarn for the central stripe: 1 sc in each st (48)
Round 33-48 :
Change back to blue yarn. 1 sc in each st (48)
Info :
Alternate blocks to create long bands: pattern pictured uses a sequence of approx 16 white rounds then 16 blue rounds repeated three times. For strong striping, carry colors inside tube and weave ends in as you go; for crisp edge at center stripe, slip stitch color changes invisibly on WS.
Round 49-96 :
Repeat rounds 17-48 twice more to reach desired length. Maintain 48 sts per round (48)
Info :
If adding internal wire, push a length of 20–22 gauge wire into the tube now before finishing the final rounds. Shape wire gently into a spiral using a large dowel to match the desired twist. Leave 5–6 cm extra at both ends for secure anchoring into topper and bottom bead caps.
Round 97-112 :
Continue even rounds in color sequence to extend spiral further if you want a longer hanging; keep 48 sts (48)
Info :
Edge shaping: after tube is full length, we'll add the silver-bead scalloped edging. If beads were not pre-strung on the body yarn, string a sequence of small silver beads on a separate thin thread to whip them into place on the exterior edge.
Round 113 :
Switch to a contrast yarn or same blue yarn held with fine beading thread. 1 sc in each st BLO (48) — this creates a slightly ridged edge where beads will be attached.
Round 114 :
Attach silver beads: *sl st to next st, ch2, slide one small silver bead down yarn and position over ch2, sl st to secure on top of bead, sl st into next st; rep from * around (48 bead placements). Fasten off and weave tails into interior.
Info :
For a tighter beaded picot, work (ch2, sl st back into base, slide bead, sl st) to set bead flush to edge. If using larger pearl beads at intervals (as in the photo), add a larger pearl every 8–10 bead placements by sewing them onto the exposed edge with a needle and strong thread.
— Snowman Ornament (Make 3) :
Info :
Each snowman is a small beaded amigurumi using white beads strung on white yarn. The pattern builds a tiny two-sphere body with a tiny hat and scarf. Work tightly so beads hold spherical shape.
Head Round 1 :
Using white yarn with pre-strung white seed beads for body and small black beads for eyes, make mr, 6 sc in MR (6)
Round 3 :
(1 sc, inc) x6 (18)
Round 4 :
(2 sc, inc) x6 (24)
Info :
Place two black seed beads for eyes between rounds 3 and 4 approximately 6 stitches apart: before completing the stitch at the eye placement, slide a black bead onto the yarn and trap it in the stitch, then continue crocheting. Secure bead with a small stitch on the inside when finished.
Round 5 :
1 sc in each st (24)
Round 6 :
(3 sc, dec) x6 (18)
Round 7 :
(2 sc, dec) x6 (12)
Round 8 :
Start stuffing head lightly with tiny amounts of polyfill. 1 sc in each st (12)
Round 9 :
(1 sc, dec) x4, 1 sc, dec (8)
Round 10 :
6 dec (3) — close and fasten off leaving tail for sewing to body
Info :
We leave a small opening to seam the head to the body later. Stuff firmly but not overpacked so the charm remains lightweight.
Body Round 1 :
Make mr, 6 sc in MR (6)
Round 3 :
(1 sc, inc) x6 (18)
Round 4 :
(2 sc, inc) x6 (24)
Round 5 :
(3 sc, inc) x6 (30)
Round 6-8 :
1 sc in each st (30)
Info :
Sew three small black beads onto the front center of the body as buttons between rounds 6 and 8 spaced 2–3 stitches apart. Use a needle to place them securely and tie inner knot.
Round 9 :
(3 sc, dec) x6 (24)
Round 10 :
(2 sc, dec) x6 (18)
Round 11 :
Start stuffing body firmly. (1 sc, dec) x6 (12)
Round 12 :
6 dec (6) — do not fully close; leave opening to attach head
Info :
Sew head to body by stitching opening of head around top of body opening, closing both openings together. Reinforce with several passes to ensure secure seam for hanging. Fasten off and weave tail in.
Hat Round 1 :
With blue yarn, mr, 6 sc in MR (6)
Round 3-4 :
1 sc in each st (12)
Round 5 :
BLO: 1 sc in each st (12) — turn brim up and sew to top of head. Fasten off.
Scarf Round 1 :
With blue yarn, ch8, sl st back along chain to make a narrow band. Wrap around neck and tack in place with a few stitches. Add small picot fringe at ends (ch3, sl st) to mimic pictured scarf.
Info :
Make three identical snowmen. Keep them lightweight by using minimal stuffing and small bead size. Attach small loop of monofilament on the hat top to hang them from bead chain on the spiral.
— Present Ornament (Make 2) :
Info :
Small cube-style gift made with two small rounds flattened into a box shape. Work as a rectangular prism by increasing to a small circumference then working short even rounds and closing ends.
Round 1 :
With blue yarn, mr, 6 sc in MR (6)
Round 3 :
(1 sc, inc) x6 (18)
Round 4-6 :
1 sc in each st (18)
Info :
At Round 7 switch to white yarn for the 'ribbon'. Work 2 rounds white then 2 rounds blue. You will fold seams and whipstitch edges to create a small cubic look.
Round 7-8 :
Change to white: 1 sc in each st (18)
Round 9 :
Change back to blue: 1 sc in each st (18)
Info :
Stuff lightly and close top with decreases mirroring increases: (1 sc, dec) x6 then dec to close and fasten. Add a tiny whipstitched bow on top with white yarn and a small picot for bow loops.
Round 10 :
(1 sc, dec) x6 (12)
Round 11 :
6 dec (6) — close, fasten off leaving tail for sewing
Info :
Make two presents. Attach a small white loop and hang them on bead chain spaced along spiral like in photo.
— Small Snowflake Charms (Make 2) :
Round 1 :
Using white yarn, mr, 6 sc in MR (6)
Round 3 :
Work 6 spokes: *ch4, sl st into base to form a picot spoke; rep from * six times, finishing with sc to secure around (12)
Round 4 :
Add small pearl bead at each spoke tip by sliding bead up yarn and completing picot; fasten off and weave tails.
Info :
These tiny snowflakes are lightweight and should measure about 2.5–3 cm across. Attach with short monofilament strands to the spiral interior so they dangle visibly from underside.
— Beaded Silver Scallop Edge (Detail) :
Round 1 :
With silver beading thread and a small beading needle, pick up 3–4 small silver beads, sl st to the outer edge of the tube at a base stitch to anchor the bead group, then sl st 2 stitches forward and repeat. Work continuous around both outer longitudinal edges (one edge at a time) forming a scalloped beaded fringe.
Round 2 :
At every 8th scallop, add a larger pearl bead by sewing it on with an extra securing stitch. Fasten off and weave tails.
Info :
If you pre-strung beads on the yarn, insert each bead into a sl st while crocheting Round 114–116. For sewn-on beads, take care to keep stitches small and knots secure to prevent beads from detaching when hung.
— Hanging Loop & Bottom Bead Weights :
Loop :
Create a hanging loop by chaining 20 with white yarn (or desired length), slip stitch back to the start to form a flat loop. Reinforce by working 2 rounds of sc into the loop chain and sewing the ends securely through the snowflake topper center.
Bottom Weights :
Attach two silver teardrop bead caps or larger ornamental beads at the bottom end of the spiral to pull the spiral straight. Use a short beaded chain (6–10 small silver beads, a large bead, jump ring) sewn through the last 2 closed stitches of the tube to hang the weight. Fasten off tails and weave in thoroughly.
Info :
Ensure bottom weights are securely attached—add a dab of fabric glue to reinforce the knot, tuck it into the base and hide under beads. Test hang before final trimming of yarn tails.
— Assembly & Hanging Instructions :
Info :
Before final assembly, block and press the snowflake and small flat pieces with gentle steam. Do not press beads directly; use pins to shape and cool fully. Position charms along spiral using measuring tape so they are distributed evenly and symmetrical as pictured.
Step 1 :
Sew snowflake to top of spiral tube by anchoring the snowflake center to the first 6 rounds of the tube. Use sturdy yarn/thread and make 6–8 passes through both layers to secure, then hide tails inside the tube.
Step 2 :
Attach snowmen and presents onto beaded strands: use small jump rings or tie monofilament loops to charm tops, then pass through bead chain holes and secure with knots hidden inside a neighboring bead. Space charms at approx 6–8 cm between each other.
Step 3 :
Sew the scalloped beaded edge around the spiral exterior. If you used pre-strung beads into the crocheted edge, secure loose thread ends to the interior and weave them at least 6 cm back into tube then trim.
Info :
Test hang the whole garland from a hook or dowel. Adjust charm positions if the spiral leans or twists irregularly. If the spiral is too loose, add a thin wire inside and wrap with tape before placing back inside tube for additional rigidity.
Step 4 :
Add a suspended loop appropriate to where you will hang it (ceiling, mantel hook, or window). Ensure top loop is strong—stitch through 10+ internal rounds and bind with extra thread or wire.
Info :
Final trimming: weave all ends into the interior of the tube so they cannot be seen. Optionally, add a small tag with year or maker's initials sewn into the inside near the top.
Creating this beaded spiral garland is a soothing labor of love that results in a refined seasonal accent for your home. Each embroidered bead and tiny charm builds toward a delicate, sparkly final piece that catches light and draws the eye. Enjoy the tactile, repetitive rhythm of beading and crochet—then hang your finished garland where it will bring joy. 🧶❄️✨