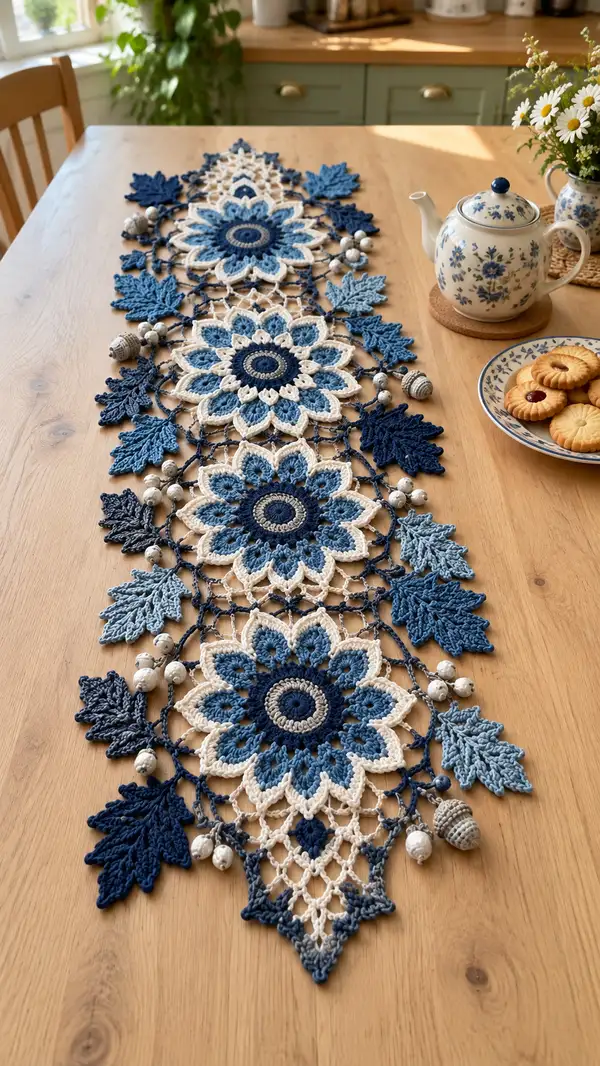
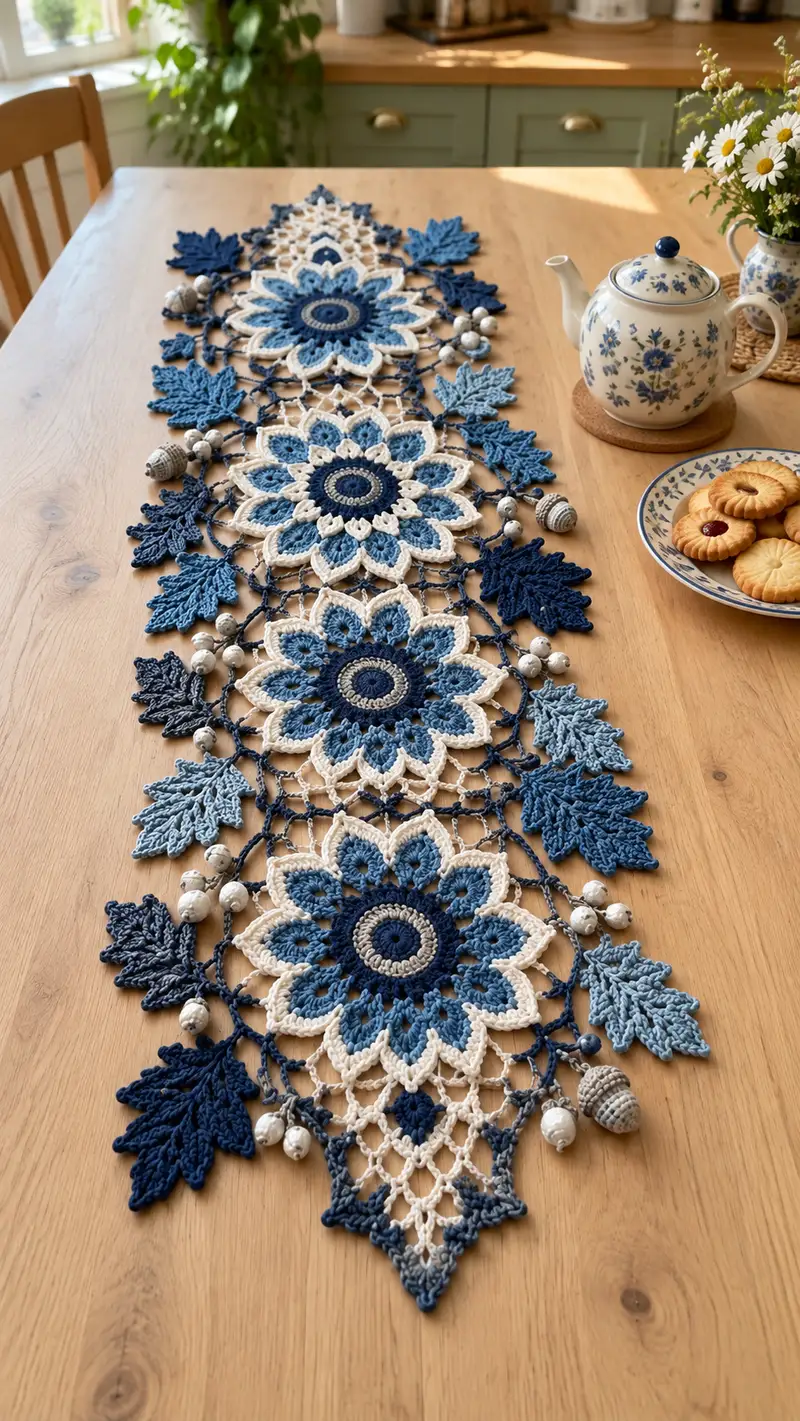
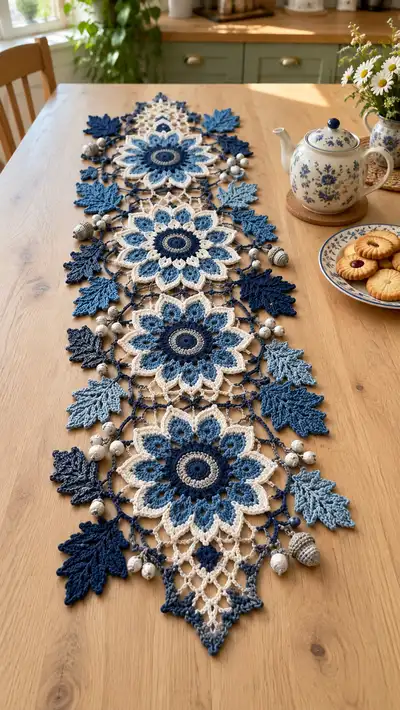
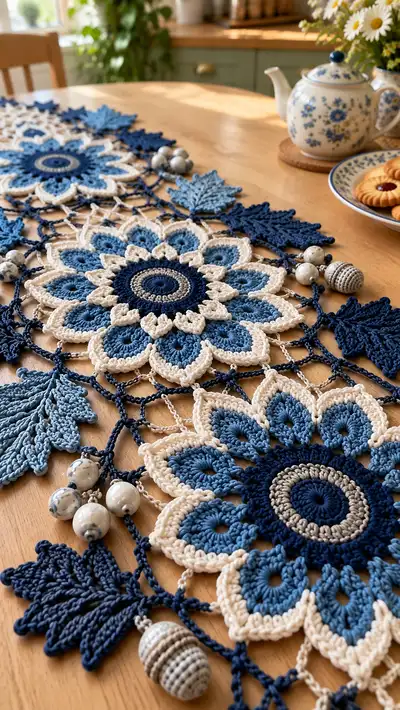
Create a stunning blue floral table runner with layered crochet motifs, delicate lace joins, and decorative beaded tassels. This pattern features three large floral medallions joined by an openwork mesh, accented with layered leaves in three shades of blue and cream edging. The finished piece is ideal for a dining table centerpiece or decorative dresser runner. Detailed round-by-round instructions, color change notes, and assembly tips make this a satisfying advanced crochet project.
Progress Tracker
0% Complete
— Notes :
Info :
This pattern is modular: make three large floral medallions, a central elongated diamond medallion, and join using an openwork mesh. All motifs are worked flat in the round unless specified. Work tightly to avoid holes showing through cotton yarn. I recommend blocking each completed motif before joining to ensure accurate, flat edges.
— Main Flower Medallion (make 3 identical) :
Round 1 :
With Navy, make magic ring, ch 1, 10 sc into ring; tighten ring and join with sl st to first sc (10)
Round 2 :
Ch 2 (counts as hdc), hdc in same st, 2 hdc in each st around, join with sl st to top of ch 2 (20)
Round 3 :
Ch 2, (hdc in next st, 2 hdc in next st) x10, join (30)
Round 4 :
Ch 2, (hdc in next 2 sts, 2 hdc in next st) x10, join (40)
Info :
These first rounds set a firm flat disc. Maintain even tension and use stitch marker at start of round. If the disc cups, go up a hook size; if it ruffles, go down a hook size.
Round 5 :
Ch 1, sc in each st around, join (40)
Round 6 :
Change to Natural Grey. Ch 2, (hdc in next 3 sts, 2 hdc in next st) x8, join (48)
Info :
Change to grey to create a narrow ring that frames the navy center. Carry unused navy loosely along the back if preferred, or fasten off and weave in later.
Round 7 :
With Grey, ch 1, sc in next st, *ch 3, sk 1 st, sc in next st* around to create chain loops; join with sl st to first sc (24 ch-3 loops)
Round 8 :
Change to Sky Blue. Work into each ch-3 loop: (sc, ch 1, 7-dc shell, ch 1, sc) in each loop; join (24 shells)
Info :
For the 7-dc shell, work 7 dc into the chain space. Keep shells slightly loose so subsequent rounds with puff stitches tuck nicely into the shell ledge.
Round 9 :
Ch 2, *in next shell work (fpdc, dc, tr, dc, fpdc) across the shell to create a raised petal texture; sl st to next shell top* repeat around (24 raised petals)
Round 10 :
Change to Denim Blue. Ch 1, sc across the top of each raised petal: (sc, ch 4, sc) in center top of petal, creating 24 ch-4 arches; join (24)
Info :
These ch-4 arches will form the base for the layered puff petals. Place a marker every 6 arches to keep count as you proceed into more textured rounds.
Round 11 :
With Denim Blue, into each ch-4 arch: *(ch 1, sc, ch 1, puff stitch x5 across arch, ch 1, sc) in arch* - work 5 puff stitches evenly spaced in the arch; join (24 petals composed of 5 small puff clusters)
Round 12 :
Ch 2, working behind the puff petals: 1 dc around the base of each puff cluster across (120 dc) - this creates an underlayer stabilizer; join
Info :
Puff stitch: yarn over, insert hook, yarn over and pull up loop (3 loops), repeat twice more in same space so there are 7 loops on hook, yarn over and pull through all loops, ch 1 to close. Keep puff height consistent by using same number of yarn overs and pull-through technique.
Round 13 :
Change to Cream. Ch 1, sc in each st around working around both the bases of puffs and the dc under layer (120 sc)
Round 14 :
With Cream, *ch 3, sk 3 sc, sl st in next sc* around to create openwork arches between petals; join (approx 30 arches depending on spacing)
Round 15 :
Change to Sky Blue. Into each ch-3 arch: (sc, ch 2, 5 dc cluster, ch 2, sc) to form larger outer petals; join (approx 24 outer petals)
Info :
The 5 dc cluster is worked as follows: 5 dc worked into the same stitch or space, leaving the last loop of each dc on hook, then yarn over and pull through all loops to close as a cluster; chain 1 after the cluster to secure if desired.
Round 16 :
Ch 1, sc around petals at base to secure cluster shells, placing 2 sc between outer petal peaks (approx 120 sc)
Round 17 :
Change to Cream. Work 1 sc in next 2 sc, ch 5, sk 4 sc, 1 sc in next sc; rep around to create a tall decorative loop network linking petals (approx 24 ch-5 loops)
Round 18 :
With Cream, into each ch-5 loop: (sc, ch 2, picot, ch 2, sc) to form scalloped points; join (24 scallops)
Info :
Picot option: ch 3, sl st in 3rd ch from hook for a tiny raised point; or ch 2 picot for smaller point. Keep consistent throughout for even edging.
Round 19 :
Change to Navy. Working behind the scalloped points, make 1 sc between scallops and 3 sc at each scallop peak to create a firm outer border (approx 144 sc)
Round 20 :
With Navy, Ch 1, 1 sc in each st BLO to create a fine ridge and give the motif a defined outer line (144)
Round 21 :
Change to Cream. In each pair of outer petals (work across two petals): *ch 6, sl st into base between those petals* to form connecting arches for future mesh join; repeat around to form 12 ch-6 arches; join
Round 22 :
With Cream, into each ch-6 arch work: sc, ch 4, sc to reinforce the arch (12 reinforced arches)
Info :
At this stage the medallion diameter should measure roughly 20-22 cm (8-8.5 inches) depending on your tension. Block flat, pinning out petals and arches to achieve even circular shape. Repeat to make a total of 3 medallions.
Round 23 :
Change to Denim Blue. Around the base of each reinforced arch, work (sc, ch 3, sc) into the base stitch, creating small loops for later leaf attachment (24 small loops)
Round 24 :
With Denim Blue, sl st around the final border to tidy joins and weave in ends; fasten off and weave tails into the back of the motif
Info :
Make three identical medallions and one elongated diamond medallion for the center (the elongated medallion uses a similar sequence but increases fewer shells per side and finishes with pointed tips; see the 'Diamond Medallion' section below).
— Diamond Center Medallion (make 1) :
Round 1 :
With Navy, ch 6 and join to form ring; ch 2 (counts as hdc), work 14 hdc into ring; join (15)
Round 2 :
Ch 2, hdc in same st, (hdc in next 2 sts, 2 hdc in next st) x4, hdc in last st; Join (20)
Round 3 :
Change to Sky Blue. Work 1 sc in each st around (20)
Round 4 :
Working lengthwise to create diamonds: ch 3, *sk 1, 5 dc shell in next st, ch 3, sl st in shell top* working symmetric shells on two opposing sides to build diamond points; create three shells per side; join
Round 5 :
Change to Cream and work open lace between shells: around, ch 6, sl st to next shell base to form archwork (12 arches)
Info :
The diamond medallion is constructed to match width with the circular medallions so when joined in sequence the runner is balanced. Block to a triangular/diamond shape, pinning shells to points.
Round 6 :
Work short rows of sc and shell repeats on corners to sharpen points until diamond measures same width as circular medallion's widest point (measure and adjust; typically 6-8 small increases per point)
Round 7 :
Finish with a row of sc around entire diamond and prepare ch-6 reinforced arches at the joining edges as done on circular medallion; fasten off
— Leaves (make 12-16 assorted; three shades) :
Round 1 :
With Denim Blue (or chosen leaf color), ch 6, sc in 2nd ch from hook, hdc in next, dc in next, tr in next, then work same stitches back along opposite side: dc, hdc, sc, sl st to join to first sc; fasten off on center leaf (7 stitches along each side)
Round 2 :
Rejoin yarn at leaf base, ch 1, sc evenly around leaf edge working 2 sc at tip and 1 sc along sides to produce a smooth outline (approx 24 sc)
Round 3 :
Ch 3, *fpdc around next stitch, ch 1; rep across center vein area to create raised center rib* (approx 8 fpdc), sl st; fasten off leaving tail for sewing
Info :
Leaves are worked flat and slightly cupped. Make several in Navy, Denim and Sky Blue. Leave long tails for sewing and block leaves with slight curve by pinning to foam block and misting lightly.
Round 4 :
Optional: With contrasting yarn, embroider small veins using straight stitches from leaf center to edge; add light blocking to set shape
Round 5 :
Optional: Add a picot tip at the leaf point (ch 3, sl st into base of ch-3) for decorative detail
— Mesh Join and Runner Body :
Info :
Arrange motifs in sequence: circular medallion, diamond medallion, circular medallion, circular medallion (or as in photos: circle - circle - circle with diamond center). Use blocking pins to align ch-6 reinforced arches so they match between adjacent motifs. The mesh will be made in rows of chain arches and joined at motif loops.
Round 1 :
With Cream, at one motif's reinforced arch, attach yarn, ch 1, sc in base, ch 7, sc into corresponding arch on second motif; repeat to join two adjacent arches to create a connecting chain arch—this forms the primary join row; continue across all adjacent arch points to link medallions (approx 12 joins per side)
Round 2 :
Turn and work back along chain arches: slip into chain space, ch 6, picot (ch 3, sl st into 3rd ch), sl st into center of arch beneath; repeat across the row connecting to the opposite motif arch to create a diamond network of chain loops (this creates the visual lattice)
Info :
Keep tension relaxed on chain arches so the mesh lies flat; if the mesh pulls heavy, lengthen chain spaces by 1-2 chains. Use blocking pins to arrange the mesh into symmetric diamond shapes before securing permanently by slip stitching at intersections.
Round 3 :
Work a network of 3-chain spaces between adjacent motif joins: in each chain arch from previous round: *(sc, ch 3, sc) into arch center; ch 4 bridge to next arch and sl st into bridge to anchor*; repeat across all arches to create a net-like lattice; fasten off
Round 4 :
With Navy, reinforce intersections by working a small star: attach yarn at intersection, ch 1, (sc, ch 3) x 4 around intersection, join with sl st; repeat at every intersection for added strength (approx 20-30 stars depending on runner length)
Info :
This reinforced star stops the mesh from stretching over time and provides small anchor points where leaves and beads will be attached. Pin the runner laid flat and check symmetry before sewing leaves and beads.
— Leaf Attachment and Decorative Placement :
Round 1 :
Position leaves around each medallion where small loop markers were placed in Round 23 of the medallion. Using yarn needle and matching yarn, sew each leaf by the base into the small loop anchor with 6-8 tiny stitches. Allow leaves to lift slightly outward from the mesh (do not sew flat).
Round 2 :
Alternate leaf colors around the medallion: for each medallion attach 2 Navy, 3 Denim, 3 Sky Blue leaves in a balanced arrangement. Leave some spaces open for beads.
Info :
Use pins to preview the placement and step back to check balance across the runner. If you prefer a denser look, add 1-2 more leaves per medallion. Sew leaves with long tails and weave securely on the back of the mesh.
— Beaded Tassels and Accents :
Round 1 :
To make a beaded tassel strand: with Navy, ch 20, thread beads onto strand using a beading needle or by threading a slipknot loop through bead hole; knot the yarn below last bead to hold. Attach strand through mesh intersection using a tight knot and secure with a few sc stitches in Navy into the mesh intersection to hold bead placement.
Round 2 :
Make a variety of tassels: short (ch 12) with 3 small beads, medium (ch 18) with 4 beads, and long (ch 24) with a large bead at the end. Mix bead finishes: matte white, marbled ceramic, pewter for a coastal look.
Info :
Bead weight can pull the runner; space heavier tassels evenly along runner edges so the fabric hangs without distortion. Consider sewing a small felt patch hidden behind a heavy bead to distribute weight across more stitches.
— Outer Edge Points and Finishing :
Round 1 :
With Cream, work a uniform scalloped outer edge around entire runner: attach at an outermost mesh joint, ch 1, *sc in next 2 sts, 5 dc in next st, sc in next 2 sts, sl st* repeat along outline of mesh and medallion edges to create scalloped petals; join and fasten off
Round 2 :
With Navy, work a final ridge: join yarn and make 1 sc in each sc around working in BLO to give a raised border line (total stitch count will vary; maintain one sc per underlying sc)
Info :
Weave in all ends neatly on the back. Trim tails close to fabric. Steam block gently or wet-block and pin to final shape, ensuring petals and leaves are nicely fanned and the mesh diamonds lay flat. Allow to dry fully before use.
— Finishing Touches :
Round 1 :
If desired, lightly starch or use fabric stiffener on outer petals for longevity; avoid on bead areas if beads are sensitive. Attach a few additional beads to the central medallion inner ring for sparkle (use small beads sewn gradually to avoid puckering).
Round 2 :
Store the runner flat or gently rolled to preserve shape. Avoid folding, which may create creases in cotton yarn and distort blocking shape.
Info :
With careful blocking and even join tension, your finished runner will lie flat and look professionally made. If you prefer a longer runner, add additional diamond medallions or repeat a medallion sequence; follow the mesh join instructions to extend length symmetrically.
This beautiful floral table runner brings handcrafted charm and a calming blue palette to any table. Each medallion and leaf is made with care, then joined into a delicate lace of chains and picots that dances across the wood. The beaded tassels add a bespoke finish that catches the light and catches the eye. 🧶 Lay it on your dining table, dresser, or a sideboard for an instant vintage-modern accent. Enjoy every stitch, and celebrate your finished centerpiece! ✨