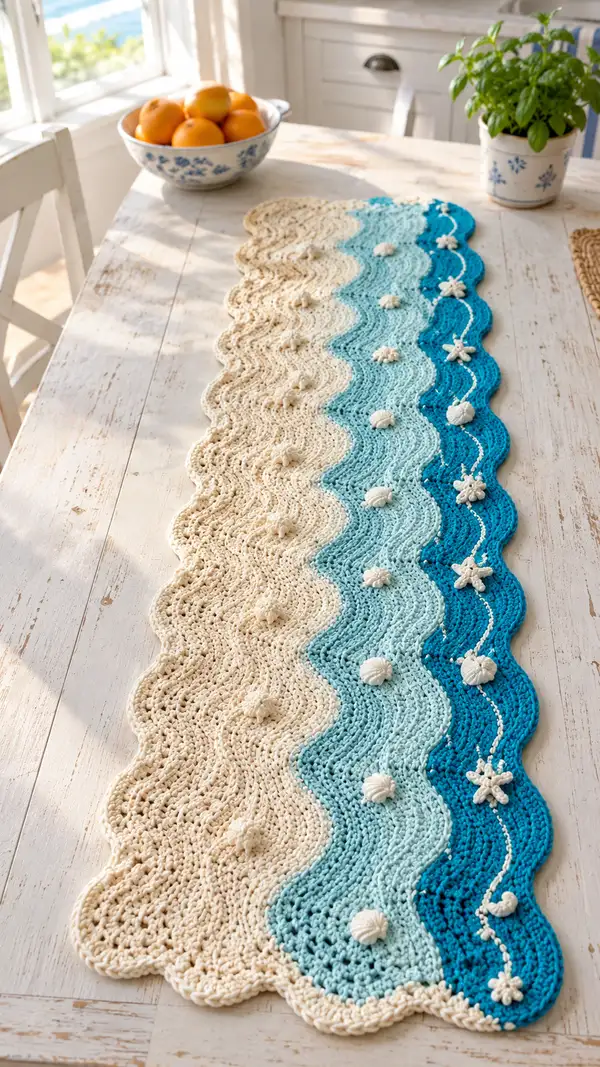
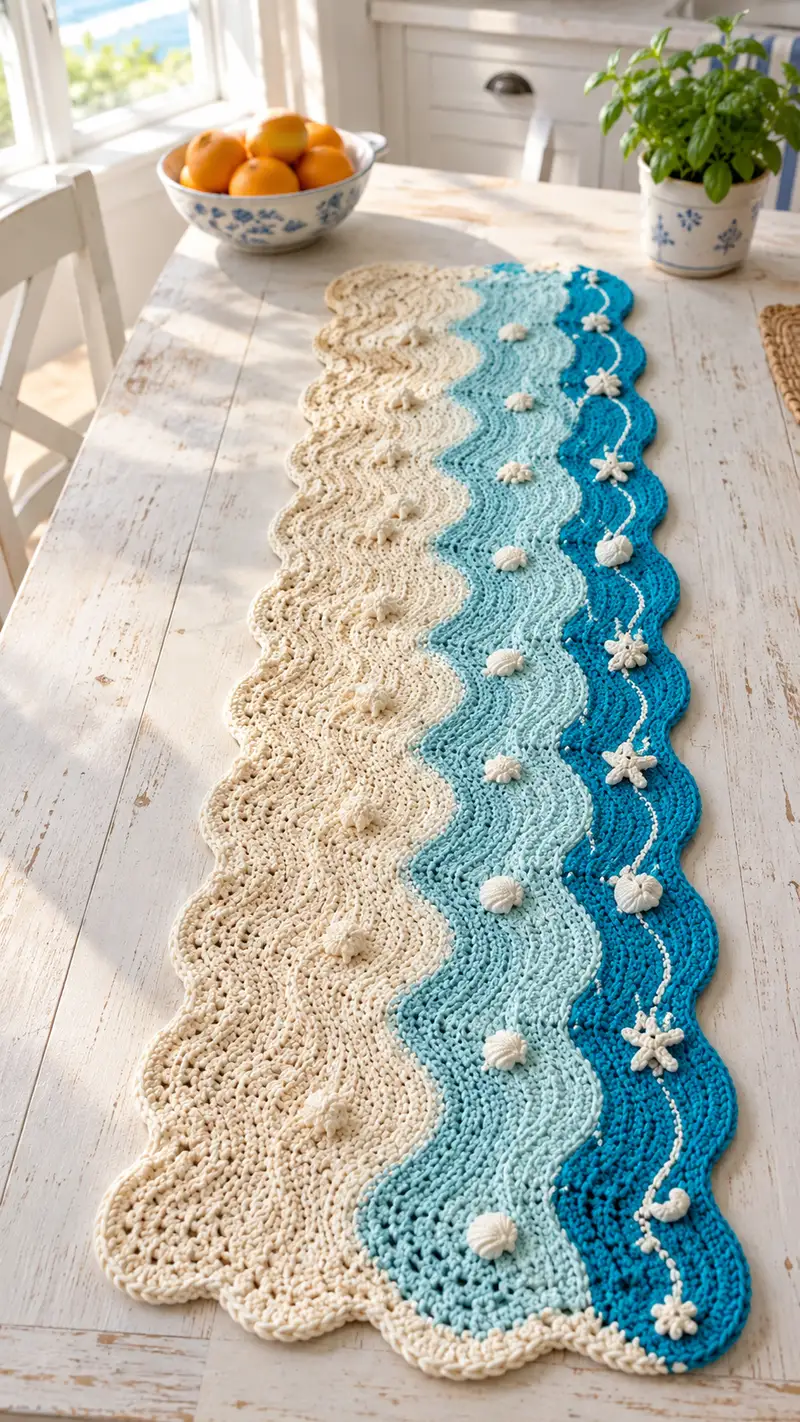
Bring a relaxed coastal vibe to your table with this scalloped wave table runner. Worked in soft cotton in sand-to-sea gradients, it features a gentle ripple stitch, scalloped edges and stitched shell and starfish appliques for a handmade beachy finish. The runner measures approx 10–12 inches wide and can be lengthened or shortened to fit any table. Detailed row-by-row instructions and clear assembly notes make this a satisfying project for intermediate crocheters.
Progress Tracker
0% Complete
— Notes & Gauge :
Info :
Pattern uses US terms. Gauge is not critical for width but for drape: 12 dc & 8 rows = 4 inches in pattern repeat using 4.5mm hook and worsted cotton. The foundation chain is a multiple of 12 plus 3 to create the shell ripple. Finished runner in photo is approximately 10–12" (25–30cm) wide and 60" (152cm) long. Adjust foundation chain multiples to increase or decrease width; repeat row sequences to increase length.
Info :
Work loosely but evenly; cotton has low memory - blocking helps set waves. Use stitch markers at each end of the foundation chain and at the repeat boundaries to help maintain alignment across long rows.
— Foundation & Row Structure :
Row 0 - Foundation Chain :
Ch 99 (multiple of 12 + 3). This chain gives a runner approx 10–12" wide depending on yarn. If you prefer wider, increase multiples of 12 by 2-4 repeats (each 12-st repeat adds approx 1.25–1.5" to width) (99)
Row 1 :
Dc in 4th ch from hook (counts as first dc), *skip next 2 ch, 1 sc in next ch, skip next 2 ch, shell (5 dc) in next ch, skip next 2 ch, 1 sc in next ch; rep from * across to last 3 ch, skip next 2 ch, dc in last ch. End with total pattern width remaining same across (99)
Info :
This first row establishes the shell peaks and shallow valley spaces. The shell (5 dc) creates the crest and the sc in between gives a little texture that helps make the beachy ripple. Keep stitches uniform, and tighten or loosen the starting chain if your edge looks too tight or too wavy.
Row 2 :
Ch 3 (counts as dc), turn. Dc in same st as ch-3, *2 dc in each of the next 2 dc, dc in sc, 5 dc in center dc of shell (this forms the new shell), dc in sc, 2 dc in each of next 2 dc; rep from * across, ending with 2 dc in last st before turning ch, dc in top of turning ch (maintains 99)
Info :
Row 2 builds on the shell peaks so the ripple will read on the RS. If shells look offset, check that you placed the 5-dc shell into the center dc of the shell below. Use a stitch marker on the center dc of the initial shell to keep placement consistent for the first few repeats.
Row 3-6 :
Repeat Row 2 pattern exactly for Rows 3-6 (99). Maintain color for this block. After Row 6, lightly block or pin the piece to see the waves forming and ensure edging is even.
Info :
Work Rows 3-6 steadily. If you are planning color changes, plan them at row boundaries so the color stripes line up across the runner. Carry unused yarn up the inside of the row if you want fewer ends to weave in.
Row 7-10 :
Continue repeating Row 2 sequence for Rows 7-10. By Row 10 the ripple will be establishing a regular shape (99). Place stitch markers at the start and end of the 12-st repeat across the row for easier counting.
Info :
If you want a graded color block like the sample, change color at the end of Row 30, Row 60 and Row 90. Always finish the row and fasten off or carry yarn up the side, then begin the next row with the new color to avoid jogs.
— Main Wave Panel (Rows 1-120 divided into color blocks) :
Color Block A - Sand (Rows 1-30) :
Work Rows 1-30 following the Row 2 shell ripple repeat so that shells align vertically creating a long undulating sand area (99). Keep tension consistent; sand gives the softest, neutral background for appliques. After Row 30, fasten off sand if changing colors or carry for a subtle fade.
Info :
Start the runner in sand to emulate the beach. If you're joining with seamless color carry, twist the new color around the old at the beginning of the row to avoid holes. We suggest cutting yarn and weaving in for a crisp color break as shown in photo.
Color Block B - Pale Aqua (Rows 31-60) :
Join pale aqua with a standing dc in the first stitch of Row 31. Then work Rows 31-60 repeating the same shell ripple sequence. Place the 5-dc shell directly over the shell below so peaks align (99).
Info :
When joining new color, leave a 6" tail to weave in; add it on the WS if you plan to hide it under appliques later. Carrying yarn on the inside of the runner can reduce ends but can add bulk at long lengths.
Color Block C - Mid-Teal (Rows 61-90) :
Change to mid-teal at the end of Row 60. Continue the pattern Rows 61-90 in identical fashion: ch-3, center shell placement in the middle dc of the shell below, continue repeat to end of Row 90 (99).
Info :
Double-check the placement of the center dc inside each shell to ensure the vertical columns of shells remain straight. If the shell centers drift left or right, re-place your stitch markers on the shell centers and work to that gauge for two rows to correct alignment.
Color Block D - Deep Teal (Rows 91-120) :
Change to deep teal at the end of Row 90. Work Rows 91-120 repeating the shell ripple. This deep band creates the ocean edge and provides a strong color frame on one side of the runner (99).
Info :
You may wish to create a mirror gradient (sand at both outer edges and sea center) by planning your color placement differently — change the order of color blocks to taste. Keep the same number of rows per block for a balanced look.
Row 121-122 (optional extra rows):
Add flat even rows (1 dc in each stitch) if you want to flatten the central area before edging; work 1-2 rows of even dc (99) to stabilize. Fasten off and weave in major ends before beginning edgework.
Info :
Blocking the whole panel after this stage helps shape the scalloped edge properly. Lay the runner flat and adjust peaks with pins for a smooth scallop before working the border.
— Scalloped Edge Border :
Border Setup :
With RS facing, join cream/sand yarn at any shell peak on the long side with a sl st. The scallop border will be worked along both long edges and both short ends to create a finished frame.
Round 1 :
Working into edge loops: *ch 1, sc evenly along edge for 6 sts (approx), ch 3, skip 3 edge bars (space), 7 dc in next shell peak (creates scallop), ch 3, sc in next 6 edge bars; rep from * along entire long edge until you reach corner. End with sc in last st and sl st to join. The total number of scallops across each long side should equal the number of shell peaks (8 scallops for 99 width)
Info :
Work the scallops centered over the shell peaks — this aligns decorative curving with the ripple beneath. If your peaks are shifted, adjust by adding or removing one sc between scallops to keep scallops evenly spaced.
Round 2 :
Turn work if comfortable: into each 7-dc scallop work (sl st into center dc, ch 1, sc in center, ch 3, 5 dc in same center dc, ch 3, sc in center again) to create a fuller scallop. Along straight short ends, work 3 scallops across each end to mirror the long sides. Fasten off and weave ends (counts vary but scallop centers track to 8 across)
Info :
This second round deepens the scallop. Keep your tension loose on ch-3 arches to avoid puckering. If a scallop looks too full, reduce the dc cluster to 5 dc instead of 7 on the second round.
Round 3 - Decorative Picot Edge :
Join white/cream yarn for an optional delicate picot: *ch 1, sc in each stitch around scallop top for 6 sc, (ch 3, sl st in 3rd ch) to make a picot, sc in remaining 6 sts; rep around scallop tops. This adds a tiny beaded highlight like sea foam. Fasten off and weave ends.
Info :
If you prefer a simpler edge, omit Round 3 and instead make a single round of sc around the entire runner. The picot gives a contrasting white thread of 'seafoam' that complements the shell appliques.
— Appliques: Small Sand Dollar (Make 6) :
Round 1 :
With cream yarn, magic ring, ch 1, 6 sc in mr (6)
Round 2 :
Inc in each st around (12)
Round 3 :
(1 sc, inc) x 6 (18)
Round 4 :
1 sc in each st (18)
Round 5 :
BLO: (2 sc, dec) x 6 (12) — This creates a slight indentation on one face for a sand-dollar look
Round 6 :
Ch 1, sc evenly around in both loops to tidy and finish. Fasten off leaving 6" tail for sewing. Lightly stuff with fiberfill to give a low-profile dome.
Info :
Sew 5 tiny surface french-knot style stitches in a star pattern on the sand dollar's face with embroidery thread to mimic the petal pattern. Use minimal stuffing so the motif sits flat on the runner.
— Appliques: Small Seashell (Make 8) :
Round 1 :
With cream yarn, ch 6, sl st into first ch to make a loop (6)
Round 2 :
Into loop, work (sc, hdc, 3 dc, hdc, sc) in same loop — this forms a fan shell. Fasten off leaving 8" tail for sewing. Make 8 shells in varied sizes by working larger fans (sc, 2 hdc, 5 dc, 2 hdc, sc) for some of them.
Info :
Flatten the shell while stitching and add a tiny back stitch to hold the fan closed at the base if needed. A few surface slip stitches across the fan can mimic ridges.
— Appliques: Starfish (Make 6) :
Round 1 :
With cream yarn and 4.0mm hook, ch 6, sl st into first ch to form loop (6)
Round 2 :
Ch 1, sc in same loop, *ch 6, sl st into 3rd ch from hook (forms arm), sc in loop to anchor; rep from * for 5 arms total. Fasten off leaving long tail for sewing. Lightly wind a few extra single crochet around each arm for texture.
Info :
Pin starfish in position and adjust arm spacing so they read as a small five-pointed star. Slight differences in arm lengths make the motif feel organic and sea-worn.
— Applique Attachment & Layout :
Info :
Layout planning: Arrange sand dollars and shells along the transition zones between color blocks for a natural gradient. In the sample image, shells and sand dollars land roughly centered in each shell peak column, with starfish mainly on the deep teal edge. Pin each applique before sewing to ensure balance. Use the long tails and yarn needle to stitch motifs with small ladder stitches around the base, catching a few ripples underneath for secure hold.
Attachment Step :
Using the long tail left on each applique, sew each motif down with small, tight stitches through the runner fabric and the motif base. Hide the end by weaving through several rows on the WS and trimming. Reinforce high-traffic motifs with 2 passes of stitching if runner will be used often.
Info :
Place motifs asymmetrically for a natural look — group small shells in threes or pairs and space sand dollars about 6-10" apart down the length. View from several angles before final sewing to ensure pleasing rhythm.
— Embroidered Wave Line :
Info :
For the white embroidered wave seen on the deep-teal edge, use strand of cream yarn doubled. With a yarn needle, follow the center of each scallop top and trace a gentle wavy line. Use a decorative chain stitch (or backstitch if easier) to create a continuous flow. Secure ends on WS.
Round - Embroidery Detail :
Using a tapestry needle, come up at a scallop, chain-stitch along the border of the deep teal band, making points where shells are to be sewn. Small loops (chain 3) tied down every 6-8 stitches give a beaded sea-foam effect.
Info :
Test stitches on a spare swatch to pick the right spacing for your yarn weight. Thicker yarn will make a chunkier embroidery which may overwhelm tiny appliques; keep lines delicate if using worsted cotton.
— Finishing & Blocking :
Info :
Wet-block the runner on a flat surface: pin scallops and shell peaks into place, shape each wave gently, and allow to dry fully. If you prefer, use steam-block carefully, being mindful of cotton’s reaction to heat. Blocking sets scallops and helps appliques sit flush.
Final Steps :
Weave in all yarn tails on the WS with a yarn needle. Trim close to the fabric after weaving 3-4 inches back through plasticized yarn to prevent unraveling. If desired, add a little diluted craft glue under each applique for extra hold before final stitching.
Info :
For long-term care, wash on a gentle cycle with mild detergent and reshape while damp, or spot-clean appliques as needed. Avoid bleach to preserve color vibrancy.
This seaside table runner brings textured waves and tiny beach treasures to your table with a handmade touch. The scalloped edges and playful appliques finish it beautifully, making it both decorative and tactile. Whether you keep it on your kitchen table or gift it to a friend, this runner captures the calm energy of the shore. Happy stitching and enjoy your coastal creation! 🧶🌊