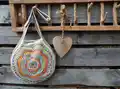
Make a vibrant Boho Flower Slouch Bag that mixes colorful motifs and textured stitches to create a unique statement accessory. This pattern walks you through the strap and floral medallions with clear photos and step-by-step rounds so you can follow along easily. You will learn surface slip-stitch techniques, crocheting between stitches, and working in backloops for textured petals.
Progress Tracker
0% Complete
— Strap :
Round 1 :
288ch, skip 3 stitches (=first dc), 4 dc in one, 283dc, 5dc in one, 283dc, j.r.w. slst in first dc, fasten off,
Info :
TIP : See page 13 how to make a smooth finish.
Round 2 :
new color - first sc=attach between two dc after the 5dc in one - 284sc between the stitches, (1ch, 1sc between st) 4 times, 1ch, 284sc between st, (1ch, 1sc between st) 4 times, 1ch, j.r.w. slst in first sc, fasten off,
Info :
How to attach a new color? See page 13. How to crochet between stitches? See page 14.
Round 3 :
new color - first dc=attach in second stitch after the last chain space + 2ch, 283dc, (3dc in ch.sp) 5 times, 283dc, (3dc in ch.sp) 5 times, j.r.w. slst in first dc, fasten off,
Round 4 :
attach a new color between two stitches after the last 3dc in one, sc around between the stitches, j.r.w. slst in first sc, fasten off,
Info :
crochet surface slst on/around the stitches of ROUND 1 and 3, How to? See page 14.
— Flower Part :
Note :
FLOWER PART - two times -
Round 1 :
8ch, j.r.w. slst in first ch to form a ring, (first dc=3ch) - 21dc, j.r.w. slst in first dc, fasten off,
Round 2 :
new color - first sc = attach new color between 2 stitches – (1sc between st, 1ch) 21 times, j.r.w. slst in first sc, fasten off,
Round 3 :
new color - first sc = attach new color in a ch.sp – (1sc between st, 1ch) 21 times, j.r.w. slst in first sc, fasten off,
Info :
crochet zigzag slst on/around the dc's of ROUND 1: pull a loop (from back to front) between two dc stitches, *insert hook in ch.sp ROUND 2 to the backside, yarn over, pull through loop, insert hook between the next two stitches R1, yarn over, pull through loop*, repeat from * to * till you have 41slst, cut yarn, finish last stitch with a wool needle, (total 42slst)
Round 4 :
new color - first dc = attach new color in a ch.sp + 2ch – 1dc in a ch.sp, 1dc in previous ch.sp (= a cross)
Round 4 :
(1dc in next ch.sp, 1dc in previous ch.sp) 20 times, j.r.w. slst in first dc, fasten off, (total 21 crosses)
Round 5 :
new color - first sc = attach new color between 2 dc of a cross - [1sc in cross, (1dc, 2trc, 1dtr) in next cross, (1dtr, 2trc, 1dc) in next cross,] 7 times, j.r.w. slst in first sc, fasten off,
Round 6 :
new color - first dtr = attach new color in backloop sc + 3ch - - crochet in the backloops! - (1dtr, 2trc, 1dc, 2hdc, 1dc, 2trc) 7 times, j.r.w. slst in first dtr, fasten off,
Round 7 :
new color - first sc = attach new color between 2hdc - - crochet between stitches - [1sc, 1hdc, 2hdc in one, 2dc in one, (2trc in one) 2 times, 2dc in one, 2hdc in one, 1hdc] 7 times, j.r.w. slst in first sc, fasten off,
Info :
-crochet surface slst on/around the stitches of ROUND 5 starting in the same space of sc ROUND 5 (10 on each petal), total 69 surf.slst, finish last one with a wool needle, -crochet surface slst in the backloops of ROUND 5 starting between 2 petals (10 on each petal), total 69 surf.slst, finish last one with a wool needle,
Round 8 :
new color - first hdc = attach new color + 1ch - - crochet in the backloops! - 105hdc, j.r.w. slst in first hdc, fasten off,
Round 9 :
new color - first sc = attach a new color between 1hdc and 2hdc in one of ROUND 7 (see picture), [(1sc between st in R7, 2ch, skip 2st R7) 6 times, 1sc between st R7, skip 3st R7] 7 times, j.r.w. slst in first sc, fasten off,
Round 10 :
new color - first dc = attach new color in a loop (see picture) + 2ch - (3dc in loop) 42 times, j.r.w. slst in first dc, fasten off,
Round 11 :
new color - first sc = attach new color between 2sc of ROUND 9 - (1sc between 2sc R9, 18dc in backloops) 7 times, j.r.w. slst in first sc, fasten off,
Round 12 :
new color - first sc = attach new color in sc of ROUND 11 - (1sc in sc R11, 18dc in backloops) 7 times, j.r.w. slst in first sc, fasten off,
Round 13 :
new color - first sc = attach new color in sc of ROUND 12 - [(1sc in sc R12, crochet in the backloops; 8dc, (2dc in one) 2 times, 8dc] 7 times, j.r.w. slst in first sc, fasten off,
Round 14 :
new color - first sc = attach new color in sc of ROUND 13 - (1sc in sc R13, crochet in the backloops; 8dc, 2dc in one, 2dc, 2dc in one, 8dc) 7 times, j.r.w. slst in first sc, fasten off,
Round 15 :
bl=backloop - new color - first sc = attach new color in sc R14 - (1sc in backloop sc R14, 2sc in backloop, skip 1 f.loop R13, 1dc in next f.loop, 3sc in bl, skip 2 f.loops R13, 1dc in next f.loop, 4sc in bl, skip 3 f.loops R13, 1dc in next f.loop, 4sc in bl, skip 2 f.loops R13, 1dc in next f.loop, 4sc in bl, skip 3 f.loops R13, 1dc in next f.loop, 3sc in bl, skip 2 f.loops R13, 1dc in next f.loop, 2sc in bl) 7 times, j.r.w. slst in first sc, fasten off,
Round 16 :
new color - crochet in the horizontal loop on the backside of the stitches (see picture) - first trc = attach new color in sc between two petals + 3ch - (1trc, 3dc, 5hdc, 12sc, 5hdc, 3dc) 7 times, j.r.w. slst in first trc, fasten off,
Info :
crochet surface slst on/around the stitches of ROUND 11; start between two sc of R9,
Info :
crochet surface slst on/around the stitches of ROUND 12/13; start in previous ROUND,
Info :
crochet surface slst on/around the stitches of ROUND 7; start in R6 between 2hdc,
Info :
crochet the flower part on the strap: - attach a marker after the 3dc in one of the strap (see picture),
Info :
fftb=from front to back / fbtf=from back to front
Round 17 :
attach a new color in the 9th stitch counted from left trc of ROUND 16 - 5ch(=first trc), remove hook, skip 19 stitches on the strap after the marker, insert hook fftb, pull loop through, 1ch, remove hook, insert hook fftb in next stitch, pull loop through, 1trc in the same stitch, remove hook, insert fbtf, pull through, (1trc, remove hook, insert fbtf, pull through) 2 times, (1dc, remove hook, insert fftb, pull through) 3 times, (1hdc, remove hook, insert fftb, pull through) 3 times,
Round 17 :
(1sc, remove hook, insert fftb, pull through) 145 times,
Round 17 :
(1hdc, remove hook, insert fftb, pull through) 3 times, (1dc, remove hook, insert fftb, pull through) 3 times, (1trc, remove hook, insert fftb, pull through) 3 times, 1ch, remove hook, insert fftb, 1trc in the same stitch,
Round 17 :
on top of the flowerpart: 2trc, 3dc, 3hdc, 22sc, 3hdc, 3dc, 2trc, j.r.w. slst in first trc, (1ch, turn, 38sc, remove hook, insert fftb in next st on strap, pull through) 2 times,
Round 17 :
1ch, turn, (1sc, 1sc two rows lower) 19 times, 1sc, remove hook, insert hook fbtf, pull through and fasten off,
Info :
crochet the second flower part on the strap starting on the longest strap side parallel to the first flower part, follow the description from page 11,
Info :
put both ends of the strap together and sew a large button through both parts to finish of your flower bag.
— How To? :
Info :
HOW TO MAKE A SMOOTH FINISH : after you joined round and cut yarn, insert your hook from back to front in the last stitch you used (=first st of round), yarn over and pull cut yarn to the backside, finish last stitch with a wool needle for a smooth finish, see pictures.
Info :
HOW TO ATTACH A NEW COLOR: insert hook, pull loop new color through stitch (or chain space/between two stitches), insert hook underneath the short end yarn, yarn over, pull through, (=first sc)
Info :
HOW TO CROCHET BETWEEN STITCHES: insert hook between two stitches, this is not as usual in the stitch but insert lower,
Info :
HOW TO CROCHET SURFACE SLST ON/AROUND STITCHES : insert hook between two dc's, yarn over, pull through (1 loop), insert hook between the next two dc's, yarn over, pull through loop and repeat all around but do not crochet last slst, cut yarn and finish last stitch with a wool needle,
Info :
Good luck + happy crocheting
This Boho Flower Slouch Bag pattern is a colorful, textured project that makes a unique handmade accessory. It combines layered petals, surface slip-stitch details, and a long comfortable strap for everyday wear. Whether you gift it or keep it, this bag brings joy and crafty satisfaction. 🌸✨🧶