🧢 Beautiful ✨ Detailed πŸ’ Adorable

Bunny Amigurumi Pattern

Bunny Amigurumi Pattern
4.1β˜… Rating
5-7 Hours Time Needed
2.8K Made This
βœ‚οΈ

Beginner Friendly Level

Perfect for those just starting their crochet journey, with clear instructions and simple techniques

⏱️

Weekend Treat

Takes 5-7 hours, making it an enjoyable project to finish over a couple of days.

🧸

Cute Companion

An adorable friend to cherish, handcrafted with love to bring comfort and joy for years to come.

About This Bunny Amigurumi Pattern

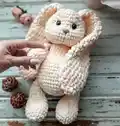
This pattern creates a soft, plush bunny amigurumi worked mainly in single crochet and half double crochet using velvet/plush yarn. You will make separate hind paws, front paws, ears and body pieces then assemble them into a charming bunny. The design emphasizes a no-hole canvas technique for a neat finish and uses simple shaping for a cuddly shape.

Bunny Amigurumi Pattern crochet pattern - detailed view of completed project

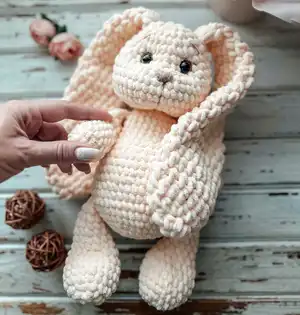
Ideal for beginners, the pattern includes clear round-by-round stitch counts and helpful photo cues. The finished bunny measures approximately 12 inches tall with long floppy ears.

Why You'll Love This Bunny Amigurumi Pattern

I absolutely love this pattern because it turns soft plush yarn into a wonderfully tactile, huggable bunny. I enjoy the simple shaping that still creates a professional-looking toy without complicated techniques. The large ears and rounded paws give so much charm and personality to each finished piece. Working with velvet yarn is relaxing and each stitch looks plush and luxurious, which makes every bunny feel special.

Bunny Amigurumi Pattern step 1 - construction progress Bunny Amigurumi Pattern step 2 - assembly progress Bunny Amigurumi Pattern step 3 - details and accessories Bunny Amigurumi Pattern step 4 - final assembly and finishing

Switch Things Up

I love customizing this bunny by changing yarn colors; try pastel shades for a nursery or bold colors for a playful gift.

I often vary the ear length by adding or subtracting rounds to create short or long-eared versions.

If you want a smaller bunny, use thinner yarn and a smaller hook; for a chunky cuddly version, use bulky yarn and a larger hook.

I like to embroider different facial expressions with contrasting yarn to give each bunny its own personality.

Try adding tiny crocheted accessories like a scarf, bow, or mini hat to personalize your bunny for holidays or special occasions.

I sometimes add a little weighted filler in the base for a more stable seated pose if the bunny will be used as decor.

Consider using safety joints for the limbs if you want posable arms and legs for play-friendly toys.

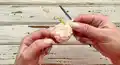
I recommend experimenting with placement of the eyes and muzzle before fastening them permanently to adjust expression and balance.

For a washable toy, attach felt features with thread instead of safety eyes, and make sure all attachments are secure.

I also enjoy making a whole family of bunnies in coordinating colors and sizes β€” it makes a sweet set for gifting.

Common Mistakes & How to Fix Them

βœ— Skipping stitch markers when working spirals can make it hard to find the row start; place a marker in the first stitch of each row and move it after completing each round. βœ— Crocheting single crochet too tightly on plush yarn can create holes or distort the texture; relax your tension and pull the working loop up to the hook level as instructed to keep a smooth canvas. βœ— Overstuffing the paws or body makes the shape bulky and distorts seams; stuff gradually and evenly, using small amounts at a time to maintain natural shaping. βœ— Forgetting to count increases and decreases leads to incorrect stitch counts; always count stitches after each increase or decrease round to ensure the correct total.

Bunny Amigurumi Pattern

Make a soft plush bunny amigurumi using plush/velvet yarn and simple crochet techniques. This beginner-friendly pattern guides you step-by-step through paws, ears, body and finishing touches so you can create a cuddly handmade toy. Clear photos and exact stitch counts make it easy to follow and perfect for gifting or decorating nurseries.

Beginner Friendly 5-7 Hours

Materials Needed for Bunny Amigurumi Pattern

β€” Main Fabric

  • 01
    Plush/velvet yarn, approximately 130 yards (120m)/100g per skein, 2 skeins (example: Baby Love plush yarn, peach color)
  • 02
    Small amounts of contrasting yarn for muzzle embroidery (color as desired)

β€” Tools Required

  • 01
    Crochet hook size 4.0 mm
  • 02
    Crochet hook size 6.0 mm
  • 03
    Safety eyes 15 mm (2 pieces)
  • 04
    Soft polyester stuffing
  • 05
    Plastic needle with large eyelet
  • 06
    Stitch markers (3 pieces recommended)
  • 07
    Scissors

Progress Tracker

0% Complete

β€” Hind paws :

Info :

Take the 4 mm hook. Crochet 5 CH.

Round 1 :

From the 2nd loop from the hook 3 SC, 3 SC in 1, 2 SC, 1 Inc (=10)

Info :

Next crochet a spiral.

Round 2 :

1 Inc, 2 SC, 3 Inc, 2 SC, 2 Inc (=16)

Info :

Place the marker in the 1st SC of the row. Next rearrange the marker to the 1st SC of each subsequent row.

Info :

When crochet SC, pull the working loop to the level of the hook. Then the canvas will be without holes.

Round 3 :

1 SC, 1 Inc, 3 SC, 1 Inc, 3 SC, 1 Inc, 3 SC, 1 Inc, 2 SC (=20)

Round 4 :

1 SC, 1 Inc, (4 SC, 1 Inc)*3, 3 SC (=24)

Round 5-6 :

2 rows of 24 SC

Round 7 :

6 SC, (1 Dec, 1 SC)*3, 1 Dec, 5 SC, 1 Dec (=19)

Round 8 :

4 SC, 4 Dec, 5 SC, 1 Dec (=14)

Round 9-14 :

6 rows of 14 SC

Info :

Take some stuffing. Take the same amount for the second paw to ensure they are equally filled. Gently stuff the lower part of the paw. Fold in half.

Info :

Crochet 6 SC on both part. Cut the thread, pull out the end.

Info :

Similarly crochet the 2nd paw.

β€” Front paws :

Info :

Take the 4 mm hook. Crochet 2 CH.

Round 1 :

6 SC in the 2nd loop from the hook

Info :

Next crochet a spiral.

Round 2 :

6 Inc (=12)

Info :

Place the marker in the 1st SC of the row. Next rearrange the marker to the 1st SC of each subsequent row.

Round 3 :

(5 SC, 1 Inc)*2 (=14)

Round 4-7 :

4 rows of 14 SC

Round 8 :

10 SC, 2 Dec (=12)

Round 9-13 :

5 rows of 12 SC

Info :

Take some stuffing. Take the same amount for the second paw to ensure they are equally filled. Gently stuff the lower 2/3 of the paw. Fold in half.

Info :

Crochet 5 SC on both part. Cut the thread, pull out the end.

Info :

Similarly crochet the 2nd paw.

β€” Ears :

Info :

Take the 6 mm hook. Crochet 2 CH.

Round 1 :

6 HDC in the 2nd loop from the hook

Info :

Next crochet a spiral. Crochet the loops loosely to create a voluminous pattern.

Round 2 :

6 Inc (=12)

Info :

Place the marker in the 1st HDC of the row. Next rearrange the marker to the 1st HDC of each subsequent row.

Round 3 :

(1 HDC, 1 Inc)*6 (=18)

Round 4-8 :

5 rows of 18 HDC

Round 9 :

(4 HDC, 1 Dec)*3 (=15)

Round 10-12 :

3 rows of 15 HDC

Round 13 :

(3 HDC, 1 Dec)*3 (=12)

Round 14-16 :

3 rows of 12 HDC

Round 17 :

(4 HDC, 1 Dec)*2 (=10)

Round 18 :

10 HDC

Round 19 :

(3 HDC, 1 Dec)*2 (=8)

Round 20-22 :

3 rows of 8 HDC

Info :

Fold in half. Crochet 4 SlSt on both part. Cut the thread, pull out the end.

Info :

Similarly crochet the 2nd ear.

β€” Body :

Info :

Take the 4 mm hook. Crochet 2 CH.

Round 1 :

6 SC in the 2nd loop from the hook

Info :

Next crochet a spiral.

Round 2 :

6 Inc (=12). Place the marker in the 1st SC of the row. Next rearrange the marker to the 1st SC of each subsequent row.

Round 3 :

12 Inc (=24)

Round 4 :

(3 SC, 1 Inc)*6 (=30)

Assembly Instructions

  • Attach the front paws to the sides of the body where the front shaping begins, sew securely with a yarn needle using the long tail and a whipstitch to hide seams.
  • Sew the hind paws to the lower body opening so the bunny can sit evenly, using the same stuffing level on both paws for balance and symmetry.
  • Position the ears at the top of the head and sew them in place with small stitches, folding slightly if needed to create the desired flop and shape.
  • Place safety eyes between the recommended head rounds (as noted in pattern photos) and embroider the muzzle with contrasting yarn before closing the head to secure features.

Important Notes

  • πŸ’‘Use stitch markers to keep track of the start of each round, especially when working spirally to avoid accidental increases or decreases.
  • πŸ’‘When working single crochet with plush yarn, pull the working loop up to the level of the hook before tightening to prevent holes in the fabric.
  • πŸ’‘Stuff pieces gradually and evenly; overstuffing can distort shaping and understuffing can make pieces floppy or misshapen.
  • πŸ’‘Fold and join ear and paw halves carefully and crochet or slip stitch across both layers to create a neat edge before fastening off.

This cute plush bunny is perfect for gifting or keeping as a soft companion, made with velvet yarn for a luxurious feel. Create one in classic pastel tones or choose bright colors for a playful twist. Handmade bunnies make lovely nursery decor and heartfelt presents. 🧢🐰

You ask,

we answer.

FAQs

What size will the finished piece be?

The finished amigurumi measures approximately 12 inches (30 cm) tall with ears about 11 inches (27 cm) long when using the recommended plush yarn and hook sizes.

Can I use different yarn weights for this pattern?

Yes, you can use different yarn weights, but this will affect the final size and texture; choose an appropriate hook for your yarn and expect the bunny to be larger or smaller.

Do I need prior crochet experience for this pattern?

This pattern is rated beginner friendly, so basic crochet knowledge like single crochet, increases and decreases is recommended to follow the rounds confidently.

How long does this project typically take to complete?

Most crocheters complete this project in 5-7 hours, though time may vary based on experience level, yarn choice, and assembly details.