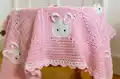
Make a soft and cuddly Bunny Baby Blanket that adds a playful, handmade touch to any nursery. This pattern includes sweet bunny applique squares and solid granny squares worked in DK yarn, with detailed instructions for assembly and a pretty scalloped border. You can personalize colors and placement to make a unique gift that will be treasured.
Progress Tracker
0% Complete
— Pattern Notes :
Info :
US crochet terms used throughout. The blanket is worked in rounds.
Info :
When working the ears, you will change from pink to white as follows: Work the last hdc st as normal, up until the point where you have 3 loops left on your hook. Grab the new colour and fold it so that you form a loop (leave a 5 - 6 inch tail for weaving in later). Place the loop on your hook and pull it through the remaining 3 loops on your hook. Cut the yarn in the old colour, again making sure that you leave a 5 - 6 inch tail for weaving in.
— Supplies :
Infos :
Yarn: Category #3 / DK / 8 ply yarn. I used Stylecraft Naturals Bamboo and Cotton, 273yds / 3.5oz (250m / 100g) in the following colours: 2 balls of Colour A: Chalk (7127); 5 balls of Colour B: Pale Pink (7132). Yarn for the eyes: I used a small amount from 1 ball of Paintbox Yarns Cotton Aran in the colour Pure Black (602), 93yds/ 1.8oz (85m /50g). Other yarn suggestions (ensure that you order enough yarn): Paintbox Yarns Cotton DK, Paintbox Yarns Simply DK, Stylecraft Special DK. Crochet hook: 3mm. Scissors. Tapestry needle (for weaving in ends). OPTIONAL: Stitch marker.
— Gauge / Tension :
Info :
Each square measures 5.5" (14cm). Gauge is not crucial here, but I would recommend that you keep a consistent tension so that all your squares end up the same size.
— Finished Size :
Info :
Width - 34 inches / 86cm. Length - 34 inches / 86cm.
— Stitches & Abbreviations :
Infos :
beg - beginning. BLO - back loop only. ch(s) - chain(s). dc - double crochet. dc2tog - double crochet two together (also known as a dc decrease). FLO - front loop only. hdc - half double crochet. sc - single crochet. sk - skip: Do not crochet into this stitch / space. sl st - slip stitch. sp(s) - space(es). st(s) - stitch(es). tr - treble crochet. Special Stitches: EXdc - Extended double crochet: Yarn over (yo), insert hook into st or sp, pull up a loop, 3 loops on hook, yo, pull through 1 loop (3 loops remain on hook), yo, pull through 2 loops (2 loops remain on hook), yo, pull through both loops. 1 EXdc made. Shell: 7dc in same stitch / space. C-Shell: 9dc in same stitch / space.
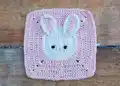
— Bunny Square (Make 13) :
Round 1 :
Ch2 (counts as your 1st dc here and throughout), 11dc in the magic circle, sl st to top of beg ch2 to join, [12 sts].
Alternative Round 1 :
Ch4, sl st to 1st ch to form a ring, ch2 (counts as your 1st dc here and throughout), 11dc into the ring, sl st to top of beg ch2 to join, [12 sts].
Round 2 :
Ch2, 1dc in same st (at base of ch2), 2dc in next 11 sts, sl st to top of beg ch2 to join, [24 sts].
Round 3 :
Ch2, 1dc in same st (at base of ch2), 2dc in BLO of next 23 sts, sl st to top of beg ch2 to join, [48 sts].
Round 4 :
Ch1 (does not count as your 1st st) 1sc in same st (at base of ch1), 1sc in next 47 sts, to join sl st to 1st sc or make an invisible join, [48 sts]. Cut yarn, fasten off and weave in ends.
Info :
Change to Colour B.
Round 5 :
Ch3 (counts as your 1st st here and throughout), 1dc in BLO of next 2 sts, 1EXdc in BLO of next 2sts, (2tr, ch2, 2tr) in BLO of next st, *1EXdc in BLO of next 2 sts, 1dc in BLO of next 7 sts, 1EXdc in BLO of next 2 sts, (2tr, ch2, 2tr) in the BLO of the next st*, repeat from * to * twice, 1EXdc in BLO of next 2 sts, 1dc in BLO of next 7 sts, 1EXdc in BLO of next 2 sts, (2tr, ch2, 2tr) in BLO of next st, 1EXdc in BLO of next 2 sts, 1dc in BLO of last 4 sts, sl st to top of beg ch3 to join, [15 sts on each side of square, 4 x ch2 sps].
Round 6 :
Ch3, 1dc in next 6 sts, *(2dc, ch2, 2dc) in ch2 corner sp, 1dc in next 15 sts*, repeat from * to * for a total of 3 times, (2dc, ch2, 2dc) in last ch2 corner sp, 1dc in last 8 sts, to join sl st to top of beg ch3 or make an invisible join (for easier seaming later), [19 sts on each side of square, 4x ch2 sps].
Round 7 :
Ch3, 1dc in next 8 sts, *(2dc, ch2, 2dc) in ch2 corner sp, 1dc in next 19 sts*, repeat from * to * for a total of 3 times, (2dc, ch2, 2dc) in last ch2 corner sp, 1dc in last 10 sts, to join sl st to top of beg ch3 or make an invisible join (for easier seaming later), [23 sts on each side of square, 4x ch2 sps].
Round 8 :
Ch3, 1dc in next 10 sts, *(2dc, ch2, 2dc) in ch2 corner sp, 1dc in next 23 sts*, repeat from * to * for a total of 3 times, (2dc, ch2, 2dc) in last ch2 corner sp, 1dc in last 12 sts, make an invisible join, [27 sts on each side of square, 4x ch2 sps].
Info :
IMPORTANT: If you used the magic circle method in round 1, make sure that you weave in the yarn tail securely so that the middle of your square does not unravel. Weave in ends.
— Ears (Make 26) :
Setup :
With Colour B: Ch 10.
Row 1 :
1sc in 2nd ch from hook, 1dc in next 5 ch, 1hdc in next 3 ch (change to Colour A in last hdc - see 'Pattern Notes'), TURN.
Info :
Cut yarn and weave in ends.
Change to Colour A :
Ch2, 1hdc in same st (at base of ch2), 1hdc in next 2 sts, 1dc in next 5 sts, 2dc in last st, working down other side of ear: 2dc in next st, 1dc in next 5 sts, 1hdc in last 3 sts, sc2tog along bottom of ear.
Info :
Cut yarn, ensuring that you leave a long tail (about 10") for sewing ear to bunny square later.
— Assembly of Bunny Square :
Info :
NOTE: Embroider the details to your liking or watch the video tutorial for the preferred methods.
Step 1 :
Sew the ears through the exposed front loops in round 3.
Step 2 :
Embroider both eyes (cut about 10" of black yarn for each eye).
Step 3 :
Embroider the nose using about 15" of pink yarn (Colour B).
— Solid Granny Square (Make 12) :
Round 1 :
Using Colour B: Make a magic circle. Ch5 (counts as your 1st dc and a ch2), (3dc, ch2 into the magic circle) 3 times, 2dc, sl st to 3rd ch of beg ch5 to join [3dc on each side of square].
Alternative Round 1 :
Ch4, sl st to 1st ch to form a ring, ch5 (counts as your 1st dc and a ch2), (3dc, ch2) into the ring 3 times, 2dc, sl st to 3rd ch of beg ch5 to join [3dc on each side of square].
Round 2 :
Ch3 (counts as your 1st dc here and throughout), *(2dc, ch2, 2dc) in next ch2 corner sp, 1dc in next 3 sts*, repeat from * to * for a total of 3 times, (2dc, ch2, 2dc) in last ch2 corner sp, 1dc in last 2 sts, sl st to top of beg ch3 to join, [7 dc on each side of square].
Round 3 :
Ch3, 1dc in next 2 sts, *(2dc, ch2, 2dc) in next ch2 corner sp, 1dc in next 7 sts*, repeat from * to * for a total of 3 times, (2dc, ch2, 2dc) in last ch2 corner sp, 1dc in last 4 sts, sl st to top of beg ch3 to join, [11 dc on each side of square].
Round 4 :
Ch3, 1dc in next 4 sts, *(2dc, ch2, 2dc) in next ch2 corner sp, 1dc in next 11 sts*, repeat from * to * for a total of 3 times, (2dc, ch2, 2dc) in last ch2 corner sp, 1dc in last 6 sts, sl st to top of beg ch3 to join, [15 dc on each side of square].
Round 5 :
Ch3, 1dc in next 6 sts, *(2dc, ch2, 2dc) in next ch2 corner sp, 1dc in next 15 sts*, repeat from * to * for a total of 3 times, (2dc, ch2, 2dc) in last ch2 corner sp, 1dc in last 8 sts, sl st to top of beg ch3 to join, [19 dc on each side of square].
Round 6 :
Ch3, 1dc in next 8 sts, *(2dc, ch2, 2dc) in next ch2 corner sp, 1dc in next 19 sts*, repeat from * to * for a total of 3 times, (2dc, ch2, 2dc) in last ch2 corner sp, 1dc in last 10 sts, sl st to top of beg ch3 to join, [23 dc on each side of square].
Round 7 :
Ch3, 1EXdc in next 10 sts, *(2EXdc, ch2, 2EXdc) in next ch2 corner sp, 1EXdc in next 23 sts*, repeat from * to * for a total of 3 times, (2EXdc, ch2, 2EXdc) in last ch2 corner sp, 1EXdc in last 12 sts, sl st to top of beg ch3 to join or make an invisible join (easier when seaming later), [27 EXdc on each side of square].
Info :
Weave in ends. IMPORTANT: If you used the magic circle method in round 1, make sure that you weave in the yarn tail securely so that the middle of your square does not unravel.
— Arrangement of Bunny Crochet Baby Blanket :
Info :
Once you've made all your squares, you will arrange them before joining. Please see photo 3 in the photos section below, demonstrating how to arrange your squares.
— Joining Your Squares :
Info :
For this blanket, the designer used a flat slip stitch seam to join granny squares. You can use any method you like to join your squares, but the flat slip stitch seam gives a flat finished look that the designer prefers.
— Border :
Info :
Once you have joined your squares, you will then finish your blanket off with a border consisting of 7 rounds. Using Colour B: Attach yarn to the ch2 corner sp in the top right hand corner of the blanket.
Round 1 :
*(3dc, ch2, 3dc) in ch2 corner sp, 1dc in each st to next ch2 corner sp, working 1 dc2tog over the ch2 sps at each seam*, repeat from * to * 4 times, sl st to 1st dc at beg of round to join.
Rounds 2-5 :
Sl st in next st, sl st in ch2 sp, *(3dc, ch2, 3dc) in ch2 corner sp, 1dc in each st to next ch2 corner sp, working 1 dc2tog over the ch2 sps at each seam*, repeat from * to * 4 times, sl st to 1st dc at beg of round to join. Cut yarn, fasten off and weave in ends.
Change to Colour A :
Attach yarn to ch2 corner sp.
Round 6 :
*(3dc, ch2, 3dc) in ch2 corner sp, **sk next 2 sts, 2dc in sp immediately before next st**, repeat from ** to ** to last 3 sts before next ch2 corner sp, sk next 3 sts*, repeat from * to * 4 times, sl st to top of 1st st to join round. Cut yarn, fasten off and weave in ends.
Change to Colour B :
Attach yarn to ch2 corner sp.
Round 7 :
Ch3 (counts as your 1st dc), 4dc in ch2 sp, *(sk next 2 sts, 1sc in next st, sk next 2 sts, shell in next st) 26 times until 4 sts remain before next ch2 corner sp, work these 4 sts as follows: sk next 2 sts, 1sc in next st, sk next st, work C-Shell in next ch2 corner sp*, repeat from * to * 4 times (when you get back to the beginning of the round, replace the C-Shell with 4dc in beg ch2 corner sp), sl st to top of ch3 to join round.
Info :
Cut yarn, fasten off and weave in ends.
This Bunny Baby Blanket pattern blends classic granny-square construction with adorable bunny faces for a sweet handmade gift. Personalize it with your favourite colour palette to create a truly unique keepsake. Whether you are making this for a new baby or as a thoughtful shower present, it will bring smiles and cozy cuddles. 🐰🧶