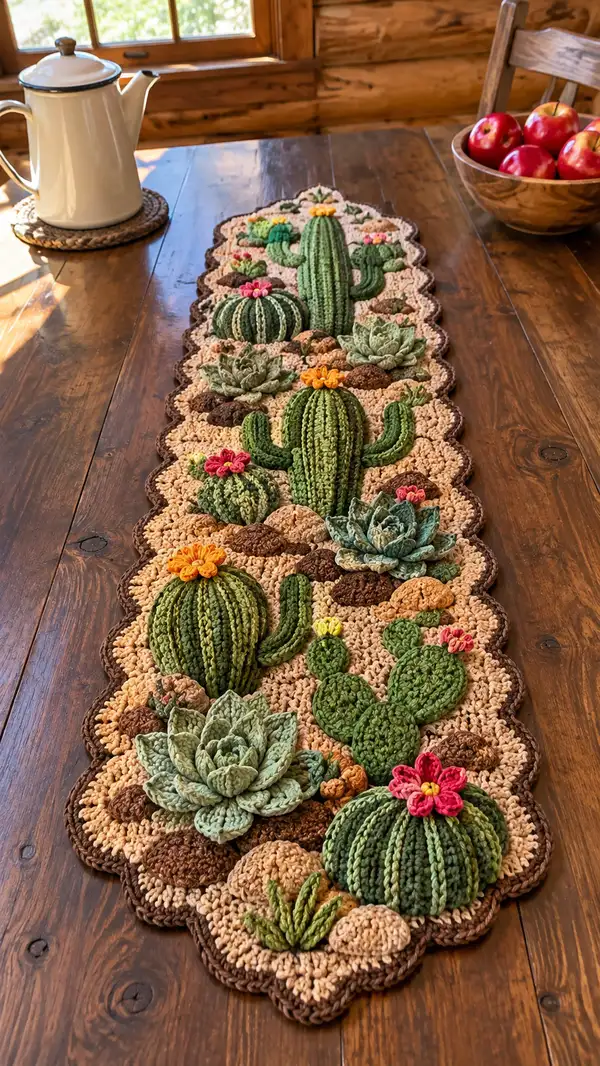
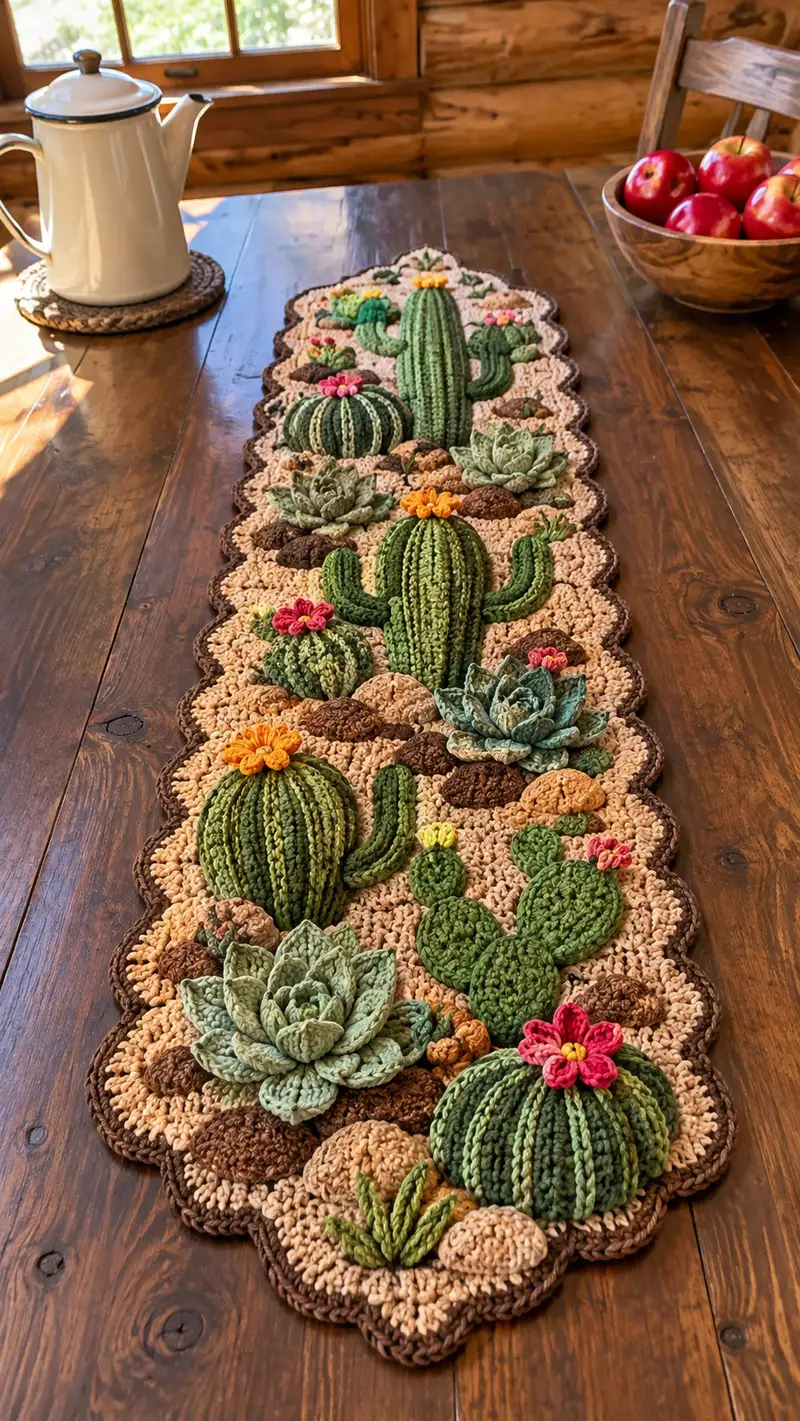
Bring a sun-drenched desert to your dining table with this richly textured Cactus and Succulent Desert Table Runner Pattern. This long runner features layered 3D succulents, barrel and column cacti, prickly-pear pads, scattered rocks, and bright floral accents sewn onto a sandy textured base with a scalloped chocolate border. The finished piece is eye-catching, tactile, and designed to sit flat while showcasing a playful miniature succulent garden.
Progress Tracker
0% Complete
— Notes & Gauge :
Info :
Gauge is not critical for this decorative runner, but for consistent size use worsted cotton with a 3.5mm hook for the base and 2.75–3.0mm hooks for sculptural pieces. Work tightly on 3D elements so stuffing does not show. All pieces are sewn to the base unless otherwise noted.
— Base Runner Panel (make one long panel) :
Info :
This base is worked as an elongated oval worked in continuous rounds around a foundation chain. Start with a foundation chain to determine runner length. The example here uses a chain of 72 for a long narrow runner about 34-40 inches long; adjust chain length in multiples of 6 to scale your runner.
Round 1 :
Chain 72. 1 sc in 2nd ch from hook and in each ch across to last chain (71), 3 sc in last ch, rotate to work along opposite side of the foundation chain and 1 sc in each foundation chain back toward the beginning (71), 2 sc in the final chain where you began to close (total around = 148)
Round 2 :
1 sc in each stitch around (148)
Round 3 :
1 sc in each stitch around (148)
Round 4 :
1 sc in each st around (148)
Info :
Switch to a slightly larger hook (3.5mm if you started with 3.0mm) if you want a slightly looser, textured sand surface. Keep the first several rounds flat; you will add textured clusters in the next section.
Round 5 :
Work 1 sc in next 5 st, then (3 sc in next st, 1 sc in next 10 st) repeat around to distribute 3-sc increases and keep the oval flat (total 160)
Round 6-10 :
1 sc in each st around (160)
Info :
We will create a textured sand effect using bobble and cluster stitches placed in irregular groups. Use the same sand/tan color yarn throughout the base. Place markers for sections where 3D elements will be sewn later so you preserve flatness at attachment points.
Round 11 :
*sc 4, bobble in next st, sc 6, cluster (hdc3tog worked in same 3 sts) rep from * around adjusting to fit (160)
Round 12 :
1 sc in each st around (160)
Round 13 :
*sc 8, bobble, sc 10, cluster* around (160)
Round 14-18 :
1 sc in each st around (160)
Info :
If you want more pronounced texture, alternate bobble and popcorn stitches. Keep the center area relatively smooth where large succulents will sit so they sew flat.
Round 19 :
BLO 1 sc in each st around to create a faint ridge across the field (160)
Round 20-26 :
1 sc in each st around (160)
Info :
Begin placing temporary pins to mark where the major cacti clusters will be: one centered near each end and two along the middle. This helps you orient the 3D pieces as you make them.
Round 27 :
Switch to sand color slightly darker for a subtle color shift: 1 sc in each st around (160)
Round 28-32 :
1 sc in each st around (160)
Info :
Prepare to add scalloped border. Border rounds use chocolate brown yarn worked in shell stitches to create rounded scallops. Keep base flat—do not over-tighten tension on border rounds.
Round 33 :
Change to chocolate brown. *skip 2 st, 5 dc in next st (shell), skip 2 st, sl st in next st* repeat around. Adjust final repeats so scallops are even (approximately 26 scallops around long runner)
Round 34 :
In each shell: sl st into center, ch 1, (sc, hdc, dc, hdc, sc) all into shell center to deepen scallop shape; sl st to next joining point around (scalloped edge complete)
Info :
Fasten off and weave in ends but leave surface for sewing. The base is complete; next create the 3D desert elements to attach on top. Make all 3D elements using smaller hooks (3.0mm and 2.75mm) for a firm texture.
— Tall Column Cactus (make 2 large columns) :
Info :
Each tall column cactus is worked in rounds like an amigurumi tube and features vertical ribbing achieved by working alternating rounds in BLO and FLO. Work with dark green for the outer ribs and lighter green for the inner ribs for a variegated look. The example column is approximately 18 rounds tall after increases (about 7-8 inches before sewing).
Round 1 :
mr, 6 sc in mr (6)
Round 3 :
(1 sc, inc) x 6 (18)
Round 4 :
(2 sc, inc) x 6 (24)
Round 5 :
(3 sc, inc) x 6 (30)
Info :
At this point the cactus base is established. If you want the column narrower, stop increasing earlier. For vertical ribs, the next rounds will be alternated in BLO and FLO to create ridge lines; do not join rounds — work continuous spiral for smooth ribs.
Round 6 :
1 sc in each st BLO (30)
Round 7 :
1 sc in each st FLO (30)
Round 8 :
1 sc in each st BLO (30)
Round 9 :
1 sc in each st FLO (30)
Info :
Continue alternating BLO and FLO rounds to build height. To accent ribs, use surface slip stitch in a contrasting green along selected FLO rounds after you finish stuffing to create fine ridge lines.
Round 10-22 :
Alternate: Round even numbers BLO, odd numbers FLO (1 sc in each st) building to desired height (30)
Info :
Begin stuffing the column firmly after round 14 so the cactus holds a tall posture. Use small amounts of stuffing and push into narrow places with a blunt tool.
Round 23 :
(4 sc, 1 dec) x 5 + (5 sc, 1 dec) x 1 to shape top evenly (approx 25)
Round 24 :
(3 sc, 1 dec) x 5 (20)
Round 25 :
(2 sc, 1 dec) x 5 (15)
Round 26 :
(1 sc, 1 dec) x 5 (10)
Round 27 :
5 dec (5) - or close as needed for a small top hole. Fasten off leaving long tail for sewing
Info :
Sew finish and use a yarn needle with the long tail to close remaining gap and create a smooth top. Optionally add a small yellow/orange flower: ch 6, sl st to form ring, 5 dc petals around, fasten off and sew to top.
— Ribbed Barrel Cactus (make 3 medium barrels) :
Info :
These are squat, spherical barrel cacti with vertical ribs achieved with post stitches or alternating BLO/FLO. Work tightly with a 2.75–3.0mm hook and stuff firmly so they hold shape.
Round 1 :
mr, 6 sc in mr (6)
Round 3 :
(1 sc, inc) x 6 (18)
Round 4 :
(2 sc, inc) x 6 (24)
Round 5 :
(3 sc, inc) x 6 (30)
Info :
At round 5 you have the width of a medium barrel. From here work 6–8 rounds even and then start alternating post stitches for ribs.
Round 6-11 :
1 sc in each st around (30)
Round 12 :
Work a round of fpdc (front post double crochet) across every 3rd stitch to form raised ribs, then continue with sc rounds above and below to stabilize (30)
Round 13-16 :
1 sc in each st around (30)
Info :
Stuff the barrel firmly beginning after round 12. Continue stuffing in small amounts to maintain firm, round shape; do not overstuff or it will flatten when sewn to base.
Round 17 :
(3 sc, 1 dec) x 6 (24)
Round 18 :
(2 sc, 1 dec) x 6 (18)
Round 19 :
(1 sc, 1 dec) x 6 (12)
Round 20 :
6 dec (6) - close small opening with tapestry needle or leave long tail for sewing to base
Info :
Optional: embroider small white or light yellow dots for tiny spines, or attach small yarn fuzz using a contrasting light thread to simulate hairly spines. Sew small flower petals (see Flower motif section) to the top.
— Prickly Pear Pad (make sets of 3-6 pads per grouping) :
Info :
Each pad is a flattened oval worked in rounds and sewn together in clusters. Use medium green and a small hook for firmness. Make multiple pad sizes (small, medium, large) to create natural clusters.
Round 1 :
mr, 6 sc in mr (6)
Round 3 :
(1 sc, inc) x 6 (18)
Round 4 :
(2 sc, inc) x 6 (24)
Round 5 :
sc 2, inc, sc 4, inc, sc 2, inc, sc 4, inc, sc remaining to form a slightly elongated oval (approx 30)
Info :
Make small clusters by creating a larger pad (30 sts) and two smaller pads (18–24 sts). Sew small pads overlapping slightly to form prickly-pear clusters. Add tiny yellow or pink flowers by making 5 small chain petals and sewing them on.
Round 6-10 :
1 sc in each st around to give desired thickness (30 / 24 / 18 depending on size)
Round 11 :
Fold pad and sc through both layers around bottom edge to give slight thickness and curvature (stitch count will halve where folded)
Info :
Sew pads together along edges using mattress stitch to create the characteristic overlapping pad look. Add tiny embroidered spines by stitching straight stitches in a lighter color.
— Mini Column with Arms (small 'saguaro' shape, make 2-3) :
Info :
These smaller saguaro-like columns have 1–2 arms. Make a central column and make arms separately to sew on later to allow shaping and angling.
Round 1 :
mr, 6 sc in mr (6)
Round 3 :
(1 sc, inc) x 6 (18)
Round 4-6 :
1 sc in each st around (18)
Round 7 :
Alternate BLO/FLO round for 3 rounds to create ribbing (18)
Info :
For the arm: ch 1, 5 sc in next st, then continue in rounds (or make a small tube of 10–12 rounds) and decrease slightly at the base. Stuff lightly and sew to main column at chosen height.
Round 8-14 :
1 sc around to desired length (18)
Round 15 :
(1 sc, 1 dec) x 6 (12)
Round 16 :
6 dec (6). Fasten off; leave tail for sewing
Info :
When attaching arms, use a small amount of stuffing to shape the elbow and pinch to create a natural curve. Stitch securely through multiple stitches to anchor arm to column.
— Succulent Rosette (large, make 3) :
Info :
Large succulents are layered petal motifs worked flat in rounds and joined to create the rosette. Use a slightly lighter variegated sage green and a smaller hook (2.75–3.0mm) for sculptural leaf definition. Each rosette uses multiple petal rounds and is approximately 10-12 rounds of petals.
Round 1 :
ch 2, 6 sc in 2nd ch from hook or mr 6 sc (6)
Round 2 :
(1 sc, inc) x 3 (9)
Round 3 :
(2 sc, inc) x 3 (12)
Round 4 :
(3 sc, inc) x 3 (15)
Info :
Leaf rounds: Each leaf/petal is created by working a small fan (sc, hdc, dc, hdc, sc) into a single stitch on the round below, then securing with sl st and moving to the next stitch. This creates sculptural layers. Make 3–4 layers, staggering leaf placement.
Round 5 :
*sc in next st, make leaf fan in next st (sc, hdc, dc, hdc, sc), sc in next st* repeat around (15 leaves)
Round 6 :
sl st behind each leaf to create a base for next layer, then make leaf fans into spaces between leaves: *sl st, ch1, (sc, hdc, dc, hdc, sc) in space* around (15 larger leaves)
Round 7-9 :
Repeat leaf layering, decreasing leaf size slightly for inner rounds by working smaller fans (sc, hdc, dc) for dramatic layered effect. After final layer, secure and leave long tail for sewing (rosette diameter approx 3.5–4.5 inches)
Info :
To give a succulent a cupped shape, slightly block each leaf with a warm steam and bend the leaf upward while damp. Tend to arrange three large rosettes diagonally along the runner for visual balance.
— Small Rosettes & Baby Succulents (make 6–8) :
Round 3 :
1 sc in each st around (12)
Round 4 :
Make 6 tiny leaf fans around (small fan sc, hdc, dc, hdc, sc) into every other post to create a mini rosette (6 leaves)
Info :
Small rosettes are used to fill gaps and add texture. Because they are small, work them very tightly so they hold shape when sewn flat to the base.
— Rocks & Pebbles (make many in 3 sizes) :
Info :
Create small dome rocks by working tiny amigurumi spheres flattened on one side. Use brown shades and tan shades to add realistic clusters around succulents and cacti bases.
Round 1 :
mr, 6 sc (6) - small pebble
Round 3 :
(1 sc, inc) x 6 (18)
Round 4 :
1 sc in each st around (18)
Round 5 :
(1 sc, dec) x 6 (12) - stuff lightly and close with 6 dec (6), leave tail for sewing
Info :
For medium rocks start with 8 sc in mr and increase to 24–30 before decreasing. For very flat stones, crochet in rounds of sc into a short tube, stuff minimally, then very lightly whip stitch closed and flatten while sewing to base to give flatter profile.
— Small Accent Plants: Agave spikes (make 4–6) :
Info :
Agave or grass-like accents are made from narrow leaves worked flat and folded. Make 6–8 leaves per clump and stitch them together to form a rosette-like clump with pointy ends.
Round 1 :
ch 6, sc in 2nd ch from hook and across to create a narrow leaf, ch 1, turn and sc back to the start for 2 rows; fasten off and fold in half and stitch base to secure (approx 8 sts long)
Round 2 :
Make 6–8 leaves and stitch them together at bases to form a cluster. Use darker green on undersides and light green on tops for contrast.
Info :
Use a small amount of glue or tight stitches to anchor leaf tips so they do not fray during handling. Sew clusters to the base between rocks for a realistic look.
— Flower Motif (small - topflowers) :
Round 1 :
ch 6, sl st to form ring (or mr). ch 1
Round 2 :
Make (sc, hdc, dc, hdc, sc) in ring to form one petal. Repeat 5 times to make 5 petals total. Fasten off and sew center slightly stacked with a small yellow french knot or a tiny bobble (3–5 wraps) for the stamen. (5 petals)
Info :
Use vivid pinks, corals, and yellows to contrast with greens. Flowers are sewn on last so you can place them to accent composition.
— Assembly & Placement Preparation :
Info :
Lay the base runner flat and place all elements in the arrangement you like before sewing. Typical arrangement: large rosettes near each end and one central; tall column cacti made in pairs set near centerline; barrel cacti and rocks fill gaps; prickly pear groups on one side for asymmetry. Pin each piece with rust-proof pins before sewing.
Info :
For heavy pieces like large rosettes and tall column cacti use multiple anchor stitches through the base and, if desired, a small length of upholstery thread or doubled yarn to secure; stitch through the innermost rounds so stitches are hidden.
— Detailed Sewing & Attachment Steps :
Round 1 :
Position large column cactus at marked center placement. Use long tail from cactus to sew through base starting at the bottom of cactus and working around at intervals of 6–8 stitches, pulling snug to create secure attachment
Round 2 :
Sew barrel cacti into place by catching foundation rounds of the barrel and weaving through several stitches of the base (6–8 passes per barrel)
Round 3 :
Sew succulents by using the long tail at the center of the rosette, pass needle through base and then back through several times creating a secure anchor. For extra stability, make 2–3 passes under a rock or behind a penciled-in ridge of the base.
Info :
When sewing, keep stitches small and tight and avoid large visible knots on the underside. Weave tails into the base across multiple rows and trim close. For particularly heavy pieces tie an internal lock stitch and bury ends inside the body of the piece before final trimming.
Round 4 :
Attach prickly pear pads in natural overlapping formation by sewing small pads first, then overlapping larger pads on top and across so seams are hidden. Use mattress stitch for tidy joins.
Round 5 :
Stitch rocks and pebbles around plant bases in clusters. Sew small rocks first, then larger. Use contrasting brown threads to anchor rocks so they appear nested in the sand texture.
Info :
Add flowers last. Sew each flower to the top of a barrel or pad so the base of the flower pierces into the very top center and sits flush. Use a dot of fabric glue if needed for extra security but hide glue residue.
— Extra Embellishments & Finishing :
Info :
After all pieces are sewn down, gently steam-block succulent leaves to set their shapes if needed. Lightly fluff cacti ribs with a blunt needle to sharpen vertical ridges. Ensure all tails are woven in and cut close. Block runner flat if any elements lifted during sewing.
Info :
If you prefer a reversible runner, create motifs that can be sewn loosely and removed for washing. Otherwise, hand-wash gently and dry flat; do not wring or put under heavy heat.
Final Care :
Spot clean when necessary. To flatten/rreshape after storage, re-block lightly with steam and arrange succulents back into place if needed.
This Cactus and Succulent Desert Table Runner transforms a table into a tiny, tactile garden — full of texture, color, and charm. Each stitch builds up sculptural plants and rocky accents for a truly special centerpiece. Take your time, enjoy the layering and assembly, and savor how the runner comes to life! 🌵🧶🌸