🧢 Beautiful ✨ Detailed πŸ’ Adorable

Daisy Buttercup Crochet Table Runner Pattern

Daisy Buttercup Crochet Table Runner Pattern
4.3β˜… Rating
8-10 Hours Time Needed
1.6K Made This
βœ‚οΈ

Intermediate Level

Ideal for those with basic crochet experience, featuring slightly more advanced stitches and techniques to expand your skills.

⏱️

All-Day Adventure

Requires 8-10 hours, ideal for a full day of immersive crocheting.

🏑

Cozy Accent

A warm touch for your space that transforms ordinary corners into inviting nooks filled with handmade charm.

🧢 Jump to Pattern ↓

About This Daisy Buttercup Crochet Table Runner Pattern

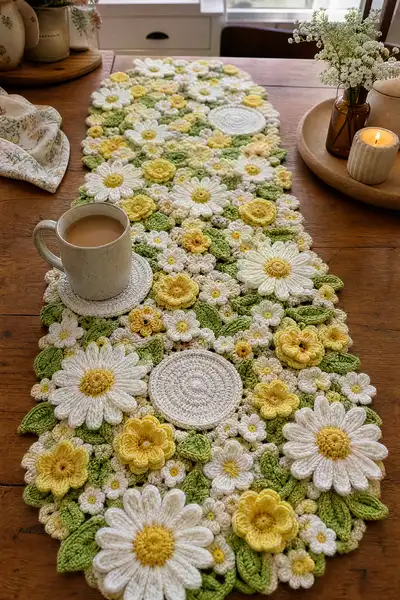
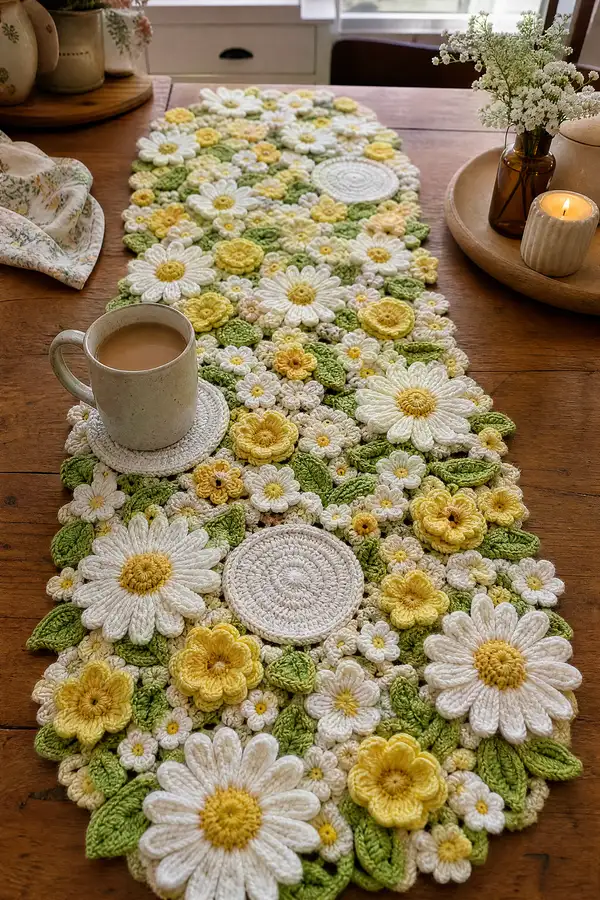
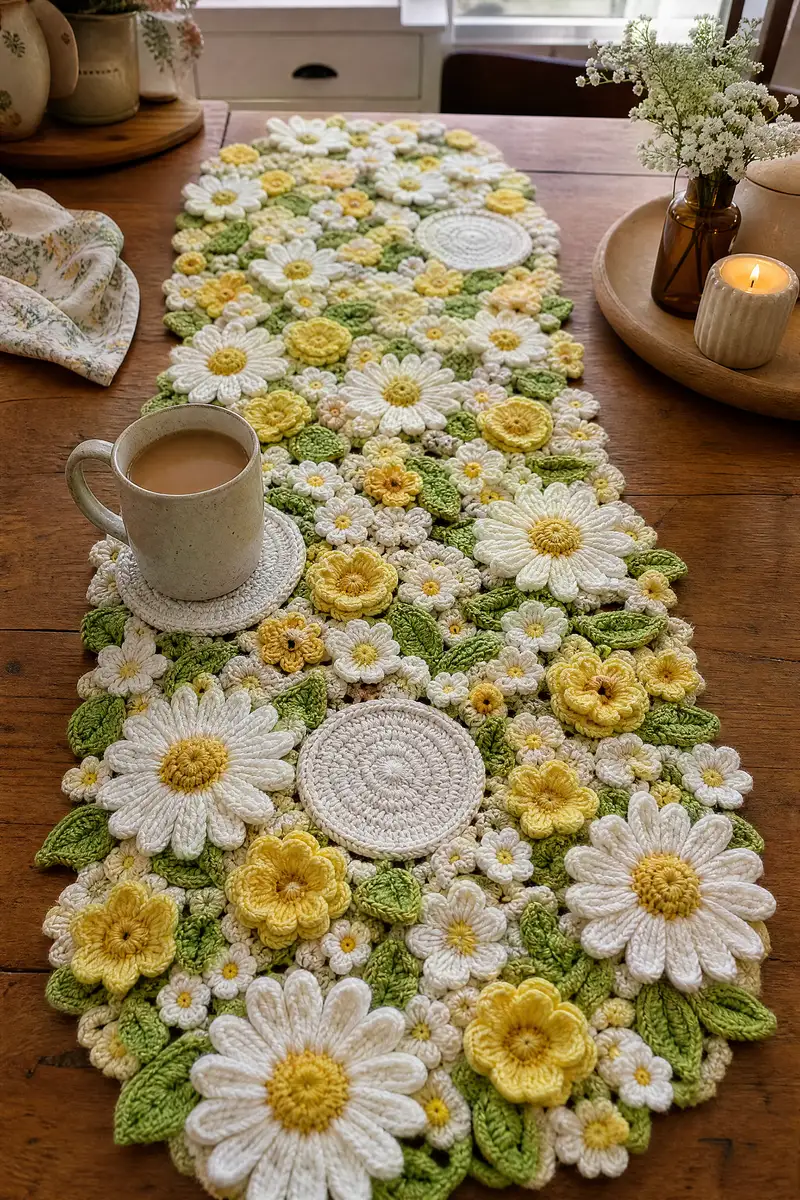
This Daisy Buttercup table runner is created from dozens of small crochet motifs β€” large daisies with raised petals, layered buttercup rosettes, tiny single-petal blooms, and sculpted leaves β€” joined into a dense, organic field of flowers. Colors are pale cream, warm butter yellow, soft lemon and fresh leaf greens to create a springtime palette. The runner shown is worked in worsted weight cotton with a 3.5 mm hook to give a sturdy, slightly textured finish ideal for tabletops.

Daisy Buttercup Crochet Table Runner Pattern crochet pattern - detailed view of completed project

The pattern breaks the runner into repeatable motif recipes: big daisies, mid and small flowers, rosette buttercups, leaves and round coasters/placemat circles. Each motif is crocheted individually and assembled with whip stitch and strategic slip-stitch joins to create the lacy, dimensional effect.

Why You'll Love This Daisy Buttercup Crochet Table Runner Pattern

I love this pattern because it brings the joy of creating tiny motifs into a cohesive, dramatic table piece. The layered petals and small filler flowers let you play with color and texture, and assembling these motifs is relaxing and oddly meditative. The finished runner makes a beautiful seasonal centerpiece and every time I see the clustered daisies I smile.

Daisy Buttercup Crochet Table Runner Pattern step 1 - construction progress Daisy Buttercup Crochet Table Runner Pattern step 2 - assembly progress Daisy Buttercup Crochet Table Runner Pattern step 3 - details and accessories Daisy Buttercup Crochet Table Runner Pattern step 4 - final assembly and finishing

Switch Things Up

I love playing with the color palette on this runner β€” you can make a soft pastel spring version or swap in warm autumn shades for a fall table. Changing just the center color of the daisies will dramatically alter the overall mood.

I often vary motif scale: make a few extra-large daisies as stronger anchors and fill with even smaller rosettes for a lacy, delicate texture. You can also add tiny embroidered accents or beads to centers for sparkle, or substitute acrylic yarn for a more budget-friendly piece that still looks lovely.

I recommend experimenting with motif placement before sewing; the pattern is very forgiving and allows you to rearrange clusters until the balance feels right. Have fun mixing leaf shapes and negative space β€” sometimes a small gap with a few leaves looks more organic than tightly packed flowers.

Common Mistakes & How to Fix Them

βœ— Skipping stitch markers at round starts can cause misaligned petals and gaps; mark the first stitch of each round for accurate placement βœ— Using yarn with too much sheen or stretch will flatten puff stitches and petals; choose cotton or cotton-blend worsted for structure βœ— Not blocking larger daisies before assembly can make edges uneven; lightly steam or pin them to shape before joining βœ— Stuffing or pressing motifs too firmly when joining will create lumps under the runner; keep joins firm but flat βœ— Inconsistent tension between motif types creates an uneven surface; try to keep hook size and technique consistent for all pieces βœ— Joining without planning layout causes awkward edges; lay out all motifs first and pin in place before sewing

Daisy Buttercup Crochet Table Runner Pattern

A delicate, spring-inspired table runner made from clustered daisies, buttercup rosettes, leaves and textured filler motifs. This pattern recreates the layered, 3D floral surface shown in the photo with detailed motif instructions and an assembly method to join everything into a long runner for a dining table or console.

Intermediate 8-10 Hours

Materials Needed for Daisy Buttercup Crochet Table Runner Pattern

β€” Main Fabric

  • 01
    Worsted weight cotton yarn (#4), approximately 300-350g in cream/white for daisies and coasters
  • 02
    120-160g in soft butter yellow for centers and buttercup rosettes
  • 03
    80-120g in pale lemon/soft yellow for small flowers and accents
  • 04
    150-200g in leaf green (2 shades: light and medium) for leaves and filler motifs
  • 05
    Small amounts (20-30g each) of pale beige or warm ecru for background filler flowers

β€” Tools Required

  • 01
    3.5mm (E) crochet hook for main motifs
  • 02
    3.25mm (D) hook for tighter centre work and small motifs (optional)
  • 03
    Yarn needle for sewing motifs together
  • 04
    Scissors
  • 05
    Stitch markers (at least 6)
  • 06
    Blocking pins and a blocking mat
  • 07
    Tape measure or ruler
  • 08
    Optional: small amount of fabric glue for securing loose ends
  • 09
    Optional: T-pins for laying out motifs during assembly

Progress Tracker

0% Complete

β€” Overview and Layout :

Info :

Make motifs in batches by type and color. Lay them on a flat surface mimicking the photo's organic scatter β€” large daisies act as anchors, medium daisies and buttercups fill the field, and many small 3–5 petal flowers plus leaves fill gaps. Work on a flat table and pin pieces as you assemble to ensure a steady shape for the runner.

Info :

Suggested motif counts for a runner approximately 12-14 inches wide and 48-60 inches long: Large daisies x 6, Medium daisies x 8–10, Small daisies x 30–40, Large buttercups x 8–10, Small buttercups x 20–30, Leaves x 40–50, Small filler rosettes x 60–80, Round coasters x 3–4 for cup placement.

β€” Large Daisy (Make 6) :

Round 1 :

6 sc in mr (6)

Round 2 :

6 inc (12)

Round 3 :

(1 sc, inc) x 6 (18)

Round 4 :

(2 sc, inc) x 6 (24)

Round 5 :

(3 sc, inc) x 6 (30)

Round 6 :

1 sc in each st BLO (30)

Info :

This builds a shallow, slightly raised center base for the yellow middle. Work Round 6 in BLO to give a subtle ridge that helps the petal base sit nicely.

Round 7 :

Change to petal color (white/cream). *ch 2, (3 dc, ch 1, 3 dc) in next st, sl st in next st* repeat around to create petal clusters; make 12 petals total spaced evenly β€” you will use every other stitch for petal placement. (12 petals)

Round 8 :

Work petals up a second layer for full-bodied petals: In same stitch as each petal base, *sl st to the 1st dc of the petal, ch1, 5 dc cluster around the ch1 space, sl st to next base stitch* repeat for 12 petals, finishing last sl st to the center ridge.

Round 9 :

Edge: 1 sc between petals to tidy gaps (30)

Info :

Petals are intentionally worked as layered clusters to create the sculpted look. Keep petals consistent in tension so they all flare similarly. If preferred, use a long tail to tack each petal root to the center with a few stitches to secure shape.

Round 10 :

Optional: For extra texture, sc around each petal in FLO only to catch the raised ridges; join with sl st. Work 1 sc in each st (30)

Round 11 :

Switch to center yellow. Join in any center stitch behind petals and work 6 sc in magic loop style around remaining central hole to create a raised button (6)

Round 12 :

Inc each stitch around the small center: 6 inc (12)

Round 13 :

(1 sc, inc) x 6 (18)

Round 14 :

Finish center with puff stitch ring for height: *ch1, (yarn over, insert, yo, pull up loop) 3 times in same st, yo pull through all loops to make 3-loop puff, ch1, sl st in next st* repeat around 9 times to make 9 small puffs. Fasten off and weave in ends.

Info :

Block each large daisy flat by pinning to a mat and steam lightly if needed. Ensure centers remain slightly raised; avoid flattening petals during blocking.

Round 15 :

Optional edge trim: With contrasting ecru, sl st 1 round around petals to neaten joins and provide a sturdier edge for assembly (30)

β€” Medium Daisy (Make 8–10) :

Round 1 :

6 sc in mr (6)

Round 2 :

6 inc (12)

Round 3 :

(1 sc, inc) x 6 (18)

Round 4 :

1 sc in each st BLO (18)

Info :

Using BLO here gives a slight ridge to anchor the petals; do not skip unless you want flatter petals.

Round 5 :

Petal round: Make 9 petals. *Ch2, 4 dc in next stitch, sl st in next stitch* repeat around to create 9 petals. (9 petals)

Round 6 :

Second petal pass for fullness: Into the same base for each petal, *ch1, 3 dc, ch1, sl st* repeat around (9 petals)

Round 7 :

Center: Join yellow and work 6 sc in a small loop (6)

Round 8 :

(1 sc, inc) x 3 (9)

Info :

Fasten off center and weave tail through the back to secure; leave long tail if you will sew this center onto the face of the flower to raise it slightly.

Round 9 :

Optional scallop edge: *sl st, ch2, sl st in next stitch* around to create delicate scallops between petals. Fasten off and weave in ends.

β€” Small Daisy (Many β€” Make 30–40) :

Round 1 :

6 sc in mr (6)

Round 2 :

6 inc (12)

Round 3 :

Petal round: Make 6 small petals around by *ch1, 3 dc in next st, sl st in next st* repeat to make 6 tiny petals

Round 4 :

Join center with contrasting yellow: 6 sl st around center hole and fasten off (6)

Info :

These tiny daisies act as filler. Make many and vary the sizes slightly by switching hook to 3.25mm for tighter pieces or 3.75mm for airy ones.

β€” Large Buttercup Rosette (Make 8–10) :

Round 1 :

6 sc in mr (6)

Round 2 :

6 inc (12)

Round 3 :

(1 sc, inc) x 6 (18)

Round 4 :

Change to buttercup color. Work 1 sc in each st (18)

Round 5 :

Forming petals with puff clusters: *ch1, (yo, insert, yo, pull up loop) 4 times in same st, yo pull through all loops to make 4-loop puff, ch1, sl st in next st* repeat around for 9 puff petals. Fasten off and weave in ends.

Info :

Puff petals create the buttercup's rounded look. Keep loop height even when making the puffs so petals read uniformly when joined into clusters.

β€” Small Buttercup (Make 20–30) :

Round 1 :

6 sc in mr (6)

Round 2 :

Change to buttercup yellow, 6 sl st around to make a tidy little button (6)

Round 3 :

Make 4-5 tiny puffs equally spaced: *(yo, insert, yo, pull up) 3 times, yo pull through* in every other stitch to produce 4 mini petals. Fasten off.

Info :

These are very small and intended to be sewn flat into gaps. Use 3.25mm hook for the tightest read and smallest footprint.

β€” Leaf Motif (Make 40–50) :

Round 1 :

Ch 8, sl st to form a small ring (or mr and 8 ch around) (8)

Round 2 :

Work along chain: sc in 2nd ch from hook, hdc, 3 dc, hdc, sc in last ch; now work along opposite side of chain: sc, hdc, 3 dc, hdc, sc (total symmetrical leaf shaping). Fasten off leaving tail for sewing.

Round 3 :

Optional center vein: With darker green, embroider a central running stitch from base to tip to mimic a vein. Secure and weave ends on the back.

Info :

Vary leaf sizes by adjusting foundation chain between 6 and 12. Slight blocking across shape will help leaves to tuck beneath petals better during assembly.

β€” Filler Rosette (Tiny Pom Flower) (Make 60–80) :

Round 1 :

6 hdc in mr (6)

Round 2 :

(1 hdc, inc) x 3 (9)

Round 3 :

Work a puff-edge round to add texture: *ch1, (yo, insert, yo, pull up) 3 times, yo pull through* into every other stitch for 4 tiny puffs. Fasten off and flatten slightly while sewing.

Info :

These small rosettes help hide join seams between larger pieces and add visual depth. Make many; they are quick and use little yarn.

β€” Round Coaster / Cup Mat (Make 3–4) :

Round 1 :

6 sc in mr (6)

Round 2 :

6 inc (12)

Round 3 :

(1 sc, inc) x 6 (18)

Round 4 :

(2 sc, inc) x 6 (24)

Round 5 :

(3 sc, inc) x 6 (30)

Round 6 :

1 sc in each st BLO (30)

Round 7 :

1 sc in each st (30)

Round 8 :

Edge: *ch1, skip 1, sl st in next st* around to create slight scallop and allow coaster to sit flat (approx 15 sl st scallops). Fasten off and weave in ends.

Info :

Coasters can be made slightly larger by adding more rounds of (4 sc, inc) etc. Make them in cream to act as neutral anchor discs on the runner surface.

β€” Joining Strategy and Motif Edging :

Info :

Lay out all motifs in your desired runner shape and pin to a large blocking board or thick towel. Start with large daisies placed evenly, add medium motifs and bigger buttercups, then tuck small daisies and rosettes tightly between to create a dense surface with minimal gaps.

Info :

When motifs touch, use whip stitch with matching yarn to join through back loops only on one motif and front loops on the other to create an invisible seam. Use small stitches so seams are secure but low-profile. Work outward from central motifs to edges.

Round 1 :

Edge join step 1: Using cream yarn, work a single loop round around the perimeter of the entire pinned assembly by slip stitching into the outermost stitches of motifs to create a continuous backing ridge. This is not a counted round; work evenly around, making 1 sl st every 3–4 mm depending on motif spacing.

Info :

If you want a softer runner edge, add a final round of sc around the perimeter with 1 sc per sl st, placing 2 sc in corners or wider gaps to keep it flat.

Round 2 :

Optional blanket stitch edging for a handmade look: With contrasting ecru, *ch1, sc in next st, ch2, skip one gap, sc* around. Fasten off and weave in ends.

Info :

Use blocking pins after joins to keep motifs flat while seams set. Mist lightly with steam or water and let dry pinned to hold final shape.

β€” Assembly Details, Spacing and Tips :

Info :

Work in small sewing sessions: pin a small area of motifs (about 6–8 pieces) and sew them together, then move on. This prevents the layout from shifting as you attach pieces. Always sew through backs of motifs to hide tails and join points.

Info :

When joining a large daisy to a small cluster, sew a few stitches into the petal bases and center ring to pull motifs snugly together. Add tiny filler rosettes on top of seams to hide stitches and reinforce joins.

Info :

Edge finishing tip: If your final runner edge looks jagged, add small leaf motifs or half-flowers into gaps and whip stitch them to the edge to even out curves.

Info :

Final pressing: After all seams are sewn, lay runner flat and block again. Use low steam and a pressing cloth to avoid flattening puffy petals. Allow to dry fully before use.

Info :

Storage: Store flat or rolled with tissue paper between layers to protect petals. Avoid heavy stacking to prevent crushing puff petals.

Assembly Instructions

  • Arrange all motifs flat on a large surface, placing the largest daisies first as anchors. Pin each motif with T-pins to maintain layout symmetry before sewing.
  • Start joining at the central anchor motifs: use a yarn needle and a length of the main cream color to whip stitch overlapping edges, sewing through the back loops of one motif and front loops of the adjacent motif for an invisible seam.
  • Sew leaves into gaps between flower clusters by placing the leaf base beneath a petal edge and stitching through both motif and leaf tail to secure, then tack the tip with one or two stitches.
  • Add filler rosettes and tiny daisies over joins to hide seams and reinforce attachment; sew through the center firmly with several passes to keep them flat.
  • For perimeter stabilization, sl st around the outermost motifs picking up 1–2 loops from each motif to create a continuous edge. Add an additional sc round if you prefer a stronger border.
  • Attach round coasters by securely sewing around their backs to the surface in their planned positions so they sit flush with minimal wobble when cups are placed.
  • Weave all yarn tails into the backs of adjacent motifs using a yarn needle, making sure to catch multiple threads for security, then trim close.
  • Final blocking: pin the entire runner into the intended final shape and lightly steam or spray and leave to dry overnight to set joins and flatten edges.

Important Notes

  • πŸ’‘Use stitch markers consistently when making rounds with many sc to ensure placement of petals and puff stitches stays accurate
  • πŸ’‘Work all puffs and textured stitches with even loop heights; test a practice puff and measure before committing to an entire batch
  • πŸ’‘Stuffing is not required for motifs; shape comes from stitch height and blocking rather than internal filling
  • πŸ’‘Make motifs in consistent batches so color dye lots match; small variations between lots are noticeable across many motifs
  • πŸ’‘Sewing seams with a thinner yarn or doubled running thread can create less visible joins; tuck ends thoroughly
  • πŸ’‘Pin and plan layout before sewing any permanent joints so you can adjust spacing and balance the composition
  • πŸ’‘When making coasters, ensure the central rounds are flat by working BLO then normal rounds to prevent cupping
  • πŸ’‘Keep a small stash of extra motifs to fill unexpected gaps or to replace any motif that is misshapen

This Daisy Buttercup Runner brings a garden to your table β€” layered petals, tiny rosettes and sculpted leaves come together for a whimsical, tactile centerpiece. It's a joyful project that rewards you with a beautiful, one-of-a-kind decorative runner. 🧢🌼 Take your time assembling the clusters and enjoy the meditative nature of stitching small motifs into a larger whole. Display it proudly, give it as a special handmade gift, and share your creation with friends! 🌿
You ask,

we answer.

FAQs

What is the finished size of this runner?

Based on the suggested motif counts and worsted cotton yarn, the runner will measure approximately 12-14 inches wide and 48-60 inches long. Adjust motif counts to alter length and width proportionally.

Can I use a lighter or heavier yarn?

Yes β€” lighter yarn (sport/fingering) will make a more delicate, smaller runner; heavier yarn (aran/bulky) will create a sturdier, larger piece. Adjust hook size accordingly and make a gauge swatch of a motif to estimate final size.

How do I prevent petals from flattening during use?

Choose cotton or cotton-blend yarn with decent body; avoid overly soft acrylics that can sag. Block motifs gently and avoid heavy items on top of petals. For frequently used tables, place a cloth under the runner to reduce friction and flattening.

Can I machine wash this runner?

Hand wash only in cool water and lay flat to dry. Cotton can shrink slightly; blocking after washing will help reshape petals. Machine washing is not recommended because the texture and assembly seams can be damaged.

How much yarn will I need overall?

Approximately 700-900 grams total of worsted cotton yarn across main and accent colors for a runner of the sizes suggested. Exact amounts depend on motif counts and yarn brand. Always buy extra yarn to ensure dye lot consistency.

How do I fix a motif that's misshapen after assembly?

Unpick the few stitches holding that motif in place and remove it, re-block the motif flat, then re-sew it in using the same method. Small rosettes can be used to cover any evidence of rework.

Do I need to block motifs before assembly?

Blocking is highly recommended for all large and medium motifs to ensure uniform petal shape and easier joining. Small filler motifs can be lightly shaped as needed.

Can I add beads or sequins?

Yes, you can embellish centers with small beads sewn securely into place. Avoid heavy embellishments near the runner edges to prevent sagging.