🧢 Beautiful ✨ Detailed πŸ’ Adorable

Cactus frog with removeable pot Amigurumi Pattern

Cactus frog with removeable pot Amigurumi Pattern
4.0β˜… Rating
2-4 Hours Time Needed
1.2K Made This
βœ‚οΈ

Intermediate Level

Ideal for those with basic crochet experience, featuring slightly more advanced stitches and techniques to expand your skills.

⏱️

Bite-Sized Project

Finishes in 2-4 hoursβ€”perfect for an afternoon of creative relaxation.

🧸

Cute Companion

An adorable friend to cherish, handcrafted with love to bring comfort and joy for years to come.

About This Cactus frog with removeable pot Amigurumi Pattern

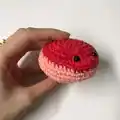
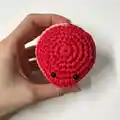
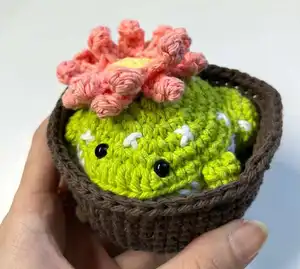
This pattern creates a small cactus-inspired frog with embroidered cactus marks, a removable flower, and a crochet flower pot. It uses simple amigurumi construction worked in continuous spiral rounds and includes separate pieces for legs, toes, a decorative flower, and a pot. The finished toy is compact and perfect for gifting or display.

Cactus frog with removeable pot Amigurumi Pattern crochet pattern - detailed view of completed project

Clear round-by-round instructions and photos guide you through assembly and finishing. Materials are common and interchangeable, making the design adaptable to yarn you already have.

Why You'll Love This Cactus frog with removeable pot Amigurumi Pattern

I absolutely love this pattern because it combines charming whimsy with simple construction that yields a delightful result. I enjoy how the removable pot adds a playful interaction to the toy, making it feel extra special. The little embroidered cactus marks and the layered flower let me add personalized touches every time. I also appreciate that the pattern uses common stitches and small pieces, so you can finish a complete character in a short time. Seeing the finished frog perched in its pot always brings a smile, and I hope it brings you the same joy.

Cactus frog with removeable pot Amigurumi Pattern step 1 - construction progress Cactus frog with removeable pot Amigurumi Pattern step 2 - assembly progress Cactus frog with removeable pot Amigurumi Pattern step 3 - details and accessories Cactus frog with removeable pot Amigurumi Pattern step 4 - final assembly and finishing

Switch Things Up

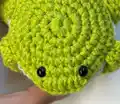
I love how easy it is to change colors to create new personalities for the frog; try a pastel green for a softer look or a lime green for a bright, poppy friend.

You can make the frog larger or smaller by changing yarn weight and hook size β€” bulky yarn with a larger hook makes a cuddly version, while finer yarn creates a tiny keychain friend.

I often swap the flower colors to match seasons: warm oranges for autumn, bright pastels for spring, or snowy whites for winter themes.

Try embroidering different patterns instead of the X marks β€” tiny hearts, dots, or stripes give the frog a unique character.

Make a set of frogs in matching or contrasting pots to create a mini succulent garden display for your desk or shelf.

Use safety eyes for durability, or stitch embroidered eyes for a child-safe option if gifting to young children.

For a posable look, you can add a small piece of wire inside the limbs before sewing them closed to gently bend legs into playful poses.

I like adding a tiny removable scarf or bow to accessorize the frog β€” simply crochet a small strip and tie it loosely around the neck.

To make the pot more stable, add a small flat weight inside the bottom (safely enclosed) so the frog sits nicely without tipping over.

If you want a sewn-in flower, stitch the flower firmly to the head rather than using a long tail; otherwise, leave it removable for play and positioning.

Common Mistakes & How to Fix Them

βœ— Forgetting to use a stitch marker when working in spiral rounds can cause you to lose your place; place a marker at the first stitch of each round and move it up as you work to stay accurate. βœ— Stuffing too late or too much will distort shaping and make sewing pieces together difficult; stuff gradually during shaping, especially before closing neck and leg openings. βœ— Placing safety eyes after too many rounds can misalign the face; insert safety eyes between rounds 5 and 6, four stitches apart as instructed to ensure the nose sits centered. βœ— Skipping counts during increases and decreases results in uneven shaping; count stitches at the end of each round and correct any mistakes before continuing to maintain the intended silhouette.

Cactus frog with removeable pot Amigurumi Pattern

Make a delightful cactus frog amigurumi with a removable flower pot β€” a small, giftable project that mixes simple amigurumi techniques with playful details. You will work in continuous rounds and assemble separate pieces including legs, toes, a decorative flower, and a cozy pot. Perfect for adding charm to your desk, shelf, or as a handmade present.

Intermediate 2-4 Hours

Materials Needed for Cactus frog with removeable pot Amigurumi Pattern

β€” Main Fabric

  • 01
    Any type of yarn (I use Sugar and Cream cotton yarn) - main: Green (hot green) for frog body
  • 02
    White yarn for belly and embroidery marks
  • 03
    Yellow yarn for flower center
  • 04
    Light red / Tea rose yarn for flower petals
  • 05
    Red yarn (optional accent)
  • 06
    Brown yarn (warm brown) for removable flower pot

β€” Tools Required

  • 01
    Crochet hook size 3.5mm
  • 02
    Poly-fil fiber for stuffing
  • 03
    Yarn needle
  • 04
    Safety eyes 6mm (Not for children under 3)
  • 05
    Stitch marker or a piece of yarn to mark rounds

Progress Tracker

0% Complete

β€” Head and body :

Round 1 :

8sc in a MR (8)

Round 2 :

8inc (16)

Round 3 :

(sc, inc) x8 (24)

Round 4 :

(2sc, inc) x8 (32)

Round 5 :

(3sc, inc) x8 (40)

Round 6 :

16sc, inc, 5hdc-inc, inc, 17x (47)

Round 7 :

BLO: 21sc, 3dec, 20sc (44)

Round 8 :

(3sc, inc) x2, 12sc, 2dec, 12sc, (3sc, inc) x2 (46)

Round 9-10 :

46sc (46)

Round 11 :

(3sc, dec) x2, 10sc, dec, 2sc, dec, 10sc, (3sc, dec) x2 (40)

Round 12 :

(2sc, dec) x10 (30)

Round 13 :

30sc (30)

Info :

Now it's time to insert the safety eyes between round 5 and 6, 4 stitches apart. Make sure the nose is in the middle of the eyes.

Info :

Stuff the piece.

Round 14 :

(sc, dec) x10 (20)

Round 15 :

10dec (10)

Round 16 :

3 dec. F.O You don't have to finish this round.

Info :

Close the body by using needle and cut the yarn. Hide the end inside the body.

Info :

(Please ignore the color, those are the pictures show the shape of the body)

β€” Back legs :

Round 1 :

6sc in a MR (6)

Round 2 :

6inc (12)

Round 3 :

(sc, inc) x6 (18)

Round 4 :

18sc (18) F.O

Info :

Leave long end to connect with the body.

β€” Toes :

Round 1 :

8sc in a MR (8)

Round 2 :

do not break the working yarn, continue to work the toes with it: chain 3, turn work, start from the second chain from the hook, hdc, 1 slst in the chain, 1 slst on the MR)x3, 4sc, slst on the last stitch. (8) F.O

Info :

Leave long end to connect with the back legs.

β€” Front legs :

Round 1 :

5sc in a MR (5)

Round 2 :

inc, 2sc, inc, sc (7)

Round 3-10 :

7sc (7) F.O

Info :

Do not close the piece.

Info :

Do not stuff the piece.

Info :

Leave long end to connect with the body.

β€” Flower :

Round 1 :

BLO: 6sc in a MR (6)

Round 2 :

BLO: 6inc (12)

Round 3 :

BLO: (sc, inc) x6 (18)

Info :

Change to light red yarn.

Round 4 :

BLO: slst, (chain 5, start from the 2nd chain from the hook, 4hdc along the chain, skip 1 stitch, slst on the next stitch of the base) x 8

Info :

After you finished all the petals in the back loop (8 petals ), change to the front loop and do the same step (8 petals ). F.O the last stitch.

Info :

At the end you should have 16 petals.

Info :

Leave long end to sew into the frog's body.

β€” Flower Pot :

Round 1 :

8sc in a MR (8)

Round 2 :

8inc (16)

Round 3 :

(sc, inc) x8 (24)

Round 4 :

(2sc, inc) x8 (32)

Round 5 :

(3sc, inc) x8 (40)

Round 6 :

(4sc, inc) x8 (48)

Round 7 :

(5sc, inc) x8 (56)

Round 8 :

BLO: 56sc (56)

Round 9-14 :

56sc (56)

Round 15 :

FLO: 56hdc (56), slst to the first stitch.

Info :

F.O

Info :

Leave long end and sew around the pot to secure and hide the end. Cut off the yarn.

β€” Assembly :

Back legs and toes :

Start sewing the back legs on two side of the thighs and make sure to stuff it before closing it all the way. Sew the toes to the bottom of the legs. Make sure 3 toes pointed out.

Front legs :

Sew the front leg two stitches away from the back leg, 3 stitches long. Then sew the tip of the leg into the belly. Repeat the same steps on the other side.

Info :

Using white yarn, embroider "X" around the frog body.

Flower placement :

Sew the flower to one side of the frog. You can also sew it on the top of the frog. It's completely up to you ☺

Final :

Now you have a cactus frog. Please take care of it by handwashing when dirty ☺ Hope you enjoy making this pattern.

Assembly Instructions

  • Start sewing the back legs on each side of the thighs, stuff the legs before closing them completely, and sew the toes to the bottom so three toes point outward.
  • Sew the front legs two stitches away from each back leg, make the front leg three stitches long, then sew the tip of the front leg into the belly for a natural pose.
  • Insert safety eyes between rounds 5 and 6, spaced four stitches apart, then embroider white 'X' marks around the frog body as shown.
  • Sew the flower onto one side or the top of the frog using the long tail left from the flower; secure firmly so the flower stays attached during play.
  • Place the finished frog into the removable pot and, if needed, sew a few stitches around the pot rim to hide ends and secure the seam.

Important Notes

  • πŸ’‘Use a stitch marker or a piece of yarn to mark the first stitch of each round to avoid losing your place while working in continuous spiral rounds.
  • πŸ’‘Stuff pieces gradually and firmly before closing openingsβ€”overstuffing can distort the shape while understuffing can make sewing parts unstable.
  • πŸ’‘Hide and weave in ends as you go and leave long tails where noted for sewing parts together so assembly is cleaner and easier.

This cute cactus frog is a small handmade treasure with a removable pot and a pretty flower topper. It makes a lovely gift or desk buddy that fits in the palm of your hand. Keep it bright and clean with gentle handwashing and enjoy your new companion! 🧢🌸

You ask,

we answer.

FAQs

What size will the finished piece be?

The product is about 2 1/2 inches in height and 2 1/2 inches wide when made with the suggested yarn and a 3.5mm hook.

Can I use different yarn weights for this pattern?

Yes, but using a different yarn weight will change the final size; adjust your hook size accordingly and expect a different finished scale.

Do I need prior crochet experience for this pattern?

This pattern is rated intermediate, so basic amigurumi skills and familiarity with increases, decreases, BLO/FLO, and sewing pieces are recommended.

How long will this pattern take to complete?

Most makers finish this project in about 2-4 hours depending on experience and how many details you add, such as embroidery or color changes.