🧢 Beautiful ✨ Detailed πŸ’ Adorable

Capybara Amigurumi Pattern

Capybara Amigurumi Pattern
4.4β˜… Rating
1.5-2 Hours Time Needed
3.5K Made This
βœ‚οΈ

Intermediate Level

Ideal for those with basic knitting experience, featuring slightly more advanced stitches and techniques to expand your skills.

⏱️

Bite-Sized Project

Complete in under 2 hoursβ€”quick, fun, and perfect for a little creative escape.

🧸

Cute Companion

An adorable friend to cherish, handcrafted with love to bring comfort and joy for years to come.

About This Capybara Amigurumi Pattern

This Capybara amigurumi pattern guides you through crocheting the body with the legs attached as you work, producing a seamless, cuddly result. It uses plush super-bulky yarn to give a soft, tactile finish and is written in US crochet terminology. Clear step-by-step rounds and helpful photographs make the process approachable.

Capybara Amigurumi Pattern crochet pattern - detailed view of completed project

Designed for easy-to-intermediate crocheters who want a fast, rewarding project. Includes instructions for a tiny tangerine and leaves as a charming topper.

Why You'll Love This Capybara Amigurumi Pattern

I love how quickly this pattern comes together and how soft the final toy feels β€” I appreciate projects that are both adorable and fast. I also enjoy the small details like the embroidered eyes and tiny tangerine which give the capybara personality.

Capybara Amigurumi Pattern step 1 - construction progress Capybara Amigurumi Pattern step 2 - assembly progress Capybara Amigurumi Pattern step 3 - details and accessories Capybara Amigurumi Pattern step 4 - final assembly and finishing

Switch Things Up

I love how quickly this capybara comes together; I usually have one finished in under two hours.

I recommend experimenting with color for a whimsical look β€” a pastel or gray capybara can be lovely.

I often make the tiny tangerine in contrasting colors to add a pop of brightness.

I find stuffing gradually and shaping as I go yields the smoothest result.

I like to use stitch markers liberally when attaching legs so the placement stays even.

If I want a sturdier toy I use a slightly smaller hook and tighter tension to reduce gaps.

I always hide my ends inside the body to make the finish look professional.

I sometimes add a small loop at the top if I want to hang my capybara as an ornament.

I recommend testing placement of ears and eyes before final stitching to ensure symmetry.

I enjoy gifting these because they’re quick to make and always bring a smile.

Common Mistakes & How to Fix Them

βœ— Skipping stitch markers when attaching legs can make placement uneven; mark starting stitches clearly and count carefully. βœ— Using too much stuffing early will make shaping difficult; stuff gradually and evenly as you go. βœ— Closing the magic ring too tightly can distort small parts; leave a small opening until the final rounds to adjust stuffing. βœ— Not counting rounds after shifting a stitch can change placement of ears or legs; re-count and re-mark the new start of round.

Capybara Amigurumi Pattern

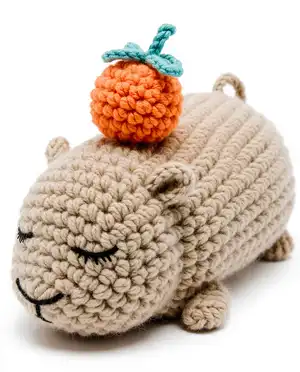
Create a lovable capybara plush with this easy-to-follow amigurumi pattern. Step-by-step rounds, clear photos, and simple finishing instructions guide you from start to fuzzy finish. Perfect as a sweet handmade gift or a cozy desk companion.

Intermediate 1.5-2 Hours

Materials Needed for Capybara Amigurumi Pattern

β€” Main Fabric

  • 01
    Super bulky plush yarn (Himalaya Dolphin Baby or similar) ~120m/100g beige color (approx. 1 skein)
  • 02
    Small amount of orange yarn for the tangerine
  • 03
    Small amount of green yarn for the leaves
  • 04
    Black fine yarn for eyes and nose (example: YarnArt Begonia black)

β€” Tools Required

  • 01
    4.5 mm (H-7 US) crochet hook
  • 02
    Stuffing (polyfill)
  • 03
    Crochet stitch markers
  • 04
    Big and small yarn needle
  • 05
    Scissors

Progress Tracker

0% Complete

β€” Leg (x 4)

R1) :

crochet a MR with 6 Sc (6)

R2) :

Inc around (12)

R3) :

Sc around (12)

Info :

Fasten off. Leave a small tail.

β€” Ear (x 2)

R1) :

crochet a MR with 6 Sc (6)

Info :

Don`t close the ring, turn, Ch

R2) :

(Inc, Sc) x 3 (9)

Info :

Fasten off.

Info :

Sew the corners together. Leave sewing tail.

β€” Head-body

R1) :

crochet a MR with 8 Sc (8)

R2) :

Inc around (16)

R3) :

(Sc 1, inc) x 8 (24)

R4) :

(Sc 2, inc) x 8 (32)

R5) :

(Sc 3, inc) x 8 (40)

R6) :

(Sc 4, inc) x 8 (48)

R7) :

Sc around (48)

R8) :

Sc 19, Inc, Sc 8, Inc, Sc 19 (50)

R9) :

Sc around (50)

R10) :

Sc 21, Inc, Sc 6, Inc, Sc 21 (52)

R11-R13) :

Sc around (52) 3 Rnds

R14) :

Sc 23, Inc, Sc 4, Inc, Sc 23 (54)

R15-R17) :

Sc around (54) 3 Rnds

Infos :

In the next round we will mark the approximate position of the ears.

R18) :

Sc 6, Dec, Sc 4, Dec, Sc 9, Sc 1 (mark this St), Sc 9, Sc 1 (mark this St), Sc 10, Dec, Sc 4, Dec, Sc 2 (50)

R19) :

Sc 4, Dec, Sc 2, Dec, Sc 34, Dec, Sc 2, Dec (46)
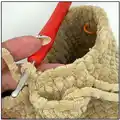
Infos :

Next, we will attach the legs. Start attaching from the stitch of the leg, as shown on the photo.

R20) :

Inc, Sc 2, Inc, Sc 2, Inc, Sc 33, Sc 6 together with 1st leg (49)

Infos :

We shifted one stitch. Now from here we will count the beginning of the round. We continue to crochet.

R21) :

Sc, Inc, Sc, Sc 6 together with 2nd leg, Sc 13, Dec, Sc 4, Dec, Sc 13, Sc 6 of 1st leg (48)

R22) :

Sc 4, Sc 6 of the 2nd leg, Sc 12, Dec, Sc 4, Dec, Sc 18 (46)

R23) :

Sc 9, Dec, Sc 28, Dec, Sc 5 (44)

R24) :

Sc 19, Dec, Sc 6, Dec, Sc 15 (42)

R25) :

Sc around (42)

R26) :

(Sc 6, Inc) x 6 (48)

R27-R30) :

Sc around (48) 4 Rnds

R31) :

Sc 43, Sc 6 together with 3rd leg (48)

Infos :

We shifted one stitch again. Now from here we will count the beginning of the round. We continue to crochet.

R32) :

Sc 4, Sc 6 together with 4th leg, Sc 32, Sc 6 of 3rd leg (48)

R33) :

Sc 4, Sc 6 of 4th leg, Sc 38 (48)

Info :

Stuff with filler.

R34) :

(Sc 4, Dec) x 8 (40)

R35) :

(Sc 3, Dec) x 8 (32)

R36) :

(Sc 2, Dec) x 8 (24)

R37) :

(Sc, Dec) x 8 (16)

Info :

Stuff firmly.

R38) :

Dec 8 (8)

Info :

Tighten the hole, hide the thread inside.

Info :

With threads from the legs, sew up the holes.
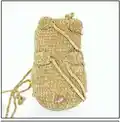
Infos :

Since everyone has a different crocheting style and yarn thickness, a slight shift of stitches is possible. See if the markers are positioned equally from the center. Adjust the position if necessary. Sew the ears in place of the markers at a distance of approximately 10 stitches.

β€” Embroider the EYES

Left eye :

From the left ear down 3 rounds, then to the left 5 stitches - here is the 1st dot of the eye.

Info :

From this dot down 5 stitches and to the left 1 stitch - here is the 2nd dot of the eye.

Info :

Embroider the eye with a thin black thread connecting these two dots. I used one long thread to embroider the eyes and nose. You can fix the thread as shown in the photo. Make 2 stitches to make the eye more expressive.

Right eye :

From the right ear down 3 rounds, then to the right 5 stitches - here is the 1st dot of the eye.

Info :

From this dot down 5 stitches and to the right 1 stitch - here is the 2nd dot of the eye.

Info :

Embroider the second eye in the same way as the first.

β€” Embroider the NOSE

Info :

Follow the placement dots as shown in the photos. Bring black thread through the chosen points and stitch three short lines meeting to form the nose, tie a knot and hide the threads inside.

β€” Tangerine

R1) :

crochet a MR with 6 Sc (6)

R2) :

Inc around (12)

R3) :

(Sc 1, Inc) x 6 (18)

R4-R6) :

Sc around (18) 3 Rnds

R7) :

(Sc 1, Dec) x 6 (12)

Info :

Stuff

R8) :

Dec around (6)

Info :

Fasten off, tighten the hole, leave the thread for sewing.

β€” Leaves

Info :

Ch 4, Sl St in 1st Ch, Ch 4, Sl St in 1st Ch. Fasten off, wrap the center with thread and tie a knot.

Info :

Sew the leaves to the tangerine, hide the threads inside.

Info :

Sew a tangerine to the head. Hide the threads inside.

Info :

OUR CAPYBARA IS READY!

Assembly Instructions

  • Attach legs to the body as you crochet rounds 20-33, following the instructions to work the leg stitches together with body stitches.
  • Sew the ear pieces (x2) closed at the corners, then position and stitch them to the markers placed in R18 at roughly 10 stitches apart.
  • Use the long black yarn to embroider both eyes and the nose, following the placement instructions from the ears; hide and knot threads inside the body.
  • Sew the tangerine onto the top of the head and attach leaves to the tangerine; hide all threads inside for a neat finish.
  • Use the threads from the legs to sew up the holes left by attachments and to reinforce leg joins.
  • Tighten the final opening after R38 and hide the tail of yarn inside the body for a clean finish.

Important Notes

  • πŸ’‘Mark the start of rounds when you shift counting to keep stitch placement accurate.
  • πŸ’‘Stuff gradually and check the shape often to avoid lumps or overfilling small parts.
  • πŸ’‘Keep the yarn tails from legs when fastening off to use them for sewing holes closed.
  • πŸ’‘Adjust ear placement if markers seem uneven; position ears approximately 10 stitches apart for symmetry.
  • πŸ’‘Hide all thread tails inside the body and knot securely to prevent unraveling.

This adorable Capybara amigurumi is crocheted with super-bulky plush yarn for a soft, squishy finish. The legs are attached as you crochet the body for a seamless look, and a tiny tangerine with leaves adds extra charm. Perfect as a quick gift or a cozy handmade friend. 🧢🍊🧡

You ask,

we answer.

FAQs

What size will the finished capybara be?

Approximately 8.7 x 4.7 x 4.7 inches (22 x 12 x 12 cm) depending on yarn and tension.

Can I use a different yarn weight?

Yes, but using a thinner yarn will change the final size; adjust hook size accordingly and expect a smaller toy.

Do I need to attach the legs while crocheting the body?

This version attaches the legs as the body is crocheted for a seamless result; you can alternatively sew pre-made legs on afterward but follow placement instructions carefully.

How do I embroider the eyes and nose?

Use a thin black yarn or embroidery thread; mark placement points from the ears as instructed, make connecting stitches for eyes and three short lines that meet for the nose, knot and hide threads inside.